

A Happy Little Accident
I first made these scones by mistake. I meant to make biscuits. I added chocolate chips instead of herbs. My grandson took one bite and his eyes got so wide. He said, Nana, you are a genius. I still laugh at that.
It was a happy little accident. It taught me that mistakes in the kitchen can be wonderful. Sometimes, the best things happen when we don’t follow the plan. Have you ever had a happy cooking accident? What did you make?
The Secret to a Flaky Friend
Cold butter is the secret to a fluffy scone. When cold butter hits the hot oven, it steams. That steam pushes the dough up into soft layers. It is like a little magic trick inside your oven.
That is why we chill the butter. We want to see little butter pieces in the dough. Do not mix them away. This matters because those butter pockets create the most wonderful, flaky texture. It makes all the difference.
A Tip from My Kitchen
You see that step about tossing chocolate in flour? It seems odd. But it is a very smart trick. The flour helps the chocolate stick to the dough. It stops it from sinking to the bottom.
This way, you get chocolate in every single bite. No one gets a sad, plain corner. Fun fact: This same trick works for blueberries in muffins! It is a small step that makes a big, happy difference.
Bringing It All Together
When you mix the wet and dry, be gentle. Just mix until you see no more dry spots. A shaggy, messy dough is a good thing here. It means you have not overworked it.
I love this part. The smell of the sourdough starter fills my kitchen. It smells like promise. Doesn’t that smell amazing? Your hands will feel the dough come to life. It is a lovely feeling.
The Final Touch
That egg wash and sugar on top are not just for looks. They give the scone a beautiful, golden crown. The coarse sugar adds a little crunch. It is a lovely surprise with the soft inside.
Turning the pan halfway is my quiet time. I peek in at them. I see them getting tall and golden. This matters because it makes sure every scone is perfect. No one gets a pale scone. Do you have a favorite part of the baking process? I love the waiting, and the hoping.
Why We Share Food
These scones are best shared warm. I love to see people’s faces when they try one. The mix of sourdough tang and sweet chocolate is a surprise. It makes people smile.
Sharing food is how we show love. It is a simple way to say, I care about you. This matters more than any perfect recipe. What is a food that always makes you think of someone you love?
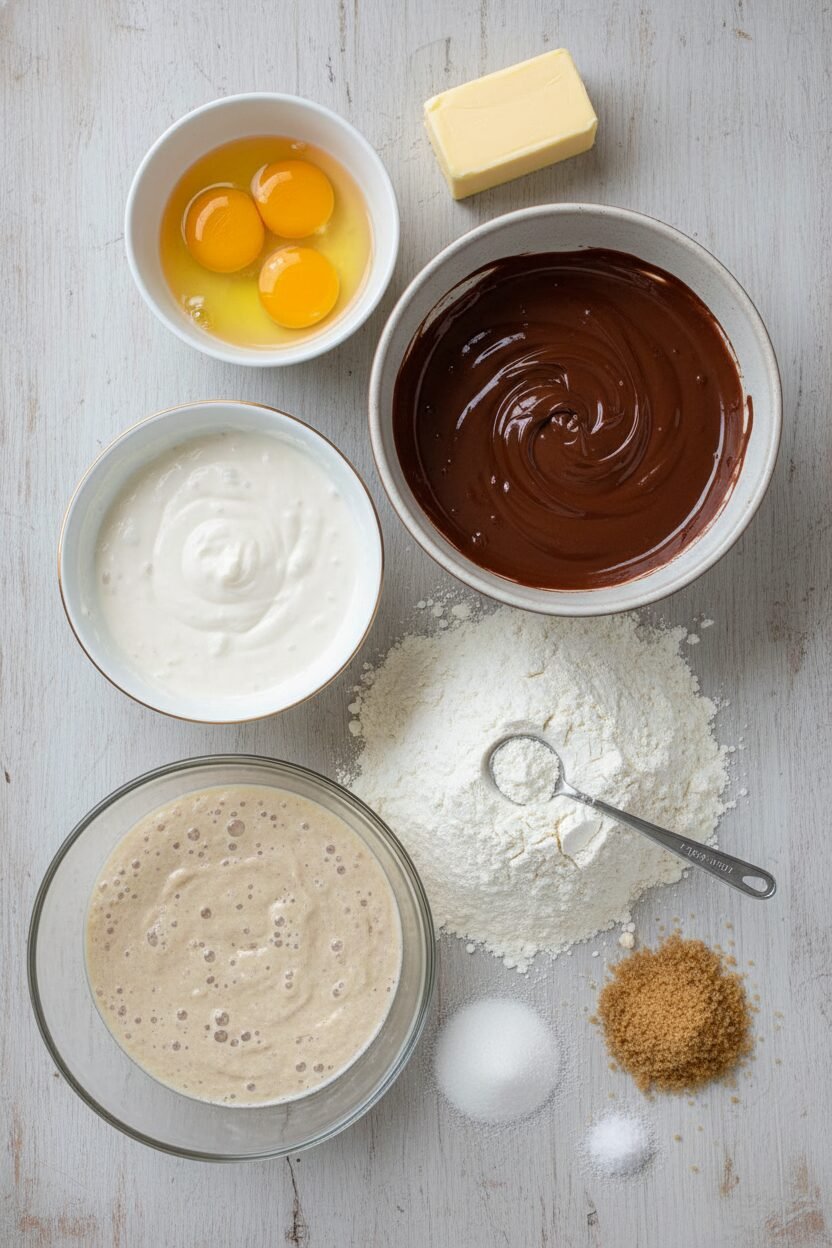
Ingredients:
| Ingredient | Amount | Notes |
|---|---|---|
| All-purpose flour | 3 3/4 cups | Plus 2 tbsp for coating chocolate |
| Baking powder | 2 tablespoons | |
| Salt | 3 teaspoons | |
| Cold butter | 1 cup | Diced into 1/2 inch cubes |
| Heavy whipping cream or coconut cream | 1 cup | Cold, from a can if using coconut |
| Large eggs | 4 | |
| Granulated sugar | 1/4 cup | |
| Sourdough starter | 1/2 cup | Active or discard |
| Semi-sweet bakers chocolate | 8 oz | Roughly chopped |
| Large egg (for wash) | 1 | Whisked |
| Coarse sugar | Sprinkle | For topping |
My Sourdough Chocolate Chip Scones
Hello, my dear. Come sit with me for a moment. I want to share my scone recipe with you. These are not your ordinary scones. They have a little secret ingredient. It’s my sourdough starter. It gives them a special, cozy flavor. I think of it as a kitchen friend. It makes everything taste a little more like home.
We are going to make them together, step by step. Don’t you worry about a thing. Just follow along with me. I have learned a few tricks over the years. I will share them all with you. The smell in your kitchen will be heavenly. I promise you that.
Step 1: Preheat and Prepare
First, let’s get our oven nice and hot. Set it to 400 degrees. Then, grab two baking sheets. We will line them with parchment paper. This keeps our scones from sticking. I always do this. It saves so much scrubbing later.
Step 2: Prepare the Chocolate
Now, let’s prepare the chocolate. Give that big bar a rough chop. We want lovely, chunky bits. Toss them in two tablespoons of flour. This little coat of flour is my best trick. It stops all the chocolate from sinking to the bottom. You will get chocolate in every single bite.
Step 3: Mix Dry Ingredients
Time for the dry ingredients. Put the flour, baking powder, and salt in your mixer bowl. Just give them a quick mix. Now, for the butter. It must be very, very cold. I pop my cubed butter in the freezer for five minutes. (My hard-learned tip: Cold butter makes the scones light and flaky. Warm butter makes them flat.)
Step 4: Add the Butter
Add that icy butter to the flour. Mix on low until the butter is the size of little peas. You should still see the butter pieces. That is perfect. It means your scones will be wonderfully tender. I still laugh at the time I mixed it too much. We had very dense scones that day.
Step 5: Combine Wet and Dry
In another bowl, we mix the wet things. Whisk together the cream, eggs, sugar, and your sourdough starter. Doesn’t that smell amazing? It smells like promise. Now, pour this into the dry ingredients. Stir until it just comes together. A few dry spots are okay.
Step 6: Knead the Dough
Dump your dough onto a floured counter. Gently knead it to bring it together. Don’t work it too much. We want to see those little butter bits. If the dough feels sticky, add a bit more flour. What’s your favorite chocolate treat to bake? Share below!
Step 7: Cut the Scones
Roll the dough out until it is about one inch thick. Then, use a round cutter. I just use a clean kitchen glass. It works perfectly. You will have to re-roll the scraps a few times. Place the scones on your prepared baking sheets.
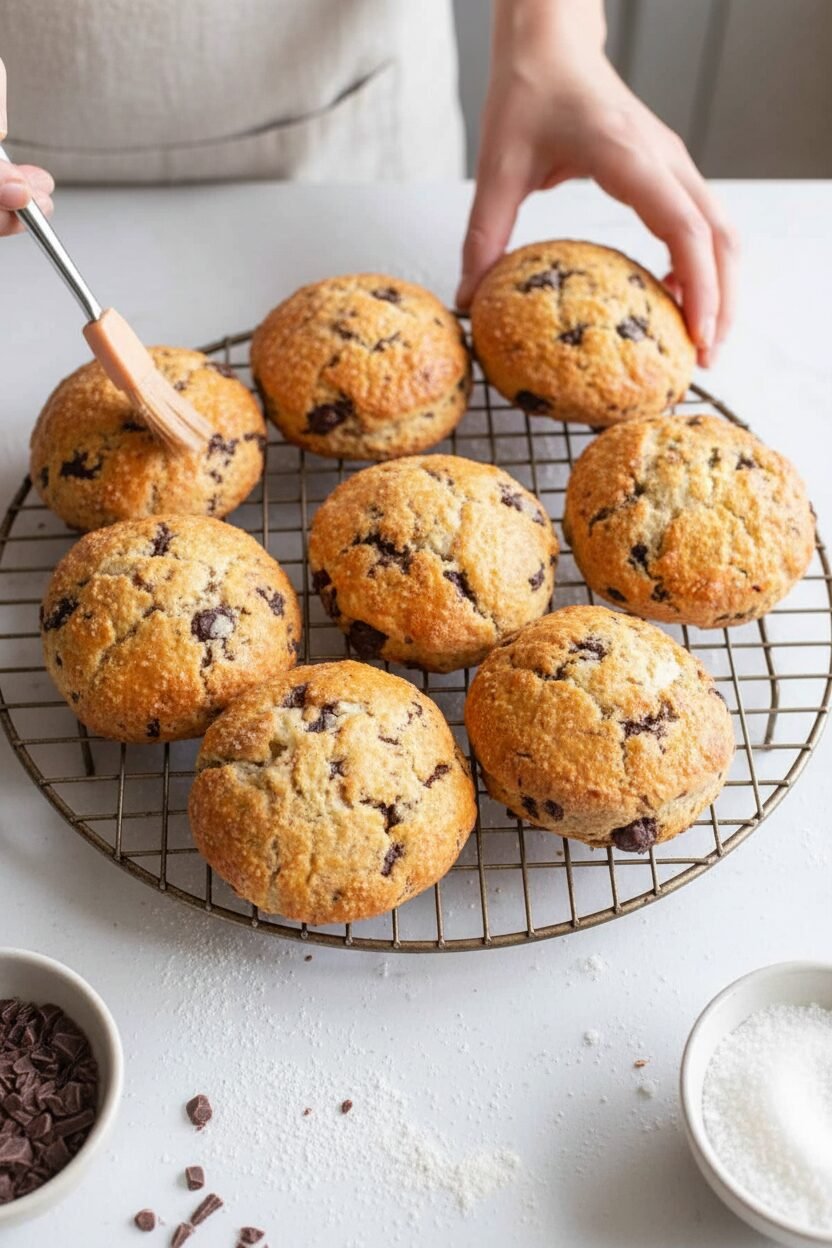
Step 8: Bake to Perfection
Give each scone a light brush with a whisked egg. Then, sprinkle them with coarse sugar. This makes the tops shiny and sweet. Bake for about 20 minutes. Remember to turn the pan halfway through. They will be golden and beautiful.
Cook Time: 20–22 minutes
Total Time: About 40 minutes
Yield: About 12 scones
Category: Breakfast, Snack
Three Tasty Twists to Try
Once you master the basic recipe, you can have some fun. I love adding little changes. It keeps things exciting in the kitchen. Here are a few ideas I play with. They are all so simple and delicious.
Orange Zest & Dark Chocolate
Add the zest of one orange to the dough. It pairs so well with dark chocolate. It tastes like a special holiday.
Cinnamon Swirl
Mix one tablespoon of cinnamon with two tablespoons of sugar. Sprinkle this over the dough before you roll it up. You get a lovely swirl inside.
Raspberry White Chocolate
Use white chocolate chunks instead. Then, gently press a few fresh raspberries into each scone before baking. The berry jam pockets are divine.
Which one would you try first? Comment below!
Serving Your Beautiful Scones
Oh, the best part is eating them! A warm scone, straight from the oven, is pure joy. I like to break mine open. You can see all the melted chocolate inside. It’s a little moment of happiness.
For a real treat, serve them with clotted cream and jam. Or just a simple pat of good butter. They are also wonderful all on their own. I often pack one in my grandson’s lunchbox. He says it makes his day better.
What should you drink with them? A glass of cold milk is always perfect. For the grown-ups, a hot cup of coffee is just right. The bitter coffee and the sweet scone are a perfect match. Which would you choose tonight?
Keeping Your Scones Happy and Fresh
Let’s talk about keeping these treats delicious for days. Once cool, pop them in an airtight container. They will stay soft on your counter for two days.
For longer storage, the freezer is your friend. Wrap each scone tightly in plastic wrap. Then place them all in a freezer bag.
I once forgot to wrap one properly. It tasted like the freezer! A good wrap keeps the flavor safe. This matters because a little care saves a lot of waste.
To reheat, warm frozen scones in a 300-degree oven for ten minutes. They will taste just-baked. This is perfect for busy school mornings.
You can also bake a whole batch and freeze the dough. Just cut the scones and freeze them on a tray first. Then bake a few anytime you want a fresh treat. Have you ever tried storing it this way? Share below!
Easy Fixes for Common Scone Troubles
Even grandmas have baking troubles sometimes. Here are some easy fixes. If your scones spread flat, your butter was likely too warm.
I remember when my first batch melted in the oven. I learned to keep everything very cold. This matters because cold butter creates little steam pockets. Those pockets make your scones light and fluffy.
If your scones are tough, you might have over-mixed the dough. Mix just until the flour disappears. A shaggy dough is a good dough.
If they are too dry, you may have used too much flour. Fluff your flour with a spoon before you measure it. This matters for a tender, soft bite every time. Which of these problems have you run into before?
Your Scone Questions, Answered
Q: Can I make these gluten-free?
A: Yes! Use a good gluten-free flour blend. The results are very tasty.
Q: Can I make the dough ahead?
A: Absolutely. Keep the shaped scones in the fridge overnight. Bake them in the morning.
Q: What can I use instead of chocolate?
A: Dried cranberries or raisins are wonderful. Just coat them in flour too.
Q: Can I make a smaller batch?
A: You can cut the recipe in half. Just use a smaller egg for the wet ingredients.
Q: Any optional tips?
A: A dash of cinnamon in the dough is a lovely surprise. *Fun fact: Cinnamon was once more valuable than gold!* Which tip will you try first?
Bake, Share, and Enjoy
I hope you love baking these scones as much as I do. The smell fills the kitchen with joy. It is one of my favorite things.
I would be so happy to see your creations. Sharing food is a way to share love. It connects us all.
Please show me your beautiful scones. Have you tried this recipe? Tag us on Pinterest! I cannot wait to see them.
Happy cooking!
—Elowen Thorn.


Sourdough Chocolate Chip Scone Recipe
Description
These Sourdough Chocolate Chip Scones are a delightful treat, combining the tangy flavor of sourdough with rich, melty chocolate chips for a perfect breakfast or snack.
Ingredients
Instructions
- Preheat the oven to 400 degrees F and prepare two baking sheets with parchment paper.
- Give the chocolate a rough chop, toss it in 2 tablespoons of flour to coat it (this prevents the chocolate from sinking to the bottom while baking), and set aside.
- In the bowl of a stand mixer with the paddle attachment, quickly mix together the flour, baking powder, and salt.
- Cut up very cold butter into 1/2 inch cubes. I would recommend putting the butter in the freezer, after cutting it, for five minutes if you’re not sure if it’s cold enough. Add the cold butter and run the mixer on low until the butter is broken down to the size of peas, but no smaller. Be careful not to over mix at this stage.
- In a medium separate bowl, whisk together the heavy cream or coconut cream, eggs, granulated sugar, and sourdough starter.
- Pour the wet ingredients into the dry ingredients until just combined. Then add the chocolate and stir again. There may still be some dry flour at the bottom.
- Dump the dough out onto a lightly floured cold counter and knead the dry flour until incorporated, being careful not to over knead. You want to see small pieces of unincorporated butter visible in the dough. if the dough is sticky at all feel free to add flour a tablespoon at a time. The dough should be easy to handle and not sticky.
- Flour a rolling pin and roll the dough out on a lightly floured surface in a sheet approximately one inch thick.
- Cut the dough with a round cutter sized approximately three inches across. I used a kitchen glass for this.
- You will need to re-roll the dough a few times to cut more scones. Arrange the unbaked scones across the two prepared baking sheets and brush scones lightly with whisked egg wash, then sprinkle generously with coarse sugar.
- Bake for 20-22 minutes in a preheated oven and turn the baking sheet in the oven halfway through the bake time to ensure the scones brown evenly.
Notes
- Keeping the butter and other ingredients very cold is the secret to achieving flaky, tender scones. Avoid over-mixing the dough to prevent tough scones.