A Little Red in the Snow
Hello, my dear. Come sit. Let’s talk about cookies. These are my Raspberry Snowdrift Cookies. They look like a fresh snowfall with little red berries peeking through. I love that. It feels like a winter story in every bite.
My grandson calls them “winter jam cookies.” He once ate three before dinner. I still laugh at that. The secret is a simple raspberry syrup. You cook berries and sugar until they sing. Doesn’t that smell amazing? It makes the whole kitchen feel warm.
Why We Freeze the Dough
Now, the recipe says to freeze the dough for an hour. This matters. It keeps the cookies thick and soft. If the dough is warm, the cookies spread too thin. They become lace, not a snowdrift.
Patience is a quiet ingredient. It is not in the list. But it is just as important. While the dough chills, you can wash the pan. Or just sit with a cup of tea. What is your favorite thing to do while you wait for dough?
A Berry Good Trick
We use frozen berries here. Chopping them while frozen is my little trick. It keeps the red juice from running into the dough too soon. You get lovely pink pockets, not a purple mess.
*Fun fact: The cornstarch and water mix is a “slurry.” It helps bind things in gluten-free baking. It gives the cookie a nice chew. I learned that from my friend Mae. She cannot eat gluten. This way, everyone can share the cookies.
The Shape of Warmth
When the cookies come out of the oven, they are puffy. You must act fast. Use a spatula to gently shape the edges into a circle. This matters too. It makes them look loved and cared for.
Food is not just about taste. It is about how it looks and feels. A round, soft cookie says “I made this for you.” Do you have a food that makes you feel that way?
Sharing the Snowdrifts
These cookies are for sharing. The sugar coating sparkles like real snow. The raspberry is a tart little surprise. It is a happy mix of sweet and bright.
I always pack them in a tin with a paper doily. It feels special. Making someone feel special is the best part of baking. Who would you make these cookies for? Tell me about them.
Ingredients:
| Ingredient | Amount | Notes |
|---|---|---|
| Frozen raspberries (for syrup) | 1 cup | |
| Granulated sugar (for syrup) | 1/4 cup | |
| Gluten-free multipurpose flour with xanthan gum | 2 cups | |
| Cornstarch | 1.5 tablespoons | For the dry ingredients |
| Baking powder | 1.5 teaspoons | |
| Kosher salt | 1/2 teaspoon | |
| Unsalted butter or vegan baking stick | 1/2 cup | Softened |
| Granulated sugar (for dough) | 1 1/4 cups | |
| Granulated sugar (for rolling) | 2 tablespoons | |
| Cornstarch (slurry) | 2 rounded tablespoons | Mixed with 3 tablespoons water |
| Milk | 3 tablespoons | |
| Raspberry syrup | 3 tablespoons | Cooled, from the recipe above |
| Red food coloring | 3 drops | Optional |
| Frozen raspberries (for dough) | 1/2 cup | Finely chopped and kept frozen |
Instructions
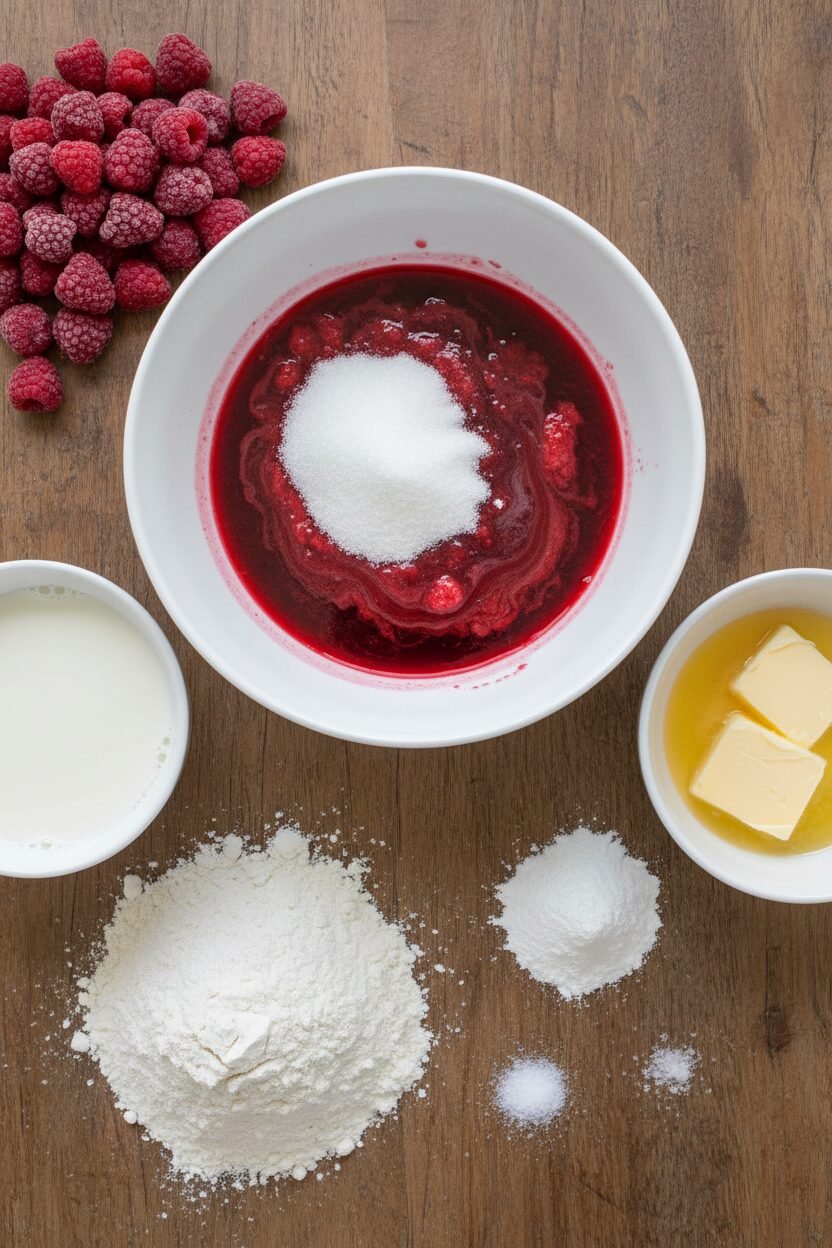
Step 1: First, make your raspberry syrup. Cook the frozen berries and sugar in a pan. Stir them for about ten minutes. They will get all soft and syrupy. Pour it through a strainer into a bowl. Press gently to get all that good pink juice out. Let it cool completely. (A hard-learned tip: let it cool fully, or it will melt your butter later!)
Step 2: Now, chop your other half-cup of berries. Make the pieces nice and small. Pop them back in the freezer right away. In a bowl, mix your flour, cornstarch, baking powder, and salt. Give it a good whisk with your hand. Doesn’t that smell amazing, just like fresh flour?
Step 3: Time for the fun part! Cream your soft butter and sugar together. Mix until it looks light and fluffy. In a little cup, stir the cornstarch and water until smooth. Add this, the milk, and your cool syrup to the butter. It might look a little funny, but that’s okay. What do you think the cornstarch mixture does? Share below!
Step 4: Slowly mix your dry ingredients into the wet bowl. If you want a brighter pink, add a few drops of food color. Then, gently fold in your frozen berry pieces. Be gentle so they don’t bleed too much. Cover the bowl and freeze the dough for one hour. This chill time is very important for perfect cookies.
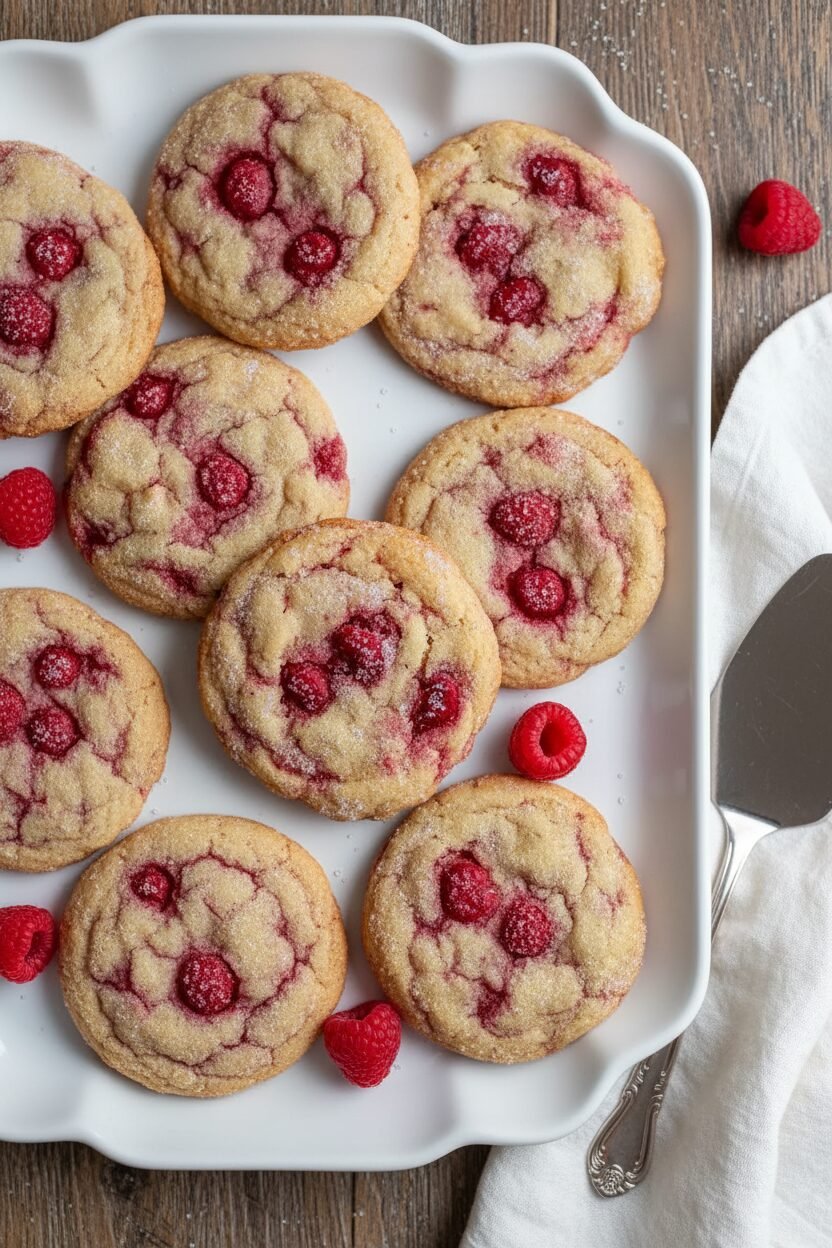
Step 5: Heat your oven to 325°F. Scoop your dough into big balls. Roll each one in sugar. They will look like little snowballs. Place them far apart on your baking sheet. Bake for 15 minutes. I still laugh at how they puff up like little clouds.
Step 6: Take the cookies out. Quickly, use a spatula to nudge their edges into neat circles. Let them sit on the pan for five minutes. Then move them to a rack to cool. The smell in your kitchen will be wonderful. Repeat with the rest of your dough, keeping it cold.
Creative Twists
These cookies love to play dress-up. You can make them new every time. Try a different berry, like blackberry or strawberry. The color will be a beautiful surprise. Use lemon zest in the dough for a bright, sunny flavor. Roll the dough balls in powdered sugar instead of granulated. They will look like they’re covered in real snow. Which one would you try first? Comment below!
Serving & Pairing Ideas
These cookies are a happy little treat all on their own. For something special, serve them on a vintage plate. Crumble one over a scoop of vanilla ice cream. It’s my favorite. For a drink, a cup of hot cocoa is perfect. The chocolate and raspberry are best friends. For the grown-ups, a small glass of champagne makes it a party. The bubbles cut through the sweetness nicely. Which would you choose tonight?
Keeping Your Snowdrift Cookies Perfect
These cookies freeze beautifully. Just pop the baked, cooled cookies into a freezer bag. They keep for a month. Thaw them on the counter for an hour.
You can also freeze the dough balls. Roll them in sugar first. Then freeze them on a tray before bagging. Bake straight from the freezer, adding a minute or two.
I once forgot a batch in my summer kitchen. The heat made them soft. A quick five-minute warm-up in the oven fixed them right up. It was like magic.
Batch cooking saves your holiday energy. Making a double batch means more time for stories by the fire. Have you ever tried storing cookies this way? Share below!
Cookie Troubles and Simple Fixes
First, if your cookies spread too much, your dough was too warm. I remember my first batch melting into one big cookie! Freezing the dough for a full hour matters. It gives you a thick, soft cookie.
Second, if the berries make the dough too wet, you chopped them thawed. Always chop and keep them frozen. This little step keeps your dough just right.
Third, if they seem too cakey, you might have over-mixed. Gently fold in the dry ingredients until just combined. This keeps them tender. Getting these steps right builds your kitchen confidence. It also makes sure every bite is full of flavor. Which of these problems have you run into before?
Your Quick Questions, Answered
Q: Can I use regular flour? A: Yes, use the same amount of all-purpose flour. Just omit the xanthan gum.
Q: Can I make the dough ahead? A: Absolutely. Keep it in the fridge for two days or freeze it for later.
Q: What can I use instead of cornstarch? A: Arrowroot powder works the same way. Use the same amount.
Q: Can I double the recipe? A: You sure can. Just mix in a bigger bowl. *Fun fact: Doubling a recipe is called “scaling up.”*
Q: Is the food coloring needed? A: Not at all. It just makes the pink color brighter. The syrup gives a lovely natural tint. Which tip will you try first?
From My Kitchen to Yours
I hope you love making these raspberry snowdrifts. They always remind me of my granddaughter’s pink mittens. Baking is about sharing sweet moments.
I would love to hear about your baking adventure. Tell me all about it. Have you tried this recipe? Let me know how it turned out in your kitchen.
Happy cooking!
—Elowen Thorn.

Raspberry Snowdrift Christmas Cookies
Description
Festive, gluten-free cookies with a sweet raspberry swirl and a snowy sugar coating, perfect for the holidays.
Ingredients
For the Raspberry Syrup:
For the Cookies:
Instructions
- Prepare the Raspberry Syrup: In a saucepan set over medium heat, combine the frozen raspberries and 1/4 cup granulated sugar. Cook for approximately 10 minutes, stirring consistently, until the fruit breaks down and the mixture becomes syrup-like, though slightly chunky. Set a mesh strainer over a bowl and pour the mixture through it, pressing gently to extract the liquid. Allow the syrup to cool completely. You should obtain 2–3 tablespoons of syrup.
- Prepare the Cookie Dough: Measure 1/2 cup frozen raspberries and chop them into small pieces. Place the chopped raspberries back into the freezer until ready to incorporate. In a medium bowl, whisk together the gluten-free flour, baking powder, 1.5 tablespoons cornstarch, and kosher salt. Set aside. In a small bowl, combine the rounded 2 tablespoons of cornstarch with 3 tablespoons water, stirring until the mixture becomes smooth and thin.
- In the bowl of an electric mixer fitted with the paddle attachment, cream the softened butter (or vegan baking stick) with 1 1/4 cups granulated sugar for 2–3 minutes, or until light and creamy. Add the cornstarch-water mixture, milk, and cooled raspberry syrup to the creamed butter mixture, beating briefly until combined. The mixture may appear slightly uneven in texture.
- Gradually add the dry ingredients, mixing on low speed until just combined. If desired, incorporate 3 drops of red food coloring and mix briefly to distribute the color throughout the dough. Using a spatula, gently fold in the frozen chopped raspberries. Avoid overmixing, as the berries will release excess liquid if handled too aggressively.
- Cover the bowl with plastic wrap and freeze the dough for at least 1 hour. This step is essential to prevent the cookies from spreading excessively during baking.
- Baking the Cookies: After 1 hour of freezing, preheat the oven to 325°F (163°C). Line a baking sheet with parchment paper. Using a large cookie scoop (approximately 2 ounces), portion the dough into 12 balls. Roll each dough ball in the reserved 2 tablespoons of granulated sugar until fully coated.
- Place the dough balls on the prepared baking sheet, spacing them 3–4 inches apart. Bake for 15 minutes. Remove the cookies from the oven and immediately use a spatula to gently reshape the edges into uniform circles. Allow the cookies to cool on the baking sheet for 5 minutes before transferring them to a cooling rack. Repeat the process with remaining dough, keeping unbaked portions in the freezer between batches.
Notes
- For best results, ensure the raspberry syrup is completely cool before adding to the dough. Keep the chopped raspberries frozen until the last moment to prevent the dough from becoming too wet.