My First Crust Disaster
My first pie crust was a real mess. I was so nervous. I tried to roll it out, but it just crumbled. I almost cried. My grandma saw my face. She just smiled.
She said, “Child, some dough just needs a hug, not a fight.” She showed me how to press it in the pan with my hands. It worked! This recipe is like that. No rolling pin needed. Just your trusty hands.
Why This Dough Is Different
Most crusts are just flour and butter. This one has a secret friend: cream cheese. It makes the dough so friendly. It holds together beautifully. It also bakes up tender and a little flaky.
You mix it all in a bowl. You press it into the plate. It feels like playing with clay. I still laugh at that. A pie crust that feels like play! This matters because cooking should be fun, not scary. Anyone can do this.
The Simple Steps
Just whisk your dry things first. Then beat the soft butter and cream cheese. Doesn’t that smell amazing? Mix them all together until it looks like crumbs. Now, press most of it into your greased pie plate.
Use the heel of your hand. Push it from the middle out. Hold the plate up to the light. Check for thin spots. Patch them with your fingers. See? You are the boss of this dough.
A Little Fancy Touch
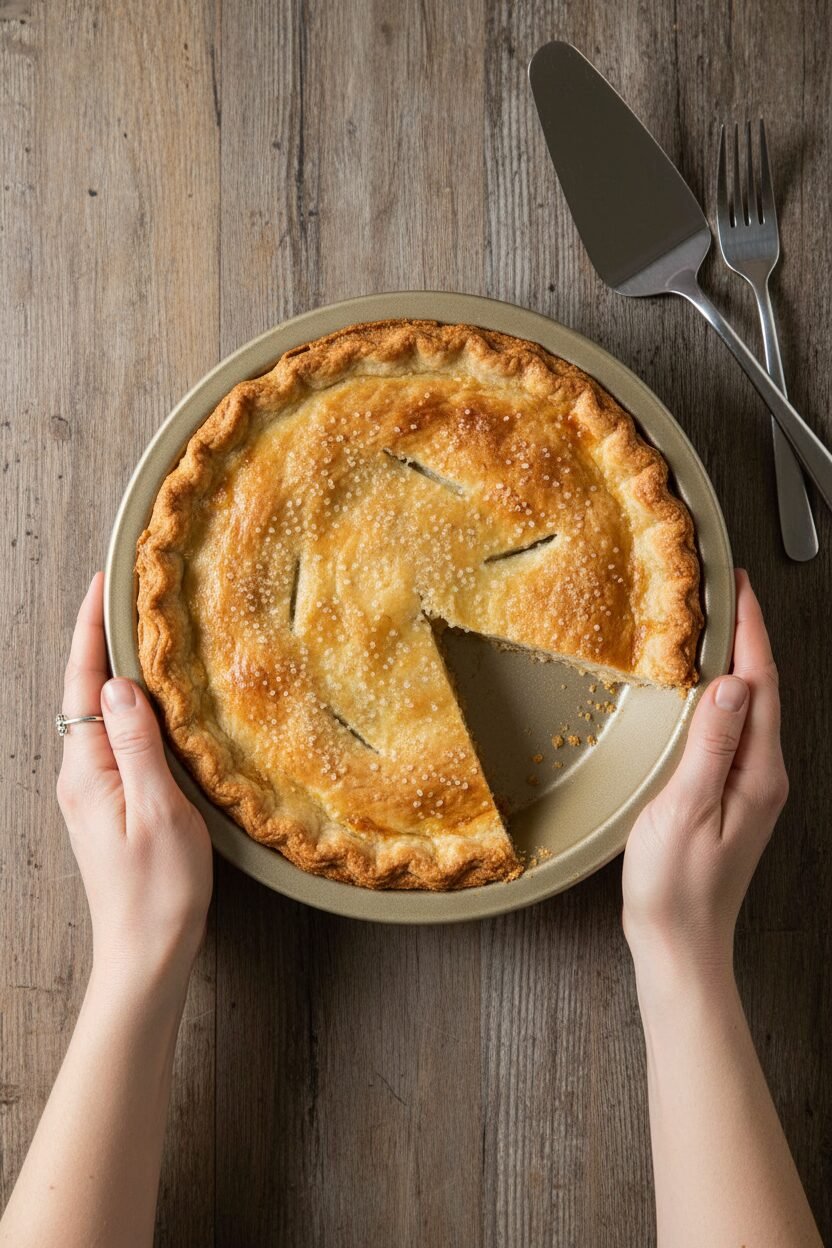
You saved a little dough, right? This is for the edge. Roll it into skinny ropes. You’ll make a braided edge or just press it on. It makes your pie look so special. Like it’s wearing a little hat.
Fun fact: Chilling the dough firms up the butter. This helps your crust keep its shape in the oven. No slumping! After it’s cold, bake it until it’s golden. That color tells you it’s ready.
Your Turn to Share
This crust is fearless. It holds any filling you dream up. Pudding, fruit, even a savory quiche. What filling would you put in yours? Tell me your idea.
I think the best kitchen tools are our hands. Feeling the dough teaches you so much. This matters because it builds confidence. Do you have a cooking disaster that turned out okay? I love those stories.
Will you try the braided edge or a simple pinch? Let me know how it goes in your kitchen. I’m cheering for you.
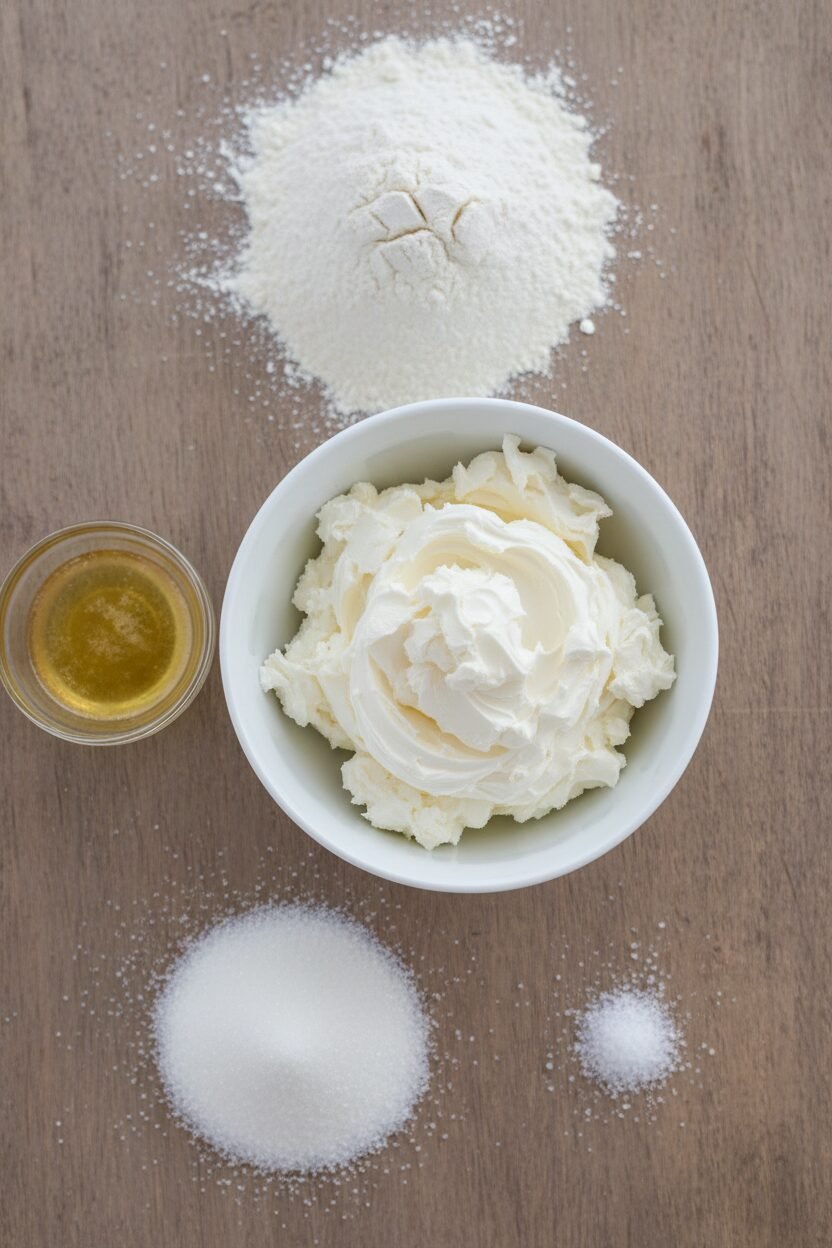
Ingredients:
| Ingredient | Amount | Notes |
|---|---|---|
| all-purpose flour | 1 ¼ cups (6 ¼ ounces/177 grams) | |
| sugar | 2 tablespoons | |
| table salt | ¼ teaspoon | |
| unsalted butter | 8 tablespoons (1 stick) | softened but still cool |
| cream cheese | 2 ounces (57 grams) | softened but still cool |
Fearless Festive Pie Crust
Hello, my dear. Come sit. This crust is my secret for holiday pies. It never gets tough. You just pat it right into the pan. I love that. It feels like playing with clay. The cream cheese makes it so tender and flaky. It’s a little magic trick. I’ve made this for decades. My grandkids love to help press the dough. Their little hands are perfect for the job. It always turns out golden and wonderful. You can do this. I believe in you.
Instructions
Step 1: Lightly spray your pie plate. Now, whisk the flour, sugar, and salt in a bowl. That’s your dry team. In another big bowl, beat the soft butter and cream cheese. Use your mixer until it’s all smooth. This takes about two minutes. Scrape the bowl sides once or twice. Doesn’t that smell amazing already?
Step 2: Add your flour mixture to the butter bowl. Mix on low until it looks like coarse sand. Now, turn the mixer up. Beat until big, soft clumps form. This is the dough! Save three tablespoons of it. Turn the rest onto a floured counter. Gently press it into a ball, then a disk. (A cool tip: if the dough sticks, dust your hands with flour.)
Step 3: Place your dough disk in the greased pie plate. Now, just pat it in. Use the heel of your hand to push it out to the sides. Hold the plate up to a light. Can you see any thin spots? Use your fingertips to fix them. I still laugh at my first lopsided crust. What’s your favorite pie filling? Share below!
Step 4: Take that reserved dough. On your floured counter, roll it into a long, skinny rope. Cut it into three pieces. Roll each into a shorter rope. Now, press them onto the pie rim to make a pretty edge. Wrap the whole plate in plastic. Let it chill in the fridge for an hour. This rest makes all the difference.
Step 5: Heat your oven to 325 degrees. Prick the bottom of the crust with a fork. This stops big bubbles. Bake it until it’s a beautiful golden brown. It will take about 35 minutes. If a bubble pops up, don’t worry. Just press it down gently after baking. Let it cool on a rack. Your perfect crust is ready for any filling.
Creative Twists
Sparkly Sugar Rim: Brush the crust edge with milk. Sprinkle it with coarse sugar before baking.
Citrus Zest: Add a teaspoon of orange or lemon zest to the flour mixture. So bright and cheerful.
Spiced Dough: Mix a pinch of cinnamon or nutmeg right into the dry ingredients. It whispers “holidays.”
Which one would you try first? Comment below!
Serving & Pairing Ideas
This crust deserves a wonderful filling. Try a smooth chocolate pudding or a tart lemon curd. A dollop of whipped cream on top is a must. For a savory twist, fill it with herby egg custard and cheese. That’s a lovely brunch. To drink, a glass of spiced apple cider warms your hands. For the grown-ups, a small glass of rich cream sherry pairs beautifully. It’s like a cozy hug. Which would you choose tonight?
Keeping Your Pie Crust Happy
Let’s talk about keeping your crust perfect. A baked, cooled crust freezes beautifully. Just wrap it tightly in plastic wrap. Then slide it into a freezer bag. It will be happy for up to two months.
Thaw it on your counter for an hour before filling. No need to re-bake. I once froze three crusts for the holidays. It saved me so much time on baking day.
Batch cooking like this matters. It turns a big baking day into a simple task. You can focus on the fun part, the filling. Have you ever tried storing it this way? Share below!
No-Fuss Fixes for Pie Crust Woes
First, dough too crumbly? Your butter was likely too cold. Just sprinkle a teaspoon of cold water over it. Mix gently with your fingers until it comes together.
Second, big bubbles in the baked crust? Do not panic. Wait until the crust is fully baked. Then gently press the bubble down with a kitchen towel. I remember when my first crust puffed up like a pillow.
Third, a soggy bottom? Always prick the dough with a fork before baking. This is called docking. It lets steam escape. Fixing these small issues builds your confidence. It also gives you a crisp, golden crust every time. Which of these problems have you run into before?
Your Quick Questions, Answered
Q: Can I make this gluten-free?
A: Yes. Use a good gluten-free flour blend. Add an extra tablespoon of cold water if needed.
Q: How far ahead can I make the dough?
A: You can make the dough disk up to two days ahead. Keep it wrapped in the fridge.
Q: What if I don’t have cream cheese?
A: You can use all butter. The crust will be a bit more crumbly, but still tasty.
Q: Can I double the recipe?
A: Absolutely. Just make two separate batches in your mixer. This ensures everything mixes evenly.
Q: Any optional tips?
A: For a shiny crust, brush it with an egg wash before baking. *Fun fact: This trick comes from my grandmother’s notebook.* Which tip will you try first?
From My Kitchen to Yours
I hope this crust brings you joy. It is my go-to for every sweet pie. The cream cheese makes it so forgiving. It is a friendly dough for new bakers.
I would love to hear about your baking adventures. Tell me what filling you chose. Have you tried this recipe? Please share your story in the comments below. I read every one.
Happy cooking!
—Elowen Thorn.


Fearless Festive Pie Crust
Description
Pat-in-the-Pan Pie Dough
Ingredients
Instructions
- Lightly coat 9-inch Pyrex pie plate with cooking spray. Whisk flour, sugar, and salt together in bowl.
- With electric mixer at medium-high speed, beat butter and cream cheese in large bowl, stopping once or twice to scrape down beater and sides of bowl, until completely homogenous, about 2 minutes. Add flour mixture and combine on medium-low until mixture resembles coarse cornmeal, about 20 seconds. Scrape down sides of bowl. Increase mixer speed to medium-high and beat until dough begins to form large clumps, about 30 seconds. Reserve 3 tablespoons of dough. Turn remaining dough onto lightly floured surface, gather into ball, and flatten into 6-inch disk. Transfer disk to greased pie plate.
- Press dough evenly over bottom of pie plate toward sides, using heel of your hand. Hold plate up to light to ensure that dough is evenly distributed. With your fingertips, continue to work dough over bottom of plate and up sides until evenly distributed.
- On floured surface, roll reserved dough into 12-inch rope. Divide into three pieces, roll each piece into 8-inch rope, and form fluted edge. Wrap in plastic and refrigerate until dough is firm, at least 1 hour.
- Adjust oven rack to middle position and heat oven to 325 degrees. Lightly prick bottom of crust with fork. Bake until golden brown, 35 to 40 minutes. Cool on wire rack. (If large bubbles form, wait until crust is fully baked, then gently press on bubbles with kitchen towel. Bubbles will settle as crust cools.)
Notes
- This pat-in-the-pan dough is forgiving and doesn’t require rolling. Ensure butter and cream cheese are softened but still cool for best texture.