A Sweet Story from My Kitchen
Let me tell you about my first Nanaimo square. My friend Margie brought them to a Christmas party. I took one bite and my eyes got wide. I had to have the recipe right away. I still laugh at that.
These bars are a Canadian treasure. They come from a city called Nanaimo. That is why they have their name. Making them feels like sharing a hug from far away. What is your favorite treat from another country? I would love to hear about it.
Building a Strong Foundation
The base layer is the most important part. It holds everything up. You melt butter, cocoa, and sugar together. Then you stir in a beaten egg. It will get thick and smell like chocolate dreams.
Next, mix in graham crumbs and coconut. The almonds are optional. I like the little crunch they add. Press this mix firmly into your pan. A strong base means your squares won’t fall apart later. This matters because good food is made with care, from the bottom up.
The Magic Middle Layer
Now for the sunny yellow filling. This part is so fun. You beat butter, cream, and custard powder. Custard powder gives it that special flavor and color. Doesn’t that smell amazing? It reminds me of vanilla pudding.
Gradually add the powdered sugar. Beat it until it’s smooth and fluffy. Spread this over your chilled base. This creamy layer is the heart of the square. It makes the treat feel special and rich.
A Shiny Chocolate Blanket
The top is simple but needs attention. Melt chocolate with a bit of butter. This keeps it soft enough to slice later. Pour it over the cold filling. Spread it gently to cover every bit.
Let it chill until the chocolate is set. This final layer brings all the flavors together. *Fun fact: The classic version uses a hard chocolate layer. My “frosted” version is a little softer, like a frosting. Which do you think you’d prefer?
Why These Squares Matter
These are not just sweets. They are little pieces of tradition. Making them connects us to bakers from long ago. Sharing them creates new memories at your own table.
That is the real magic of holiday baking. It is about the love you mix in. Do you have a family recipe that feels like history? Tell me about it if you do.
Slicing and Sharing Your Joy
Use a sharp knife to cut them. Wipe the blade clean between cuts. This gives you neat little squares. The three layers look so pretty together.
Plate them up on a nice dish. They are rich, so small pieces are best. Seeing people enjoy something you made is the best feeling. This matters because sharing food is how we show we care. Will you be sharing these with friends, family, or keeping them all for yourself? Be honest!
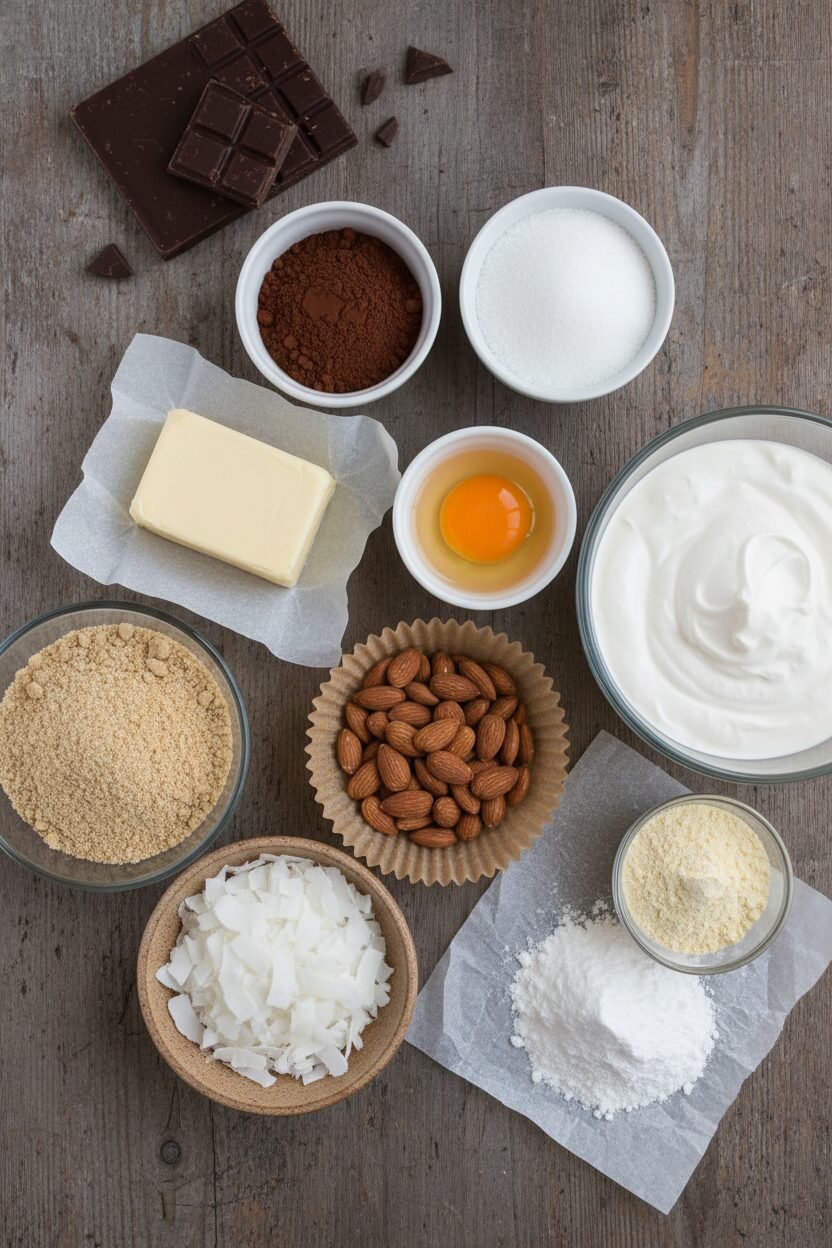
Ingredients:
| Ingredient | Amount | Notes |
|---|---|---|
| Unsalted butter, softened | 1/2 cup | For base layer |
| Unsweetened cocoa powder | 5 tablespoons | For base layer |
| Granulated sugar | 1/4 cup | For base layer |
| Large egg, beaten | 1 | For base layer |
| Graham cracker crumbs | 1 3/4 cups | For base layer |
| Flaked sweetened coconut | 1 cup | For base layer |
| Finely chopped almonds | 1/2 cup | For base layer; optional |
| Unsalted butter, softened | 1/2 cup | For custard filling |
| Heavy cream | 3 tablespoons | For custard filling |
| Custard powder | 2 tablespoons | For custard filling |
| Confectioners’ sugar (powdered sugar) | 2 cups | For custard filling |
| Semisweet baking chocolate | 4 ounces | For chocolate topping |
| Unsalted butter | 2 teaspoons | For chocolate topping |
Instructions
Step 1: Let’s make the base. Melt the first butter, cocoa, and sugar together. Stir until it’s a smooth, dark pool. Add the beaten egg and keep stirring for a few minutes. It will get a bit thicker. (A double boiler keeps it from burning!) Remove from heat and stir in the crumbs, coconut, and nuts. Press this mix firmly into your pan. I use my fingers. Doesn’t that smell amazing already?
Step 2: Now for the lovely yellow filling. Beat the other butter, cream, and custard powder together. Keep going until it’s light and fluffy. Gradually add the powdered sugar. Beat until it’s smooth and dreamy. Spread this evenly over your chilled base. Pop it back in the fridge. What holiday flavor does custard powder remind you of? Share below!
Step 3: Time for the chocolate hat. Melt the chocolate and last bit of butter together. Stir until it’s glossy. Pour it over your cold filling layer. Gently spread it to the edges. (Warm your knife in hot water for cleaner slices later.) Let the whole pan chill until the top is firm. This takes patience, my dears.
Creative Twists
My grandson loves to play with this recipe. You can too. Try a peppermint twist. Add a drop of peppermint extract to the yellow filling. It tastes like a candy cane. Use a crushed candy cane sprinkle on the wet chocolate. It looks so festive. For a nut-free version, swap the almonds for more coconut. It’s just as good. Or be fancy. Use white chocolate for the topping instead. Drizzle a little dark chocolate on top. Which one would you try first? Comment below!
Serving & Pairing Ideas
These squares are rich. A small piece is perfect. I serve them on my Christmas china plate. A dusting of powdered sugar looks like snow. They pair nicely with fresh berries. The tartness cuts the sweetness. For a drink, a hot cup of coffee is lovely. The bitterness balances the bar. For the grown-ups, a small glass of cream sherry is nice. It’s sweet and nutty. For the kids, a cold glass of milk is the classic choice. It’s the best combo. Which would you choose tonight?

Keeping Your Nanaimo Squares Happy
These squares keep beautifully in the fridge. Just cover the pan tightly. They will stay perfect for a week. You can also freeze them for a month. I wrap each square in parchment paper first. Then I place them in a freezer bag.
Thaw them overnight in the fridge. No reheating needed. They are a cold treat. I remember my first big batch. I froze half for a surprise visit. My grandson was so delighted weeks later. Batch cooking like this saves future-you time.
It means you always have a little joy ready to share. That matters more than you think. Have you ever tried storing it this way? Share below!
Fixing Little Kitchen Hiccups
First, a crumbly base is common. Press it into the pan very, very firmly. Use a glass with a flat bottom. I once rushed this step. My base fell apart when I cut it. A solid press makes clean slices possible.
Second, the filling might seem too soft. Just keep beating. It will become fluffy. Add the sugar slowly. This patience gives you a smooth, creamy layer. That texture is the heart of the bar.
Third, the chocolate topping can crack. Let the bars warm up for five minutes before cutting. Use a sharp knife. Wipe it clean between cuts. This gives you pretty squares every time. Which of these problems have you run into before?
Your Quick Questions, Answered
Q: Can I make these gluten-free?
A: Yes! Use gluten-free graham crackers. Check your custard powder label too.
Q: Can I make them ahead?
A: Absolutely. They taste better the next day. The flavors get friendly.
Q: What if I don’t have custard powder?
A: Use vanilla pudding powder. The taste will be a little different but still lovely.
Q: Can I double the recipe?
A: For sure. Use a 9×13 inch pan. Press the base just as firmly.
Q: Are the almonds important?
A: They are optional. You can leave them out. The squares will still be wonderful. Which tip will you try first?
*Fun fact: This recipe is named for a city in Canada!*
From My Kitchen to Yours
I hope you make a wonderful mess in your kitchen. I hope you share these squares with someone you love. Cooking is about the stories we make. It is about the smiles we create.
I would love to hear about your baking adventure. Tell me all about it. Have you tried this recipe? Leave a comment and let me know how it went.
Happy cooking!
—Elowen Thorn.


Frosted Christmas Nanaimo Squares
Description
Classic Nanaimo Bars
Ingredients
Base Layer:
Custard Filling Layer:
Chocolate Topping Layer:
Instructions
- Prepare the Base Layer: In the top of a double boiler, combine 1/2 cup softened butter, unsweetened cocoa powder, and granulated sugar. Stir occasionally until the mixture is melted and smooth.
- Add the beaten egg and continue stirring until the mixture thickens slightly, approximately 2 to 3 minutes.
- Remove from heat and immediately stir in the graham cracker crumbs, flaked coconut, and almonds.
- Press the mixture firmly and evenly into the bottom of an ungreased 8×8-inch square pan.
- Prepare the Custard Filling: In a separate mixing bowl, beat together the remaining 1/2 cup softened butter, heavy cream, and custard powder until the mixture becomes light and fluffy.
- Gradually add the confectioners’ sugar and continue to beat until smooth and spreadable.
- Evenly spread this custard filling over the chilled base layer. Refrigerate to set while preparing the chocolate topping.
- Prepare the Chocolate Topping: Melt the semisweet baking chocolate together with 2 teaspoons butter, either using a double boiler or in the microwave at low heat, stirring at regular intervals until smooth.
- Pour the melted chocolate over the chilled custard layer and spread evenly with an offset spatula to cover the entire surface.
- Chill and Slice: Allow the assembled bars to chill in the refrigerator until the chocolate topping is fully set.
- Once firm, cut into small squares using a sharp knife. For clean slices, wipe the knife between cuts.
Notes
- For a festive touch, sprinkle the chocolate topping with crushed candy canes or holiday sprinkles before it sets.