

A Little Winter Magic
Hello, my dear. Come sit. The kettle is on. Today, we are making magic. We are making Mocha Peppermint Pinwheel Cookies. They look like a winter mosaic. A stained-glass window made of dough. I still laugh at that. My first batch looked like lumpy mud pies. But the taste? Pure magic.
Why does this matter? Because food should be a joy. Not a chore. These cookies are a little project. A fun puzzle for your hands. The result is a beautiful gift. For your eyes and your tummy. What is your favorite cookie to make with someone you love?
The Story in the Dough
This recipe starts with melted butter. It makes the dough so tender. You mix it all into a loose, shaggy mess. Do not worry. That is how it should be. Let it rest for five minutes. See? It firms right up. This rest matters. It lets the flour relax. Your cookies will be soft, not tough.
Then you chill it. Patience is a secret ingredient. I learned that from my Nana. She would make her dough on Tuesday for Saturday tea. The waiting is hard. But it makes everything better. Fun fact: chilling cookie dough stops it from spreading too much in the oven. Your shapes stay pretty.
The Fun Part: Making Mosaics
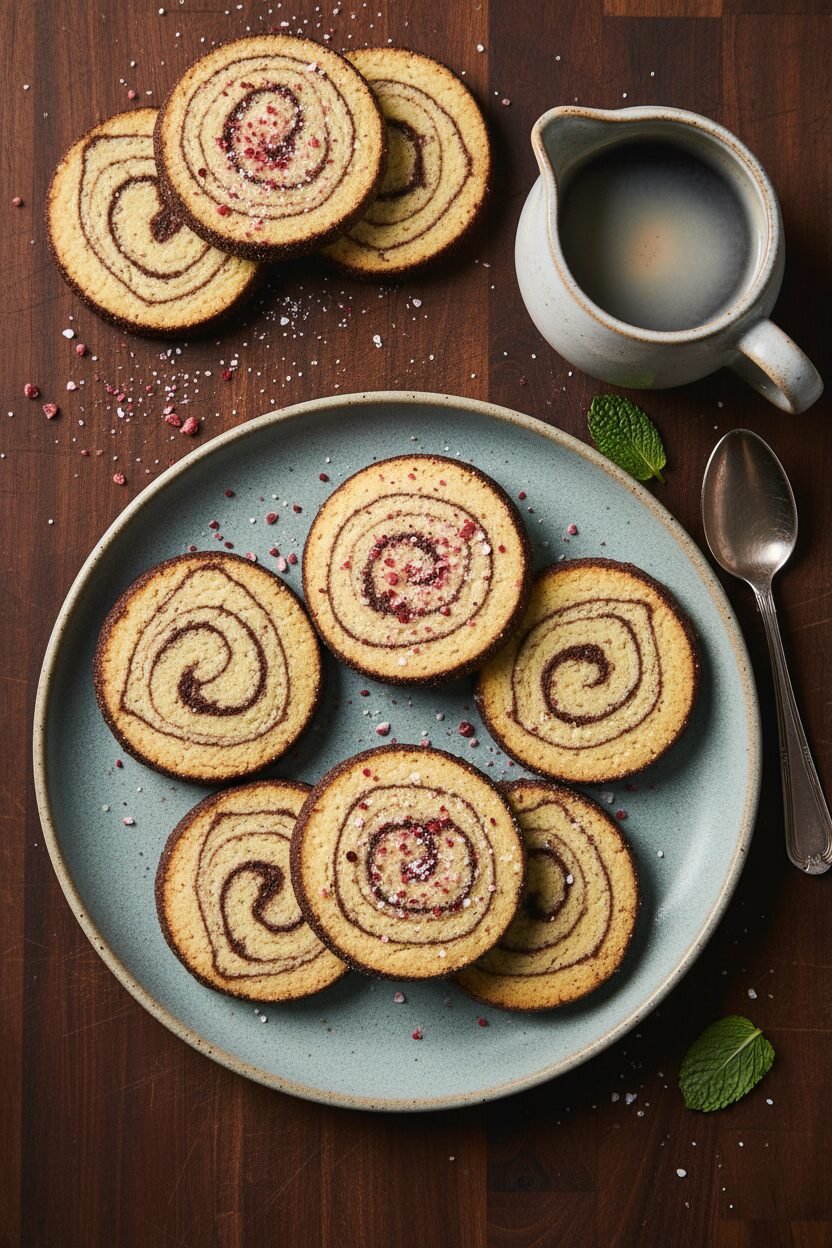
Now for the messy fun. You cut the cold dough into little pieces. Toss them in the mocha powder. It smells like a candy shop and a coffee shop had a party. Doesn’t that smell amazing? Then you squeeze the pieces into balls. Do not knead. Just squeeze. You want those dark and light streaks.
You press the balls into a log. Then roll it in the leftover powder. This is how you get that speckled, snowy look. It is like playing with edible clay. I think this part is the most fun. Do you like the rolling or the squeezing part best?
Baking with Your Nose
Slice your logs into little ovals. Let them sit for ten minutes before baking. This helps them keep their shape. Then into the oven they go. Your kitchen will fill with the warm scent of coffee and cool peppermint. It is the smell of holidays.
Watch them closely. Bake until the tops look dry. The centers should still be soft. They firm up as they cool. This is the key to a cookie that melts in your mouth. Let them cool completely on a rack. It is a test of willpower. I always sneak one warm cookie. I will not tell if you do too.
A Cookie with Two Voices
When you bite into one, you taste two things at once. The rich, deep note of mocha. Then the bright, cheerful note of peppermint. They do not fight. They dance together. Why does this matter? Life is better when different things work in harmony. Like flavors in a cookie.
These cookies keep well. Tuck them in a tin. They are perfect for sharing. Or for a secret midnight snack. I love them with a glass of cold milk. What would you drink with yours? A cup of hot cocoa, perhaps? Tell me your perfect cookie-and-drink pair.
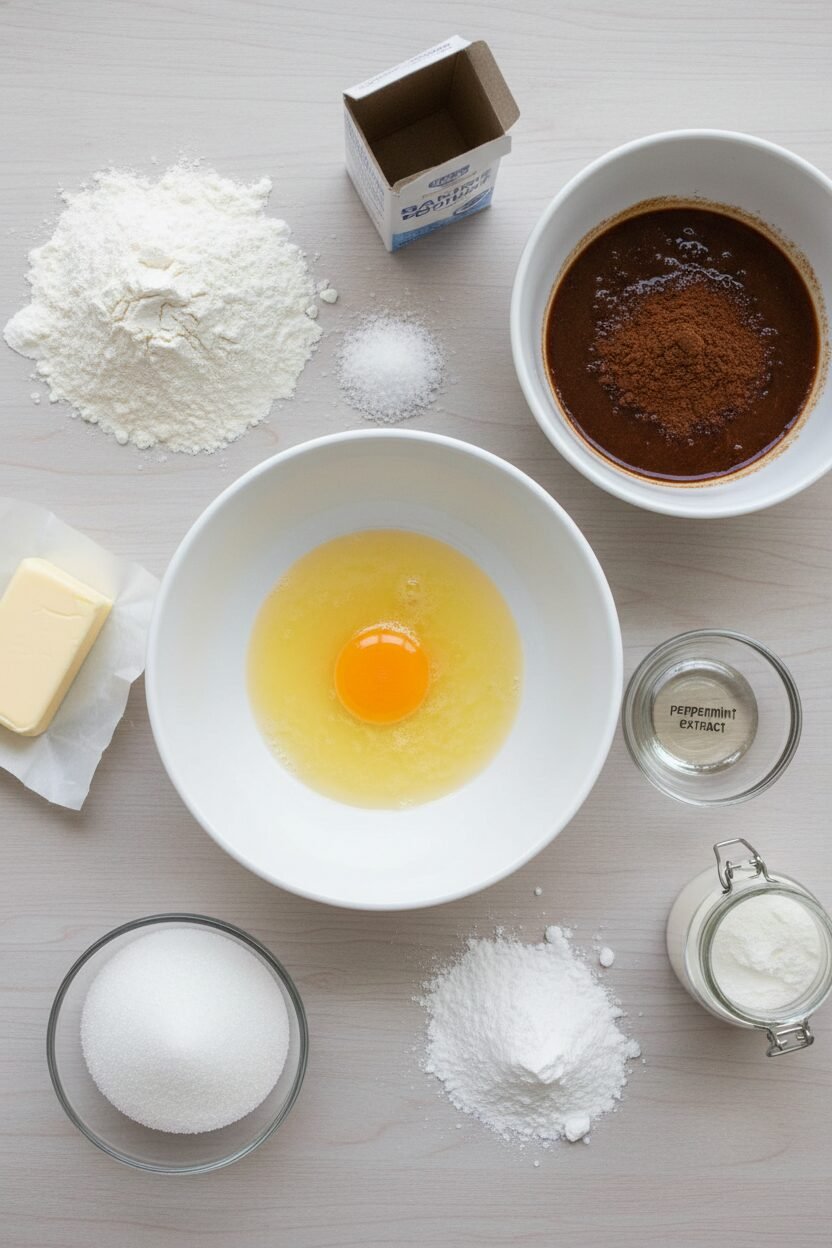
Ingredients:
| Ingredient | Amount | Notes |
|---|---|---|
| All-purpose flour | 1¾ cups (8¾ ounces/248 grams) | |
| Table salt | ½ teaspoon | |
| Baking powder | ½ teaspoon | |
| Unsalted butter | 16 tablespoons | melted and cooled |
| Granulated sugar | ¾ cup (5¼ ounces) | |
| Egg yolk | 1 large | |
| Peppermint extract | 1 teaspoon | |
| Instant espresso powder | 1½ tablespoons | |
| Unsweetened cocoa powder | 1 tablespoon | |
| Confectioners’ sugar | 1 tablespoon | |
| Dry milk powder | 1 tablespoon |
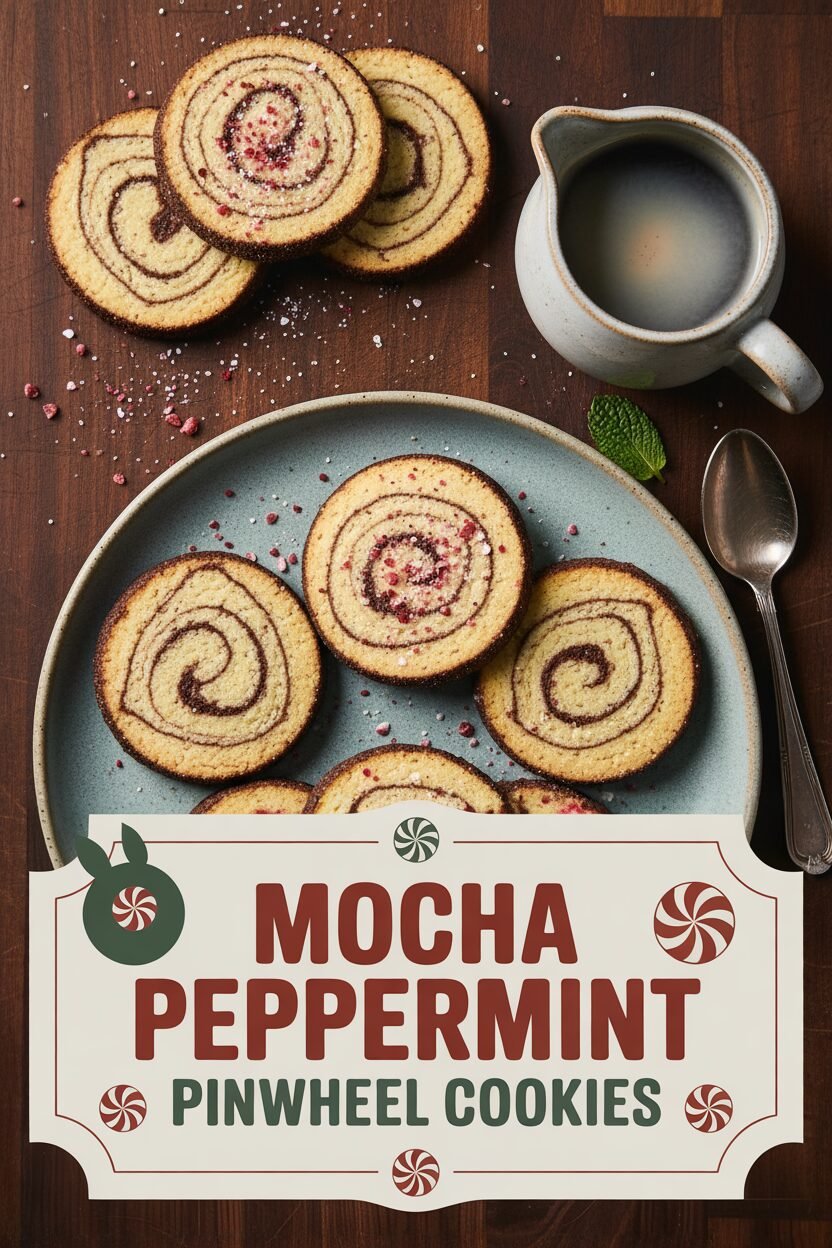
My Mocha-Peppermint Pinwheel Cookies
Hello, my dear. Come sit at the table. I want to tell you about these special cookies. They look like little winter mosaics, don’t they? The story starts with my grandson, Leo. He loves chocolate and peppermint together. One snowy afternoon, we decided to invent a cookie. We made a happy mess! I still laugh at that. The dough is very soft at first. Don’t worry. It just needs a little rest in the fridge. Like we all do sometimes. Ready to make some magic?
Step 1: First, mix your dry friends in a bowl. Flour, salt, and baking powder. In another bowl, whisk the melted butter and sugar. Add the egg yolk and peppermint extract. Doesn’t that smell amazing? Pour the dry mix into the wet. Stir until it becomes a soft dough. Let it sit for five minutes. It will firm up nicely. (A hard-learned tip: let your melted butter cool a bit. Hot butter makes the dough too greasy.)
Step 2: Now, shape that dough into a small rectangle. Wrap it tightly in plastic. Pop it in the refrigerator. It needs at least an hour to chill. This is a good time to tidy up. Or read a book! You can even leave it for a few days. I often make the dough on Tuesday for baking on Friday. Do you prefer baking right away or waiting for the weekend? Share below!
Step 3: Time for the fun part! Sift the espresso, cocoa, and sugars together. Take your chilled dough. Cut it into little pieces, like puzzle bits. Toss them in that dark, fragrant powder. Coat every piece. Now, squeeze some pieces into a ball. Make three more balls. Then, press all the balls together into a log. Roll it smooth. The streaks will look so pretty. Make a second log the same way.
Step 4: Roll your logs in the leftover cocoa mixture. This gives them a dusty, snowy look. Wrap them up and chill again. Just thirty minutes this time. Heat your oven to 350 degrees. Line your baking sheets. Now, slice your logs into pretty ovals. Let them sit on the sheet for ten minutes. This helps them keep their shape.
Step 5: Bake one sheet at a time. They puff up and look dry on top. But the centers stay soft. Rotate the sheet halfway through. Let them cool on the sheet first. Then move them to a rack. The wait is the hardest part! But a cool cookie is a crisp cookie. Store them in a tin. They are perfect with a glass of cold milk.
Cook Time: 10–12 minutes per batch
Total Time: About 2 hours 30 minutes (with chilling)
Yield: About 4 dozen cookies
Category: Dessert, Cookies
Three Twists on the Classic
I love a good recipe. But I love changing it up more! Here are three fun ideas. Try one next time you feel creative. It makes the kitchen feel new again.
The Candy Cane Crunch: Roll the finished logs in crushed candy canes before slicing. So festive and crunchy!
The Orange Zest Dream: Swap the peppermint for orange extract. Use the cocoa powder, but skip the espresso. Bright and sunny.
The Chocolate Chip Surprise: Add a handful of mini chocolate chips when you mix the dough. Everyone loves extra chocolate.
Which one would you try first? Comment below!
Serving with a Smile
These cookies are stars on their own. But a little presentation is lovely. Arrange them on a vintage plate. Maybe add a sprig of fresh mint. They look beautiful on a holiday cookie tray. Pair them with other simple treats. A bowl of roasted nuts is nice. So is a small dish of chocolate-dipped strawberries.
For drinks, I have two favorites. For the grown-ups, a small glass of peppermint schnapps. It echoes the mint in the cookie. For everyone, a big mug of steamy hot chocolate. The mocha in the cookie loves that. It’s a perfect match. Which would you choose tonight?
Keeping Your Pinwheel Cookies Perfect
These cookies keep beautifully. Store them in a tin at room temperature. They stay fresh for over a week. You can also freeze the dough logs. Wrap them well in plastic wrap first. Then pop them in a freezer bag. They will keep for two months. Slice and bake them straight from the freezer. Just add a minute or two to the bake time.
I once baked a double batch for a party. The party got cancelled! I froze one log for later. It was a wonderful surprise a month after. Batch cooking like this saves future-you time. It means fresh cookies are always close by. Have you ever tried storing it this way? Share below!
Common Cookie Troubles and Easy Fixes
Is your dough too soft to shape? Just chill it longer. A firm, cold dough is much easier to handle. I remember when my dough was too warm. It spread into a puddle in the oven! Chilling fixes this.
Are the cookies spreading too much? Your butter might have been too warm. Make sure it is melted and cooled. Also, do not skip the 10-minute rest before baking. This helps them keep their pretty shape.
Is the espresso-cocoa coating not sticking? Shake off the extra powder first. Then roll the log in the reserved mixture. This gives them that perfect mosaic look. Getting the shape right builds your confidence. A good coating makes every bite taste balanced. Which of these problems have you run into before?
Your Quick Questions, Answered
Q: Can I make these gluten-free? A: Try a 1-to-1 gluten-free flour blend. The texture may be a bit more crumbly.
Q: How far ahead can I make the dough? A: The logs keep in the fridge for 3 days. Or freeze them for 2 months.
Q: I don’t have milk powder. A: You can leave it out. The coating might be slightly less creamy.
Q: Can I double the recipe? A: Yes! Just mix in two separate bowls. This prevents over-mixing the dough.
Q: Any fun add-ins? A: A few mini chocolate chips are lovely. Fold them in with the flour. Which tip will you try first?
From My Kitchen to Yours
I hope you love making these cookies. They are a fun project for a cozy afternoon. *Fun fact: the “mosaic” method is called “marbling” by bakers.* It looks fancy but is so simple. I would love to see your creations. Sharing food connects us all. Have you tried this recipe? Tag us on Pinterest! Your pictures make my whole week brighter.
Happy cooking! —Elowen Thorn.

Mocha Peppermint Pinwheel Cookies
Description
These elegant slice-and-bake butter cookies combine rich mocha and cool peppermint in a beautiful pinwheel pattern.
Ingredients
Instructions
- Whisk flour, salt, and baking powder together in bowl. In second bowl, whisk melted butter, granulated sugar, egg yolk, and peppermint extract until very smooth. Add flour mixture and stir with rubber spatula or wooden spoon until well combined (dough will be loose). Let dough rest until firm, about 5 minutes.
- Shape dough into rough 8 by 5-inch rectangle. Wrap tightly in plastic wrap and refrigerate until firm, at least 1 hour or up to 3 days.
- Sift espresso powder, cocoa, confectioners’ sugar, and milk powder through fine-mesh strainer into medium bowl. Cut chilled dough into rough ¾-inch pieces. Add to espresso-cocoa mixture and toss until pieces are evenly coated. Transfer pieces to counter, shaking excess espresso-cocoa mixture back into bowl (do not discard). Divide dough pieces into 2 piles.
- Working with 1 pile, firmly squeeze one-quarter of pieces together to form dough ball with streaks of espresso mixture throughout (do not knead dough). Repeat with remaining three-quarters of dough to form 3 more balls. Squeeze and press dough balls together to form rough 8-inch log. Continue to shape and roll log until 1½ inches in diameter and about 9 inches long. Flatten log slightly on 2 sides, until it is 1 inch tall and has oval shape. Repeat with remaining dough pile to form second log.
- Transfer reserved espresso-cocoa mixture to counter and roll logs in mixture to coat evenly. Wrap logs tightly in plastic and refrigerate until firm, about 30 minutes.
- Adjust oven rack to middle position and heat oven to 350 degrees. Line 2 rimmed baking sheets with parchment paper.
- Slice logs into ¼-inch-thick ovals and space 1 inch apart on prepared sheets. Let rest at room temperature for 10 minutes. Bake cookies, 1 sheet at a time, until puffed and tops look dry but centers are still very soft, 10 to 12 minutes, rotating sheet halfway through baking.
- Let cookies cool on sheet for 10 minutes, then transfer to wire rack and let cool completely, about 30 minutes. Serve. (Cookies can be stored at room temperature for up to 10 days.)
Notes
- For a stronger peppermint flavor, add an extra ¼ teaspoon of peppermint extract. Ensure the dough is well chilled before slicing for clean, neat ovals.