

A Winter’s Tale in a Cookie Jar
My grandson calls these our magic snowflakes. No two are exactly alike. That’s part of the charm, I think. We make them every first snowfall.
I still laugh at that first time. He spread the mint so wide it dripped right off! We just ate it with a spoon. The kitchen smelled like a chocolate mint forest. Doesn’t that smell amazing?
Why This Little Ritual Matters
These aren’t just cookies. They are a pause. A sweet stop in a busy week. You have to wait for the dough to chill. You have to wait for the mint to melt.
That waiting is good for the soul. It teaches us that good things take a little time. What’s a simple kitchen task that makes you feel calm? I’d love to know.
The Heart of the Recipe: Melting & Mixing
Start gently. Melt your butter, sugar, and water together. It should feel like a warm bath for your spoon. Then add those chocolate chips. Watch them swirl and melt into a shiny river.
Let that mixture cool a bit. This is important. If it’s too hot, it will cook the eggs! Patience here makes a better cookie. Fun fact: letting the dough chill firms up the butter. This helps your cookies keep their pretty shape instead of spreading too thin.
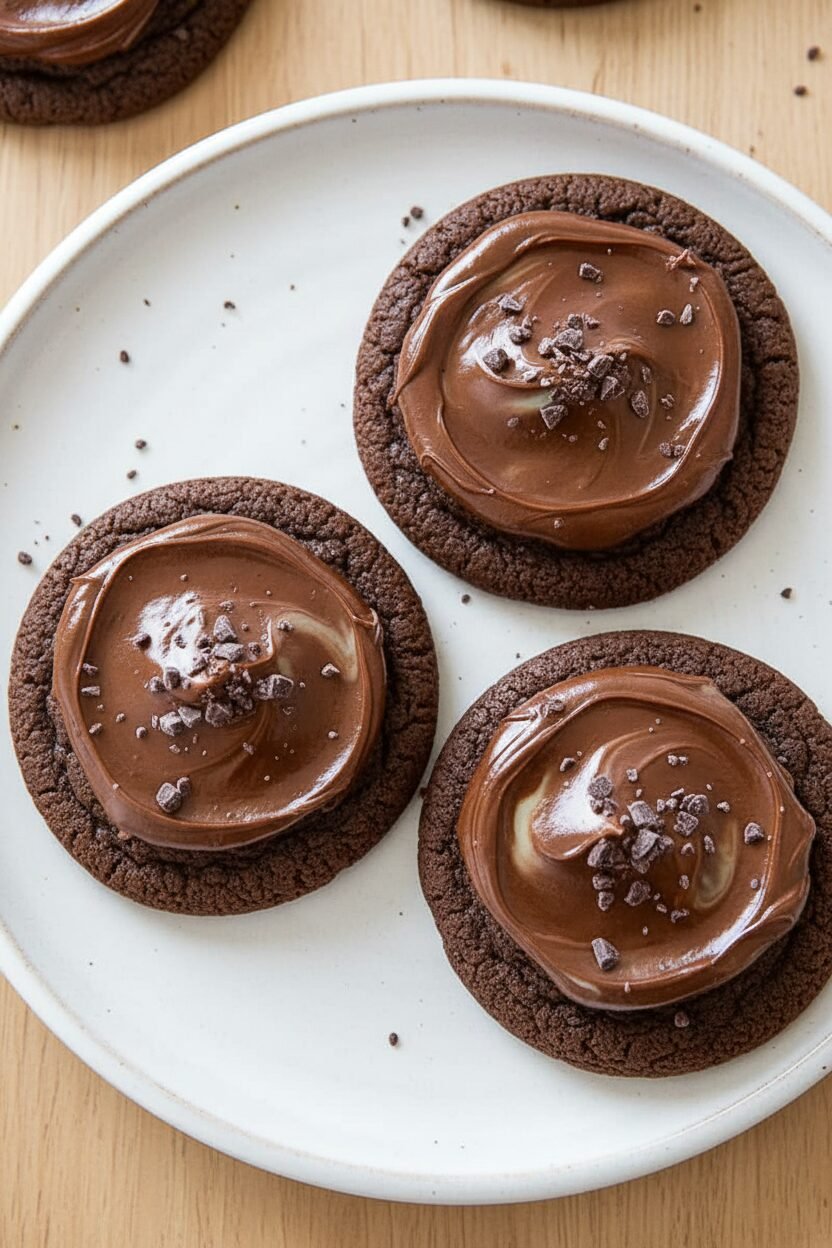
The Bake & The Magic Touch
Roll your dough into little balls. They will look plain now. But just wait. Bake them until they are just set. They will look soft in the middle. That’s perfect.
Now, the magic. As soon as they come out, place a mint on each one. The heat from the cookie does the work. In five minutes, that mint is a soft, green pool. A gentle swirl with a spoon makes a frosty topping. Do you like more mint or more chocolate in your treats?
A Flavor That Tells a Story
Chocolate and mint are old friends. They remind me of holiday candies from my childhood. The deep chocolate cookie is like a dark winter night. The bright mint is like a fresh, cold breath of air.
This matters because food is memory. One bite can take you back. It connects you to your own story. What food tastes like a happy memory to you? Share it with me.
Your Turn in the Kitchen
Now you have the recipe. It’s your turn. Maybe you’ll make them with a friend. Or maybe you’ll enjoy the quiet of the kitchen alone. Both are wonderful.
Remember, your cookies don’t need to be perfect. If the mint drips, you’re in good company. Just enjoy the making, the waiting, and the sharing. That’s the real secret ingredient.
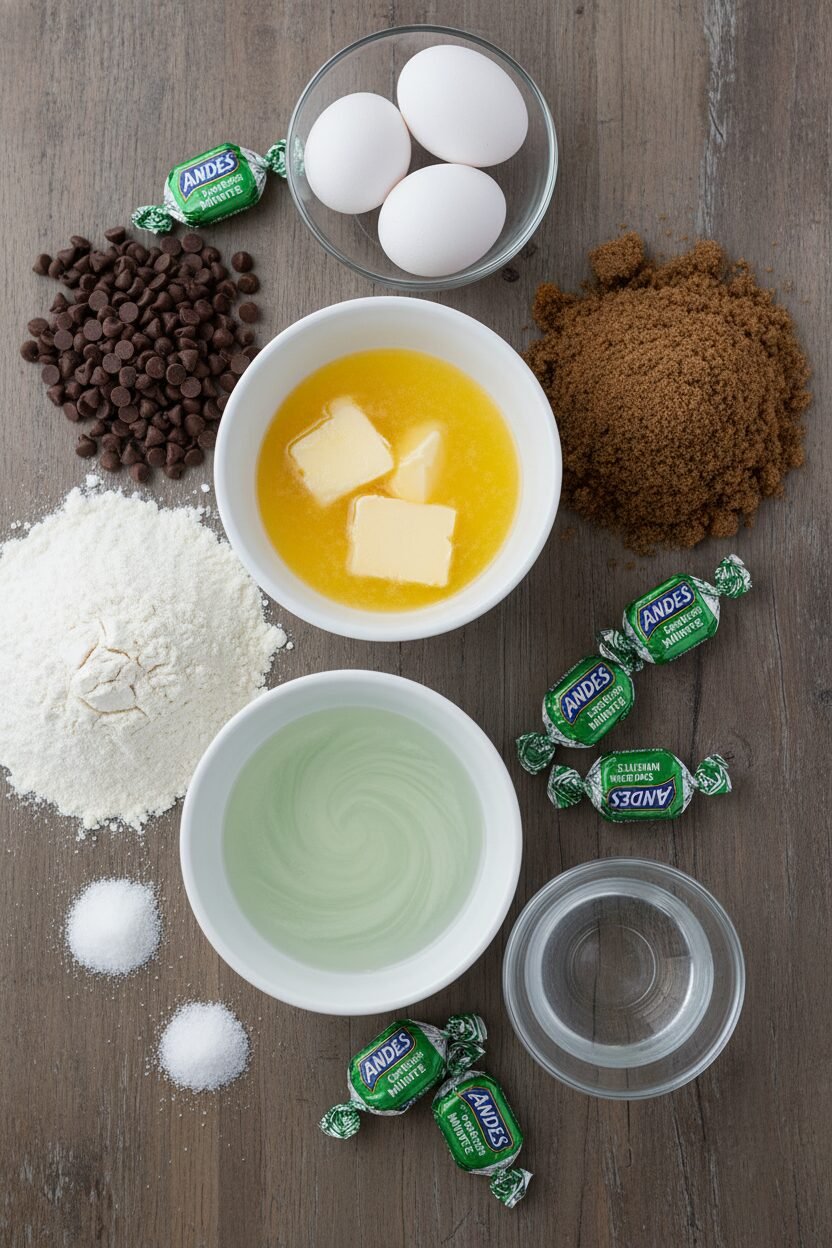
Ingredients:
| Ingredient | Amount | Notes |
|---|---|---|
| Unsalted butter, softened | 12 tablespoons | |
| Brown sugar | 1 ½ cups packed (10 ½ ounces/298 grams) | |
| Water | 2 tablespoons | |
| Semisweet chocolate chips | 2 cups (12 ounces/340 grams) | |
| All-purpose flour | 2 ½ cups (12 ½ ounces/354 grams) | |
| Baking soda | 1 ¼ teaspoons | |
| Salt | ½ teaspoon | |
| Large eggs | 2 | |
| Crème de Menthe Andes Mints | 45 | Foil wrappers removed |
Instructions
Step 1: Melt your butter, sugar, and water in a pan. Stir it gently over low heat. Add the chocolate chips right after. Keep stirring until it’s all smooth and glossy. Pour this lovely mix into your big mixer bowl. Let it sit for ten minutes to cool. (A warm bowl will cook your eggs, so patience is key!)
Step 2: Grab your flour, baking soda, and salt. Whisk them together in another bowl. Now, beat the eggs into your chocolate mixture. Mix it on medium until it looks like pudding. Add your flour mix in three parts, stirring slowly. The dough will be very soft. Chilling firms it up so you can roll it.
Step 3: Heat your oven to 350 degrees. Roll the cold dough into tablespoon-sized balls. Place them far apart on your baking sheets. Bake for 7 to 9 minutes until just set. They will look a little underdone, and that’s perfect. Do you rotate your trays in the oven? Share below!
Step 4: As soon as the cookies come out, top each with an Andes mint. Let them sit for five minutes. The heat will melt the mint beautifully. Then, use a spoon to swirl the chocolate into a frosty cap. Let them cool completely on a rack. I still laugh at how I used to eat them too soon.
Creative Twists
Peppermint Crunch: Crush candy canes and sprinkle them on the melted mint topping.
Cookie Sandwich: Spread mint frosting between two cooled cookies for a double treat.
Orange Zest: Add a teaspoon of orange zest to the dough for a chocolate-orange flavor.
Which one would you try first? Comment below!
Serving & Pairing Ideas
These cookies are wonderful on a plate with fresh berries. A little dusting of powdered sugar makes them look like real snowflakes. For a cozy night, serve them slightly warm. Doesn’t that smell amazing? For a drink, a glass of cold milk is the classic choice. For the grown-ups, a small glass of peppermint schnapps or creme de menthe liqueur pairs nicely. Which would you choose tonight?
Keeping Your Snowflakes Fresh
These cookies stay perfect for days. Just keep them in a sealed tin at room temperature. They last up to three days that way. For longer storage, freeze them. Place cooled cookies in a single layer on a tray. Once frozen, pack them into a freezer bag. They keep for a month.
I once froze a whole batch for my grandson’s visit. He was so happy to find them! Batch cooking saves time for busy days. It also means you always have a sweet treat ready. This matters because homemade joy should be easy to share.
Have you ever tried storing cookies this way? Share below!
Cookie Troubles and Easy Fixes
First, your dough might be too sticky. Chilling it is the key. A firm dough is much easier to roll. I remember when my first batch spread too much. The dough was just too warm from the kitchen.
Second, the cookies can bake unevenly. Always switch your tray positions halfway through. This gives every cookie the same heat. Third, the mint topping might not spread nicely. Let the mint sit on the hot cookie for five minutes. Then it will glide like soft frosting.
Fixing small issues builds your cooking confidence. It also makes sure every bite tastes wonderful. Which of these problems have you run into before?
Your Quick Questions, Answered
Q: Can I make these gluten-free?
A: Yes! Use a good gluten-free flour blend. Make sure it has xanthan gum in it.
Q: Can I make the dough ahead?
A: Absolutely. Wrap the dough tightly and refrigerate for up to two days.
Q: I don’t have Andes Mints. What can I use?
A: Try chopping up thin mint chocolates. Any chocolate-mint candy will work in a pinch.
Q: Can I double the recipe?
A: You can, but mix it in two separate batches. This ensures everything mixes evenly.
Q: Any optional tips?
A: A tiny sprinkle of sea salt on top is lovely. Fun fact: Salt makes chocolate taste even more chocolatey! Which tip will you try first?
From My Kitchen to Yours
I hope these cookies bring a smile to your home. Baking is about sharing love and stories. My kitchen is always full of both. I would love to hear about your baking adventures.
Please tell me all about it in the comments. Have you tried this recipe? I read every note you leave. Thank you for baking with me today.
Happy cooking!
—Elowen Thorn.
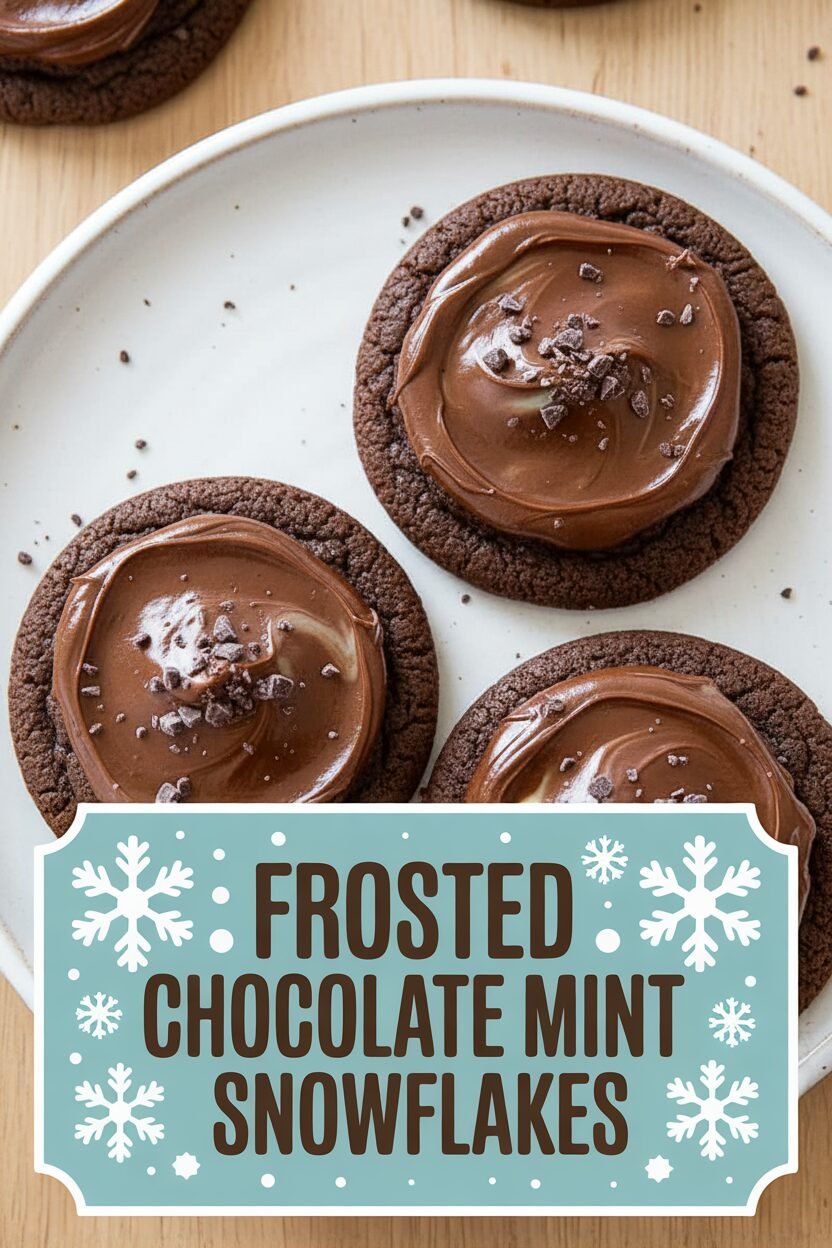

Frosted Chocolate Mint Snowflakes
Description
Rich chocolate cookies topped with a melted mint chocolate frosting, creating a delightful holiday treat.
Ingredients
Instructions
- Combine butter, sugar, and water in medium saucepan and cook over low heat, stirring occasionally, until butter is melted, about 3 minutes. Add chocolate chips and stir constantly until chips are melted. Transfer mixture to bowl of stand mixer and let cool for 10 minutes. Combine flour, baking soda, and salt in separate bowl.
- Fit mixer with paddle, add eggs to bowl with chocolate mixture, and beat on medium-high speed until smooth, about 2 minutes. Reduce speed to low, add flour mixture in 3 additions, and mix until just combined, scraping down bowl as needed. Refrigerate until dough is firm, at least 1 hour or up to 2 days.
- Adjust oven racks to upper-middle and lower-middle positions and heat oven to 350 degrees. Line 2 baking sheets with parchment paper. Working with half of dough, roll heaping tablespoons of dough into balls and place 2 inches apart on prepared sheets. Bake until just set, 7 to 9 minutes, switching and rotating sheets halfway through baking.
- After removing cookies from oven, immediately place 1 Andes Mint in center of each cookie. Let stand until chocolate is softened, about 5 minutes, then spread chocolate over tops of cookies. Transfer cookies to wire rack and let cool completely before serving, about 30 minutes. Repeat with remaining dough and Andes Mints. (Cookies can be stored at room temperature for up to 3 days.)
Notes
- For a variation, try using different flavors of Andes Mints, such as peppermint crème or toffee crunch.