

The Heart of the Home
My kitchen table has seen many pies. The wood is dotted with little floury fingerprints. I think that is a beautiful thing. A pie is more than dessert. It is a warm hug at the end of a meal.
It brings everyone together. You wait for that first slice. You share it with people you love. That is why this matters. Food made with care feeds more than our stomachs. It feeds our hearts, too.
A Story in Every Slice
My grandson once asked for apple pie in July. I told him we needed the right apples. We used what we had from the store. It was our “Christmas in July” pie. I still laugh at that.
This recipe uses two everyday apples. Granny Smith apples are tart and firm. McIntosh apples are sweet and soft. Together, they make the perfect filling. One holds its shape. The other turns lovely and saucy. Doesn’t that sound like a good team?
Grandma’s Little Tricks
Making the dough can feel tricky. But here is my secret. Keep everything very cold. I even chill my bowl sometimes. When you add the ice water, stir gently. The dough should just hold together.
If you don’t have a food processor, don’t worry. You can grate the cold butter and shortening right into the flour. Use the big holes on your box grater. It works like a charm. What is your favorite kitchen tool to use?
The Magic in the Oven
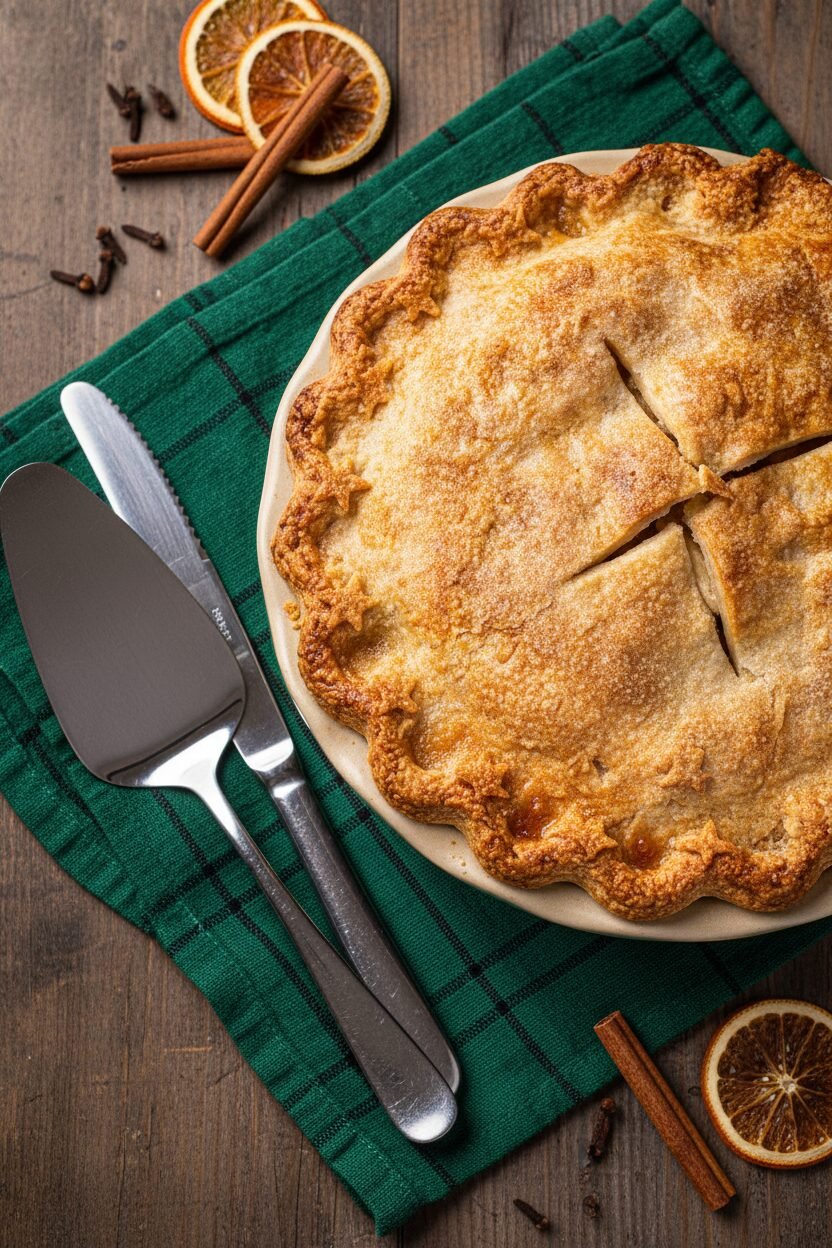
Now for the best part. That smell. Cinnamon, nutmeg, and baking apples. It fills the whole house. It smells like love and waiting. You must let the pie cool for four hours. I know, it is hard to wait.
But this wait matters. It lets the juicy filling set. If you cut it too soon, it will run everywhere. Trust your grandma. Let it rest. The reward is a perfect, neat slice. Fun fact: Putting a baking sheet in the oven first catches any drips. It keeps your oven clean!
Your Turn at the Table
Every family has its own pie story. Maybe you like a big scoop of ice cream on top. Or a slice of sharp cheddar cheese. My friend Martha always adds a pinch of cardamom to her filling. It is her special touch.
What would your special touch be? Would you change the spices? Tell me about the first pie you ever remember tasting. I love hearing your stories. They make my own kitchen feel bigger and brighter.
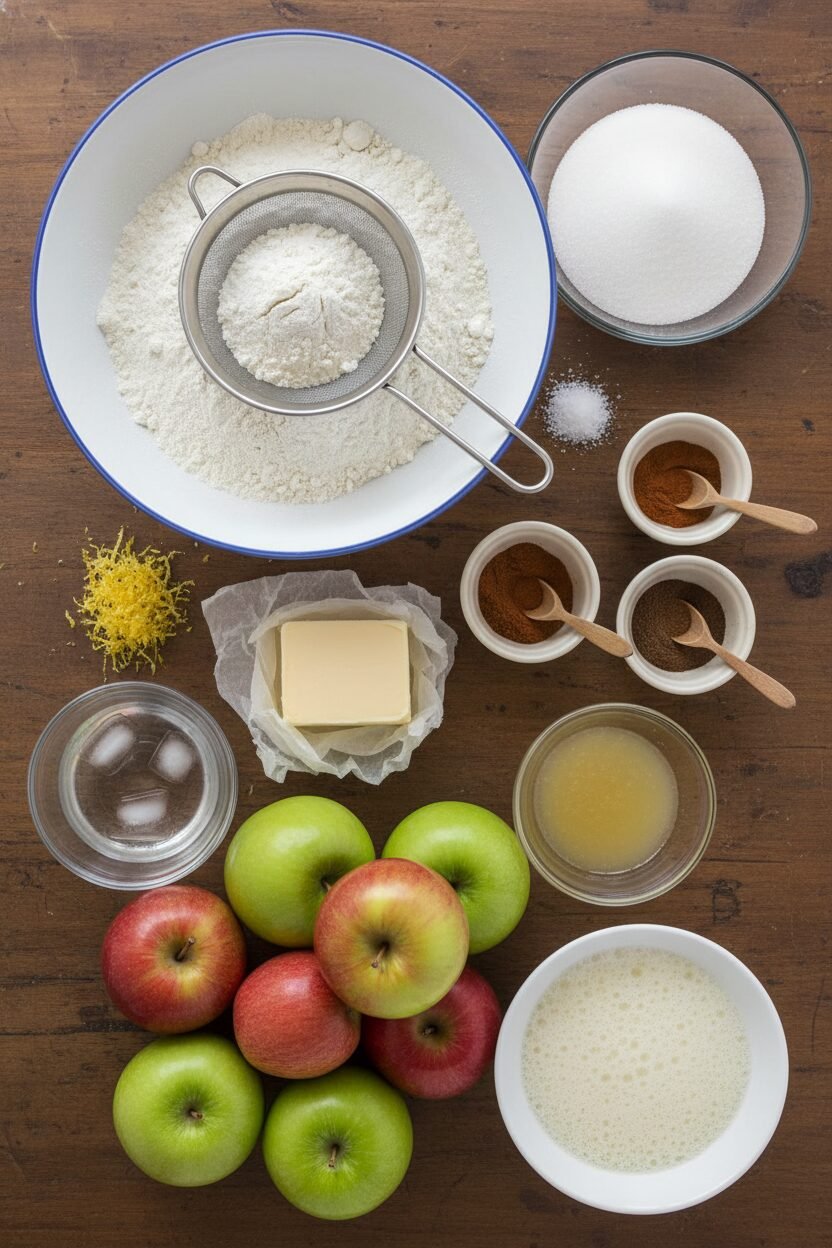
Ingredients:
| Ingredient | Amount | Notes |
|---|---|---|
| Unbleached all-purpose flour | 2 ½ cups (plus extra for dusting) | For the pie dough |
| Granulated sugar | 2 tablespoons | For the pie dough |
| Table salt | 1 teaspoon | For the pie dough |
| Vegetable shortening | 8 tablespoons | Chilled, cut into ½-inch pieces |
| Unsalted butter | 12 tablespoons | Chilled, cut into ¼-inch pieces |
| Ice water | 6 – 8 tablespoons | For the pie dough |
| Granulated sugar | ¾ cup | For the apple filling |
| All-purpose flour | 2 tablespoons | For the apple filling |
| Lemon zest | 1 teaspoon | From 1 medium lemon |
| Table salt | ¼ teaspoon | For the apple filling |
| Ground nutmeg | ¼ teaspoon | For the apple filling |
| Ground cinnamon | ¼ teaspoon | For the apple filling |
| Ground allspice | ⅛ teaspoon | For the apple filling |
| Lemon juice | 1 tablespoon | For the apple filling |
| McIntosh apples | 2 pounds (907 grams) | Peeled, cored, and sliced ¼ inch thick |
| Granny Smith apples | 1 ½ pounds (680 grams) | Peeled, cored, and sliced ¼ inch thick |
| Egg white | 1 | Beaten lightly, for brushing |
| Granulated sugar | 1 tablespoon | For topping |
My Christmas Apple Secret
Hello, my dear. Come sit at the counter. Let’s talk about apple pie. Many think you need fancy apples. I don’t. I use what’s in my fruit bowl. A mix of sweet and tart makes the best filling. Doesn’t that smell amazing? My grandson once used only green apples. His face puckered! We laughed so hard. Now we always mix them. It’s our little tradition. The secret is in the balance, just like a good day.
Instructions
Step 1: Make your dough first. Mix the flour, sugar, and salt in your food processor. Add the chilled shortening and butter. Pulse until it looks like crumbs. This part is fun. I still laugh at my first try. My dough was a sticky mess! (A hard-learned tip: Grate frozen butter and shortening for perfect flakes by hand.)
Step 2: Now, bring it together. Sprinkle ice water over your crumbly mix. Stir and press it with a spatula. It should stick together. Divide it into two disks. Wrap them tightly in plastic. Let them rest in the fridge. This chill time is important. It makes the crust flaky. What do you think the chilling does? Share below!
Step 3: Roll out one dough disk. Aim for a 12-inch circle. Gently lay it in your pie plate. Don’t stretch it. Just let the extra dough hang over. Wrap this and put it back in the fridge. Roll the second disk, too. Chill both for 30 minutes. This keeps the butter cold.
Step 4: Heat your oven now. Put a baking sheet on the lowest rack. Turn the heat to 500 degrees. This hot start gives us a crisp bottom. While it heats, mix your filling. Toss the apples with sugar, spices, and lemon juice. My kitchen smells like Christmas already.
Step 5: Fill the pie. Mound your spiced apples into the chilled crust. Roll the top crust over them. Trim and crimp the edges together. Cut slits in the top. Brush it with egg white and sprinkle sugar. This makes it shine.
Step 6: Bake your masterpiece. Place the pie on the hot baking sheet. Reduce the heat to 425 degrees. Bake until golden. Then lower it to 375 degrees. Bake until the juices bubble. Let it cool completely. This wait is the hardest part. But it’s worth it.
Creative Twists
Add a handful of fresh cranberries to the filling for a sweet-tart surprise. Swap the spices for a pinch of cardamom. It feels wonderfully cozy. Make little leaf shapes from the top crust instead of slits. Which one would you try first? Comment below!
Serving & Pairing Ideas
Serve a warm slice with a scoop of vanilla ice cream. A sharp cheddar cheese slice on the side is classic. For drinks, a hot mug of spiced apple cider is perfect. For the grown-ups, a small glass of sweet sherry pairs nicely. Which would you choose tonight?
Keeping Your Pie Cozy for Later
Let’s talk about keeping your pie happy. A cooled pie stays fresh on the counter for two days. Just cover it with a bowl. For longer storage, the fridge is your friend. Wrap it well and it will keep for four days.
You can freeze a baked pie, too. Wrap it tightly in foil first. I once froze a whole pie for my grandson’s surprise visit. Thaw it overnight in the fridge when you’re ready. Then warm slices in a low oven.
Why does this matter? A well-stored pie means less stress. You can bake ahead for busy days. This makes holiday time more about people, not panic. Have you ever tried storing it this way? Share below!
Simple Fixes for Common Pie Problems
Sometimes our pies need a little help. A soggy bottom crust is common. Baking on a hot sheet pan fixes this. It makes the bottom crisp and golden.
Juice bubbling over is another mess. I remember when my first pie flooded the oven. Mounding apples in the center helps. So does those slits in the top crust.
If your crust tears, don’t worry. Patch it with a scrap of dough. Press it on gently with a drop of water. Why fix these issues? It builds your kitchen confidence. It also makes your pie taste and look perfect. Which of these problems have you run into before?
Your Quick Questions, Answered
Q: Can I make this gluten-free? A: Yes! Use your favorite gluten-free flour blend. Make sure it has xanthan gum in it.
Q: Can I make it ahead? A: You can make the dough disks up to two days early. Keep them wrapped in the fridge.
Q: I don’t have these apples. A: That’s fine! Use any two kinds you have. Mix one sweet and one tart apple.
Q: Can I make a smaller pie? A: You can cut the recipe in half. Use a smaller pie plate for a mini pie.
Q: Is the lemon zest important? A: It adds a bright little sparkle. But your pie will still be good without it. Which tip will you try first?
A Final Sprinkle of Love from My Kitchen
There you have it, my dear. My classic apple pie with everyday apples. Baking is about sharing warmth and stories. *Fun fact: The smell of baking apples is called a “comfort scent.”* It truly is.
I hope this recipe finds its way to your table. I would love to hear all about your baking adventure. Have you tried this recipe? Tell me how it went in the comments.
Happy cooking!
—Elowen Thorn.

Classic Apple Pie
Description
A timeless and festive Classic Apple Pie, perfect for Christmas, made with a flaky homemade crust and a sweet-tart filling of McIntosh and Granny Smith apples.
Ingredients
Pie Dough:
Apple Filling:
Instructions
- Process flour, sugar, and salt together in food processor until combined, about 5 seconds. Scatter shortening over top and process until mixture resembles coarse cornmeal, about 10 seconds. Scatter butter over top and pulse mixture until it resembles coarse crumbs, about 10 pulses. (To do this by hand, freeze the butter and shortening, grate it into the flour using the large holes of a box grater, and rub the flour-coated pieces between your fingers for a minute until the flour turns pale yellow and coarse.)
- Transfer mixture to large bowl. Sprinkle 6 tablespoons ice water over mixture. Stir and press dough together, using stiff rubber spatula, until dough sticks together. If dough does not come together, stir in remaining ice water, 1 tablespoon at time, until it does. Divide dough into 2 even pieces. Turn each piece of dough onto sheet of plastic wrap and flatten each into 4-inch disk. Wrap each piece tightly in plastic and refrigerate for 1 hour. Before rolling dough out, let it sit on counter to soften slightly, about 10 minutes. (Dough can be wrapped tightly in plastic and refrigerated for up to 2 days or frozen for up to 1 month. If frozen, let dough thaw completely on counter before rolling it out.)
- Roll 1 disk of dough into 12-inch circle on lightly floured counter. Loosely roll dough around rolling pin and gently unroll it onto 9-inch pie plate, letting excess dough hang over edge. Ease dough into plate by gently lifting edge of dough with 1 hand while pressing into plate bottom with other hand. Leave any dough that overhangs plate in place. Wrap dough-lined pie plate loosely in plastic wrap and refrigerate until dough is firm, about 30 minutes. Roll other disk of dough into 12-inch circle on lightly floured counter, then transfer to parchment paper–lined baking sheet; cover with plastic and refrigerate for 30 minutes.
- Adjust oven rack to lowest position, place rimmed baking sheet on rack, and heat oven to 500 degrees.
- Mix 3/4 cup sugar, flour, lemon zest, salt, nutmeg, cinnamon, and allspice together in large bowl. Add lemon juice and apples and toss until combined. Spread apples with their juices into dough-lined pie plate, mounding them slightly in middle. Loosely roll remaining dough round around rolling pin and gently unroll it onto filling. Trim overhang to 1/2 inch beyond lip of pie plate. Pinch edges of top and bottom crusts firmly together. Tuck overhang under itself; folded edge should be flush with edge of pie plate. Crimp dough evenly around edge of pie using your fingers. Cut four 2-inch slits in top of dough. Brush surface with beaten egg white and sprinkle evenly with remaining 1 tablespoon sugar.
- Place pie on heated baking sheet, reduce oven temperature to 425 degrees, and bake until crust is light golden brown, about 25 minutes. Reduce oven temperature to 375 degrees, rotate baking sheet, and continue to bake until juices are bubbling and crust is deep golden brown, 30 to 35 minutes longer. Let pie cool on wire rack to room temperature, about 4 hours. Serve.
Notes
- For a shiny, golden crust, be sure to brush with the egg white and sprinkle with sugar before baking. Letting the pie cool completely is crucial for the filling to set properly.