

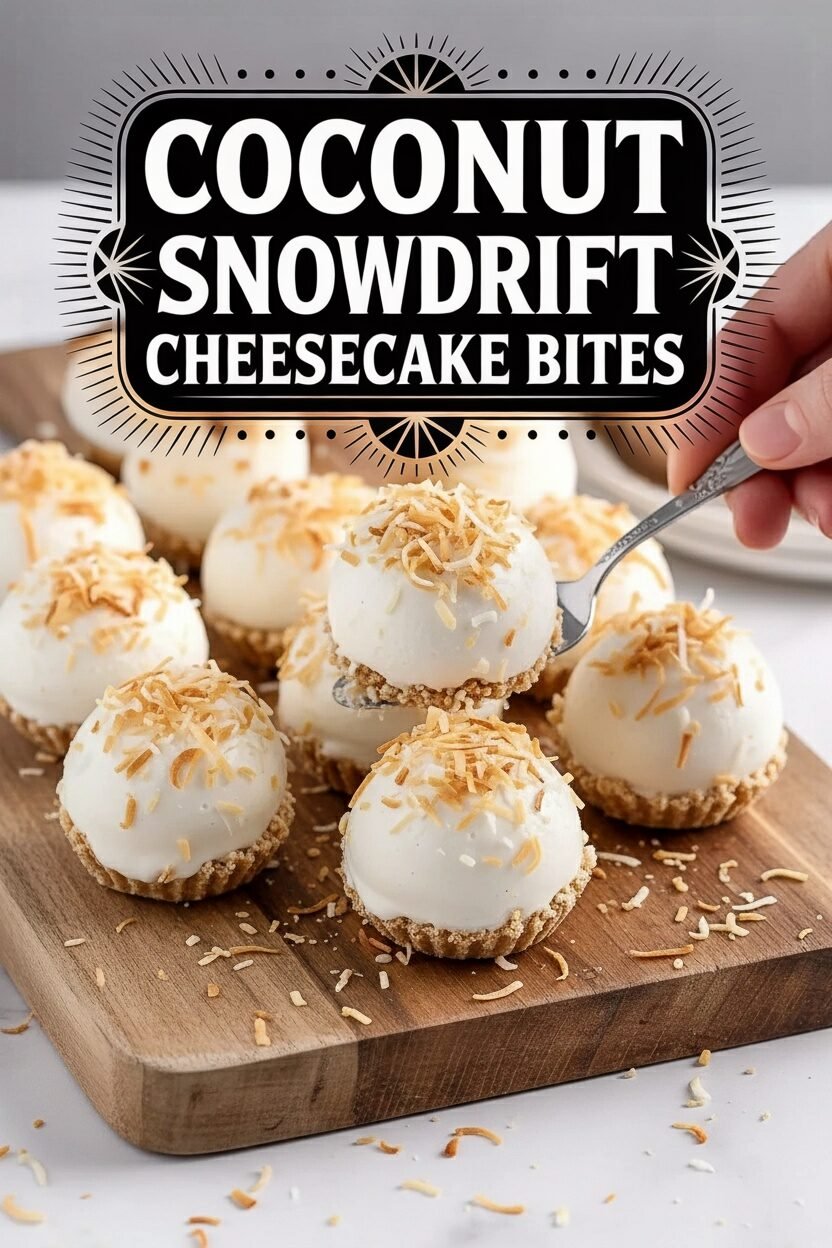
A Sweet Little Cloud of Coconut
Hello, my dear. Come sit. Let’s talk about a happy little treat. These are Coconut Snowdrift bites. They taste like a sweet, creamy cloud. One that landed in a pile of coconut.
I make these for my book club. My friend Margaret ate three last week. She didn’t even share. I still laugh at that. What is your favorite treat to share with friends? I would love to know.
Why We Heat the Cake Mix
Now, the first step seems odd. We heat the cake mix in the microwave. This is very important. It makes the flour safe to eat without baking.
Raw flour can have tiny germs. Heating them up keeps us safe. Fun fact: This is called “heat-treating.” Let it cool completely. Warm mix will melt our cream cheese. And we want a nice, firm dough to roll.
A Story from a Messy Kitchen
My first time, I was in a hurry. I did not let the dough chill. What a sticky, messy adventure. Those cheesecake balls looked like little snow monsters.
Patience matters here. Two hours in the fridge seems long. But it makes the job so easy. Your hands will stay clean. And you’ll get perfect little balls. Do you prefer baking or no-bake treats like these?
The Magic of Coating
Melting the almond bark is my favorite part. It turns so shiny and smooth. Doesn’t that smell amazing? It’s like sweet vanilla.
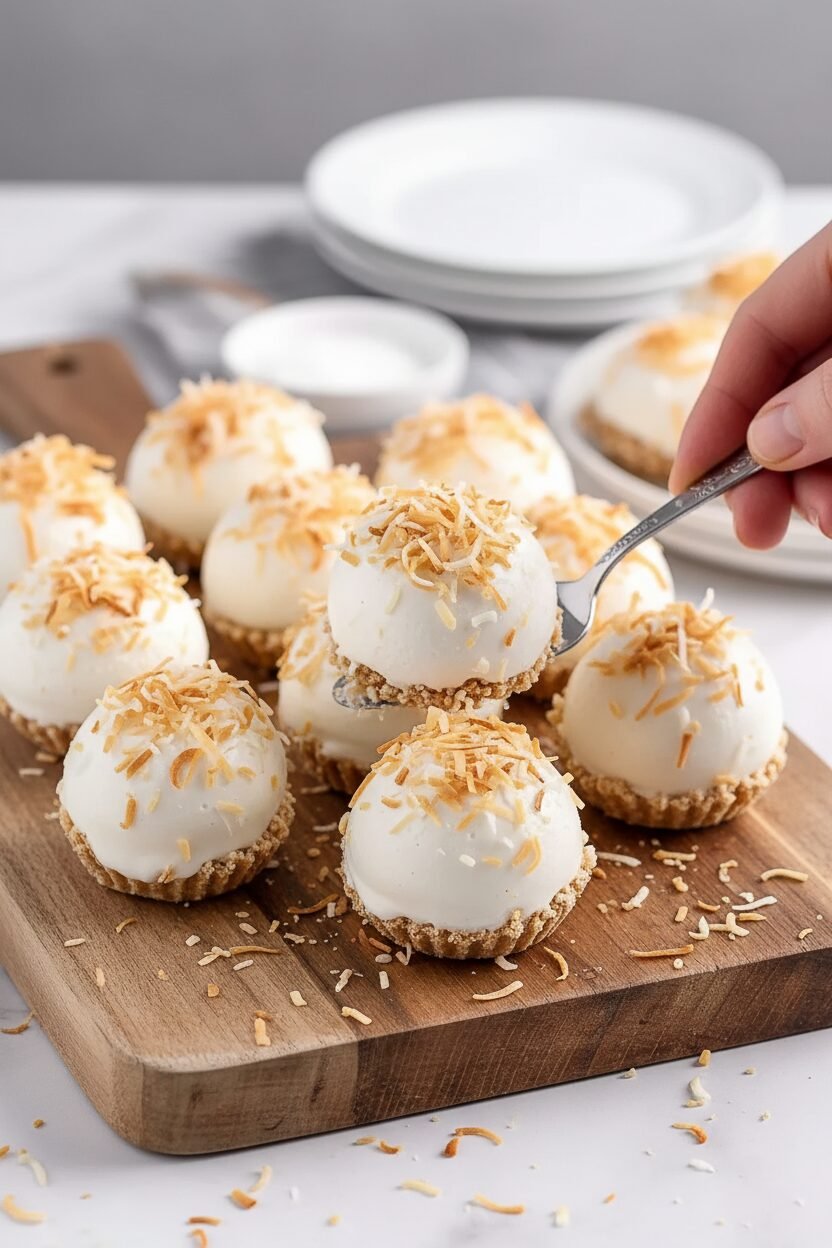
Use a fork to dip each ball. Tap off the extra coating. This gives a thin, crisp shell. It keeps the creamy center safe. Then, roll it in coconut right away. The bark sets fast. This step is fun. It feels like you’re a candy artist.
Why Little Treats Matter
These bites are small. But that is their gift. You can have just one sweet taste. You don’t need a whole big slice.
This matters. It teaches us about enough. A little joy is often just right. It also makes sharing easy. A plate of these makes everyone smile. What small thing made you smile this week? Tell me, if you like.
Making Them Your Own
You can change these up. Try toasting the coconut garnish. It adds a warm, nutty flavor. Just watch it in the pan. It goes from golden to brown very fast.
You could use vanilla coating too. Or add a tiny sprinkle of sea salt on top. Cooking is like a story. You get to write your own ending. The most important ingredient is always your own joy.
Ingredients:
| Ingredient | Amount | Notes |
|---|---|---|
| White cake mix | 15.25 ounces | Heat-treated and cooled |
| Cream cheese | 8 ounces | Softened |
| Half-and-half | 1 tablespoon | |
| Coconut extract | 2 teaspoons | |
| Shredded sweetened coconut | 1 1/3 cups | 1 cup for mixing, 1/3 cup for garnish |
| White almond bark | 12 ounces | Melted for coating |
Instructions
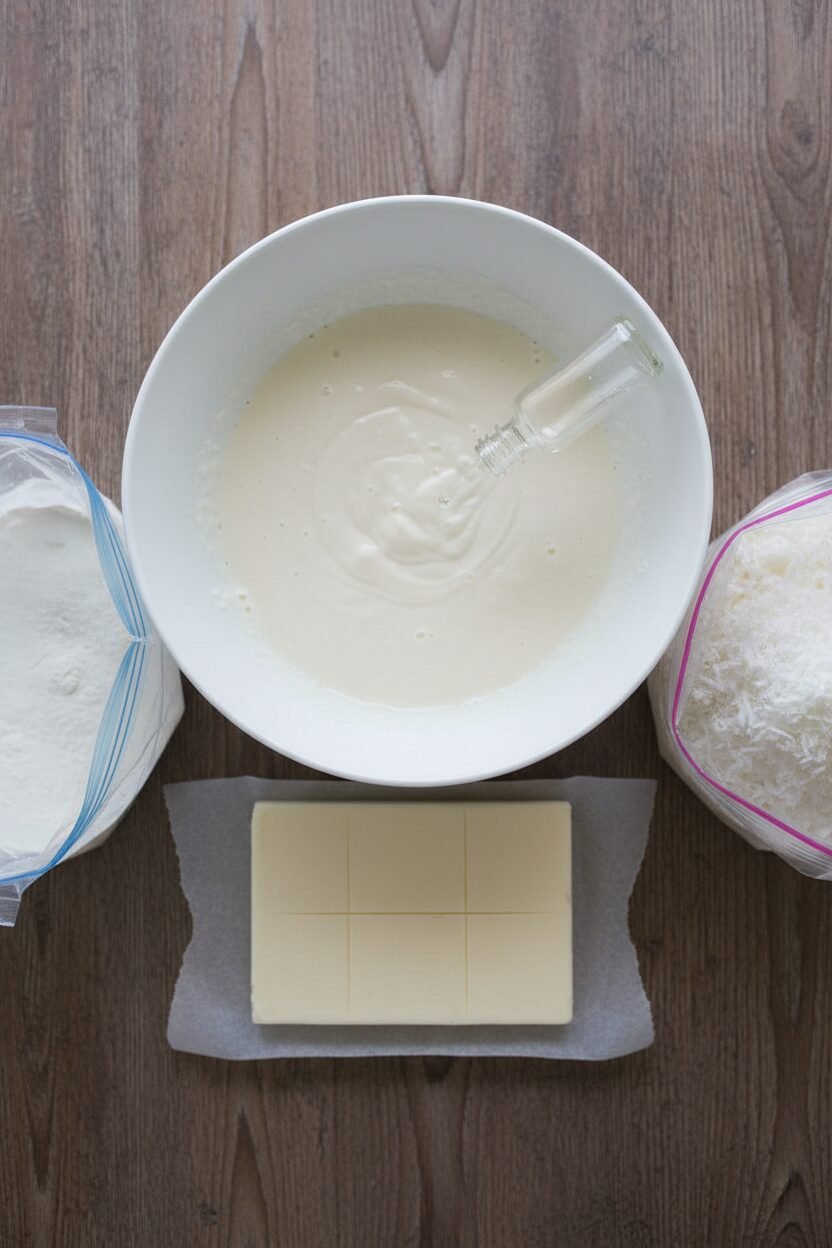
Step 1: First, we make the cake mix safe to eat. Put your dry cake mix in a bowl. Heat it in the microwave for 30 seconds. Stir it well, then heat it for 30 more seconds. Let it cool completely. This is a very important safety step. (Trust me, skipping this gives you a tummy ache!)
Step 2: Now, let’s make the creamy filling. Beat the soft cream cheese, half-and-half, and coconut extract together. Mix until it’s smooth and dreamy. Doesn’t that smell amazing? It reminds me of a tropical vacation. Sprinkle in the cooled cake mix and one cup of coconut. Stir it all together gently.
Step 3: Cover the bowl and put it in the fridge. Let it chill for two hours. This helps the mixture get firm. It will be much easier to roll later. Use this time to clean up! I still laugh at the time I forgot this step. My “balls” were more like puddles.
Step 4: Time to make little snowballs! Line a tray with parchment paper. Use a tablespoon scoop to get the dough. Roll each scoop in your hands. Make them nice and round. Place each ball on your tray. What’s your favorite shape to make with dough? Share below!
Step 5: Melt the almond bark for coating. Do this in a microwave bowl. Heat for 30 seconds, then stir. Repeat until it’s completely smooth. Be careful, the bowl will be warm. (A little coconut oil can thin it if it gets too thick.)
Step 6: Let’s coat our bites. Roll a cheesecake ball in the melted bark. Use a fork to lift it out. Gently tap off the extra coating. Place it back on the tray. Immediately sprinkle with the rest of the coconut. The coconut sticks to the wet bark perfectly.
Step 7: Finally, let them set. Leave the tray on the counter. Wait for the coating to get hard and shiny. This takes about 15 minutes. Then they are ready to share. Try not to eat them all yourself. I know it’s hard!
Creative Twists
You can make these bites your own. It’s so much fun to play with flavors. Here are a few of my favorite ideas. They always surprise my grandchildren.
Try a teaspoon of lemon zest in the filling for a sunny, bright taste.
Roll the finished bites in crushed freeze-dried raspberries for a pink, tangy crust.
Use a milk chocolate coating instead of white for a chocolate-coconut dream.
Which one would you try first? Comment below!
Serving & Pairing Ideas
These little bites are perfect for a party. I love to serve them on a big platter. Scatter some extra toasted coconut around them. It looks like a snowy landscape. For a special touch, add a bowl of fresh pineapple chunks. The sweet and tart fruit is lovely with the creamy coconut.
For drinks, a cup of hot chai tea is wonderful. The spices dance with the coconut. For a grown-up treat, a small glass of chilled coconut rum pairs beautifully. It’s like a vacation in a glass. Which would you choose tonight?
Keeping Your Snowdrift Bites Perfect
These little bites are best kept cool. Store them in a sealed container in the fridge. They will stay happy for about five days. You can also freeze them for a month. Just lay them on a tray first until frozen solid. Then pop them into a freezer bag.
No reheating is needed. Just let a frozen one sit out for ten minutes. I once left a whole batch on the counter overnight. Let’s just say they became a very soft, sweet puddle. Batch cooking these is a wonderful idea. Make a double batch and freeze half. You will thank yourself later when guests drop by.
This matters because good food should be ready for life’s little surprises. A treat in the freezer is a hug for your future self. Have you ever tried storing it this way? Share below!
Little Fixes for Big Smiles
Is your mixture too sticky to roll? Your hands might be too warm. I remember when my first batch melted as I touched it. Just wash your hands in cold water and dry them. The cold helps the dough not stick.
Is the almond bark coating too thick? You can add a tiny spoon of coconut oil. This makes it smoother and easier to dip. Are your balls cracking when you dip them? The cheesecake center is likely too cold. Let it sit out for just five minutes before coating.
Fixing these small things builds your kitchen confidence. It also makes your treats look and taste wonderful. Which of these problems have you run into before?
Your Quick Questions, Answered
Q: Can I make this gluten-free? A: Yes. Use a gluten-free white cake mix. Check that your almond bark is gluten-free too.
Q: How far ahead can I make them? A: The mixture must chill for two hours. You can make the balls a day before coating them.
Q: What can I use instead of coconut extract? A: Vanilla or almond extract works nicely. The flavor will be different but still lovely.
Q: Can I make a smaller batch? A: Absolutely. Just cut all the ingredients in half. It works perfectly.
Q: Any optional tips? A: Toasting the garnish coconut adds a nutty flavor. Fun fact: Toasting coconut brings out its natural oils and sweetness. Which tip will you try first?
From My Kitchen to Yours
I hope you love making these snowy treats. They always remind me of a gentle winter day. Cooking is about sharing joy and sweet moments. I would love to hear about your baking adventure.
Tell me all about it in the comments below. Have you tried this recipe? Your stories are my favorite thing to read. Happy cooking!
—Elowen Thorn.

Coconut Snowdrift Cheesecake Bites
Description
Coconut Cheesecake Bites
Ingredients
Instructions
- Heat Treat the Cake Mix: Place the cake mix in a medium-sized, heat-safe bowl. Microwave it in two 30-second intervals, stirring thoroughly between each interval. Allow the cake mix to cool completely before using it in the recipe to ensure safety.
- Prepare the Cheesecake Mixture: In a medium mixing bowl, combine the softened cream cheese, half-and-half, and coconut extract. Use a handheld mixer on medium-high speed to beat the ingredients until smooth and creamy, approximately 1½ to 2 minutes. Sprinkle the cooled, heat-treated cake mix and 1 cup of shredded coconut over the cream cheese mixture. Mix gently until all ingredients are well incorporated. Cover the bowl tightly and refrigerate the mixture for 2 hours, allowing it to firm up for easier handling.
- Form the Cheesecake Balls: Line a baking sheet with parchment paper and set it aside. Using a 1-tablespoon cookie scoop, portion out the chilled cheesecake mixture. Roll each scoop into a smooth ball between your hands and place it on the prepared baking sheet. Repeat this process for all the dough.
- Prepare the Coating: Place the white almond bark in a microwave-safe bowl. Heat it in 30-second intervals, stirring well after each interval, until fully melted and smooth.
- Coat and Garnish: Roll each cheesecake ball in the melted almond bark, ensuring it is fully coated. Lift the coated ball using a fork and gently tap off any excess coating. Transfer the coated ball back to the parchment-lined baking sheet. Immediately sprinkle the coated ball with the remaining shredded coconut or toasted coconut. Repeat the coating and garnishing process until all cheesecake balls are completed.
- Allow to Set: Let the coated cheesecake bites sit at room temperature until the almond bark hardens completely. Serve immediately or store as needed.