

A Cozy Kitchen Memory
Let me tell you about my grandson, Leo. He always wanted to help in the kitchen. One year, we had so much leftover turkey. He looked at it and said, “We can’t just eat sandwiches, Nana.” So we got creative. We made these little turkey balls together. I still laugh at that messy, happy afternoon.
Now, these are my go-to for using up holiday turkey. They feel special, not like leftovers. That matters. It turns “what’s left” into a new treat everyone loves. What’s your favorite way to use up leftover turkey? Do you have a kitchen helper like my Leo?
Why These Little Balls Work
These are simple to put together. You just mix everything in one bowl. The egg and broth hold it all together. They bake up nice and golden. Doesn’t that smell amazing? It fills the whole house with a cozy feeling.
They are perfect for little hands to help shape. This is a great first recipe for a young cook. *Fun fact: the bread crumbs soak up all the good flavors from the broth and herbs.* That’s what makes them so tasty inside and out.
The Magic of Sweet and Savory
Let’s talk about the cranberries. They are the secret. The turkey and herbs are savory. That means they are hearty and warm-tasting. Then you get a little pop of sweet tartness from a cranberry.
It makes your mouth happy. Every bite is interesting. This matters because food should be a small adventure. It should make you smile. Do you prefer sweet things or savory things in your main dishes? I love a little of both.
Shaping and Baking with Love
Use your hands for this part. Get the mixture to hold together when you squeeze it. If it feels too dry, add a tiny splash more broth. Roll them gently. They don’t have to be perfect. My first batch was all different sizes!
Space them out on your pan. They need room for their bottoms to get crispy. When they come out, let them rest a minute. This matters. It lets them set so they don’t fall apart when you pick one up. Then, dig in.
Serving Your Creation
These are wonderful all by themselves. They are also great with a little gravy for dipping. Or try them with a side of cranberry sauce. It doubles down on that sweet-tart flavor we love.
They are good warm from the oven. They are also good later, packed in a lunchbox. I think they taste even better the next day. What would you serve with them? Mashed potatoes, or maybe a simple green salad? Tell me your favorite pairings.
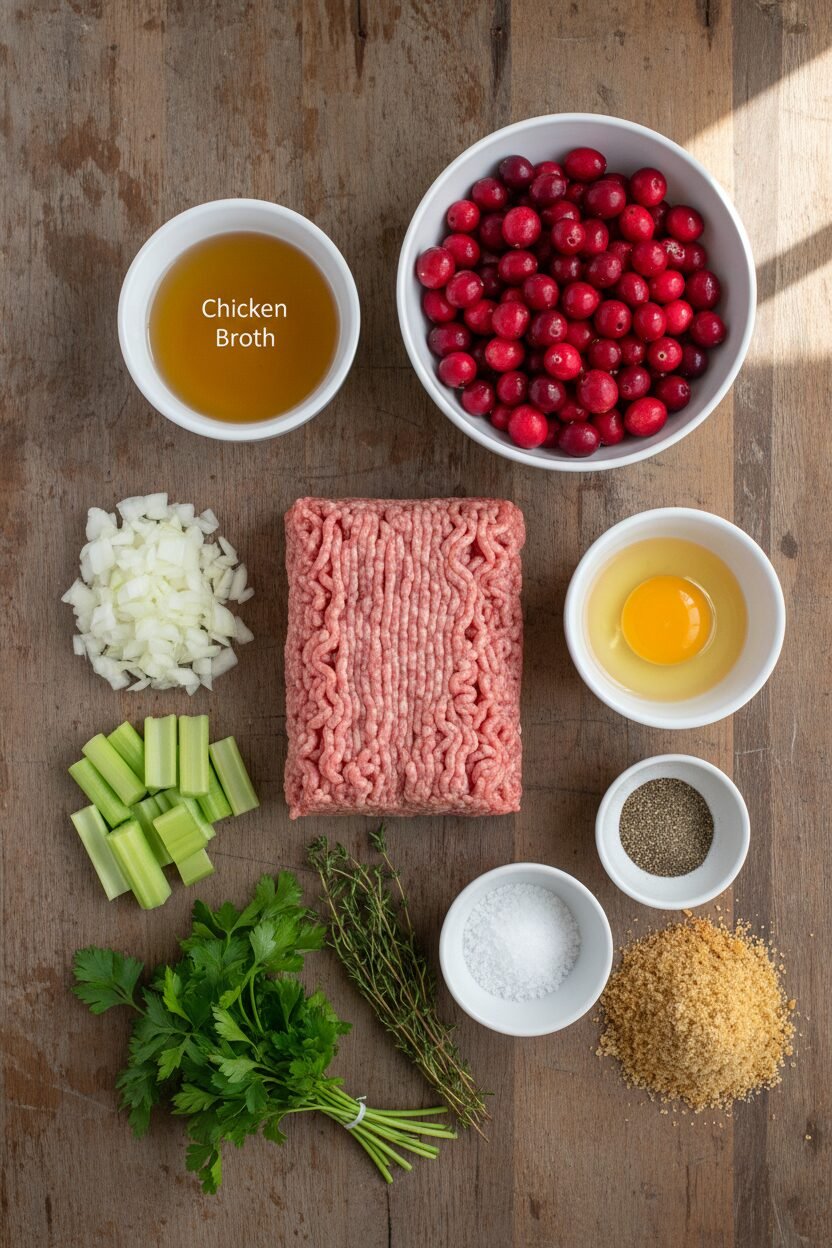
Ingredients:
| Ingredient | Amount | Notes |
|---|---|---|
| bread crumbs | 2 cups | |
| cooked turkey | 1 cup | shredded |
| dried cranberries | ½ cup | chopped |
| onion | ½ cup | finely diced |
| celery | ½ cup | diced |
| fresh parsley | ¼ cup | chopped |
| chicken broth | ¼ cup | |
| dried thyme | 1 teaspoon | |
| salt | 1 teaspoon | |
| black pepper | ½ teaspoon | |
| egg | 1 large |
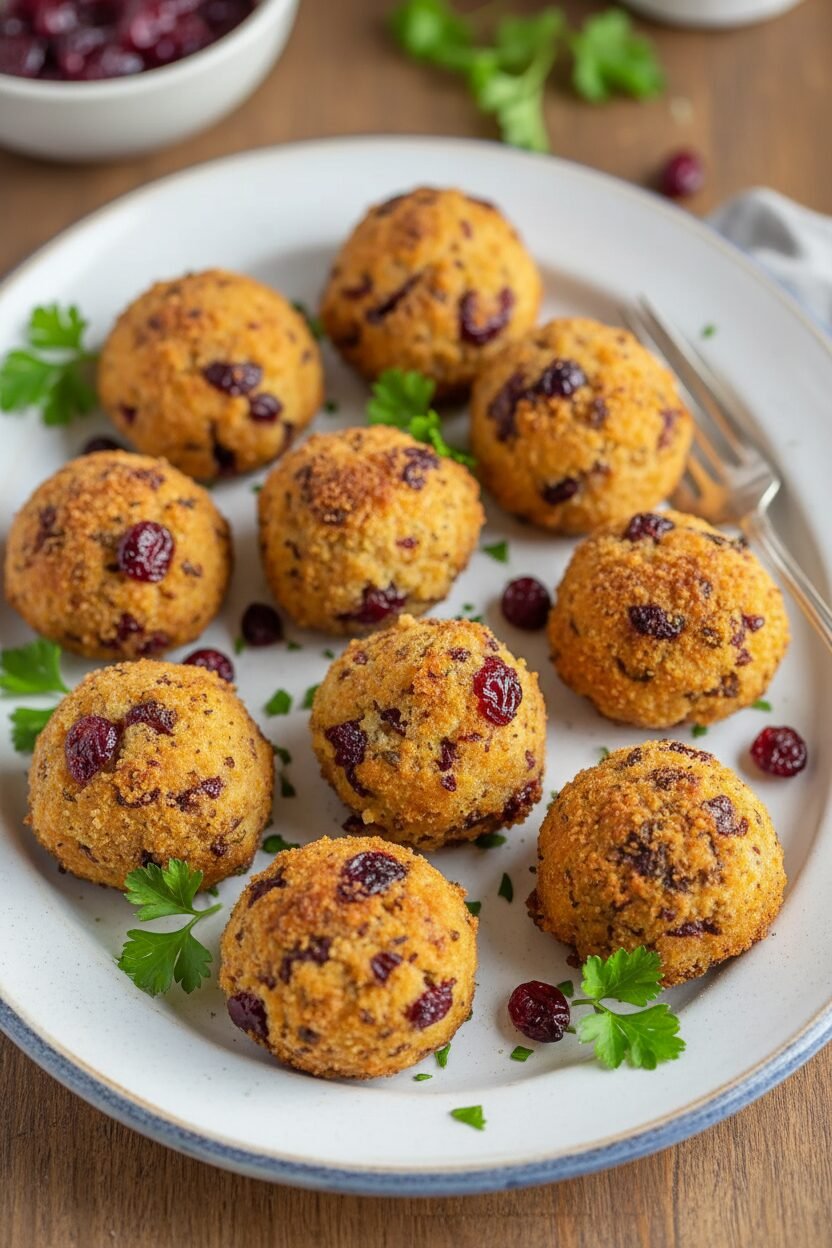
Cranberry Stuffed Turkey Balls
Hello, my dear. Come sit at the counter. Let’s make something cozy. These are little bites of Thanksgiving, any day of the year. They remind me of my grandson, Finn. He always sneaks one before dinner. I still laugh at that.
We use leftover turkey here. It feels good not to waste a thing. The cranberries are like little sweet surprises. Doesn’t that smell amazing? It’s the smell of a happy kitchen. You are making a memory, right now.
Instructions
- Step 1: First, get your oven ready. Heat it to 375 degrees. Line a baking sheet with parchment paper. This keeps our little balls from sticking. (This tip saves so much scrubbing later!). Ready to mix?
- Step 2: Now, let’s combine the dry bits. In a big bowl, add bread crumbs and turkey. Toss in the cranberries, onion, and celery. Don’t forget the fresh parsley! Mix it all with your clean hands. Feel the different textures? That’s how you know it’s right.
- Step 3: Time for the glue! Sprinkle the thyme, salt, and pepper. Crack in the egg and pour the broth. Stir everything until it holds together. Think of making a snowball. What’s your favorite part to mix? Share below! Let it sit for five minutes.
- Step 4: Let’s shape them. Scoop about two tablespoons of mix. Roll it gently between your palms. Make it a nice, round ball. Place each one on your prepared sheet. Give them a little space to breathe.
- Step 5: Into the oven they go! Bake for about 25 minutes. You’ll know they’re done when they’re golden brown. Let them cool just a bit before eating. The smell is simply wonderful. Now, the hardest part is waiting.
Creative Twists
Swap turkey for leftover chicken. It works just as beautifully.
Add a tiny cube of cheese inside. A melty, gooey surprise!
Use sage instead of thyme. It smells like a holiday walk.
Which one would you try first? Comment below!
Serving & Pairing Ideas
Serve these warm with a simple gravy for dipping. A side of buttery mashed peas is perfect. Or, put them on a bed of fluffy rice. For a drink, a crisp apple cider is lovely. Grown-ups might enjoy a glass of chilled white wine. Which would you choose tonight?
Keeping Your Turkey Balls Cozy for Later
Let’s talk about saving some for tomorrow. These stuffing balls keep well. Let them cool completely first. Then pop them in a sealed container in the fridge. They will be happy there for three days.
You can freeze them too. I freeze them on a tray first. Then I bag them up. This way they don’t stick together. They can live in your freezer for a month. I once froze a batch for my grandson’s surprise visit. He was so pleased!
To reheat, use your oven. Warm them at 350°F until hot. This keeps them crispy. Batch cooking matters. It gives you a ready-made treat on a busy day. Have you ever tried storing it this way? Share below!
Simple Fixes for Common Hiccups
Is your mixture too dry? Add one more tablespoon of broth. Is it too wet? Add a sprinkle more breadcrumbs. You want it to hold together nicely.
Are your balls falling apart? Squeeze the mixture firmly when shaping. I remember when mine crumbled. I just pressed them tighter. They baked up perfectly. Why does this matter? A good bind means a better bite.
Not browning enough? Place them near the top of the oven. This gives them a lovely golden color. Good color means great flavor. It makes you feel proud of your cooking. Which of these problems have you run into before?
Your Quick Questions, Answered
Q: Can I make these gluten-free? A: Yes! Use your favorite gluten-free bread crumbs. It works just the same.
Q: Can I make them ahead? A: Absolutely. Mix and shape them a day early. Keep them covered in the fridge until baking.
Q: What can I swap for cranberries? A: Try chopped apples or raisins. They add a nice little sweet touch.
Q: Can I double the recipe? A: You sure can. Just use two baking sheets. Give them a little more space to cook evenly.
Q: Any optional tips? A: Brush them with melted butter before baking. This makes them extra golden and delicious. Which tip will you try first?
From My Kitchen to Yours
I hope you enjoy making these little bites. They are full of cozy flavor. My kitchen always smells wonderful when they bake.
I love hearing your stories. Tell me about your cooking adventures. Have you tried this recipe? Let me know how it went in the comments. I read every one.
Happy cooking! —Elowen Thorn.


Cranberry Stuffed Turkey Balls
Description
These savory and slightly sweet stuffing balls are packed with shredded turkey, bread crumbs, dried cranberries, and aromatic herbs. Perfect as a side dish or appetizer.
Ingredients
Instructions
- Preheat the oven to 375°F (190°C). Line a baking sheet with parchment paper to ensure even cooking and prevent sticking.
- In a large mixing bowl, combine the bread crumbs, shredded turkey, dried cranberries, diced onion, diced celery, and chopped parsley. Mix until the ingredients are evenly distributed.
- Sprinkle the dried thyme, salt, and black pepper over the mixture. Add the chicken broth and egg. Stir thoroughly until the mixture is cohesive and holds together when pressed.
- Using approximately two tablespoons of the mixture per piece, form the stuffing into uniform balls. Place them evenly spaced on the prepared baking sheet.
- Bake for 25 minutes, or until the stuffing balls are golden brown and cooked through. Remove from the oven and allow to cool slightly before serving.
- Serve warm, accompanied by gravy or cranberry sauce if desired.
Notes
- For a crispier exterior, lightly spray or brush the stuffing balls with oil before baking. These can be made ahead and reheated in the oven.