

My Rocky Road Memory
I first made these brownies for a snowy Christmas Eve. My grandson Sam helped. He dropped marshmallows everywhere. I still laugh at that.
The kitchen smelled of chocolate and toasted sugar. We ate them warm by the tree. That is why this matters. Food made together tastes sweeter.
Why We Mix Wet and Dry
Let’s talk about the batter. You melt the butter and cocoa together first. This makes the chocolate flavor deep and rich. Doesn’t that smell amazing?
Then you add the dry stuff. Mix it gently. Too much stirring makes tough brownies. We want them fudgy and soft.
The Topping is the Best Part
Here is the fun part. As soon as the brownies bake, you add the toppings. The heat from the pan starts to melt everything. It’s magic.
Then you pop them under the broiler. Watch them closely! The marshmallows puff and turn gold. The almonds get toasty. *Fun fact: The name “rocky road” comes from the bumpy look of the toppings!*
A Little Patience for Perfect Slices
I know you want to eat them right away. But wait. Let the pan cool for a bit. Then, I put mine in the fridge.
Twenty minutes makes all the difference. The chocolate sets. You get clean, pretty squares. This is my secret for neat brownies. Do you like yours gooey or set?
Make It Your Own Story
You can change this recipe. Use walnuts instead of almonds. Try dark chocolate chips. It is your kitchen story now.
That is the second reason this matters. Recipes are just friendly guides. Your hands make them special. What is your favorite thing to add to brownies? Tell me next time.
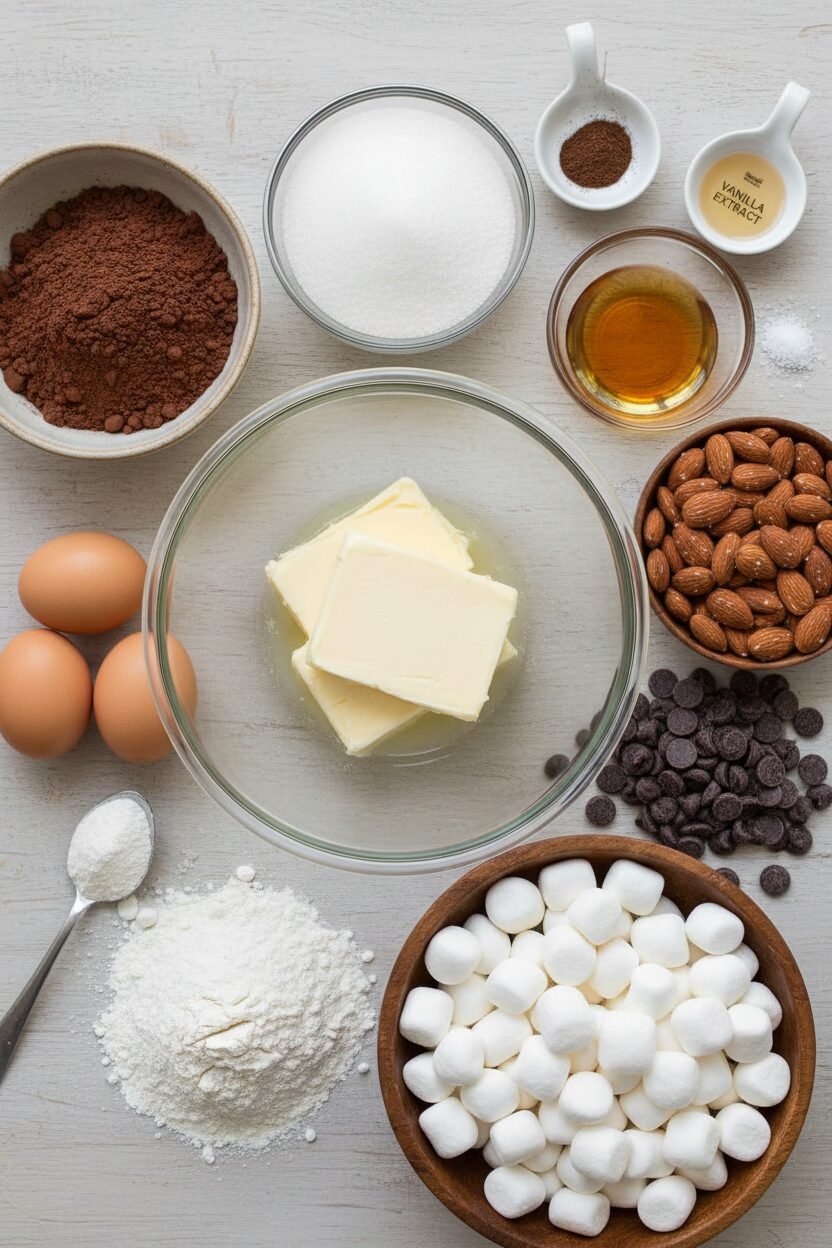
Ingredients:
| Ingredient | Amount | Notes |
|---|---|---|
| Unsalted butter | 8 tablespoons (1 stick) | |
| Unsweetened cocoa powder | 1/3 cup | |
| Granulated sugar | 1 cup | |
| Espresso powder | 1 teaspoon | Optional |
| Vanilla extract | 1 teaspoon | |
| Large eggs | 2 | |
| All-purpose flour | 1 cup | |
| Baking powder | 1/2 teaspoon | |
| Table salt | 1/4 teaspoon | |
| Miniature marshmallows | 1 cup | For topping |
| Roasted salted almonds | 1/2 cup | Coarsely chopped, for topping |
| Semi-sweet chocolate chips | 1/2 cup | For topping |
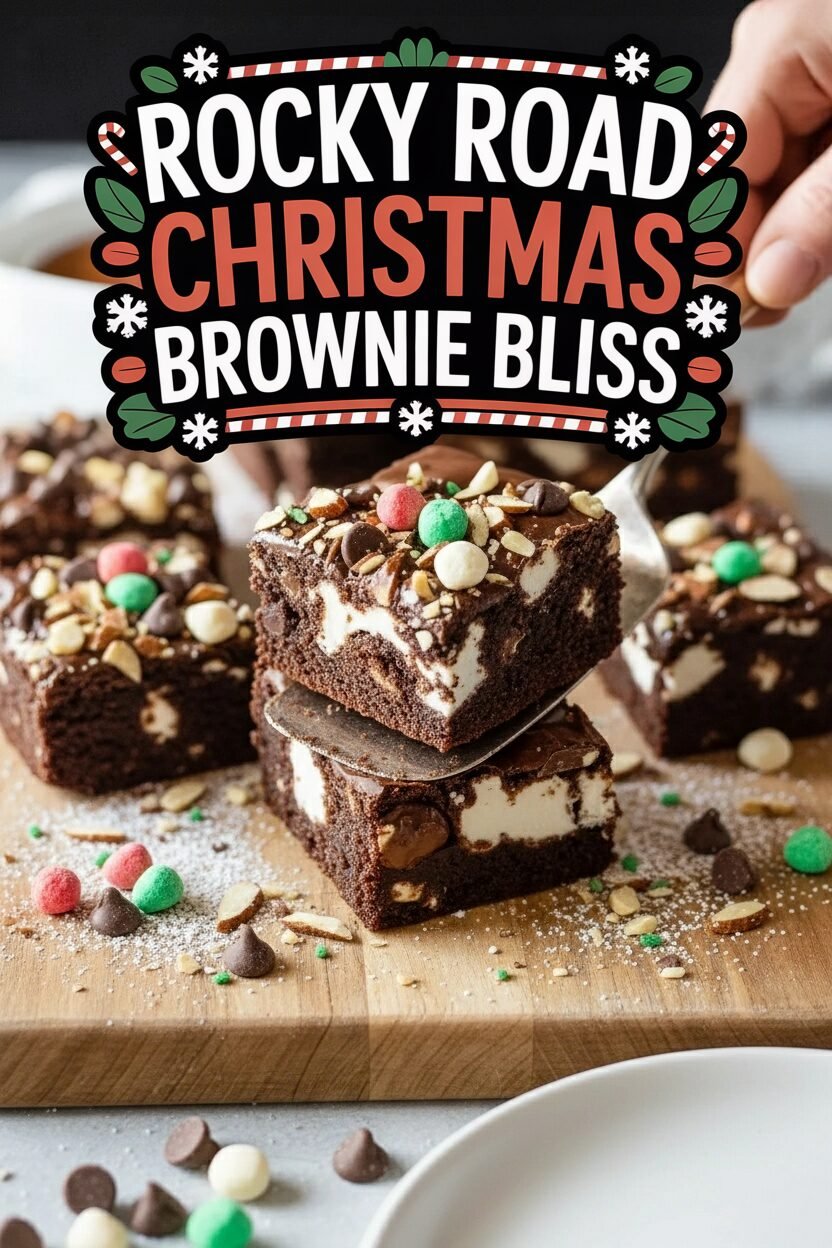
Rocky Road Christmas Brownie Bliss
Hello, my dear. Come sit at the counter. Let’s make something magical. These brownies are pure Christmas joy. They are fudgy, crunchy, and gooey all at once. I always make them for my grandkids. Their eyes get so wide when they see the toasted marshmallows. Doesn’t that smell amazing? It reminds me of snowy evenings by the fire. Baking is about sharing warmth. Let’s create some together.
Instructions
Step 1: First, turn your oven to 350°F. Grease your square pan well. I use my fingers and a bit of butter. Lining it with parchment paper is a smart trick. It makes lifting the brownies out so easy later. (A little overhang on two sides is your best friend here).
Step 2: Now, melt the butter and cocoa together. Just microwave it in short bursts. Stir until it’s smooth and dark. It will look like glossy mud. Stir in the sugar and vanilla next. The smell is already wonderful. What holiday flavor does cocoa remind you of? Share below!
Step 3: Crack in the eggs, one at a time. Stir very well after each one. The mix will get thick and shiny. I still laugh at the time I forgot to stir properly. We got funny streaks in our batter! Now, gently fold in the flour, baking powder, and salt. Just mix until you no longer see white flour.
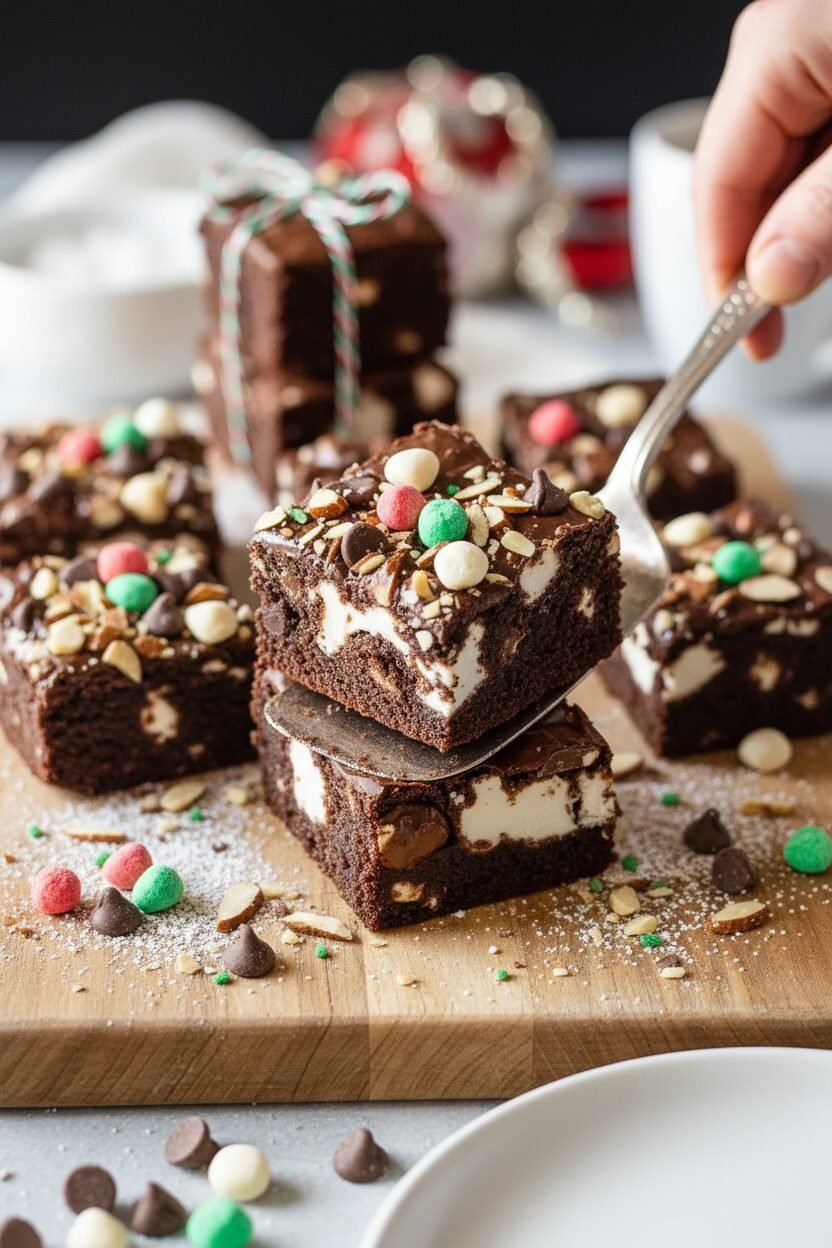
Step 4: Pour your batter into the pan. Bake for about 25 minutes. You’ll know it’s ready when the edges pull away. A toothpick should have a few moist crumbs. (Don’t overbake them, or they lose their fudgy heart). Pull the pan from the oven. Quickly cover the top with marshmallows, almonds, and chocolate chips.
Step 5: Last step! Turn your oven to broil. Watch carefully now. Broil just until the marshmallows turn golden. It only takes a minute or two. Let the pan cool for 20 minutes. For the cleanest slices, pop it in the fridge for a bit. Then lift, slice, and enjoy the bliss.
Creative Twists
Use peppermint chips instead of chocolate chips. It makes them taste like a candy cane! Swap the almonds for crushed pretzels. You get a lovely sweet and salty crunch. Add a handful of dried cranberries. They look like little ruby jewels in the topping. Which one would you try first? Comment below!
Serving & Pairing Ideas
Serve these warm with a scoop of vanilla ice cream. The cold cream melts into the gooey brownie. You could also add a drizzle of caramel sauce on the plate. For a drink, a glass of cold milk is always perfect. For the grown-ups, a small glass of cherry port wine pairs beautifully. It’s like a cozy holiday hug in a glass. Which would you choose tonight?
Keeping Your Rocky Road Bliss
These brownies keep well for three days. Just cover the pan tightly. I use a tea towel. For longer storage, freeze them. Cut the squares first and wrap each one. This stops them from sticking together. I learned this the hard way. My first batch became one big brownie brick!
To reheat, just pop a square in the microwave for ten seconds. It makes the marshmallows soft again. You can also warm it in a toaster oven. Batch cooking saves so much time during the busy holidays. It means you always have a sweet treat ready for guests. Have you ever tried storing it this way? Share below!
Simple Fixes for Common Hiccups
Is your brownie too cakey? You might have mixed the batter too much. Stir the flour just until you see no more white. I once over-mixed and got a brownie that tasted like chocolate cake. It was good, but not what we wanted.
Did the marshmallows burn? Always watch the broiler step closely. It only takes a minute. Open the oven door to peek. Are your nuts sinking to the bottom? Toss them in a little flour first. This helps them stay put in the batter.
Getting these little things right builds your kitchen confidence. It also makes the flavor and texture just perfect. Which of these problems have you run into before?
Your Quick Questions, Answered
Q: Can I make these gluten-free?
A: Yes! Use a one-to-one gluten-free flour blend. It works just fine.
Q: Can I make them ahead?
A: Absolutely. Bake them a day before. Add the topping right before you serve.
Q: What can I swap for almonds?
A: Try pretzel pieces or peanuts. Use what you love. *Fun fact: The “rocky road” name comes from the bumpy look of the toppings!*
Q: Can I double the recipe?
A: For sure. Use a 9×13 inch pan. Just add a few more minutes to the bake time.
Q: Is the espresso powder important?
A: It’s optional. It just makes the chocolate taste richer. You won’t taste coffee. Which tip will you try first?
From My Kitchen to Yours
I hope you love making these as much as I do. The smell fills the house with joy. It reminds me of my grandchildren’s smiling faces. I would love to hear about your baking adventure. Did you add your own special twist? Have you tried this recipe? Please tell me all about it in the comments below. Happy cooking!
—Elowen Thorn.

Rocky Road Christmas Brownie Bliss
Description
Fudgy brownies topped with a festive layer of toasted marshmallows, chocolate chips, and salted almonds.
Ingredients
Instructions
- Preheat the oven to 350°F (175°C). Grease a 9-inch square baking pan thoroughly with butter or non-stick cooking spray. For easier removal, line the pan with parchment paper, allowing an overhang on two sides.
- In a microwave-safe bowl, combine the unsalted butter and unsweetened cocoa powder. Microwave in 30-second intervals, stirring after each interval, until the mixture is smooth and glossy. Once melted, stir in the granulated sugar, espresso powder (if using), and vanilla extract until fully incorporated.
- Add the eggs to the cocoa mixture, one at a time, stirring well after each addition until the mixture becomes thick and shiny.
- Sift together the all-purpose flour, baking powder, and table salt. Gradually fold the dry ingredients into the wet mixture, stirring gently until just combined. Avoid over-mixing to maintain a tender, fudgy texture.
- Pour the batter into the prepared baking pan and spread it evenly with a spatula. Bake for 20 to 25 minutes, or until the edges begin to pull away from the sides of the pan and a toothpick inserted into the center comes out with moist crumbs.
- Immediately after removing the brownies from the oven, evenly distribute the miniature marshmallows, chopped almonds, and semi-sweet chocolate chips over the surface of the warm brownies.
- Adjust the oven setting to broil. Position the pan approximately 8 inches from the broiler element. Broil the brownies for 1 to 2 minutes, or until the marshmallows are lightly toasted and golden brown. Monitor closely to prevent burning.
- Remove the brownies from the oven and allow them to cool in the pan for 20 minutes. For cleaner slices, refrigerate the pan for an additional 20 to 30 minutes. Once set, loosen the brownies from the sides using a bench scraper or knife coated with non-stick spray. Lift out using the parchment overhang and cut into squares.
Notes
- For best results, use a metal pan for even baking. The brownies will continue to set as they cool. Store in an airtight container at room temperature for up to 3 days.