

A Sweet Swap for the Holidays
Hello, my dear. Come sit a spell. I want to tell you about my holiday cookies. They are sweet, but not too sweet. I use coconut sugar. It has a lovely, warm taste. It reminds me of brown sugar and caramel. Doesn’t that smell amazing?
This swap matters. It lets us enjoy a treat without that sharp sugar rush. The flavor is deep and cozy. It feels like a hug from the inside. What is your favorite holiday cookie shape? I always make stars and little trees.
The Secret in the Grinder
First, we grind the coconut sugar. This is the big trick. Coconut sugar can be a bit gritty. Grinding it makes it soft and powdery. Your cookies will be smooth, not sandy. I learned this the hard way one year. My grandson said the cookies felt like they had “tiny sweet rocks” in them. I still laugh at that.
Fun fact: Coconut sugar comes from the sap of flower buds, not the coconut itself! Isn’t that neat? Now, you mix it with flour and salt. Then comes the butter and a touch of cream cheese. This makes the dough rich and tender.
A Little Patience Makes Perfect
This dough needs a rest in the cold. Wrap it up and let it sit. This matters because it makes the dough easy to roll. If you rush, it will stick and fight you. I use this time to clean my mixing bowl. Or to have a nice cup of tea.
When you roll it out, keep it between parchment paper. No extra flour is needed. Then chill the sheet again. This keeps your shapes sharp. Do you like to make a big mess with flour when you roll dough? I sure do.
The Magic Oven Rap
Here is the fun part. Bake the cookies for five minutes. They will puff up. Take the pan out. Now, hold it flat and rap it firmly on the oven door. It makes a little thump sound. The puffed cookies will flatten right down.
This gives you a crisp, even cookie. It’s my favorite step. It feels like a little kitchen magic. Put them back in to finish baking. Your house will smell wonderful. What is the best smell in your kitchen during the holidays?
The Shiny Finish
While they cool, make the glaze. Grind more coconut sugar with a bit of cornstarch. Mix it with soft cream cheese and milk. It makes a pretty, shiny drizzle. Let it set for a few hours. It will harden just enough.
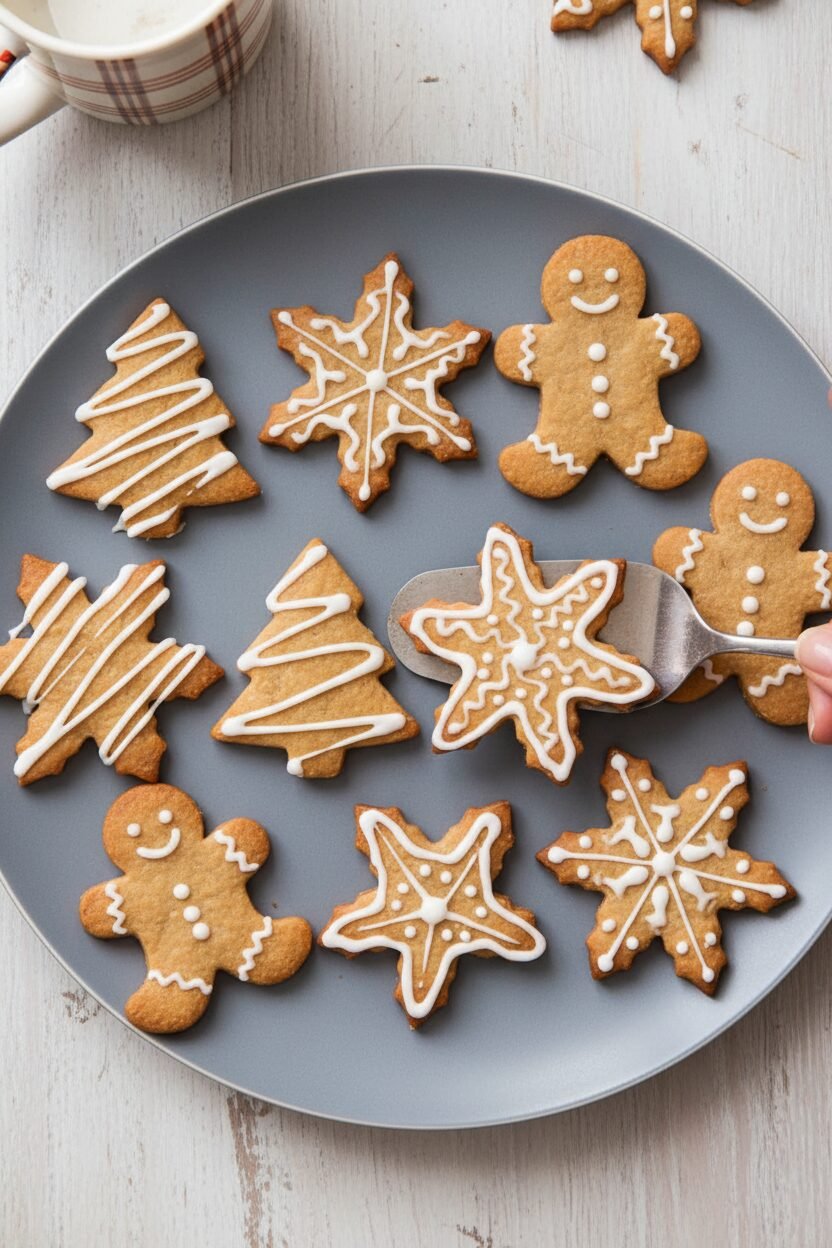
Decorating is the best. You can drizzle or draw. No two cookies look the same. That is their charm. Sharing these cookies matters. It’s about sharing a moment, not just a sweet. It’s a gift made with your own hands.
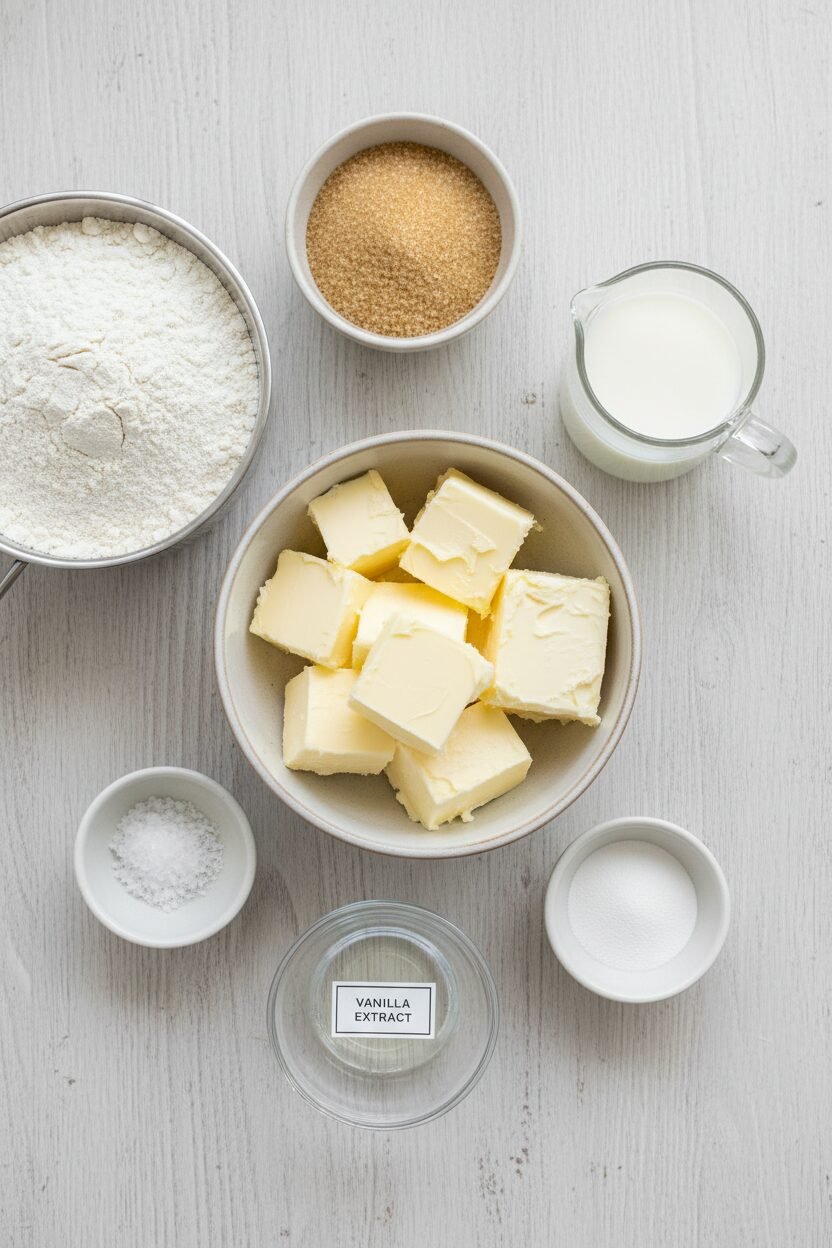
Ingredients:
| Ingredient | Amount | Notes |
|---|---|---|
| Coconut sugar | ⅓ cup plus ¼ cup (2⅔ oz / 75g) | For the cookies |
| All-purpose flour | 2½ cups (12½ oz / 354g) | |
| Salt | ⅛ teaspoon | |
| Unsalted butter | 16 tablespoons, cut into 16 pieces | Softened |
| Cream cheese | 2 tablespoons | Softened; for the cookies |
| Vanilla extract | 2 teaspoons | |
| Coconut sugar | ½ cup plus 2 tablespoons (3 oz / 85g) | For the glaze |
| Cornstarch | 4 teaspoons | |
| Cream cheese | 2 tablespoons | Softened; for the glaze |
| Milk | 1–2 tablespoons | As needed for glaze consistency |
| Salt | ⅛ teaspoon | For the glaze |
Instructions
Step 1: First, let’s make our sugar fine. Grind the coconut sugar in a spice grinder. Do this in two small batches. It should look like fluffy powder. Now, mix that sugar with your flour and salt. Use your mixer’s low speed. It just needs to be combined.
Step 2: Add the soft butter, one piece at a time. Keep mixing on low. You want little pea-sized bits of butter left. Then, add the cream cheese and vanilla. Mix just until big, soft clumps form. It’s a bit like magic!
Step 3: Dump the dough onto your counter. Gently knead it into one smooth ball. Divide it into two equal pieces. Flatten each into a disk. Wrap them in plastic and chill. (Chilling makes rolling so much easier, trust me!).
Step 4: Heat your oven to 375 degrees. Roll one dough disk between two parchment sheets. Make it about as thick as a coin. Slide it onto a pan and chill again for 20 minutes. Then, cut out your shapes! What’s your favorite cookie cutter shape? Share below!
Step 5: Bake one sheet at a time. After 5 minutes, pull them out. They’ll be puffy. Now, give the pan a firm tap on the oven door! This makes them flat and pretty. Bake a few minutes more until the edges are golden. Let them cool completely.
Step 6: For the glaze, grind more coconut sugar into powder. Whisk it with cornstarch. In another bowl, mix cream cheese, a splash of milk, and salt. Combine everything until it’s smooth and drizzly. Drizzle it over your cool cookies. Let the glaze set for a few hours. Doesn’t that smell amazing?
Creative Twists
These cookies are a wonderful blank canvas. You can make them your own so easily. A little change makes a whole new treat. I love seeing what folks come up with. It reminds me of my own grandkids in the kitchen.
Add a teaspoon of orange zest to the dough. It gives a sunny, bright flavor. Mix a pinch of cinnamon into the glaze. It tastes like a cozy holiday hug. Press a dried cranberry into the center before baking. It’s a sweet, tart little jewel. Which one would you try first? Comment below!
Serving & Pairing Ideas
These cookies are perfect for a special plate. I always use my old china. It makes everything feel like a party. Try stacking them with a dusting of powdered sugar between layers. Or serve them with a bowl of fresh, tart berries. The sweet and tart is lovely together.
For a drink, a cup of hot spiced apple cider is my favorite. It just belongs with cookies. For a grown-up sip, a glass of sweet sherry pairs beautifully. It’s a classic combination. Which would you choose tonight?
Keeping Your Cookie Joy
These cookies keep their cheer for days. Store them in a tin at room temperature. Layer them with parchment paper so the glaze stays pretty.
You can freeze the baked cookies for a month, too. Just tuck them into a freezer bag. Thaw them on the counter when you need a sweet bite.
I remember my first batch. I left them out uncovered. They went soft overnight! A simple tin fixed that forever.
Batch cooking matters. It lets you spread holiday cheer over many days. You are not rushed in the kitchen.
Have you ever tried storing cookies in a tin? Share your tip below!
Cookie Troubles? Easy Fixes Here
Is your dough too sticky? Chill it longer. A firm, cold dough is much easier to roll. I once tried to rush this step. What a messy counter!
Do cookies spread too much? Make sure your oven is fully hot. Also, chill the cut shapes before baking. This keeps their lovely shape.
Is the glaze too thick? Just add a few drops of milk. Stir until it drips nicely from your spoon. Getting the glaze right matters. It makes your cookies look special and taste wonderful.
Fixing small problems builds your cooking confidence. You learn that most mistakes have a simple solution. Which of these problems have you run into before?
Your Quick Questions, Answered
Q: Can I make these gluten-free?
A: Yes! Use a good gluten-free flour blend. The results will be just fine.
Q: How far ahead can I make the dough?
A: You can keep it wrapped in the fridge for three days. This is a great make-ahead step.
Q: What can I use instead of coconut sugar?
A: Light brown sugar will work in a pinch. The flavor will be a little different, but still good.
Q: Can I double this recipe?
A: You can, but mix it in two separate batches. This ensures everything mixes evenly.
Q: Any fun decorating tips?
A: Before the glaze sets, add a sprinkle of cinnamon. It looks like fallen snow. A little cinnamon looks like a dusting of snow!
Which tip will you try first?
From My Kitchen to Yours
I hope you love making these cookies. The kitchen is my favorite place for making memories.
I would love to hear about your baking adventure. Tell me all about it in the comments.
Have you tried this recipe? I can’t wait to hear your story.
Happy cooking!
—Elowen Thorn.


Sugar-Spared Holiday Cookie Collection
Description
A festive collection of cut-out cookies sweetened with coconut sugar, featuring a tender, slightly tangy dough and a creamy, drizzle-able glaze.
Ingredients
Cookies:
Glaze:
Instructions
- For the cookies: Working in 2 batches, grind coconut sugar in spice grinder until fine and powdery, about 1 minute. Using stand mixer fitted with paddle, mix ground sugar, flour, and salt together on low speed until combined, about 1 minute. Add butter, 1 piece at a time, and mix until only pea-size pieces remain, about 1 minute. Add cream cheese and vanilla and mix until dough just begins to form large clumps, about 30 seconds.
- Transfer dough to clean counter, knead until dough forms cohesive mass, then divide into 2 equal pieces. Shape each piece into 4-inch disk, then wrap in plastic wrap and refrigerate until firm, at least 30 minutes or up to 3 days.
- Adjust oven rack to middle position and heat oven to 375 degrees. Working with 1 piece of dough at a time, roll ⅛ inch thick between 2 sheets of parchment paper. Slide dough, still between parchment, onto baking sheet and refrigerate until firm, about 20 minutes.
- Line 2 baking sheets with parchment. Working with 1 sheet of dough at a time, remove top sheet of parchment and cut dough as desired using cookie cutters; space ¾ inch apart on prepared sheets. (Dough scraps can be patted together, chilled, and rerolled once.)
- Bake cookies, 1 sheet at a time, until lightly puffed but still underdone, about 5 minutes. Remove partially baked cookies from oven and, holding sheet firmly with both hands, rap pan flat against open oven door 3 to 5 times until puffed cookies flatten. Rotate pan, return cookies to oven, and continue to bake until light golden brown around edges, 4 to 6 minutes longer. Let cookies cool completely on sheet.
- For the glaze: Working in 2 batches, grind coconut sugar in spice grinder until fine and powdery, about 1 minute. Whisk ground sugar and cornstarch together in small bowl. In separate bowl, whisk cream cheese, 1 tablespoon milk, and salt together until smooth. Whisk in coconut sugar mixture until smooth, adding remaining 1 tablespoon milk as needed until glaze is thin enough to drizzle. Drizzle or decorate each cookie with glaze as desired. Let glaze set for at least 6 hours before serving.
Notes
- Ensure butter and cream cheese are properly softened for a smooth dough. The rapping technique is key for flat, even cookies. Glaze setting time is crucial for a clean finish.