

My Kitchen Table Secret
I have a secret. I love those store-bought strawberry pastries. But homemade ones are so much better. They taste like real strawberries and warm butter. I still laugh at that. My grandson once ate three in one sitting.
Making them is like a fun craft project. You roll, cut, and fill. It’s messy and wonderful. Doesn’t that smell amazing? The secret is cold butter. It makes the pastry flaky. Why does this matter? Because love is baked into food you make yourself.
The Magic of Cold Butter
Let’s talk about that dough. The butter must be cold. I keep mine in the fridge until the last second. You mix it until it looks like sandy pebbles. This is the most important step.
Those little butter bits melt in the hot oven. They create steam. The steam makes tiny, flaky layers. *Fun fact: This is called “laminating” the dough.* It sounds fancy, but it’s just cold butter doing its job. Do you like flaky or soft pastries more?
A Strawberry in Every Bite
Now for the filling. Use a good strawberry jam. Just a heaping teaspoon in the middle. Leave a little border around the edge. This is so it doesn’t leak out.
I learned about the border the hard way. My first batch looked like a strawberry volcano. It was a sticky mess. But it still tasted great. Why does this matter? Cooking teaches us that mistakes can still be sweet.
The Crimp and The Glaze
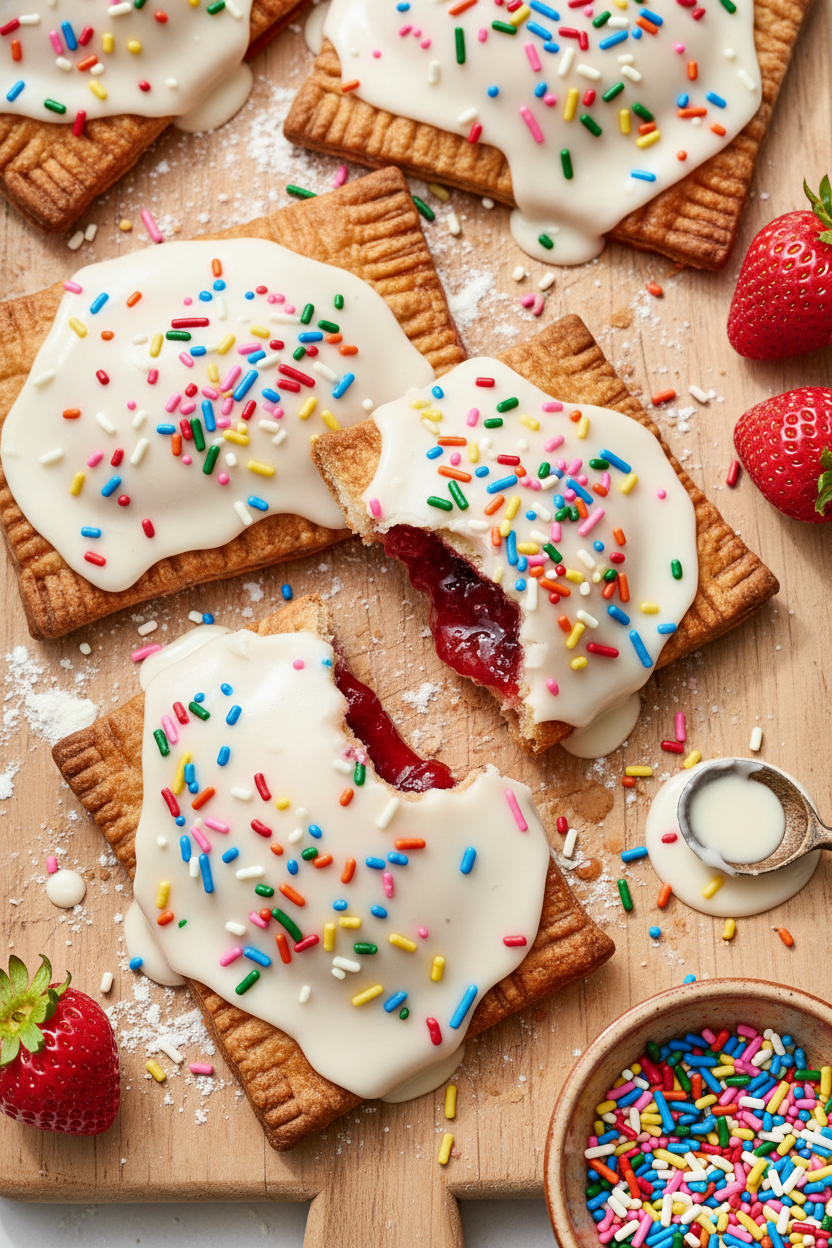
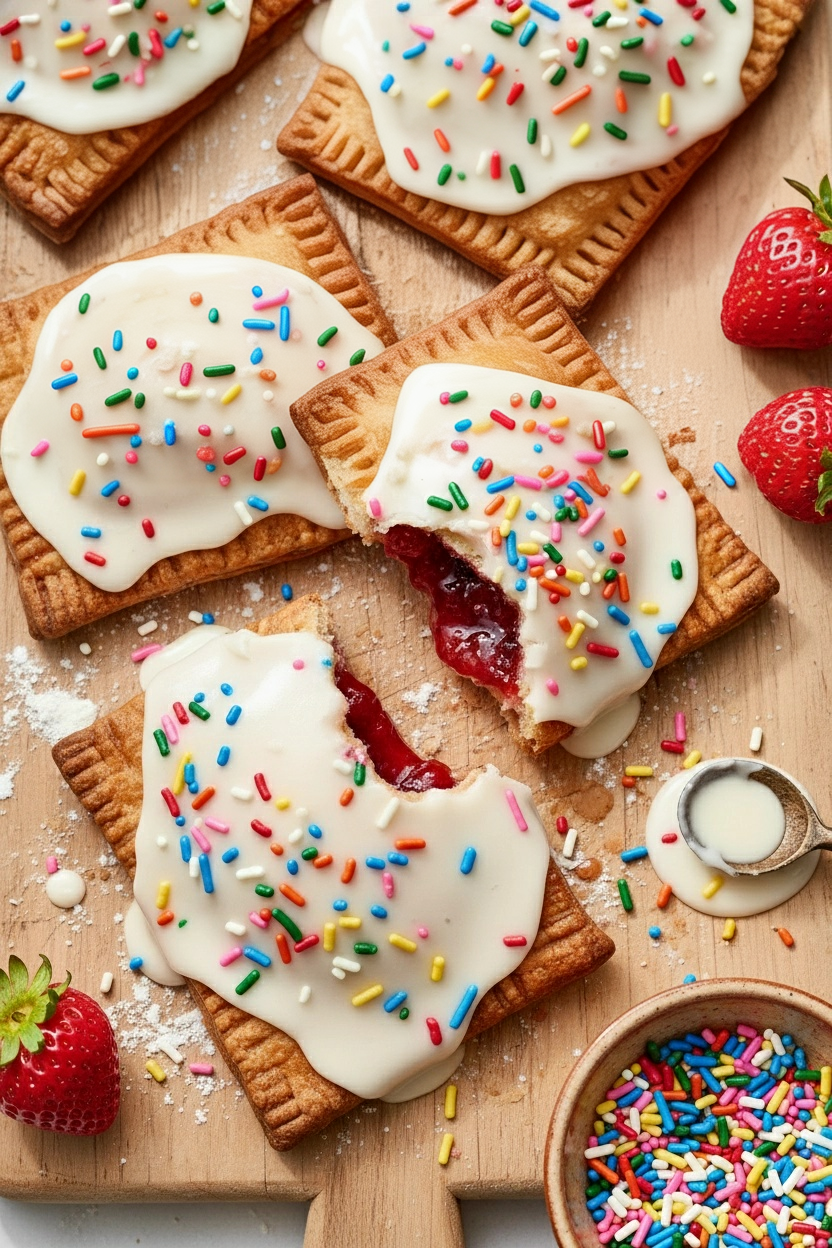
Seal the edges with a fork. Press down hard. This makes a cute pattern. Then brush them with a simple egg wash. This gives them a beautiful golden color.
After they cool, comes the fun part. The glaze. Just whisk powdered sugar, milk, and a tiny bit of vanilla. Drizzle it on while they’re still on the tray. Add sprinkles right away. What color sprinkles would you choose?
Your Turn in the Kitchen
These pop-tarts are best shared. Let them set so the glaze dries. Then pack them for a friend. Or enjoy one with a big glass of cold milk.
The recipe seems long, but it’s simple steps. Anyone can do it. I promise. Have you ever made pastry from scratch before? Tell me about it. I love hearing your kitchen stories.
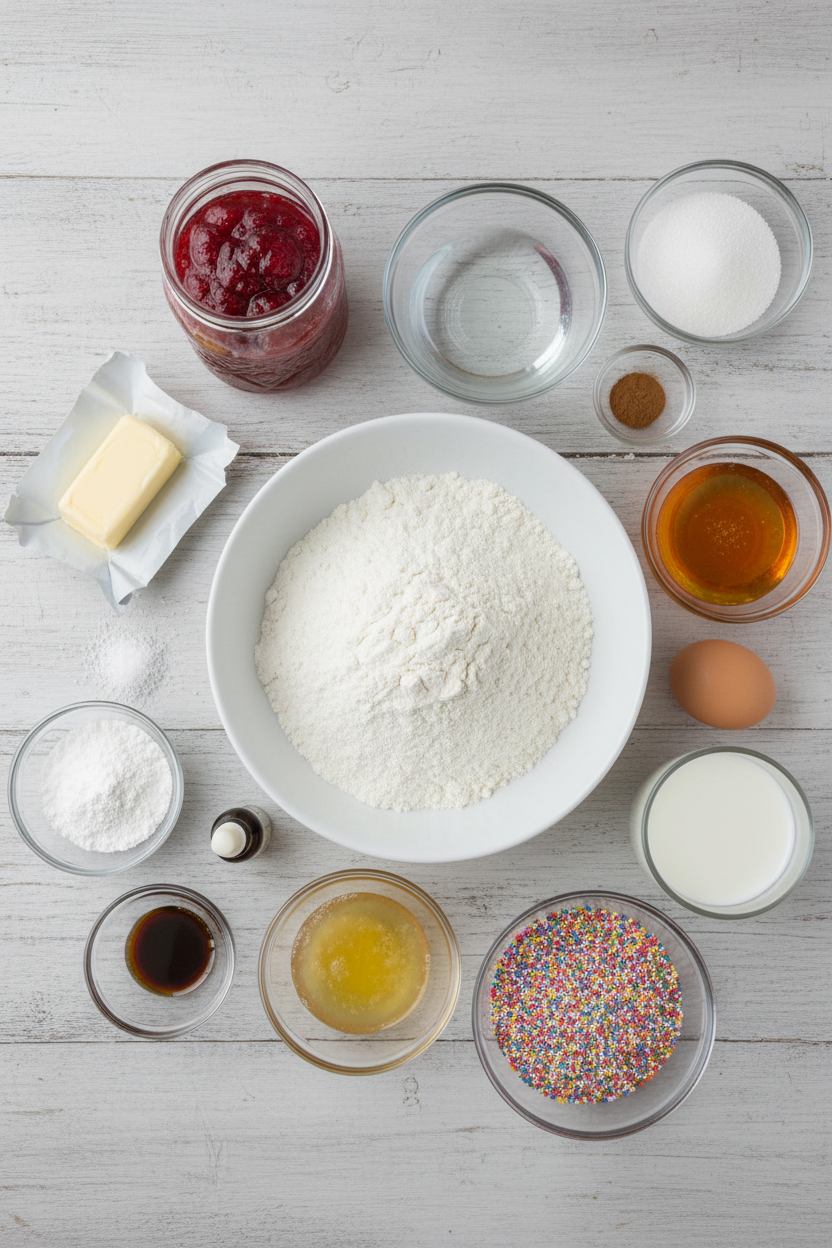
Ingredients:
| Ingredient | Amount | Notes |
|---|---|---|
| All-purpose flour | 2 ¼ cups (290 grams) | For the dough |
| Granulated sugar | ¼ cup + 1 tablespoon (65 grams) | For the dough |
| Cinnamon | ½ teaspoon | For the dough |
| Fine sea salt | 1 teaspoon | For the dough |
| Unsalted butter | 2 sticks (227 grams) | Cold and cubed, for the dough |
| Cold water | ¼ cup + 3 tablespoons (100 grams) | For the dough |
| Honey | ½ teaspoon | For the dough |
| Strawberry Preserves | As needed (approx. 1 heaping tsp per tart) | For the filling |
| Egg | 1 | For the egg wash |
| Water | 2 teaspoons | For the egg wash |
| Powdered sugar | 1 ½ cups (188 grams) | Sifted, for the glaze |
| Vanilla extract | ½ teaspoon | For the glaze |
| Milk | 2 tablespoons | For the glaze |
| Corn syrup | 1 tablespoon (about 22g) | For the glaze |
| Sprinkles | As desired | Optional, for topping |
Instructions
Step 1: Let’s make our dough. Mix the flour, sugar, cinnamon, and salt. Cut in the cold, cubed butter until it looks like sand. Then, stir in the cold water and honey. (Keep everything cold for a flaky crust!) Gently shape the dough into a disc. Wrap it and let it rest in the fridge. This makes it easier to roll.
Step 2: Roll the dough out thin on a floured surface. Cut it into rectangles. Place half on your baking sheet. Brush their edges with water. Add a spoonful of strawberry jam in the middle. Top with another dough rectangle. Press the edges with a fork to seal. This is my favorite part. It feels like making little presents.
Step 3: Whisk one egg with a little water. Brush this wash over each pastry. It makes them shiny and golden. Bake them until they are puffed and beautiful. Let them cool completely. I know it’s hard to wait! What’s your favorite jam flavor? Share below!
Step 4: Now for the sweet glaze. Whisk the powdered sugar, milk, vanilla, and corn syrup. Spread it over the cooled pastries. Add sprinkles right away, before it sets. Then let them dry. (Put wax paper between layers so the glaze doesn’t stick.) Doesn’t that smell amazing? I still laugh at how messy my first batch was.
Creative Twists
… Lemon Sunshine: Use lemon curd filling and add lemon zest to the glaze.… Chocolate Dream: Spread Nutella inside and top the glaze with crushed cookies.
… Breakfast Surprise: Fill with cinnamon sugar and a tiny bit of cooked bacon.
Which one would you try first? Comment below!
Serving & Pairing Ideas
Serve your pop-tart warm with a cold glass of milk. It’s a classic for a reason. For a fancy touch, add fresh berries on the side. A small scoop of vanilla ice cream turns it into a special dessert. Which would you choose tonight?
Keeping Your Pop-Tarts Perfect
Let’s talk about keeping your treats fresh. Cool your pop-tarts completely before storing. I place mine in a single layer in a container. A sheet of parchment between layers works too. This keeps the lovely glaze from sticking.
They are happiest at room temperature for about three days. For longer, the freezer is your friend. Wrap each one tightly in plastic wrap. Then pop them all into a freezer bag. I remember my first batch getting soggy in a tin. I learned the hard way!
Batch cooking is a wonderful time-saver. You can make a double batch of dough. Then freeze some unbaked, filled pastries for a future sweet surprise. This matters because a homemade treat is always ready for you. It turns a busy morning into something special. Have you ever tried storing it this way? Share below!
Simple Fixes for Common Troubles
Sometimes our baking has little hiccups. Do not worry. Here are easy fixes. First, if your filling leaks, you may have used too much. Just a heaping teaspoon is perfect. I once made a real mess because I got too generous.
Second, if the pastry seems tough, you might have over-mixed the dough. Mix just until it comes together. This matters because gentle handling keeps the pastry tender and flaky. Third, if your glaze is too thin, add a bit more sifted powdered sugar.
If it is too thick, add milk one drop at a time. Getting the glaze right matters for both looks and taste. A good glaze sets nicely and adds a sweet finish. Which of these problems have you run into before?
Your Quick Questions, Answered
How to make strawberry hand pies from scratch?
You make the dough with flour, cold butter, sugar, and a pinch of salt. Roll it out and cut it into rectangles. Add a spoon of strawberry preserves to the center of half the pieces. Cover with another dough piece and seal the edges with a fork. Brush with egg wash and bake until golden brown. Let them cool completely before adding the sweet glaze on top.
What is the best glaze for strawberry hand pies?
The best glaze is simple and sweet. Whisk together sifted powdered sugar, a splash of milk, a little vanilla, and a touch of corn syrup. The corn syrup is the secret. It gives the glaze a shiny finish and helps it set nicely. You want it thick enough to coat the back of a spoon but still easy to spread over your cooled pastries.
Can I use frozen strawberries for hand pies?
You can use frozen strawberries, but you must prepare them first. Thaw the berries completely in a strainer over a bowl. Press out all the extra juice. If you do not, your filling will be too wet and make the pastry soggy. You can then chop them and mix with a little sugar. Using jam or preserves is often easier for a first try.
How do you keep hand pies from getting soggy?
The key is to keep the filling thick and not too wet. Use a thick jam or cook down fresh fruit. Also, seal the edges very well with a fork. Brush the bottom dough with a little water before adding the filling. This helps create a better seal. Make sure they cool fully on a rack before storing. This lets steam escape so the crust stays crisp.
How long do homemade strawberry hand pies last?
They last about three days at room temperature when stored properly. Keep them in a single layer in an airtight container. You can put parchment paper between layers if you stack them. For longer storage, freeze them. They will keep in the freezer for up to three months. Just thaw at room temperature or warm gently in the oven when you are ready to eat.
Can strawberry hand pies be made ahead and frozen?
Yes, they are perfect for making ahead. You can freeze them before or after baking. To freeze unbaked, assemble them but do not add the egg wash. Freeze solid on a tray, then bag them. Bake from frozen, adding a few extra minutes. To freeze baked, let them cool completely first. Wrap each one well. This is a great way to have a homemade treat anytime. Which tip will you try first?
From My Kitchen to Yours
I hope you love making these as much as I do. There is nothing like a warm, homemade pastry. It fills the whole house with a sweet smell. *Fun fact: The first toaster pastries were invented in the 1960s. But homemade ones taste so much better!
I would love to hear about your baking adventure. Did your family enjoy them? Did you pick a favorite color of sprinkles? Sharing our kitchen stories is the best part. Have you tried this recipe? Tell me all about it in the comments below.
Happy cooking!
—Marina Caldwell

Fresh Strawberry Hand Pies with Glaze
Description
Delicious, flaky hand pies filled with sweet strawberry preserves and topped with a simple vanilla glaze. Perfect for a portable treat.
Ingredients
Instructions
- Adjust the oven rack to the center position and preheat the oven to 375°F. Line two baking trays with parchment and set aside.
- In a food processor or large mixing bowl, add the flour, sugar, cinnamon, and salt. Pulse lightly, or mix with a whisk, to combine. Add the cubed butter all at once and pulse for 10-20 seconds, or if mixing by hand, cut the butter into the dry mixture with a pastry cutter for 5-6 minutes, or until the mixture looks sandy and no large clumps remain. Be careful not to overmix as the butter will get too warm.
- Pour in the cold water and honey in a steady stream while pulsing the dough mixture in the food processor, or if mixing by hand, pour cold water and honey into the dough mixture and mix until the mixture comes together and a dough ball has formed. Check the dough to make sure that there are no visible flour or sugar patches, but don’t overmix.
- Remove the dough from the food processor or bowl and place on a lightly floured surface. Fold the dough 2-3 times and shape into a 1-inch thick, 7-inch diameter circle. Wrap the dough in plastic wrap and let it rest in the refrigerator for 30 minutes to 1 hour.
- Once the dough has cooled and rested, flour your work surface to roll out the dough. Roll the dough into a rectangle, about 3 feet in length, 8 inches in width, and about ⅛ of an inch thick. Using a pastry cutter, pizza cutter, knife or bench scraper, cut the dough into rectangles 3 inches wide x 4 inches in height. You should be able to cut between 18-20 rectangles depending on how thick the dough has been rolled.
- Lift 8 of the cut rectangles off your work surface with a spatula or bench scraper and place them onto one of the prepared baking sheets. These will be the bottoms of your pop tarts. Brush the dough lightly with water, ensuring that the edges get wet; otherwise the top and bottom dough won’t stick together completely when crimped and the filling will leak out. Fill each center with 1 heaping teaspoon of strawberry preserves, leaving about ¼-inch border from filling to the edge of the dough. Cover each filled pastry with a second dough rectangle and crimp the edges together with a fork. Repeat process with any remaining cut rectangles onto second prepared baking sheet.
- In a small bowl, mix together the egg and water for the egg wash. Brush each filled rectangle with egg wash and bake for 25-30 minutes, or until golden brown and the pastry is fully baked. Let cool completely before glazing, about 30-45 minutes.
- While the pop tarts are baking, in a small bowl, whisk together the sifted powdered sugar, vanilla, milk, and corn syrup, mixing until smooth. The glaze should be thick, but not too thick to spread.
- Use a spoon or offset spatula to glaze each cooled Pop Tart. Top with sprinkles of your choice. Leave to set for 30 minutes to 1 hour before eating, or at least 3 hours (or until they are dry to the touch – this will depend on your kitchen environment) before stacking on top of each other, to prevent the glaze from getting messed up and smearing, or sticking to the bottom of the Pop Tart placed on top of it.
Notes
- For best results, ensure all ingredients (especially butter and water) are very cold. You can substitute the strawberry preserves with any other fruit jam or preserve you like.