

My Kitchen, Full of Crunch
I love the sound of a good crunch. It makes food feel alive. My grandson calls these bars my “candy brick road.” I still laugh at that. The base is just graham crackers and butter. It matters because it holds all the sweet layers together without getting soggy.
You press it into the pan firmly. This makes a solid foundation. Think of it like building a house for your candy. Have you ever used graham crackers for something besides s’mores? It’s a wonderful trick. You can find more sweet uses for them in this caramelized banana treat.
The Sticky, Sweet Heart
Next comes the caramel. Melting it with cream is my favorite part. Doesn’t that smell amazing? It becomes a soft, gooey river. You pour it over the warm crust. This layer matters. It sticks everything to the base like edible glue.
*Fun fact*: Caramel is just sugar and heat! It can be sweet or a little salty. I love how versatile it is. For a totally different twist, some folks use it in savory dishes, like this unique miso caramel bread pudding.
A Candy Bar Surprise
Now for the star. Crushing Butterfingers is so fun. It’s okay to use your hands! I remember my sister once crushed them right in the bag. What’s your favorite candy bar to bake with? You sprinkle all those golden bits over the caramel. Press them in gently.
This gives every bite a toasty, peanutty crunch. It turns a simple bar into a party. The mix of soft and crunchy is what makes it special. It’s like the best part of a candy aisle, all in one square.
The Chocolate Blanket
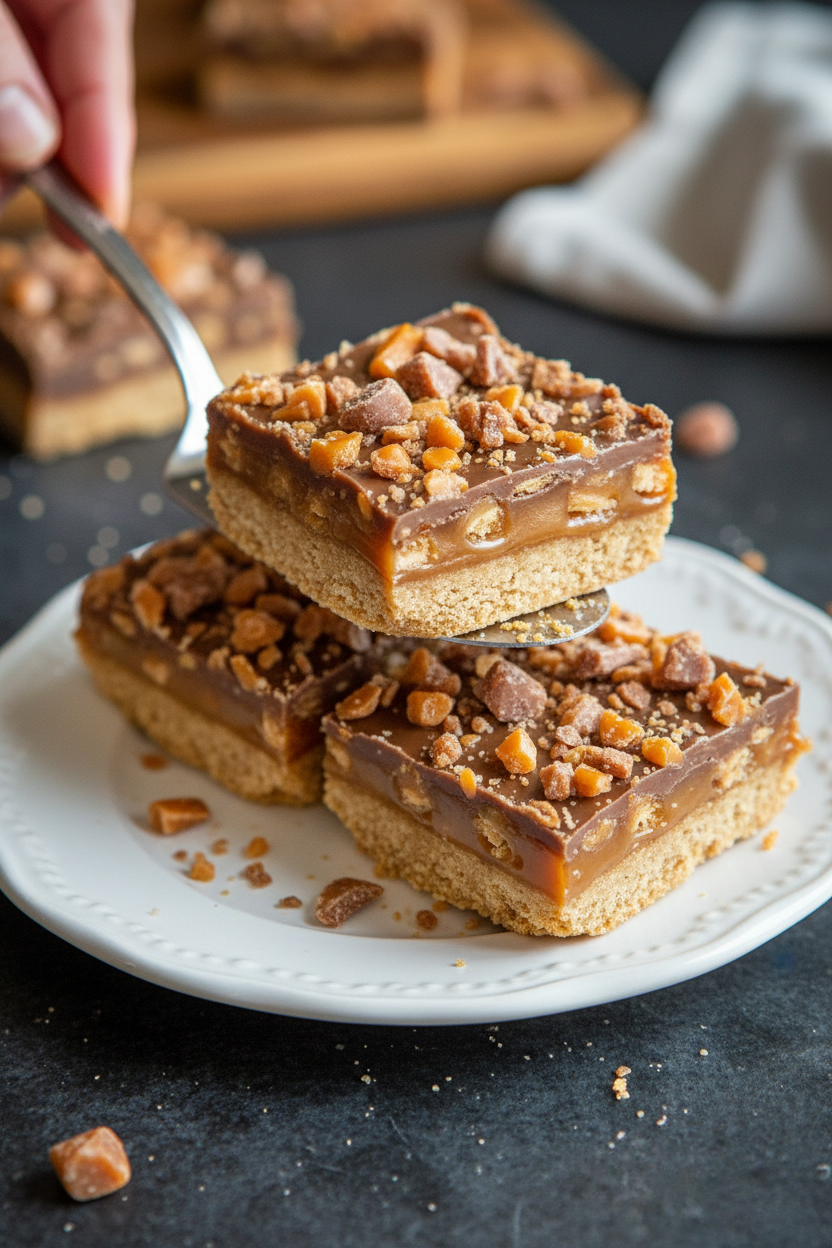
Last, you tuck everything in. Melt chocolate with a little butter. This makes it shiny and smooth. Pour it slowly to cover all the crunch. It sets into a perfect, firm top. This final layer protects all the textures inside.
Waiting for it to set is the hardest part. But it’s worth it for a clean cut. Chocolate can top so many things. It’s lovely on a tangy rhubarb cake, too. Do you prefer dark or milk chocolate for baking?
Cutting and Sharing
Use the parchment paper to lift out the whole slab. It feels like magic. A sharp knife cuts best. Wipe it clean between cuts for pretty squares. These bars are rich, so small pieces are just right.
They keep well in a tin. Sharing them is the real joy. I always make a double batch for my book club. What’s your favorite treat to share with friends? For another great make-ahead dessert, this salted caramel fudge is a holiday hit. Now, tell me, will you add extra Butterfinger on top?
Instructions
Step 1: First, make your crunchy base. Mix the crumbs, melted butter, and sugar. Press it firmly into your lined pan. Bake it for just 8-10 minutes. I love that warm, toasty smell. Let it cool a bit on the counter. (A good hard press here means no crumbly base later!)
Step 2: Now for the gooey caramel. Melt caramel bits with cream in the microwave. Stir it until it’s perfectly smooth. Pour it over your warm crust and spread it. What’s your favorite caramel treat? Share below! Try a caramelized banana for breakfast, too.
Step 3: Sprinkle your crushed Butterfingers over the caramel. Press them in gently. This layer gives the wonderful crunch. I still laugh at how messy this step gets. It’s part of the fun, dear.
Step 4: Melt chocolate chips with a bit of butter. Stir until it’s glossy. Pour it over everything and spread it smooth. Doesn’t that look amazing? For a different twist, a salted caramel fudge is lovely.
Step 5: Let the pan sit out for 30 minutes. Then chill it for two hours. This patience makes clean slices. Lift out the slab and cut into bars. A caramel glaze works for savory dishes as well.
Creative Twists
Salty-Sweet: Sprinkle a little sea salt over the chocolate layer.
Peanut Butter Swirl: Melt peanut butter and swirl it into the chocolate.
Cookie Base: Use crushed chocolate wafer cookies instead of graham crackers.
Which one would you try first? Comment below!
Serving & Pairing Ideas
Serve these bars with a cold glass of milk. It’s the classic pairing. For a fancy touch, add a dollop of whipped cream. A tangy rhubarb cake offers a nice fruit contrast. You could also crumble one over vanilla ice cream. Which would you choose tonight?
Keeping Your Bars Fresh and Tasty
Let’s talk about storing these sweet bars. Keep them in a sealed container on the counter. They stay good for five days there. For longer storage, the fridge is your friend. They will last a whole week when chilled.
You can also freeze them for a month. Wrap each bar tightly in plastic wrap first. Then place them all in a freezer bag. Thaw at room temperature when you want one. I once froze a whole batch for my grandson’s visit. He was so happy to find them!
Batch cooking saves so much time. Make a double recipe and freeze half. Future-you will be very thankful on a busy day. This matters because good food should bring joy, not stress. Have you ever tried storing it this way? Share below!
Simple Fixes for Common Kitchen Hiccups
First, a sticky crust can be tricky. Press your crumb mix into the pan firmly. Use the bottom of a glass to help you. This creates a solid base that won’t fall apart. I remember when my first crust crumbled everywhere. What a mess we had to eat with spoons!
Second, caramel can be stubborn to melt. Always use short bursts in the microwave. Stir well between each heating interval. This prevents burning and makes it smooth. Getting it right matters for that perfect chewy layer. It makes the whole bar feel special and well-made.
Third, chocolate can get too thick. Adding that bit of butter is the key. It makes the topping silky and easy to spread. This simple step builds your cooking confidence. A smooth finish makes the treat look as good as it tastes. Which of these problems have you run into before?
Your Quick Questions, Answered
How to make Butterfinger caramel crunch bars?
You start with a simple graham cracker crust. Bake it briefly until it is golden. Then layer on melted caramel and crushed Butterfinger bars. Finally, top it all with smooth melted chocolate. Let the whole pan set in the fridge before cutting. The layers create a wonderful mix of textures and flavors everyone loves.
What are the ingredients for Butterfinger bars?
You need graham cracker crumbs, butter, and sugar for the base. The caramel layer uses caramel bits and heavy cream. Then you need Butterfinger candy bars, of course. The topping is just chocolate chips and a little more butter. It is a simple list for such a fancy-tasting treat. You might already have most items in your kitchen.
Can I use homemade caramel for Butterfinger bars?
Yes, you absolutely can use homemade caramel. It will give the bars a wonderful personal touch. Just make sure it is a soft, spreadable consistency. If it is too thick, warm it with a splash of cream. Using homemade ingredients always makes baking feel more special and rewarding for the cook and everyone who eats it.
How do you get the caramel layer to set properly?
The key is to let the warm crust cool first. Pour the caramel onto the slightly warm base. Then sprinkle the Butterfinger pieces right away. The candy will stick to the soft caramel as it cools. Chilling the whole pan in the fridge is the final, important step for a perfect slice. Patience makes the best bars.
Are there any variations for Butterfinger crunch bars?
You can try so many fun twists on this recipe. Use different candy bars like crushed peanut butter cups. Try a salted caramel twist for a grown-up taste. Or add a sprinkle of sea salt on top of the chocolate. *Fun fact: Adding salt to sweet things makes the sweet flavor even stronger!* Get creative with your favorites.
Can I use milk chocolate instead of chocolate chips?
Milk chocolate is a delicious choice here. It will make the bars sweeter and creamier. Chop a bar of milk chocolate to use instead of chips. Melt it gently with the butter just like the recipe says. This swap is perfect if you prefer a milder chocolate flavor. Which tip will you try first?
From My Kitchen to Yours
I hope you love making these bars as much as I do. They are always a hit with my grandkids. Baking is about sharing joy and making memories. I would love to hear about your baking adventures in the comments. Tell me all about it. Have you tried this recipe?
Maybe you created your own caramelized delight or a special caramel cake. I enjoy reading your stories so much. Thank you for letting me share my kitchen with you today. Happy cooking!
—Elowen Thorn.
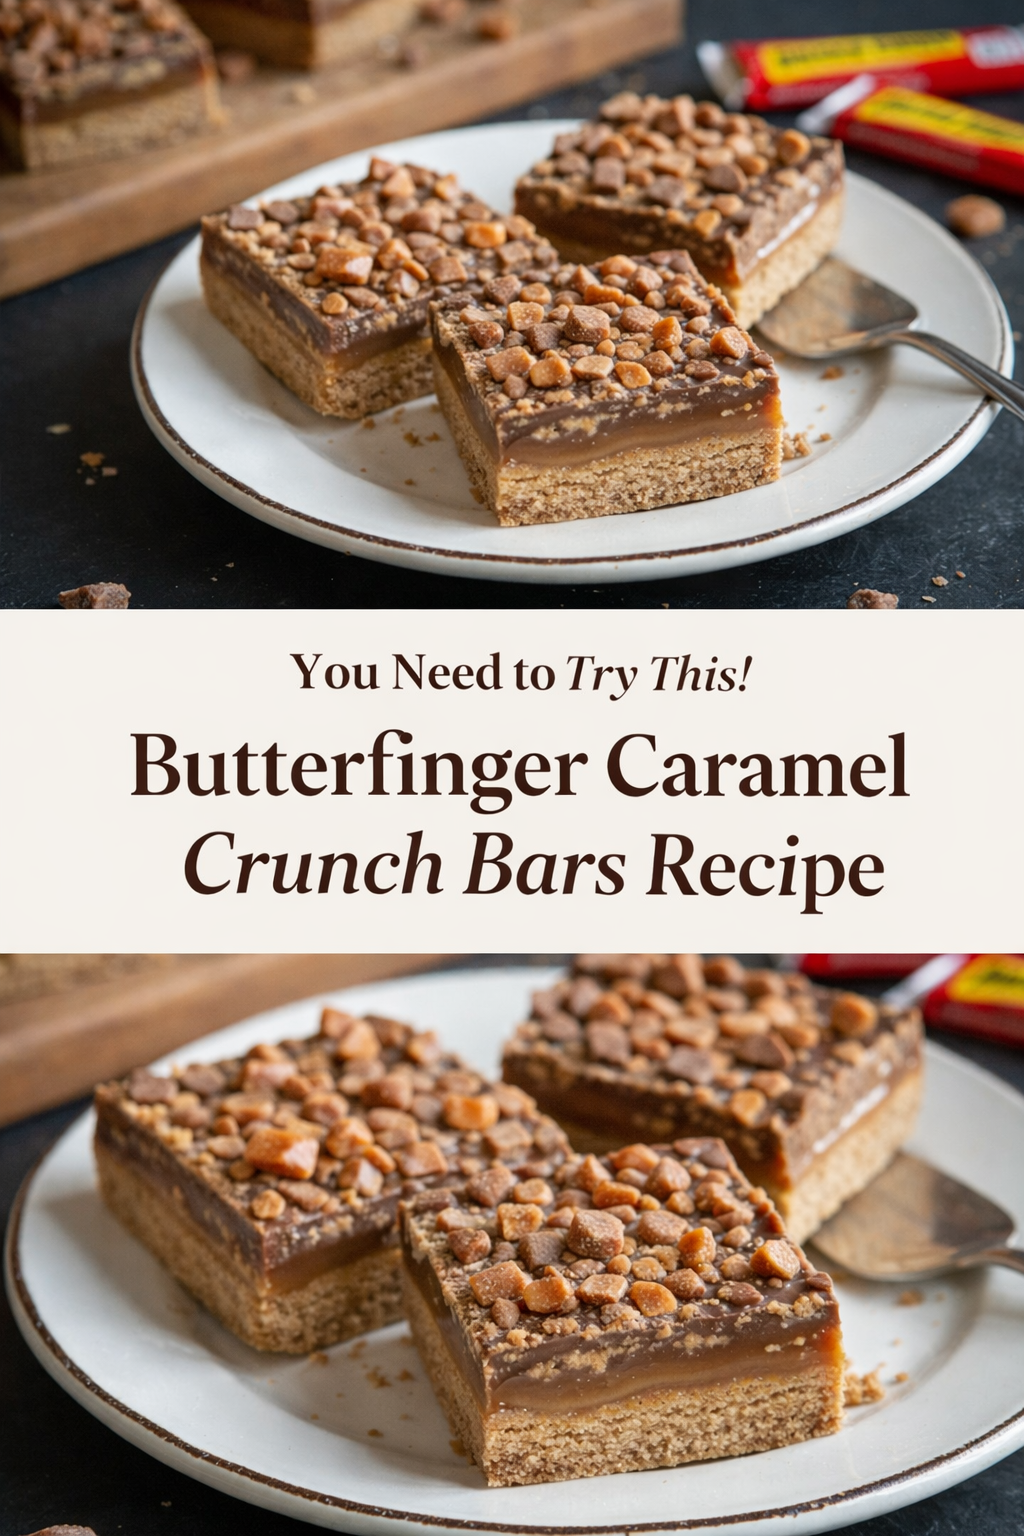

Butterfinger Caramel Crunch Bars Recipe
Description
A decadent and easy no-bake dessert featuring a graham cracker crust, a gooey caramel layer, crunchy Butterfinger pieces, and a rich chocolate topping.
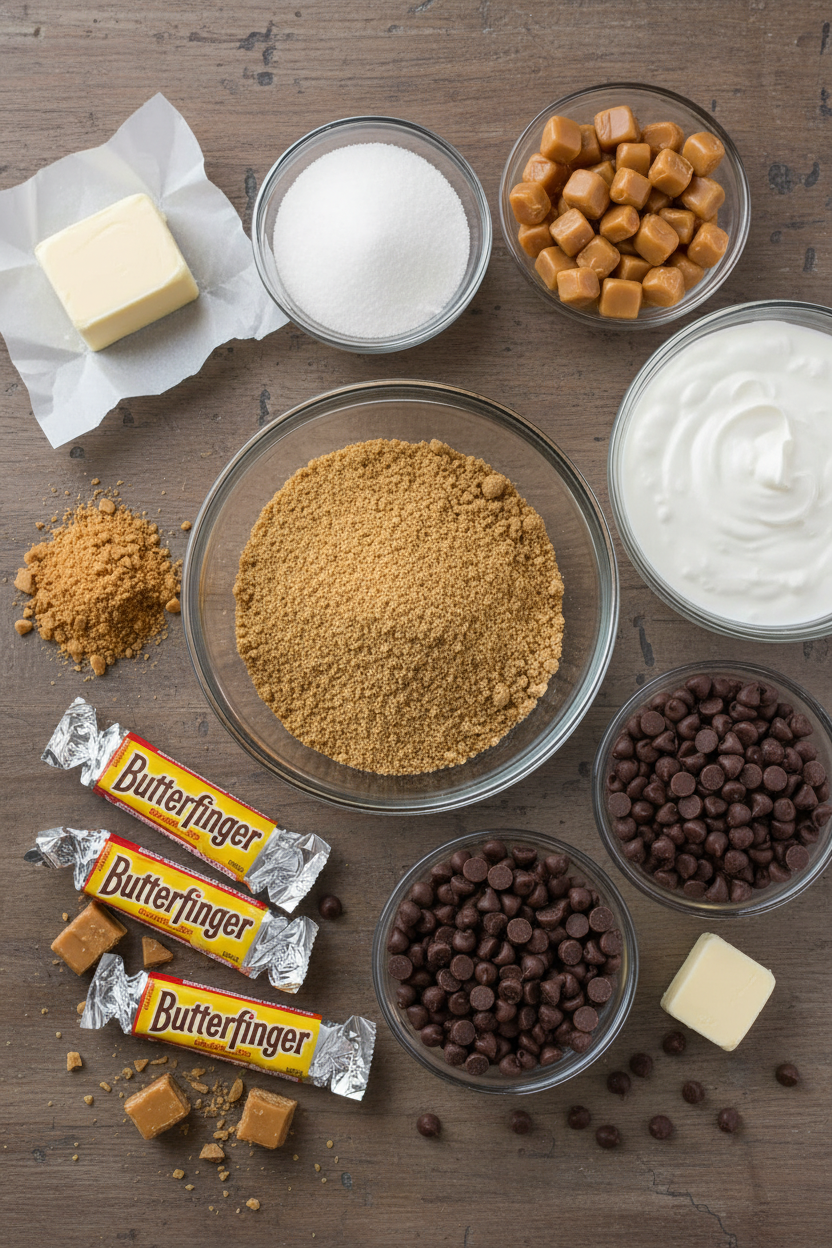
Ingredients
For the Base:
For the Caramel Layer:
For the Butterfinger Layer:
For the Chocolate Topping:
Optional Garnish:
Instructions
- Preheat your oven to 350°F (175°C). Grease and line an 8×8-inch baking pan with parchment paper, leaving an overhang for easy removal.
- In a medium bowl, combine the graham cracker crumbs, melted butter, and granulated sugar. Mix until the crumbs are evenly moistened. Press the mixture firmly into the bottom of the prepared pan to form an even layer. Bake for 8-10 minutes, or until the edges are lightly golden. Remove from the oven and let it cool slightly.
- In a microwave-safe bowl, combine the caramel bits and heavy cream. Microwave in 30-second intervals, stirring after each, until the caramel is fully melted and smooth. Pour the melted caramel over the graham cracker crust, spreading it evenly with a spatula.
- Sprinkle the crushed Butterfinger candy bars evenly over the caramel layer, pressing down gently so they adhere to the caramel.
- In a microwave-safe bowl, melt the chocolate chips and butter together in 30-second intervals, stirring until smooth and fully melted. Pour the melted chocolate over the Butterfinger layer, spreading it out evenly to cover the entire surface.
- Allow the bars to cool at room temperature for about 30 minutes, then transfer to the refrigerator to set completely, about 2 hours. Once set, lift them out of the pan using the parchment overhang and cut into squares. Optionally, sprinkle extra crushed Butterfinger pieces over the top before serving.
Notes
- Store any leftover bars in an airtight container at room temperature for up to 5 days, or in the refrigerator for up to a week.