

My No-Knead Pizza Secret
Let me tell you about my favorite lazy pizza. You just mix it and forget it. I still laugh at that. The first time I tried it, I was sure I did it wrong. The dough looked so messy! But that’s the magic. Time does all the hard work for you.
You let it sit overnight. While you sleep, it grows. It becomes soft and full of air. This makes the crust light inside and crispy outside. Why does this matter? Because good food should not be hard work. This recipe proves it.
The Magic of Waiting
That long wait is not empty time. It is flavor time. The little yeast eats the flour sugars. It makes the dough taste better. Doesn’t that smell amazing when you uncover it? It smells like a real bakery.
*Fun fact*: This long, slow rise is called “fermentation.” It’s the same thing that makes bread and pickles tasty! I think patience is the best ingredient in any kitchen. What is the longest you’ve ever waited for a food you love?
Getting Your Hands Oily
Now for the fun part. You oil your skillet. Then you use that oil on your hands. This keeps the soft dough from sticking to you. It feels a little silly and very messy. That’s how cooking should feel sometimes.
You press the dough into the pan. It will stretch and pull back. Just be gentle. It does not need to be perfect. Why does this matter? Because cooking is not about being perfect. It’s about making something real with your own hands.
Topping Your Creation
Here is my mini-anecdote. My grandson once used only pepperoni. He made a full pepperoni blanket! We called it the “Pepperoni Rug.” It was delicious. So use what you love. Cover the dough edge to edge with sauce and cheese.
The thick crust can handle it. Do you have a favorite pizza topping combo? Mine is mushrooms and a little onion. The cheese gets all bubbly in the hot oven. It is a beautiful sight.
The Big Finish
When it comes out, it will be golden. Let it cool for just a minute. Then slide your knife around the edge. That crispy cheese rim is the cook’s treat. I always sneak a piece.
Slice it up right in the pan. The bottom will be so crisp. It holds all those toppings perfectly. What is the first thing you smell when a pizza comes out of the oven? Tell me, I’d love to know. Now, go make a memory. And maybe a pepperoni rug.
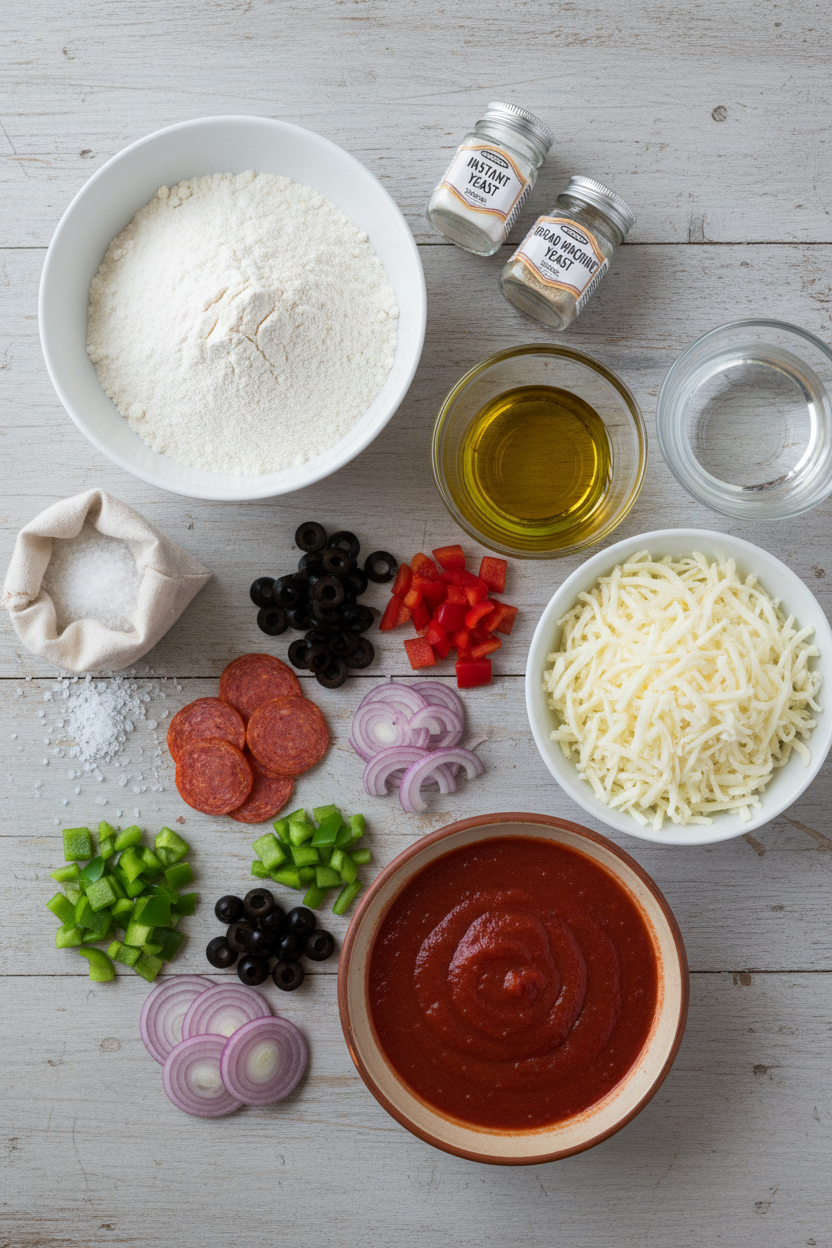
Ingredients:
| Ingredient | Amount | Notes |
|---|---|---|
| All-purpose flour | 2 cups | For the dough |
| Instant or bread machine yeast | 1/8 tsp | For the dough |
| Salt | 1 tsp | For the dough |
| Olive oil | 1 Tbsp + 1 Tbsp | 1 Tbsp for dough, 1 Tbsp for pan |
| Water | 3/4 to 1 cup | For the dough, add as needed |
| Pizza sauce | 1/2 cup | |
| Shredded mozzarella cheese | 1 cup | |
| Toppings of your choice | As desired | e.g., pepperoni, vegetables, etc. |
Instructions
Step 1: The night before, mix your flour, yeast, and salt. Stir it all up really well. It feels like the start of something wonderful. Doesn’t that smell amazing already? Now, add the oil and most of the water. Stir until a shaggy ball forms. (If flour is dry, add more water, one spoonful at a time.)
Step 2: Cover the bowl loosely with a towel. Let it sit on the counter overnight. The dough will grow bubbles and smell yeasty. This long wait does all the kneading for you. I still laugh at how lazy this is. What does the dough smell like after its long rest? Share below!
Step 3: Next day, heat your oven very hot. Pour oil into a heavy skillet. Use some oil to grease your hands, too. Gently place the dough in the pan. Press it out with your fingers. It will be soft and want to spring back. (A well-oiled pan gives you that crispy, golden bottom.)
Step 4: Now for the fun part—topping! Spread sauce to the very edges. Cover it all with cheese and your favorites. No bare crust needed here. Bake until it’s golden and bubbly. The smell will fill your whole kitchen.
Step 5: Carefully run a knife around the edge. This loosens any sneaky, stuck cheese. Slide your masterpiece onto a board. Let it cool just a minute before slicing. That first crispy-chewy bite is pure joy.
Creative Twists
Breakfast Pizza: Use gravy for sauce, top with scrambled eggs and bacon. Garlic Knot Edge: Roll extra dough at the edge into little knots, brush with garlic butter. Dessert Pizza: Skip sauce, bake dough with cinnamon sugar and apple slices. Which one would you try first? Comment below!Serving & Pairing Ideas
Serve your pizza with a simple green salad. The fresh crunch is perfect. For a cozy night, a cup of tomato soup for dipping is lovely. I also love adding a sprinkle of fresh basil on top after baking. It makes it look so pretty. Which would you choose tonight?

Making Pizza Night Last
Let’s talk about storing this lovely pizza. It is best eaten fresh and hot. But leftovers are a happy surprise for lunch. Cool the pizza completely first. Then wrap slices tightly. You can use plastic wrap or foil. Store them in the fridge for up to four days.
I remember my first no-knead pizza. I made two! We ate one, and I froze the other. Freezing works well for a whole pizza or slices. Wrap it tightly in foil, then place in a freezer bag. It will keep for about a month. This way, a homemade pizza is always ready for you.
Reheating is key for that crispy crust. Use your oven or a skillet. Do not use the microwave. It makes the crust soft. I warm my skillet over medium heat. I place the slice in for a few minutes. The bottom gets perfectly crisp again. The cheese melts beautifully.
Batch cooking the dough is a wonderful trick. Mix a double batch of dough. Let it ferment. Then, bake one pizza and save the other dough ball. You can keep the extra dough in the fridge for three days. This makes a second pizza night so easy. Storing food well means less waste and more joy. It turns cooking from a chore into a gift for your future self.
Have you ever tried storing it this way? Share below!
Simple Fixes for Common Hiccups
Sometimes our cooking has little hiccups. Do not worry. Here are three common ones with easy fixes. First, a dough that is too sticky. This happens to everyone. Just oil your hands well. The dough will not stick as you press it into the pan.
Second, a soggy pizza bottom. I once had this happen. My oven was not hot enough. Always let your oven preheat fully. Also, make sure your skillet is hot before adding toppings. This starts the cooking fast for a crisp base.
Third, cheese that is not bubbly and golden. The secret is to cover the pizza completely. Use enough cheese. Do not leave a big bare crust. The cheese right to the edge gets deliciously crispy. *Fun fact: The cheese browning is called the Maillard reaction. It creates wonderful flavor.
Fixing these small issues builds your confidence. You learn how ingredients behave. It also makes your food taste so much better. A crispy crust and golden cheese are worth the effort.
Which of these problems have you run into before?
Your Quick Questions, Answered
What is the best flour for no-knead pizza dough?
Simple all-purpose flour is perfect. It has just the right amount of protein. This helps the dough develop strength during its long rest. You do not need fancy bread flour. Your regular kitchen flour will make a wonderfully chewy and crisp crust.
How long should no-knead pizza dough ferment?
Let it rest for 12 to 16 hours at room temperature. This long, slow fermentation is the magic. The yeast works slowly. It develops great flavor and texture. This is what makes kneading unnecessary. Plan to start it the day before you want pizza.
Can you make no-knead pizza dough in advance?
Yes, you absolutely can. After its room-temperature rest, you can slow it down. Place the dough ball in an oiled container. Cover it tightly and put it in the fridge. It will be good for up to three more days. This gives you flexibility for pizza night.
What is the secret to a crispy pan pizza crust?
Two things are key: oil and heat. Use a good amount of oil in your pan. I use about a tablespoon. Also, make sure your oven is fully preheated. A hot oven, around 450 degrees, will fry the dough in the oil. This creates that irresistible crispy, golden bottom.
What kind of pan is best for crispy pan pizza?
A cast iron skillet is the champion here. It holds heat so well. It gets very hot and stays hot. This gives you an even, fierce crispness. If you do not have one, any heavy oven-safe pan will work. But cast iron truly makes it special.
How do you get the cheese crispy on a pan pizza?
Take your cheese all the way to the edge. Do not leave a bare crust. The cheese that touches the hot pan will fry and crisp up. It becomes a delicious, lacy, golden treat. Also, use enough cheese to cover the sauce completely. This protects the dough from getting soggy.
Which tip will you try first?
From My Kitchen to Yours
I hope you love making this pizza as much as I do. The long wait for the dough is so worth it. It fills your kitchen with the best smell. Cooking should be fun, not stressful. Remember, every meal is a little story you tell.
I would be so happy to hear about your pizza adventures. Tell me what toppings you chose. Did your family gobble it up? Your stories are my favorite thing to read.
Have you tried this recipe? Let me know how it went in the comments below. I read every one.
Happy cooking!
—Marina Caldwell

No-Knead Crispy Homemade Pan Pizza
Description
A simple, no-knead dough yields an incredibly crispy, thick-crust pizza baked in a cast iron skillet.
Ingredients
DOUGH:
PIZZA:
Instructions
- The day before, combine the flour, salt, and yeast in a bowl. Stir until they are very well combined.
- Add 1 Tbsp of olive oil and 3/4 cups water. Stir until the dough forms a ball. If there is still dry flour on the bottom of the bowl or the dough does not form a single, cohesive ball of dough, add more water, 1 Tbsp at a time until the dough comes together. The dough should be slightly sticky and shaggy in appearance.
- Loosely cover the dough in the bowl and allow it to ferment for 12-16 hours at room temperature. This develops the gluten, making kneading unnecessary.
- When it is time to make the pizza, begin preheating the oven to 450 degrees.
- Oil a cast iron skillet with another tablespoon of olive oil.
- Use the excess oil from the skillet to oil your hands and the dough in the bowl.
- Pull the dough out of the bowl and place it in the oiled skillet. Press it down into the skillet until it covers the entire bottom of the skillet. It will be very loose and soft.
- Top the pizza with sauce, cheese, and your desired toppings. Cover the pizza edge to edge with the sauce, cheese, and toppings. The dough will be very thick, so there is no need for a dry edge or crust around the outside.
- Bake the pizza in the fully preheated oven for 18-22 minutes, or until the top is golden brown and the cheese is bubbly.
- Run a knife around the edges to loosen any cheese that has stuck to the side. Slide the pizza out onto a cutting board to slice.
Notes
- Nutrition information is an estimate for 2 slices, calculated with the full dough and toppings as listed. Actual values may vary based on specific ingredients and toppings used.