

My First Key Lime Pie
I made my first key lime pie at sixteen. I was so nervous. I used a whole bag of limes. My arms got tired from all that squeezing. The pie was a bit sour, but everyone ate it. I still laugh at that.
This jar version is much easier. No squeezing, no baking. Just mixing and chilling. It gives you that same sunny, tangy taste. Doesn’t that sound nice? What’s the first dessert you ever tried to make? I’d love to hear your story.
Why No-Bake Treats Matter
Summer is for cool treats. You don’t want to turn on the oven. A no-bake dessert keeps the kitchen cool. It also keeps things simple. You can focus on the fun parts, like piping the cream.
This matters because cooking should bring joy, not stress. A simple recipe lets you share something sweet without worry. *Fun fact: The original Key lime pie was probably never baked! The acid from the juice thickened the filling all on its own.*
The Secret is in the Jar
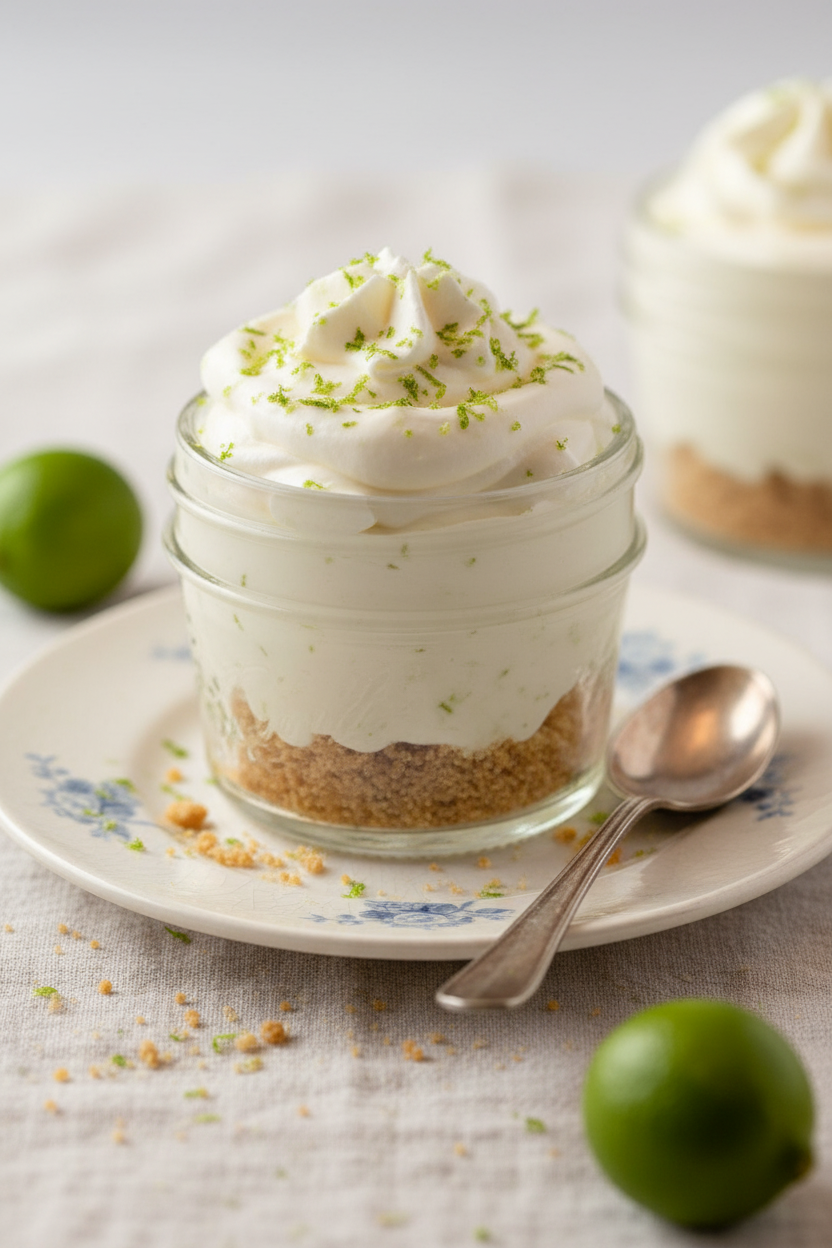
Putting pie in a jar is clever. Everyone gets their own little world of flavor. You can see all the pretty layers. It feels special, like a gift you made yourself.
I use bottled lime juice. It’s easy and tastes just right. Fresh limes can be tricky. Their flavor changes with the season. Do you prefer the ease of bottled juice, or the fun of fresh squeezing? Tell me your kitchen shortcut.
A Tip for the Crust
That buttery crumb layer is important. It’s the first thing you taste. But here is my little tip. Do not pack it down hard. Just wiggle the jar to level it.
A loose crust is easier to scoop. It mixes with the filling in your mouth just right. This matters because texture is part of the joy. A perfect bite has creamy filling and a soft, sandy crunch. It makes all the difference.
Make It Your Own
The best part is making it yours. Add more lime zest if you love that zing. Use a different juice if you want. Taste as you go. Your kitchen, your rules.
These jars keep for days in the fridge. The flavor gets even better. I think they taste best the next day. What fruit would you try in a no-bake jar like this? Lemon, maybe strawberry? Share your dream flavor with me.
Ingredients:
| Ingredient | Amount | Notes |
|---|---|---|
| Heavy whipping cream | 2/3 cup | For the filling |
| Granulated sugar | 2 tablespoons | For whipping the cream |
| Cream cheese | 8 ounces | Softened |
| Sweetened condensed milk | 7 ounces | Half of a standard can |
| Bottled lime juice | 1/4 cup | Key lime or regular lime juice (e.g., Santa Cruz Organic) |
| Lime zest | from 1-2 limes | To taste; Persian limes work well |
| Graham cracker crumbs | 1/2 cup | About 3.5 full sheets |
| Sugar | 1 1/2 tablespoons | For the crust |
| Unsalted butter | 2 tablespoons | Melted, for the crust |
Instructions
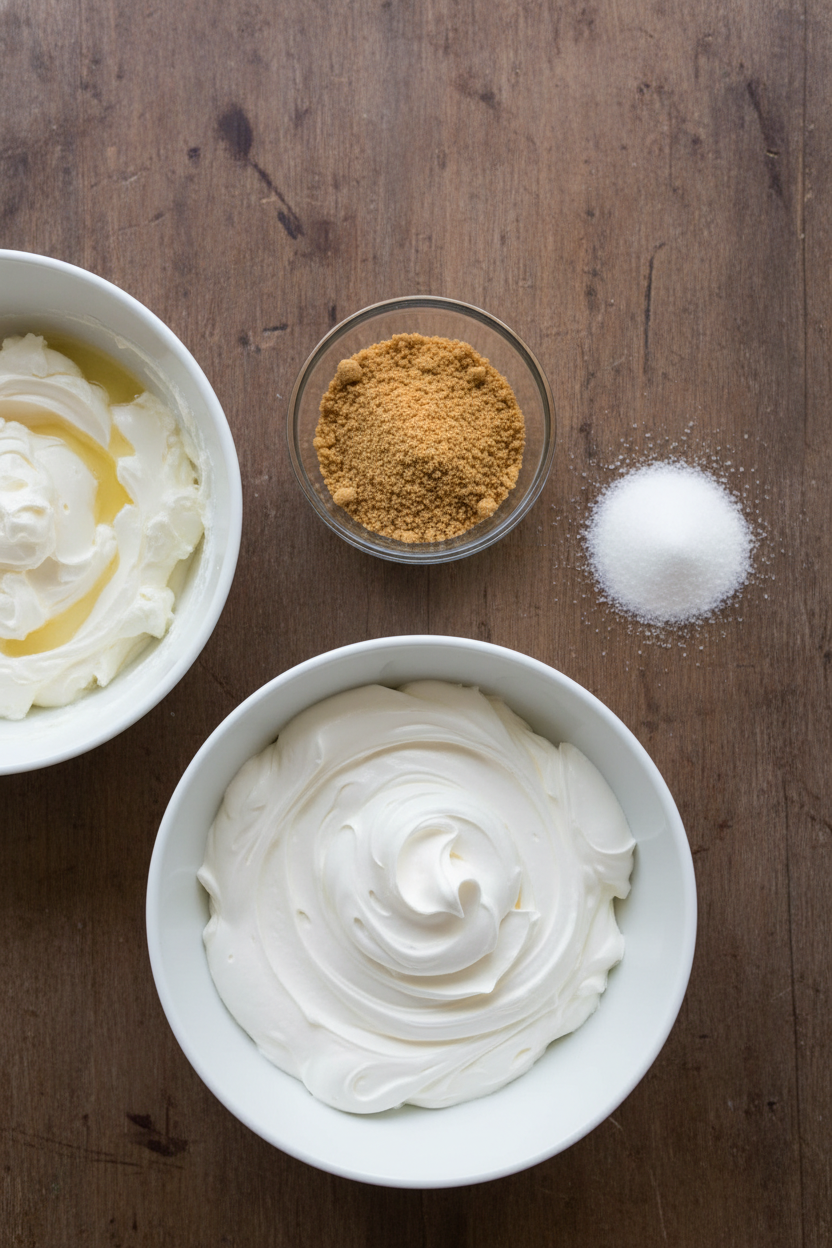
Step 1: Let’s make the creamy filling first. Whip the heavy cream and sugar until it’s fluffy. It should look like a soft cloud. Set this lovely fluff aside for later. Doesn’t that smell amazing already?
Step 2: Now, beat the softened cream cheese until it’s smooth. Add the sweetened condensed milk next. Then slowly mix in the lime juice. (Taste as you go to get the perfect tang!) Do you prefer your desserts tart or sweet? Share below!
Step 3: Gently fold in the lime zest with a spatula. Then, fold in most of your whipped cream. Save a little for the top! Put this bowl in the fridge to chill. I still laugh at how I used to skip this step.
Step 4: After it’s chilled, make the crust. Mix graham crumbs, sugar, and melted butter. It should feel like damp sand. Divide it among your little jars. Just wiggle the jar to settle it, don’t pack it down hard.
Step 5: Spoon the creamy filling over each crust. Now, pipe the saved whipped cream on top. A little extra zest makes it pretty. Let them set in the fridge. The waiting is the hardest part, I know!
Creative Twists
Add a layer of crushed berries for a sweet surprise.
Swap graham crumbs for crushed vanilla wafers.
Top with tiny meringue kisses instead of whipped cream.
Which one would you try first? Comment below!
Serving & Pairing Ideas
Serve these jars straight from the fridge. They’re perfect for a picnic. A few fresh berries on the side look lovely. For a fun touch, add a tiny lime wedge on the rim. Which would you choose tonight?
Keeping Your Sunshine Jars Fresh
Let’s talk about storing these little jars of sunshine. They keep beautifully in the fridge for five days. I make them a day ahead for the best flavor. The whipped cream topping is best added just before serving.
You can freeze leftovers, too. I once froze a jar for a rainy day. It thawed perfectly for a sweet pick-me-up. This is why batch cooking matters. It gives your future self a lovely, ready-made treat.
It turns cooking from a chore into a gift. Have you ever tried storing it this way? Share below!
Three Little Hiccups and How to Fix Them
First, a runny filling means your cream wasn’t whipped enough. Whip it until it forms stiff peaks. I remember my first batch was a bit soupy. Getting this right matters for a perfect, creamy texture.
Second, a too-tart or too-sweet flavor is common. Taste as you add the lime juice. Bottled and fresh juices taste different. This matters because balancing flavors makes the pie sing.
Third, a soggy crust happens if you add filling too soon. Always chill your filling first. Which of these problems have you run into before?
Your Quick Questions, Answered
How do you make key lime pie filling from scratch?
Whip heavy cream with sugar until stiff. In another bowl, whip softened cream cheese until smooth. Mix in sweetened condensed milk. Slowly add your lime juice, mixing well. Gently fold in lime zest and some of the whipped cream. Chill it all thoroughly. The chilling step is key for the perfect no-bake texture and flavor.
What can I use instead of key lime juice?
Regular bottled lime juice works perfectly. I use Santa Cruz Organic. Fresh Persian lime juice is also great. *Fun fact: most “key lime pies” in restaurants use regular limes!* Just taste as you go, since fresh juice can be stronger. The important thing is the bright, tangy flavor.
How long do no bake key lime jars need to set?
They need at least six hours in the fridge. Overnight is even better. This chilling time lets the filling firm up perfectly. It also allows the flavors to meld together beautifully. Do not skip this step for the best dessert experience.
Can I use regular limes instead of key limes?
Yes, you absolutely can. Use the juice and zest from regular Persian limes. They are easier to find and often cheaper. The flavor will be just as delicious and refreshing. Remember to taste your filling as you mix to get the tang just right.
What kind of crust is best for no bake jars?
A simple graham cracker crust is best. Mix crumbs with a little sugar and melted butter. It adds a sweet, crunchy contrast to the creamy filling. It is also very easy to make with no baking required. This classic combination never fails.
How do you keep the graham cracker crust from getting soggy?
Make sure your filling is fully chilled first. A cold, firm filling helps. Also, assemble the jars just before serving if you can. Do not pack the crust down too hard. A light layer will stay crunchier. Which tip will you try first?
From My Kitchen to Yours
I hope you love making these cheerful little jars. They always bring a smile. Cooking is about sharing joy and making memories.
I would love to hear about your kitchen adventures. Have you tried this recipe? Tell me all about it in the comments below. Your stories are my favorite thing to read.
Happy cooking!
—Elena Rutherford

Easy No Bake Key Lime Pie Jars Recipe
Description
Fill mini mason jars with a graham cracker crust and key lime pie filling and make these adorable Key Lime Pie Mason Jars! The recipe is completely no bake, uses bottled lime juice for ease, and is easy to prepare ahead of time.
Ingredients
Key Lime Pie Filling:
Crust Layer:
Instructions
- Key Lime Pie Filling: Use a hand mixer with the whisk attachment to whip the heavy whipping cream with the sugar until stiff peaks form. Set aside.
- Use a hand mixer with the beater attachments to whip the softened cream cheese until smooth. Then, add the sweetened condensed milk and mix until smooth. Slowly add lime juice, mixing after each addition. Mix until smooth.
- Use a spatula to gently fold in the lime zest to taste. Fold in about 3/4 cup of the whipped cream (reserving the rest for topping) until the mixture is smooth. Chill for 6 hours (longer or even overnight is fine).
- Crust Layer: After mixture has chilled, prepare the crust. In a small bowl, mix the graham cracker crumbs, sugar, and melted butter together thoroughly.
- Divide mixture evenly among eight 4-oz mason jars and gently wiggle each jar to even out the crust. Avoid packing it down.
- Scoop the filling evenly into the crust-lined jars, about 1/3 cup of filling per jar.
- Fill a piping bag with the remaining whipped cream (use a large star tip) and pipe a star or rosette on top of each jar. Sprinkle with additional lime zest if desired.
Notes
- Bottled Lime Juice: Key Lime juice is great, but it can be expensive or hard to find. I used Santa Cruz Organic Lime Juice and it worked great. Taste your filling and add both the lime juice and zest to taste. How to Make Ahead: The assembled jars will keep for five days in the refrigerator, but I suggest making them up to 24-48 hours in advance for the ideal flavor and texture. Add whipped cream just before serving. I have not tested freezing, but I imagine it would work fine for leftovers.