

My First Poke Cake Fiasco
I tried a poke cake for the first time in 1978. My neighbor Betty brought one over. I thought it looked a bit funny with all those holes. But one bite changed my mind. It was the most moist, flavorful cake I had ever tasted. I still laugh at that first impression.
I asked Betty for the recipe right away. She wrote it on a little card for me. That card is stained and faded now. But I still use it. It reminds me that good things can come in surprising packages. What was a food that surprised you the first time you tried it?
Why We Poke Holes
Poking holes might seem strange. But it is the secret. Those little tunnels let the sweet lime filling travel deep inside. Every single bite gets that tangy, wonderful flavor. It soaks right into the cake’s heart.
This matters because it turns a simple cake into something special. The filling binds everything together. It makes the cake incredibly tender. *Fun fact: The “poke cake” became super popular in America in the 1970s when gelatin mixes were all the rage.*
The Magic of Key Lime
Key limes are tiny and yellow. They pack a big, tart punch. Their juice is the soul of this cake. Doesn’t that smell amazing when you zest the lime? That bright, sunny scent fills your whole kitchen.
Using the juice and the zest is important. The juice gives the powerful tang. The zest gives the beautiful fragrance. They work together. One without the other just isn’t the same. Do you prefer desserts that are super sweet or nice and tangy?
Chill Out, Cake!
After you pour the filling, you must wait. Let the cake cool. Then let it chill in the fridge. This is the hardest part. I always want to peek. But patience is your friend here.
This waiting matters. It lets the filling set perfectly. It makes the cake firm enough to slice. The flavors also get to know each other better. They mingle and become best friends. The result is a cool, refreshing slice of heaven.
Your Cake, Your Way
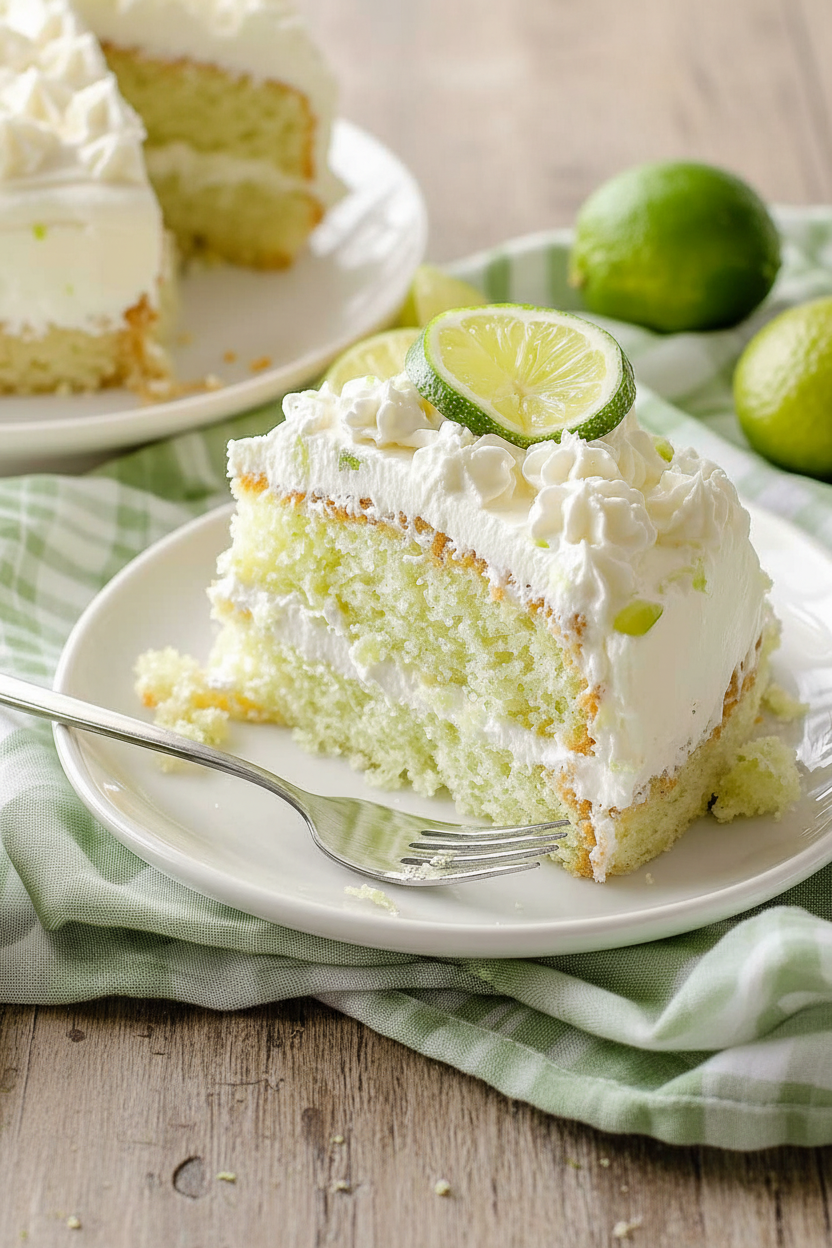
The final step is the fluffy whipped topping. Spread it on like a soft, white blanket. A little extra lime zest on top makes it pretty. It says, “Something wonderful is inside!”
This is where you can make it yours. Add a few thin lime slices. Or use a different color. The cake is a happy, forgiving dessert. It welcomes your touch. What is your favorite way to decorate a simple cake?
Ingredients:
| Ingredient | Amount | Notes |
|---|---|---|
| Yellow cake mix | 1 box (15.25 oz) | |
| Water | 1 cup | |
| Vegetable oil | ½ cup | |
| Large eggs | 3 | |
| Lime-flavored gelatin mix | 1 package (3 oz) | |
| Key lime juice | 1 cup | Bottled or fresh |
| White sugar | ¾ cup | |
| Cornstarch | 1 tablespoon | |
| Butter | 2 tablespoons | |
| Lime zest | 1 tablespoon | For the filling |
| Green food coloring | (optional) | As desired |
| Whipped topping | 1 container (8 oz) | Thawed |
| Lime zest | For garnish | Extra |
Instructions
Step 1: First, bake your yellow cake. Mix the box mix with water, oil, and eggs. Pour it into a greased pan and bake. My kitchen smells so good when it’s baking. Let it cool for just ten minutes. (Grease the pan well so nothing sticks!)
Step 2: Now, take a wooden spoon handle. Poke holes all over your warm cake. Make lots of holes, about an inch apart. This is the fun part! I still laugh at the polka-dot look. Why do we poke holes? Share below!
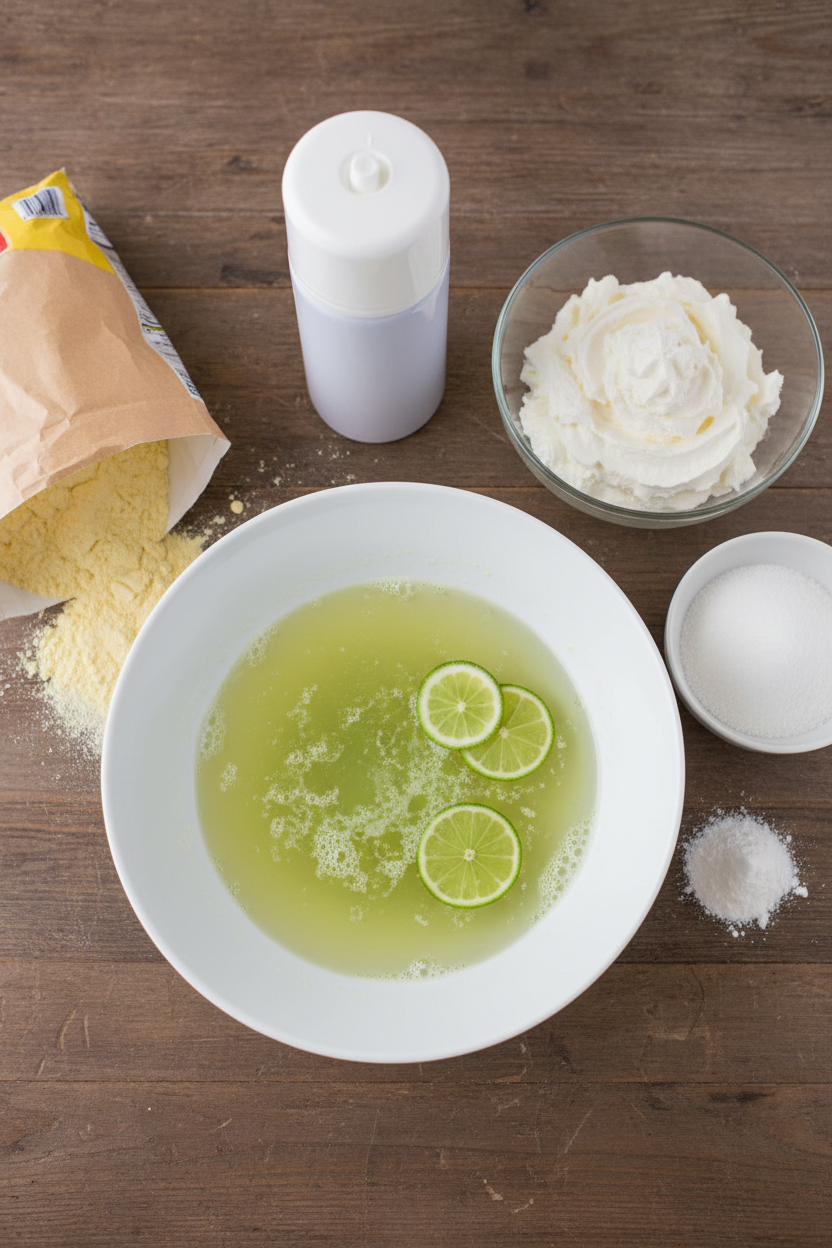
Step 3: Time for the lime filling. Whisk gelatin, juice, sugar, and cornstarch in a pan. Cook it until it gets a little thick. Then stir in butter and zest. Doesn’t that smell amazing? (Stir constantly so it doesn’t get lumpy.)
Step 4: Carefully pour the warm filling over the cake. Watch it disappear into all those holes! Let the cake cool on the counter. Then, it must chill in the fridge. Two hours feels like forever, I know.
Step 5: Finally, spread the whipped topping all over. Make it nice and fluffy. Sprinkle a little lime zest on top for garnish. It looks so pretty and tastes like sunshine. Your masterpiece is ready to share!
Creative Twists
Try a graham cracker crust layer on the bottom of the pan. Mix a little lime zest right into the whipped topping. Use lemon juice and gelatin for a sunny lemon version. Which one would you try first? Comment below!Serving & Pairing Ideas
Serve a square with fresh berries on the side. A little mint leaf makes it fancy. For a real treat, add a small scoop of vanilla ice cream. The cold creaminess is perfect. Which would you choose tonight?
Keeping Your Cake Fresh and Fabulous
Let’s talk about keeping your poke cake happy. Once chilled, cover it tightly. It lives in the fridge for up to four days. You can also freeze slices for a month. Wrap them well in plastic wrap first.
I remember my first poke cake. I left it uncovered. It dried out like the desert! Now I always cover it right away. This matters because a little care means sweet treats later. It saves time and money too.
You can bake the cake a day ahead. Just add the filling and topping the next day. This makes a busy day much easier. Have you ever tried storing it this way? Share below!
Simple Fixes for Common Cake Troubles
Sometimes cakes don’t behave. Here are three easy fixes. First, a dry cake. Poke those holes deep so the juicy filling gets inside. Second, a runny filling. Cook it until it coats your spoon nicely.
I once pulled my filling off the heat too soon. It was so runny! Letting it thicken matters. It gives you that perfect, creamy bite. Third, a soggy cake. Let the baked cake cool for ten minutes first.
Poking a warm cake helps. The holes stay open for the filling. This matters for great texture in every slice. Which of these problems have you run into before?
Your Quick Questions, Answered
How do you make key lime poke cake from scratch?
Start with a simple yellow cake mix. Bake it in a 9×13 pan. After it cools a bit, poke holes all over. Make the tangy lime filling on your stovetop. Pour the warm filling over the cake, right into the holes. Chill it well before adding fluffy whipped topping on top.
Can I use regular limes instead of key limes?
Yes, you can use regular lime juice. Key limes are a bit more tart and aromatic. But regular Persian limes work just fine. You will still get a delicious, citrusy cake. The flavor will be slightly different but still wonderful. Use the same amount, one cup of juice.
What is the best way to get a tangy filling?
Use real key lime juice for the best tang. Bottled juice works well too. Do not skip the lime zest. The zest holds so much bright flavor. *Fun fact: the zest contains fragrant oils that pack a punch.* Cooking the filling correctly also helps concentrate that lovely, tart taste.
Can I make key lime poke cake ahead of time?
Absolutely. This cake is perfect for making ahead. You must chill it for at least two hours. I often make mine the night before serving. The flavors get even better as they mingle. Just add the whipped topping right before you are ready to serve it to guests.
What are some toppings for key lime poke cake?
Whipped topping is classic and light. You could use fresh whipped cream too. Garnish with thin lime slices or more zest. Crushed graham crackers add a nice crunch. A little sprinkle of toasted coconut is also lovely. Keep it simple so the bright lime flavor stays the star of the show.
How do you keep poke cake moist?
The secret is in the poking and the filling. Poke holes while the cake is still warm. Make sure your lime filling is warm and fluid when you pour it. This lets the sweet and tart juice soak deep into the cake. Chilling it sets everything into a wonderfully moist dessert.
Which tip will you try first?
From My Kitchen to Yours
I hope you love making this sunny cake. It always reminds me of summer afternoons. Sharing food is one of life’s great joys. I would love to hear about your baking adventure.
Tell me all about it in the comments below. Have you tried this recipe? Did your family enjoy it? Your stories make my day so much brighter. Thank you for spending this time with me.
Happy cooking!
—Elena Rutherford
