

The First Crunch
Let’s start with the crunch. Mix those graham crumbs, melted butter, and sugar. It will feel like wet sand. Press it into your dish. I use my fingers. It feels good and messy.
Chill it for ten minutes. This matters because a firm crust holds everything up. It keeps your layers from getting soggy. What’s your favorite part to mix with your hands? I still laugh at how my grandson licks the bowl.
The Creamy Heart
Now, the creamy heart. Beat the peanut butter and soft cream cheese. Add the powdered sugar and vanilla. Doesn’t that smell amazing? It’s sweet and nutty. Then, fold in the whipped topping gently.
Folding keeps it light and fluffy. This matters because texture is everything. A heavy layer would feel like too much. Spread this cloud over your cold crust. *Fun fact: Peanut butter was first sold as a health food over a hundred years ago!*
Magic Chocolate Blanket
This part is magic. Heat the cream until it steams. Pour it over the chocolate chips. Let it sit. For two whole minutes. This is the hardest part. Be patient.
Then stir. It turns into a smooth, glossy blanket. This is called ganache. Let it cool a little. Then pour it over the peanut butter. Watch it spread. Do you like dark or milk chocolate better for things like this?
The Long Wait
Now, the fridge does the work. Wait at least four hours. Overnight is best. I know, waiting is tough. But it makes all the difference.
The chill lets the flavors get to know each other. It firms everything up so you get a perfect slice. This waiting matters. It turns ingredients into a real dessert. What do you do to pass the time while a treat chills?
Your Final Touch
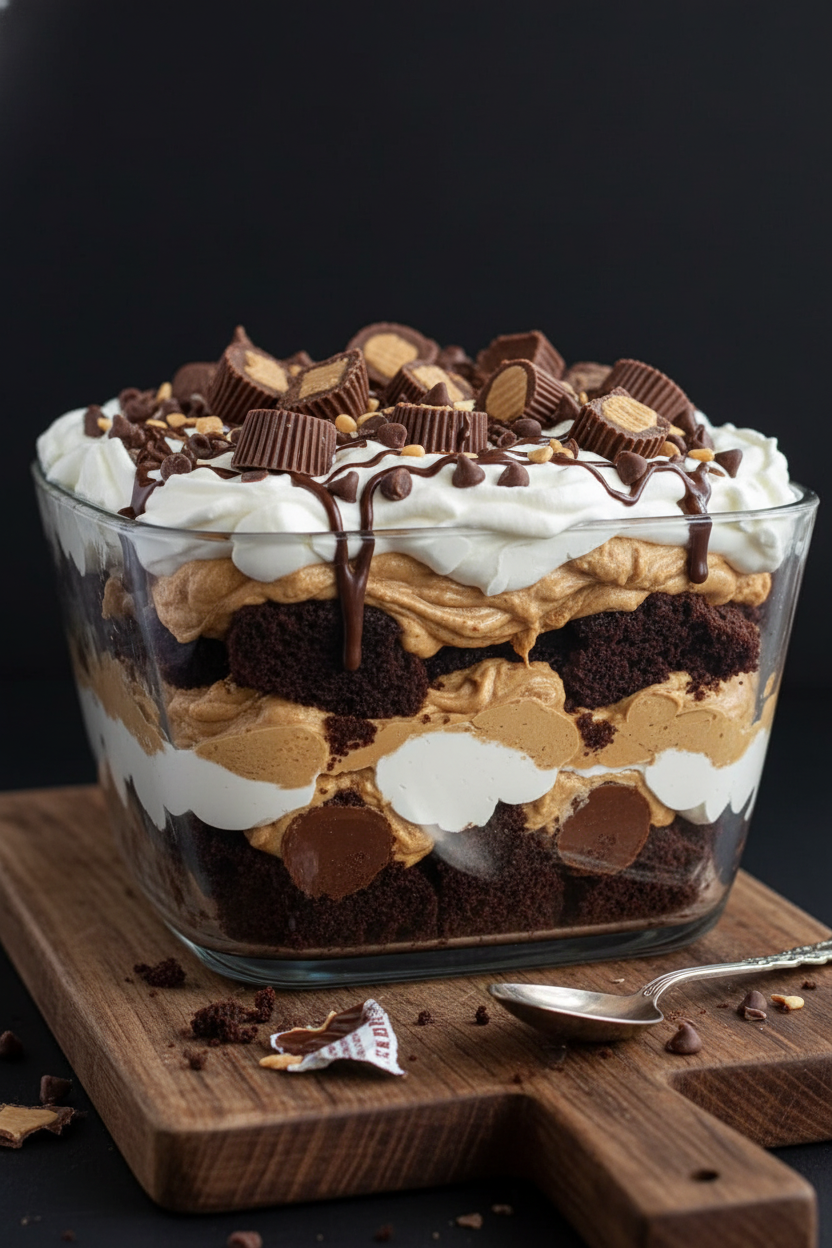
Time to serve. You can add toppings now. Chopped peanuts for crunch. Mini Reese’s for fun. Or just leave it simple. Cut it into squares.
That first bite has it all. Crunch, creamy, rich chocolate. It’s a hug in a bowl. My neighbor brings this to every potluck. Everyone always asks for the recipe. What would you name this dessert? Share your ideas with me.
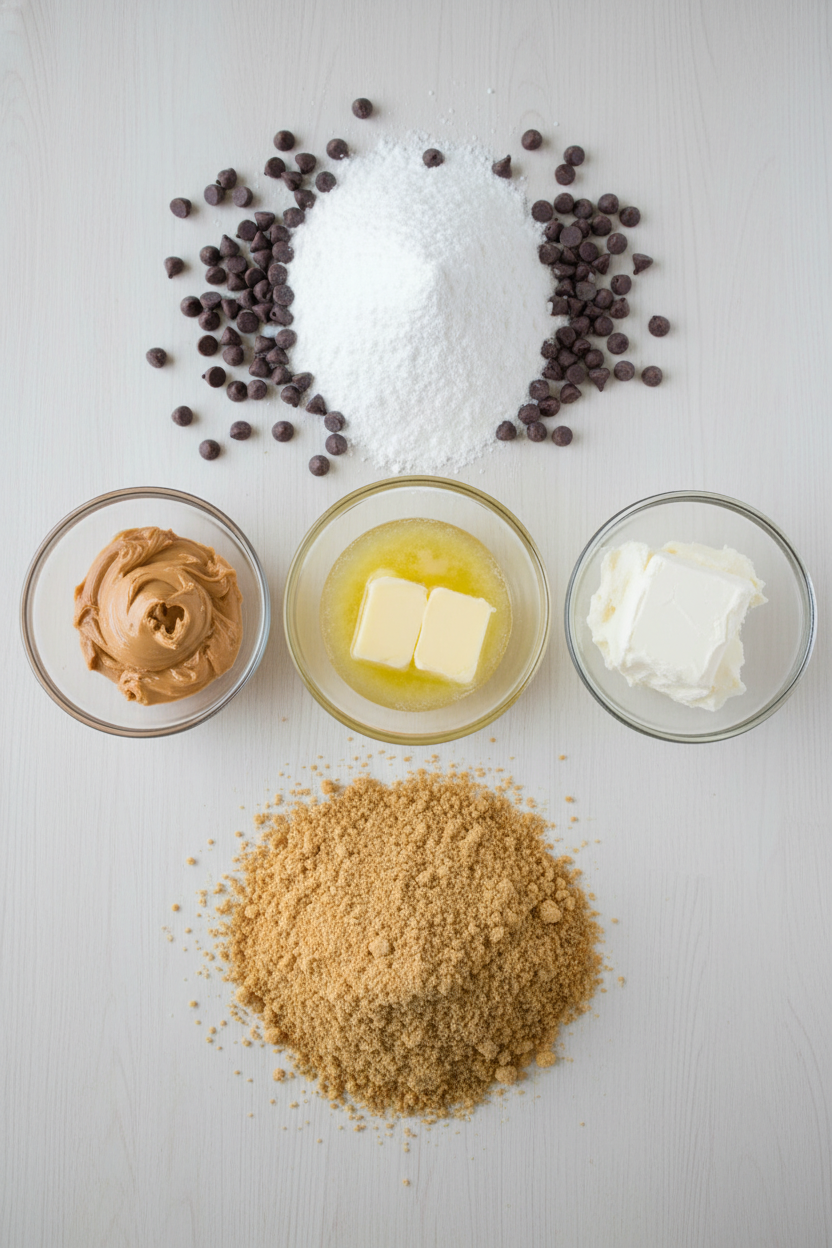
Ingredients:
| Ingredient | Amount | Notes |
|---|---|---|
| Graham cracker crumbs | 2 cups | For the crust |
| Melted butter | ½ cup | For the crust |
| Granulated sugar | ¼ cup | For the crust |
| Creamy peanut butter | 1 cup | For the peanut butter layer |
| Cream cheese | 8 oz | Softened, for the peanut butter layer |
| Powdered sugar | 1 cup | For the peanut butter layer |
| Vanilla extract | 1 tsp | For the peanut butter layer |
| Whipped topping (e.g., Cool Whip) | 1½ cups | For the peanut butter layer |
| Semi-sweet chocolate chips | 1 cup | For the ganache |
| Heavy cream | ½ cup | For the ganache |
| Chopped peanuts | As desired | Optional topping |
| Mini Reese’s pieces or cups | As desired | Optional topping |
| Chocolate curls or drizzle | As desired | Optional topping |
Instructions
Step 1: First, make your crunchy crust. Mix the crumbs, melted butter, and sugar. Press it firmly into your dish. I use the bottom of a cup. Chill it for ten minutes. This makes a perfect base. (Press it down hard so it doesn’t crumble later!)
Step 2: Now for the creamy dream. Beat the peanut butter and soft cream cheese. Add the powdered sugar and vanilla. Fold in the whipped topping gently. Doesn’t that smell amazing? Spread this cloud over your crust.
Step 3: Time for magic chocolate. Heat the cream until it’s steaming. Pour it over the chocolate chips. Let it sit for two whole minutes. Then stir until it’s shiny and smooth. Let it cool just a little bit. Why do we let it sit? Share below!
Step 4: Pour your glossy ganache over the peanut butter. Spread it carefully to the edges. I still laugh at my first messy try. Now, the hard part is waiting. You must chill it for hours.
Step 5: Let it sleep in the fridge overnight. This makes it slice so neatly. Before serving, add your favorite toppings. Chopped peanuts are my go-to. Then, cut into squares and enjoy your heaven!
Creative Twists
Cookie Crust: Use crushed chocolate sandwich cookies instead of graham crackers.Fruity Swirl: Swirl some strawberry jam into the peanut butter layer.
Salty Sweet: Sprinkle a little flaky sea salt on the chocolate ganache.
Which one would you try first? Comment below!
Serving & Pairing Ideas
Serve each square on a little plate. A dollop of whipped cream on the side is lovely. For a party, top each piece with a mini peanut butter cup. A cold glass of milk is the perfect partner. It cuts the richness just right. Which would you choose tonight?
Keeping Your Heaven In A Bowl Perfect
Let’s talk about keeping these bars happy. They must live in the fridge. Cover the dish tightly with plastic wrap. They will stay perfect for up to five days.
You can also freeze them for a month. Cut them into squares first. Wrap each square in plastic, then place in a freezer bag. I remember my first batch. I left it uncovered overnight. The ganache got dull and the crust went soft.
Batch cooking this dessert is a smart idea. It saves you time later. You always have a sweet treat ready for guests. This matters because life gets busy. A ready-made dessert brings simple joy to a hectic day.
Have you ever tried storing it this way? Share below!
Easy Fixes for Common Kitchen Hiccups
We all face little problems in the kitchen. Here are three easy fixes. First, a soggy crust. Make sure your butter is just melted, not hot. Press the crumbs firmly into the dish.
Second, a lumpy ganache. Always let the hot cream sit on the chocolate. I once stirred too soon. It made a grainy mess. Wait a full two minutes for smooth melting.
Third, a runny peanut butter layer. Your cream cheese must be very soft. Beat it well before adding other things. Fixing these issues builds your cooking confidence. It also makes your food taste so much better. Good texture is part of the flavor.
Which of these problems have you run into before?
Your Quick Questions, Answered
How to make no-bake peanut butter bars?
You mix a crust from crumbs, butter, and sugar. Press it in a dish. Then beat peanut butter with soft cream cheese and sugar. Fold in whipped topping for fluff. Finally, make ganache with hot cream and chocolate chips. Pour it on top. Chill everything for hours until firm. It’s a simple, no-oven recipe.
What is the best chocolate for ganache?
Use semi-sweet chocolate chips. They are easy to find and melt well. Good chocolate makes a smooth, shiny ganache. You can use baking bars chopped small too. I find chips are the most reliable. A fun fact: ganache was invented in France. The name might mean “jowl” or “foolishness”! Just use good chips for a foolproof topping.
Can I use natural peanut butter for no-bake bars?
I do not recommend natural peanut butter. It often separates and is more oily. This can make your filling layer too soft. For the best texture, use a regular creamy peanut butter. The kind that is already stirred and stable works perfectly. It helps the layers set firmly in the fridge.
How do you set ganache without baking?
Ganache sets by cooling down. After you pour it on the bars, just put the dish in the refrigerator. The cold air turns the liquid chocolate and cream into a firm, sliceable layer. It needs at least four hours to set properly. Overnight chilling is even better for clean cuts.
How long do no-bake peanut butter bars last?
They last up to five days in the fridge. Keep them covered well with plastic wrap. This stops the ganache from drying out. It also keeps other fridge smells away. For the best taste and texture, enjoy them within the first three days. The crust stays nicest this way.
Can you freeze peanut butter chocolate ganache bars?
Yes, you can freeze them for one month. Cut them into squares first. Wrap each square tightly in plastic wrap. Then place all the wrapped squares in a freezer bag. Thaw them in the fridge overnight before serving. This keeps the layers perfect.
Which tip will you try first?
A Final Word From My Kitchen
I hope you love making this dessert. It is one of my favorite treats to share. The layers look fancy but come together so easily. I always feel proud when I serve it.
Remember, cooking is about joy, not perfection. Your family will love it no matter what. I would be delighted to hear about your baking adventure.
Have you tried this recipe? Tell me all about it in the comments below.
Happy cooking!
—Marina Caldwell
