

The Magic of a Simple Cake
This cake is a hug on a plate. It mixes two great tastes: chocolate and strawberry. I love how the fresh berries cut through the rich chocolate. Doesn’t that sound perfect?
I made this for my grandson’s birthday. He said it was his favorite. I still smile at that memory. This matters because food is about sharing joy. It’s not just about following steps.
A Little Story About Strawberries
Let me tell you about the strawberries. You mix them with sugar and lemon. This is called macerating. It sounds fancy, but it’s easy. It pulls out their sweet, juicy syrup.
That syrup soaks into the cake layers. It keeps everything moist and tasty. Have you ever tried this trick with other fruits? It works with peaches too! A good strawberry layer makes all the difference.
Why the Chocolate Shell Works
The shiny chocolate top is the fun part. You just melt chocolate with coconut oil. Pour it over the cold cake. It hardens into a crisp shell when it hits the cold cake.
*Fun fact: This works because the coconut oil hardens at room temperature.* It gives you that satisfying crack when you slice it. It turns a simple chocolate cake into something special. Do you like that snap when you cut into a dessert?
Putting It All Together
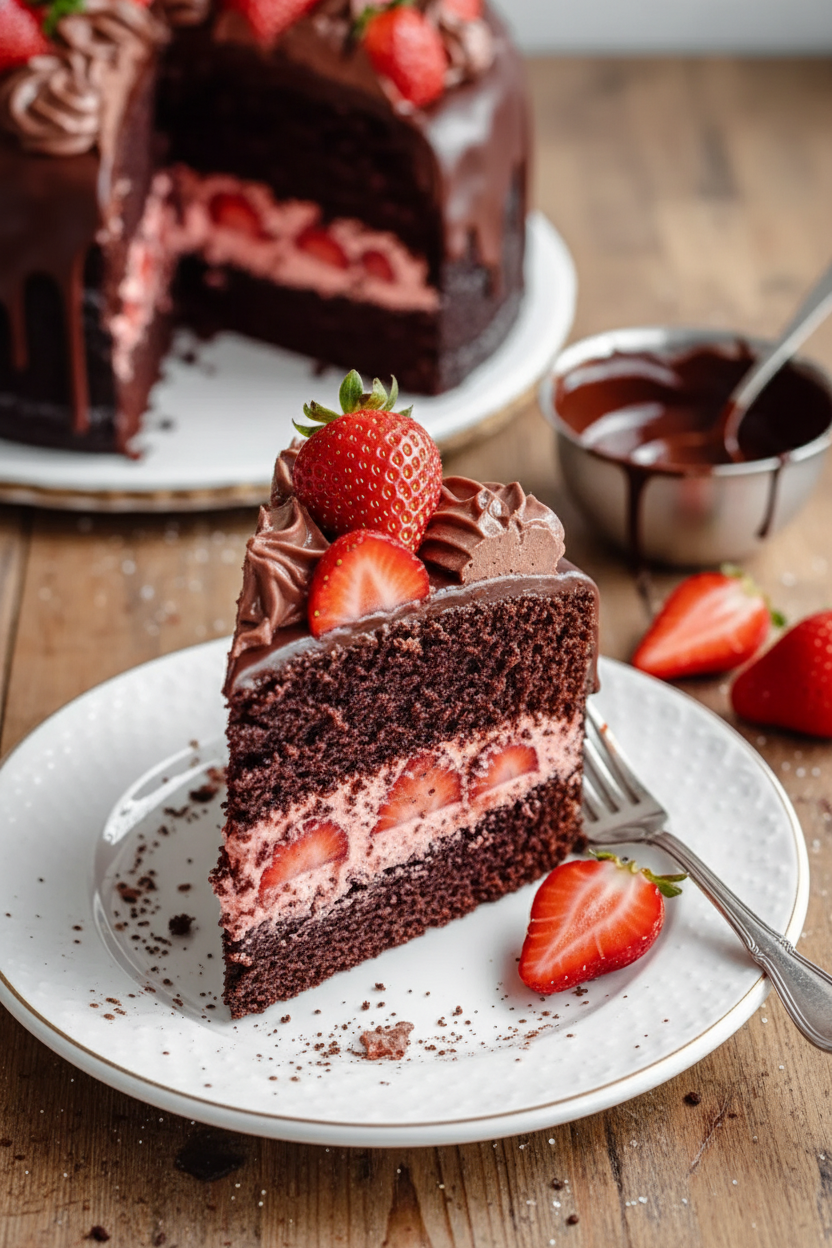
Assembling this cake is the best step. You layer the juicy strawberries between the dark cake. Then you add that magic shell. The chill in the fridge is important. It lets all the flavors get to know each other.
This matters because patience makes food better. Good things need a little rest. Would you rather eat cake right away, or wait for it to set? I know it’s hard to wait!
Your Turn in the Kitchen
Now, you try it. This recipe is very forgiving. If your shell isn’t perfect, it still tastes amazing. The real goal is to have fun and make something delicious.
You could even try this chocolate shell trick on other treats. What would you pour it over? Ice cream? Maybe a peanut butter pie? Tell me what you think!
Instructions
Step 1: Warm your oven to 350°F. Grease your cake pans well. I always use a little butter and a dusting of flour. Doesn’t that smell amazing? It reminds me of my own grandma’s kitchen.
Step 2: Whisk all your dry stuff in a big bowl. Flour, sugar, cocoa, and the rest go in. (Sift your cocoa to avoid lumps, a hard-learned tip!). This makes the cake so light and fluffy. What’s your favorite chocolate cake memory? Share below!
Step 3: In another bowl, mix the buttermilk, oil, eggs, and vanilla. Stir until it’s all smooth and friendly. I still laugh at the time I used salt instead of sugar! Pour this into your dry mix. Add the boiling water last, stirring gently.
Step 4: Divide the batter and bake for 30-35 minutes. A toothpick should come out clean. Let the cakes cool completely. Slice your strawberries and mix them with sugar and lemon. They’ll get all juicy and sweet, perfect for a strawberry layer cake filling.
Step 5: Stack the first cake layer. Pile on those lovely berries. Top with the second layer and chill it. Melt chocolate and coconut oil together until glossy. Pour it over the cold cake for a magic shell. It sets like a chocolate pie topping!
Creative Twists
Add a layer of sweetened cream cheese. It’s like a surprise inside!
Use white chocolate for the shell instead. So pretty and creamy.
Mix mini chocolate chips into the cake batter. For extra little chocolate bites.
Which one would you try first? Comment below!
Serving & Pairing Ideas
Serve each slice with a dollop of whipped cream. A few fresh berries on the side look lovely. For a real treat, a scoop of vanilla ice cream melts perfectly with the chocolate cake. Which would you choose tonight?
Keeping Your Cake Fresh and Fabulous
Hello, my dear! Let’s talk about keeping your cake lovely. First, the fridge is your friend. Cover the cake tightly with plastic wrap. This keeps it moist and safe. You can store it for up to three days this way. I remember my first chocolate cake. I left it out overnight. It was sadly dry by morning.
For longer storage, use your freezer. Wrap the whole cake or slices in plastic. Then wrap them again in foil. This stops freezer burn. It’s perfect for batch cooking for later. Why does this matter? It saves time and reduces waste. A sweet treat is always ready for surprise guests!
To reheat, let a frozen slice thaw in the fridge. Then, let it sit out for 30 minutes. A quick 10-second microwave zap can soften the chocolate shell. Have you ever tried storing it this way? Share below!
Simple Fixes for Common Cake Hiccups
Even grandmas have kitchen troubles! Here are three easy fixes. First, a dry cake. This often happens from over-baking. Set a timer and check early. I once got chatting and over-baked a batch. It matters because a moist cake is a happy cake.
Second, a soggy bottom. Always cool your cakes completely before filling. The strawberry syrup needs a firm base. Third, a broken chocolate shell. If it seizes, add a tiny bit more warm coconut oil. It matters because fixing mistakes builds your cooking confidence. Which of these problems have you run into before?
*Fun fact: Adding boiling water to chocolate cake batter helps the cocoa “bloom” for richer flavor.* For more rich ideas, see this creamy chocolate pie.
Your Quick Questions, Answered
How to make a chocolate glazed strawberry cake from scratch?
Start with the recipe above. It guides you perfectly. Make the rich chocolate cake layers first. Let them cool completely. Then, macerate fresh strawberries with sugar. Finally, make the simple chocolate shell glaze. Pour it over your assembled cake. The result is a stunning, homemade dessert that tastes like love. For another stunning layer cake, try this strawberry custard version.
What is the best filling for a strawberry layer cake?
Fresh, macerated strawberries are the best. Slicing them and mixing with sugar draws out their juice. This creates a sweet, syrupy filling. It is fresh and not too heavy. It pairs beautifully with the rich chocolate. It lets the true fruit flavor shine through in every single bite.
How do you keep a strawberry cake from getting soggy?
The key is to cool your cake layers fully. Warm cake melts the strawberry juice. Also, do not add the filling too early. Assemble just before serving or glazing. Chill the assembled cake before adding the chocolate shell. This helps the layers set and stay perfectly textured.
Can I use frozen strawberries for strawberry filling?
Yes, you can use frozen strawberries. Thaw them completely first. Then, drain the extra liquid very well. If you don’t, the filling will be too wet. You may also need to chop them after thawing. They work in a pinch, but fresh berries give the very best flavor and texture for your special cake.
What kind of chocolate is best for a mirror glaze?
Good quality dark chocolate is best. Use chocolate bars meant for baking. They melt smoothly. Chocolate chips have coatings that can hinder the shine. The coconut oil in the recipe gives that glossy, shell-like finish. It sets beautifully. For a different creamy dessert, this dirt cake is always fun.
How to decorate a strawberry chocolate cake simply?
Keep it simple and elegant. After the chocolate shell sets, add fresh whole strawberries on top. A dusting of powdered sugar looks pretty. You can also add a few mint leaves for a pop of green. The cake itself is so beautiful, it doesn’t need much! Which tip will you try first?
Bake With Love and Share a Slice
There you have it, my dear. Baking is about sharing joy. This cake is a wonderful way to show someone you care. I hope you have as much fun making it as I do. Remember, the best ingredient is always a happy heart. Have you tried this recipe? I would love to hear your story in the comments below.
Happy cooking!
—Elowen Thorn

Chocolate Glazed Strawberry Filled Layer Cake
Description
A decadent chocolate cake layered with sweet macerated strawberries and finished with a glossy, firm chocolate shell glaze.
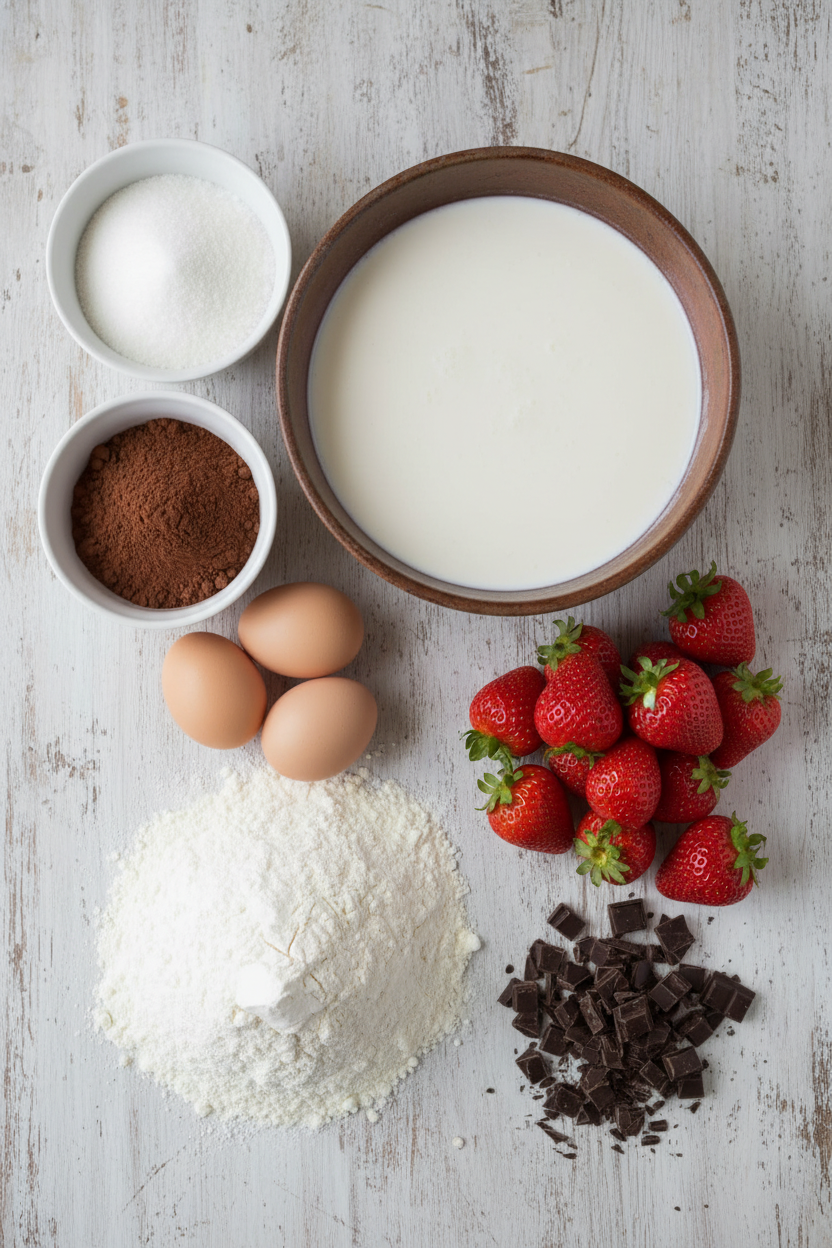
Ingredients
2 cups All-Purpose Flour
2 cups Fresh Strawberries, sliced
8 ounces Dark Chocolate
Instructions
- Preheat your oven to 350°F (175°C). Grease and flour two 9-inch round cake pans.
- In a large mixing bowl, whisk together the all-purpose flour, granulated sugar, cocoa powder, baking powder, baking soda, and salt.
- In a separate bowl, whisk together the buttermilk, vegetable oil, eggs, and vanilla extract until smooth and fully combined.
- Gradually pour the wet mixture into the dry ingredients, stirring gently to combine. As you mix, slowly add the boiling water, ensuring the batter remains smooth and well-blended.
- Evenly divide the batter between the two prepared cake pans and bake for 30-35 minutes or until a toothpick inserted in the center comes out clean. Let the cakes cool completely.
- While the cakes cool, prepare the strawberry filling. In a bowl, combine the sliced fresh strawberries with sugar and lemon juice. Allow them to sit for about 15–20 minutes, stirring occasionally.
- Place one cooled cake layer on a serving plate. Top it generously with the macerated strawberries and syrup. Gently place the second layer on top, then chill the cake in the refrigerator for 30 minutes.
- Melt the dark chocolate and coconut oil together in a heatproof bowl set over simmering water. Stir continuously until completely smooth, then remove from heat and let cool slightly.
- Carefully pour the melted chocolate over the chilled cake, ensuring it flows down the sides. Use a spatula to spread for an even coat. Allow the chocolate shell to set at room temperature for about 15-20 minutes or until firm.
- Slice and serve the cake chilled or at room temperature.
Notes
- Ensure the cake layers are completely cool before assembling to prevent the strawberry filling from making them soggy. For a shinier chocolate glaze, ensure the chocolate mixture is warm, not hot, when pouring.