

My Chicago Bakery Memory
I first tasted these apple slices long ago. My cousin worked at a little bakery there. He brought a big box to a family picnic. I still laugh at that. We all fought over the last piece.
The crust was so flaky. The apples were sweet and spiced just right. That memory makes me smile every time I bake them. It matters because food ties us to happy people and places. What’s your favorite food memory? I’d love if you shared it with me.
The Heart of the Slice
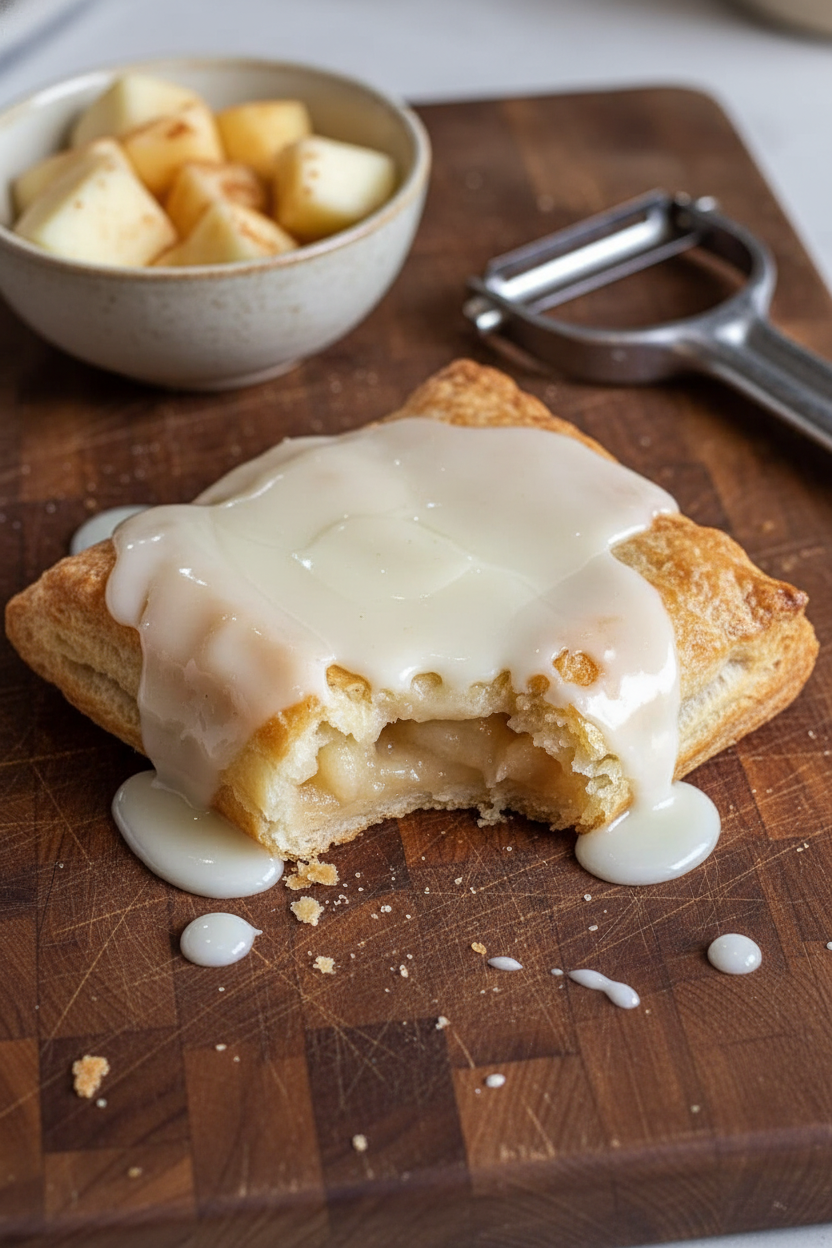
This recipe is all about the crust. You use cold butter and ice water. This makes little pockets of steam in the oven. That steam makes the crust light and flaky. It’s a simple trick with a big reward.
The filling is simple, too. Use firm apples so they keep their shape. I like a mix of sweet and tart kinds. Toss them well with the sugar and spice. Doesn’t that smell amazing? That smell is the heart of a cozy kitchen. If you love apple treats, my spiced apple cobbler is another family favorite.
Why the Little Steps Matter
Chilling the dough is not a skip. It lets the butter get firm again. This stops the crust from getting tough. Patience here makes a better treat. I know it’s hard to wait!
Letting the baked slice cool is also key. If you cut it warm, the filling will run. Letting the glaze set makes clean slices. This matters because care shows love. Your effort makes people feel special. Do you have a baking step you used to skip but now never do?
A Fun Fact About Glaze
Fun fact: The shiny glaze on top isn’t just pretty. It seals in moisture. This keeps the apple filling from drying out. It adds a little sweet crunch, too.
My trick is to use melted butter in the glaze. It makes it extra rich and helps it set nicely. For another recipe with a lovely glaze, try these blueberry crumb muffins. They are a wonderful breakfast treat.
Make It Your Own
This is a friendly recipe. You can change it to suit your taste. Try adding a handful of raisins or dried cranberries to the apples. A dash of cardamom is nice with the cinnamon, too.
Baking is about sharing joy. These slices are perfect for a school bake sale or a neighbor. They travel well in the pan. I think you’ll love them. If you like chocolate, my dark chocolate bread pudding is a cozy dessert. Which variation do you think you’ll try first?

Instructions
Step 1: First, make your dough. Whisk the flour, sugar, and salt together. Cut in the cold butter until it looks like crumbs. I still use my grandma’s old pastry cutter for this. It feels right.
Step 2: Mix the wet ingredients in a small bowl. Pour them into your flour mixture. Stir just until a dough forms. (Tip: Too much mixing makes a tough crust!). Split the dough, wrap it, and let it rest in the fridge.
Step 3: Now, for the fun part—the apples! Toss your slices with all the filling ingredients. Doesn’t that smell amazing? Use a mix of tart and sweet apples for the best flavor. What’s your favorite apple for baking? Share below!
Step 4: Roll out the bigger dough piece. Gently press it into your greased pan. Spread the apple filling over it. Roll the second piece for the top. Crimp the edges with a fork and cut little vents. This lets the steam sing!
Step 5: Bake until golden and bubbly. Let it cool completely. Whisk the simple glaze and spread it on top. Let it set before you cut. This patience is the hardest step, I know! Try it with a scoop of vanilla ice cream.
Creative Twists
Add a handful of fresh blueberries to the apple filling for a juicy surprise. Swap the glaze for a cream cheese drizzle, like on my favorite blueberry muffins. Sprinkle coarse sugar on the crust before baking for a sweet, crunchy top. Which one would you try first? Comment below!
Serving & Pairing Ideas
Serve a warm slice with a cold glass of milk. It’s a classic. For a fancy touch, add a dollop of whipped cream. A sharp cheddar cheese slice on the side is a wonderful old-fashioned treat. Which would you choose tonight?
Keeping Your Apple Slices Fresh and Tasty
Let’s talk about storing these sweet treats. Once cooled, cover the pan tightly. It will keep on the counter for two days. For longer, I slice and freeze them on a tray. Then I pop the pieces into a freezer bag. This way, you can grab one slice anytime.
I remember my first batch. I left it out uncovered overnight. The crust got so soft! Now I always cover it right away. Batch cooking this dessert is a wonderful idea. It saves you so much time on a busy week. You can have a homemade dessert ready in minutes. That matters when you need a little comfort.
To reheat, just warm a slice in the oven. This keeps the crust flaky. The microwave can make it soggy. For a real treat, try it with a scoop of vanilla ice cream. My family loves it that way. Have you ever tried storing it this way? Share below!
Simple Fixes for Common Baking Hiccups
We all run into little problems in the kitchen. First, a tough crust. This happens if you work the dough too much. Handle it gently and use very cold butter. I once made a crust hard as a rock! I learned to be more patient.
Second, a runny filling. Your apples might have been too juicy. Tossing them with cornstarch is the key. It thickens all those lovely juices. This matters because a perfect slice holds together. Third, a pale top crust. Brush it with a little milk before baking. It will turn a beautiful golden brown.
Fixing small issues builds your confidence. You learn that mistakes are just lessons. Soon, you’ll be sharing your own perfect apple desserts with pride. Which of these problems have you run into before?
Your Quick Questions, Answered
What are the best apples for baking apple slices?
Use firm apples that hold their shape. Granny Smith apples are my favorite for baking. They have a nice tart flavor that balances the sugar. Fuji or Honeycrisp apples are sweeter but also work well. Mixing two kinds gives you a wonderful depth of flavor. This tip ensures your filling is not too mushy.
How do you get the crust flaky like a bakery’s?
The secret is very cold ingredients. Keep your butter, water, and eggs chilled. Work the dough quickly with your hands. Do not overmix it. Small bits of cold butter in the dough create steam in the oven. That steam makes those perfect, flaky layers we all love.
What is the secret to preventing soggy apple slices?
Toss your apple slices well with cornstarch and sugar. The cornstarch soaks up the extra juices. Also, let your bottom crust chill in the pan before adding filling. A hot crust will start to cook the apples too soon. A fun fact: a little lemon juice on the apples also helps keep their texture.
How do bakeries make their apple filling so flavorful?
They use more than just cinnamon. A pinch of nutmeg adds a warm, cozy note. A splash of vanilla extract makes it taste richer. Letting the sugared apples sit for a few minutes helps too. The flavors get to know each other. It’s like the start of a great friendship.
What is the trick to the crumb topping on apple slices?
This recipe uses a top crust, not a crumb. But for a crumb, keep your butter cold. Mix cold butter cubes with flour and sugar. Use your fingers to make coarse crumbs. Do not let the butter melt. Bake until it is golden and crisp. It’s delicious on muffins too.
Can you make bakery-style apple slices ahead of time?
Yes, you absolutely can. Assemble the whole dessert a day before baking. Keep it covered in the fridge. You can also bake it fully, let it cool, and freeze it. This is perfect for having a special dessert ready for guests. Which tip will you try first?
From My Kitchen to Yours
I hope you feel ready to bake these lovely apple slices. There is nothing like the smell of cinnamon in your kitchen. It makes a house feel like a home. I love hearing your stories and seeing your photos. Please tell me all about your baking adventure in the comments. Have you tried this recipe?
Happy cooking!
—Elowen Thorn

Grandmas Secret Bakery Style Apple Slices
Description
Chicago-Style Bakery Apple Slices
Ingredients
For the Crust:
For the Apple Filling:
For the Glaze:
Instructions
- Whisk together flour, sugar, and salt in a large bowl.
- Add cold butter and work it into the flour with a pastry cutter until coarse crumbs form.
- Whisk eggs, ice water, and lemon juice in a small bowl. Pour over flour mixture and stir until dough just comes together.
- Split dough into two pieces (one bigger than the other). Flatten into rectangles, wrap in plastic, and refrigerate for 30 minutes.
- Toss apple slices with both sugars, cornstarch, cinnamon, nutmeg, salt, lemon juice, and vanilla.
- Heat oven to 375°F. Spray a 9×13-inch pan with cooking spray.
- Roll out the bigger piece of dough to fit your pan with overhang. Press into pan.
- Spread apple filling over bottom crust.
- Roll out remaining dough and place over filling. Trim edges and crimp with a fork. Cut vents in top.
- Bake for 45 to 50 minutes until golden and bubbling.
- Cool completely on a wire rack.
- Whisk glaze ingredients until smooth. Spread over cooled slices.
- Let glaze set for 15 minutes before cutting.
Notes
- Nutrition per serving: Calories: 310kcal | Carbohydrates: 45g | Protein: 4g | Fat: 14g | Saturated Fat: 8g | Cholesterol: 55mg | Sodium: 120mg | Fiber: 2g | Sugar: 26g | Vitamin A: 420IU | Vitamin C: 3mg | Calcium: 18mg | Iron: 2mg