

The Magic of No-Bake Treats
Some of the best things happen without turning on the oven. I learned this from my granddaughter on a hot summer day. She wanted to bake but the kitchen was too warm. So we got creative in the cool fridge instead. That’s the joy of a no-bake cheesecake. It’s a little kitchen miracle.
This recipe is perfect for new cooks. You don’t need to worry about baking times or a hot oven. You just mix, chill, and dream. The waiting is the hardest part! What’s your favorite no-bake dessert to make? I’d love to hear your ideas. For another cool treat, try this Biscoff pudding.
Building a Crunchy Foundation
The crust is where the story begins. It’s the first thing you taste. I use a simple mix of cookie crumbs and melted butter. Pressing it into the pan is my favorite part. You get to use your hands and feel the texture.
Why does this matter? A good crust holds everything together. It gives each bite a wonderful crunch. *Fun fact*: The cookies in the crust are also called speculoos. They are spiced with cinnamon and nutmeg. That warm spice makes everything taste like a hug. Save some crumbs for the middle layer too. It makes a happy surprise.
The Heart of the Cheesecake
Now for the creamy filling. Let your cream cheese get nice and soft first. This is very important. If it’s too cold, you’ll get lumps. I learned this the hard way once. My first cheesecake was bumpy! I still laugh at that.
Mixing in the cold cream slowly is the big trick. It keeps everything smooth. When you add the Biscoff cookie butter, the smell is amazing. It’s like caramel and cookies. This filling is so good you could eat it with a spoon. But be patient, it needs time to set in the fridge.
Why Patience is a Secret Ingredient
This cheesecake needs to chill for many hours. I know, waiting is tough! But this matters. The cold time lets the flavors become friends. It also makes the cake firm enough to slice. It’s worth the wait, I promise.
While you wait, you can dream of the toppings. The melted cookie butter drizzle is the final touch. It makes the cake look shiny and special. Do you like lots of drizzle or just a little? Tell me your style. For a smaller treat, this single-serve cheesecake is lovely.
Sharing the Sweetness
Food tastes better when we share it. I love making this for my neighbors. It always makes them smile. That’s the real magic of cooking. It’s a way to show you care without using words.
This recipe is very forgiving. If your layers mix a little, it’s okay. It will still taste wonderful. What will you make for someone you love this week? You could also try these Biscoff mug cakes for a quick, cozy gift. Or, for another fun project, this cookie butter fudge is a delight.
Instructions
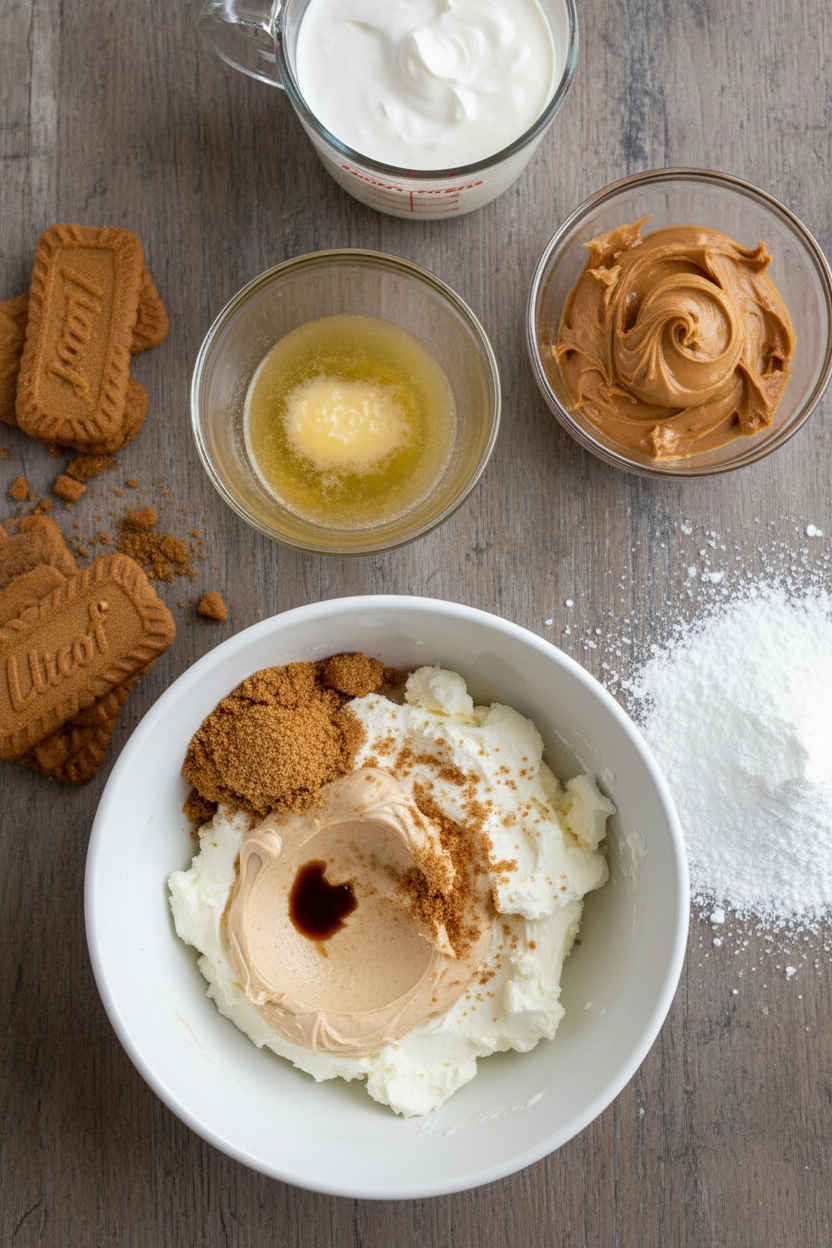
Step 1: First, make your crust. Mix the cookie crumbs, brown sugar, and melted butter in a bowl. It should feel like wet sand. Press most of it into your pan. Use a cup to pack it tight. (A hard-learned tip: really press it up the sides!) Save the rest for later. I love the smell of those spiced cookies.
Step 2: Now, the creamy filling. Beat the room-temperature cream cheese and powdered sugar until smooth. Add the cookie butter and vanilla. Scrape the bowl well. This is the heart of your Biscoff cheesecake. Doesn’t that smell amazing?
Step 3: Slowly drizzle in the cold heavy cream. Go slow, or the cream might shock the cheese. Then whip it on high until it’s thick and holds its shape. Think of fluffy clouds! What’s the most important part of this step? Share below! Pour half into your chilled crust.
Step 4: Sprinkle your saved crumbs over the first filling layer. Gently dollop the rest of the cream on top. Spread it carefully. Cover and chill it for hours. Waiting is the hardest part! For another no-bake treat, try this Biscoff pudding while you wait.
Step 5: Time for the magic finish! Warm the extra cookie butter until it’s runny. Unlatch your pan and move the cake to a plate. Drizzle that liquid gold all over the top. Add some crushed cookies for crunch. Slice, serve, and enjoy every bite!
Creative Twists
Add a layer of sliced bananas for a fun, creamy surprise.
Make mini cheesecakes in a muffin tin for personal treats.
Swirl in some melted chocolate with the cookie butter drizzle.
Which one would you try first? Comment below!
Serving & Pairing Ideas
Serve a slice with a dollop of whipped cream. A cup of cold milk or a hot coffee is perfect alongside. For a fancy touch, add a Biscoff mousse on the side. You could also pair it with fresh berries to cut the sweetness. Which would you choose tonight? For another cookie butter idea, these Biscoff sugar cookies are wonderful.

Keeping Your Cheesecake Happy
This no-bake cheesecake keeps beautifully. Cover it well and store it in the fridge. It will stay delicious for up to four days. You can also freeze slices for a sweet treat later. Wrap each slice tightly in plastic wrap first. Then place them in a freezer-safe container.
I remember my first no-bake cheesecake. I left it uncovered overnight. The top dried out and picked up fridge smells. Now I always press plastic wrap right on the surface. This simple trick keeps it creamy and perfect. Have you ever tried storing it this way? Share below!
Batch cooking matters because life gets busy. Making a dessert ahead saves time and stress. You can enjoy a slice whenever you want. It also lets the flavors blend and get even better. This makes your kitchen time feel like a gift to your future self. For another make-ahead Biscoff treat, try this Biscoff pudding.
Simple Fixes for Common Hiccups
First, a runny filling means it didn’t whip long enough. Your cream and cream cheese must be very cold. Whip until the mixture holds a firm peak. I once rushed this step and had to start over. Patience makes a perfect, sliceable cheesecake.
Second, a soggy crust comes from warm butter. Always let your melted butter cool before mixing. This keeps the crumbs crisp. A firm crust gives your dessert a wonderful texture. It is the foundation for all that creamy goodness.
Third, a grainy filling happens if you overwhip. Stop as soon as it is thick and smooth. This matters for a luxurious, silky mouthfeel. Getting these steps right builds your cooking confidence. Which of these problems have you run into before? For a different creamy dessert, this Biscoff mousse is simpler to whip up.
Your Quick Questions, Answered
How to make a no-bake Biscoff cheesecake?
First, make a crust from Biscoff crumbs and melted butter. Press it into a pan. For the filling, whip room-temperature cream cheese with powdered sugar. Then mix in Biscoff cookie butter and vanilla. Finally, slowly whip in cold heavy cream until thick. Pour filling into the crust and chill for many hours. It’s a simple, mix-and-chill process with amazing results.
What is the best way to make a cookie butter glaze?
The easiest glaze is just melted Biscoff spread. Gently heat it in the microwave or a pan. Stir until it is smooth and liquid. Then pour it right over your chilled cheesecake. It will set into a shiny, flavorful topping. This adds a big boost of that spiced cookie flavor everyone loves.
Can you make a Biscoff cheesecake without gelatin?
Yes, this recipe uses no gelatin. The structure comes from whipped heavy cream. The fat in the cream and cream cheese firms up when chilled. This creates a perfectly set, sliceable cheesecake. It is a great option if you prefer not to use gelatin. The texture is wonderfully light and creamy.
How long does a no-bake Biscoff cheesecake need to set?
It needs at least 6 hours in the fridge. Overnight is even better. This gives the filling time to firm up completely. A fun fact: the waiting is the hardest part! Rushing will give you a messy slice. Planning ahead means you get a perfect, clean piece of cheesecake every time.
What can I use instead of Philadelphia for cheesecake?
Use another full-fat, brick-style cream cheese. Store brands often work just fine. Do not use whipped or spreadable cream cheese from a tub. Those have different moisture levels. They can make your filling too soft. Sticking with a block-style cheese ensures your no-bake cheesecake sets properly and has the right texture.
How do you prevent a no-bake cheesecake from cracking?
Cracks come from air bubbles and sudden temperature changes. Tap the pan on the counter after adding the filling. This releases trapped air. Also, let the cheesecake chill gradually and fully. Do not freeze it to speed up setting. Gentle handling and patience are your best tools for a smooth, beautiful top. Which tip will you try first?
From My Kitchen to Yours
I hope you love making this special cheesecake. It brings such joy to the table. Sharing a homemade dessert is a wonderful thing. I would love to hear about your baking adventures in the comments. Have you tried this recipe? Tell me how it went for you! For a smaller portion, this small-serve Biscoff cheesecake is just as delightful.
Happy cooking!
—Elowen Thorn

No-Bake Biscoff Cheesecake with Cookie Butter Glaze
Description
A decadent, no-bake cheesecake with a spiced Biscoff cookie crust, creamy cookie butter filling, and a glossy cookie butter glaze.
Ingredients
For the Biscoff cookie crust:
For the cheesecake filling:
For the toppings:
Instructions
- Make the Biscoff cookie crust: Line the bottom of a 9 inch springform pan with parchment paper and set aside. In a medium bowl, mix together Biscoff cookie crust ingredients until moistened and combined. Drop about ⅔ of the crumb mixture into your springform pan. Using the bottom of a cup, pack the crust tightly into the bottom and about ¾ of the way up the sides of the pan. Transfer the pan to your fridge and set the remaining ⅓ of the crust mixture aside at room temperature.
- Make the cheesecake filling: In a large bowl, combine cream cheese and powdered sugar. Using an electric mixer fitted with the paddle attachment, mix on low speed until the sugar is dissolved. Increase the speed to medium high and whip until smooth (about 1 minute).
- Scrape down the bottom and sides of the bowl, then add in the cookie butter and vanilla. Mix together until combined and smooth. Pause to scrape down the bottom and sides of the bowl again.
- With the mixer running on low, very slowly drizzle the cold heavy cream into the bowl while mixing to incorporate. Pause after about every ½ cup of whipped cream to make sure it’s all mixed in and to scrape the sides of the bowl down as needed. It’s important to work slowly here or the cold cream could shock the room temperature cheese.
- Once all the heavy cream is mixed in, increase your mixer speed to high and whip until it thickens and begins leaving a distinct trail of ripples from the beater. If you pick up a spoonful of the batter and drop it back into the bowl, it shouldn’t sink back into the rest of the mixture. This will take about 2 to 3 minutes of whipping. Take care not to overwhip or it may make the filling grainy.
- Take the chilled crust out of the fridge. Drop about half of the cheesecake filling into the pan and spread into an even layer over the crust.
- Take the remaining ⅓ of the crust mixture and evenly sprinkle it on top. Dollop over the remaining cheesecake filling on top and spread into an even layer, taking care not to disturb the cookie layer too much.
- Cover the cheesecake and place in the fridge. Chill for at least 6 hours or overnight to allow it to set.
- Prep the toppings: Heat Biscoff butter in your microwave or in a pot over low heat until it becomes liquid. Take the cheesecake out of the fridge and unlatch the sides of the springform pan. Transfer the cheesecake onto your serving plate or cake stand.
- Pour the liquid Biscoff butter over the cheesecake and spread evenly on top. Sprinkle some crushed Biscoff cookies on top if desired. Slice and enjoy.
Notes
- For best results, ensure all ingredients, especially the cream cheese, are at room temperature before mixing, except for the heavy cream which must be cold. This prevents lumps and helps the filling whip properly. The cheesecake can be stored covered in the refrigerator for up to 4 days.