

My Minty Memory
I first made these for my grandson’s school party. He said they looked like little winter gardens. I still laugh at that. The green filling makes them so cheerful. Doesn’t that smell amazing when the mint hits the air?
That’s why this matters. A special treat can turn a regular day into a small celebration. It’s about sharing joy. Do you have a favorite dessert for parties? I’d love to hear about it. You might also enjoy these mini lemon blackberry cheesecakes for another colorful option.
The Crust is Key
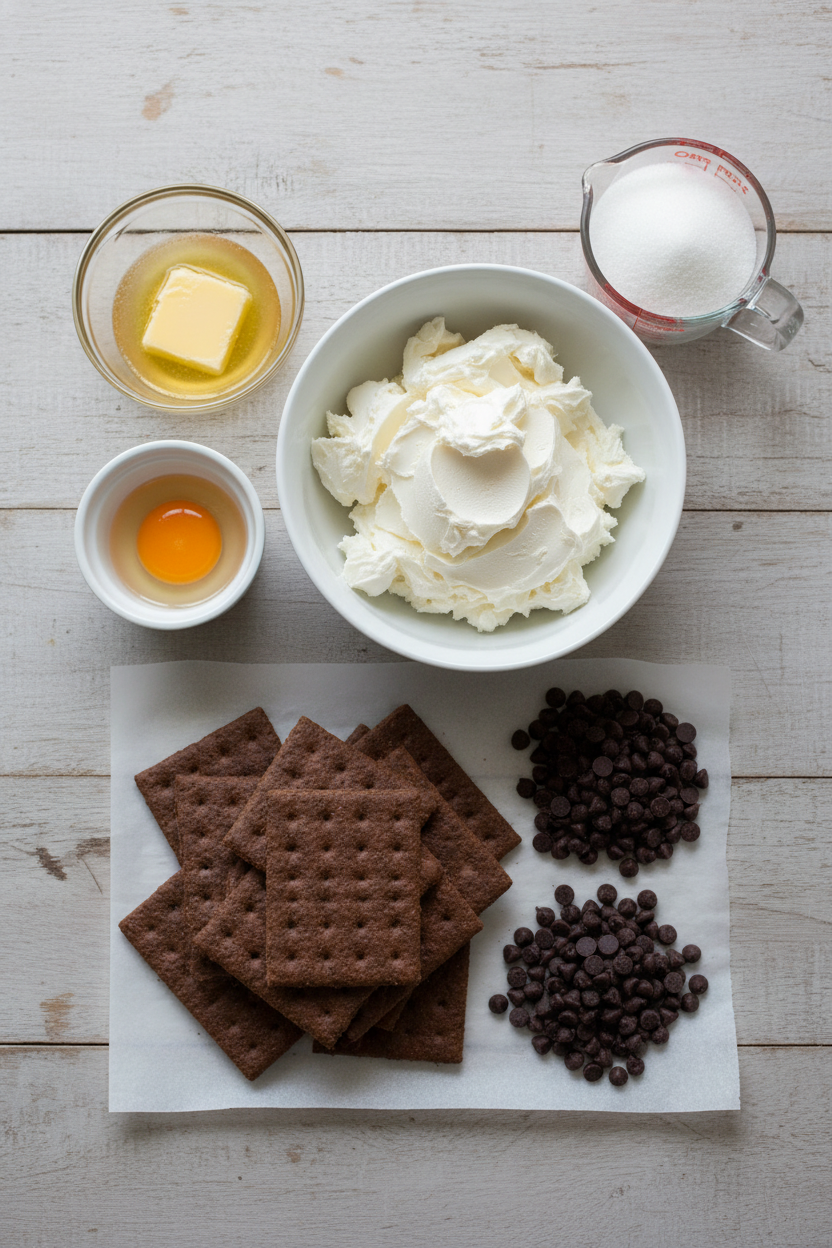
Let’s start with the chocolate crust. Mix the crumbs, sugar, and melted butter. Press it gently into the pan. A spoon works perfectly for this. You want a firm little bed for the filling.
This step matters because a good crust holds everything together. It gives a nice crunch. *Fun fact*: Graham crackers were invented to be a healthy snack! For a different crust idea, try the one in these zesty mini key lime cheesecakes.
Making the Filling
Now for the creamy part. Your cream cheese must be soft. Blend it with the sugar until it’s smooth. Then add the egg, mint, and a little green color.
Mix on low. You just want it combined. Too much mixing puts air in, and we want it dense and rich. Spoon it over your crusts. Are you a fan of mint chocolate, or is it a new flavor for you? If you like creamy fillings, these mini pumpkin cheesecakes are wonderful too.
The Slow Cool Down
Bake them for 20 minutes. Here’s the secret. Turn the oven off. Prop the door open with a wooden spoon. Let them sit for just 5-10 minutes.
This slow cool stops cracks. It keeps your cheesecakes pretty. Then chill them for hours. Patience is the last ingredient! For another no-bake method, see these zesty mini key lime cheesecakes.
The Final Touch
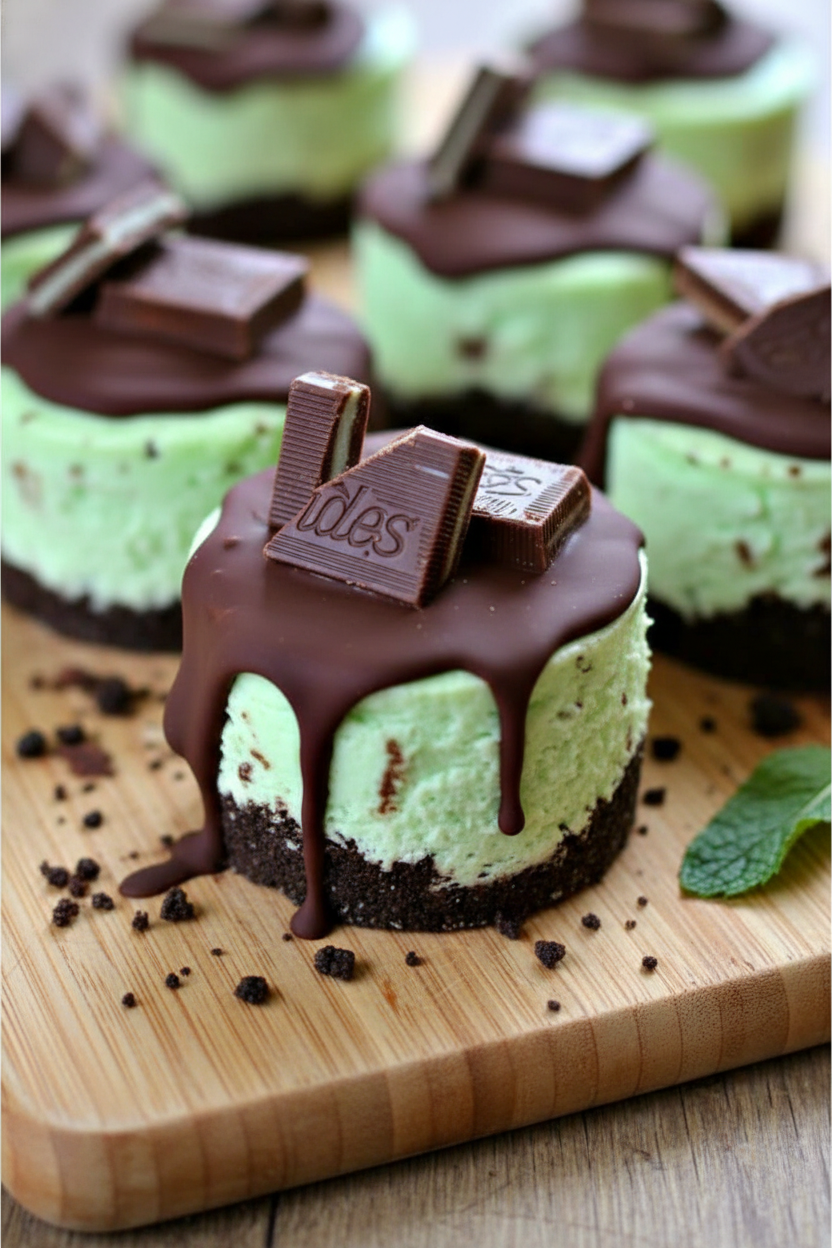
Finally, the chocolate top! Melt your chips. A heaping spoonful on each cake is just right. Then sprinkle the chopped Andes mints. The chocolate will set as it cools.
That crunch from the mint pieces is so good. It’s the perfect finish. Which do you like more, the creamy middle or the crunchy top? For a different topping idea, check out these mini cinnamon roll cheesecakes.
Instructions
Step 1: First, get your oven cozy at 325 degrees. Spray your little pan with nonstick spray. Mix the cracker crumbs, 2 tablespoons sugar, and melted butter. Press this sandy mix into each cup with a spoon. I love how it smells like a chocolate cookie already.
Step 2: Now, let’s make the filling. Beat the soft cream cheese and the rest of the sugar until it’s smooth. Add the egg, mint extract, and green food coloring. (A hard-learned tip: mix on low so you don’t get too many bubbles!) Doesn’t that minty cream look like a sweet little cloud?
Step 3: Spoon your green filling over each crust. Bake them for 20 minutes. After, turn off the oven. Prop the door open with a wooden spoon. Let them sit for just 5-10 minutes. This stops cracks, which I still laugh at from my first try. Do you think the wooden spoon trick is magic? Share below!
Step 4: Take the pan out and let it cool. Then, chill the cheesecakes for hours or overnight. Patience is the secret ingredient! Later, melt your chocolate chips. Top each chilled cheesecake with chocolate and chopped Andes mints. The crunch is the best part, reminding me of holiday dinners.
Creative Twists
Peppermint Patty Style: Use a dark chocolate crust for extra richness.
Chocolate Swirl: Skip the green color and swirl in melted chocolate instead.
Cookie Crunch: Use crushed thin mints in the crust for a double mint hit. Which one would you try first? Comment below!
Serving & Pairing Ideas
Serve these gems on a fancy plate. A dollop of whipped cream makes them extra special. For a party, pair them with other mini treats like mini lemon blackberry cheesecakes. Or try a contrast with zesty mini key lime cheesecakes. Which would you choose tonight?
Keeping Your Mini Cheesecakes Happy
These little treats store beautifully. Let them chill completely first. Then, cover the pan tightly with plastic wrap. They will keep in your fridge for up to four days. You can also freeze them for a month. Just wrap each one well in plastic.
I remember my first batch. I was so proud! I left them uncovered overnight. They tasted fine, but the tops dried out. Now I always cover them right away. It keeps them creamy and perfect. Batch cooking these is a wonderful idea. It means you have a sweet, homemade dessert ready anytime. That matters when friends drop by unexpectedly. Have you ever tried storing it this way? Share below!
Three Little Hiccups and How to Fix Them
First, cracked tops can happen. Do not worry! This is often from mixing too fast. Always mix your filling on low speed. This keeps too much air from getting in. Your mini cheesecakes will stay smooth.
Second, a soggy crust is no fun. I once pressed my crust down too hard. You must press it gently. Just firm enough so it holds together. This matters because a good crust gives a lovely texture. It makes every bite better.
Third, the cheesecakes might stick. Always use that nonstick spray well. Let them chill fully before you try to remove them. This gives them time to set. Solving these small issues builds your cooking confidence. You will feel like a real kitchen pro. Which of these problems have you run into before?
Your Quick Questions, Answered
How to make mini cheesecakes without a water bath?
You can skip the water bath for these. The key is a low oven temperature and a slow cool down. Bake them at 325 degrees. After baking, turn the oven off. Prop the door open with a wooden spoon. Let them sit inside for 5-10 minutes. This gentle cooling prevents cracks just like a water bath would.
What is the best way to melt chocolate for cheesecake?
The best way is in the microwave. Use a microwave-safe bowl. Heat the chips in short 30-second bursts. Stir well after each burst. Stop when the chocolate is mostly melted. The residual heat will finish the job. This method prevents the chocolate from burning and keeps it smooth for topping your mini desserts.
Can I use peppermint extract instead of candy canes?
Yes, you can use peppermint extract. But you must be very careful. Peppermint extract is much stronger than mint extract. Start with just a quarter teaspoon. Taste the filling before adding more. You want a gentle mint flavor, not a toothpaste taste. It is a great swap if you do not have candy canes on hand.
How long do mini cheesecakes need to set in the fridge?
They need several hours to set properly. I always plan for at least four hours. Overnight is even better. This long chill lets the flavors blend and the texture become perfect. Rushing this step can lead to a soft, messy cheesecake. Patience gives you a firm, sliceable treat. It is worth the wait!
Can I make mint chocolate cheesecakes ahead of time?
Absolutely! They are a perfect make-ahead dessert. You can bake them up to two days before you need them. Keep them covered in the fridge. The flavor actually improves. The mint gets a chance to mellow and blend. This makes your party planning so much easier. You can focus on your guests, not the kitchen.
What can I use instead of an Oreo crust?
You have many tasty options. Regular graham crackers work wonderfully. You could also use crushed vanilla wafers or shortbread cookies. For a nutty twist, try finely chopped pecans or walnuts mixed with a little butter. Each one gives a different, delicious base for your creamy filling. Which tip will you try first?
A Sweet Note From My Kitchen to Yours
I hope you love making these as much as I do. They are little bites of joy. *Fun fact: The mint and chocolate combo is called “After Eight” in some places, named for a fancy dinner mint!* I think they are perfect for any celebration. Or just a quiet Tuesday. For another cool flavor, try these zesty mini key lime cheesecakes.
I would love to hear all about your baking adventure. Did your family enjoy them? Did you try a different crust? Your stories make my day. Have you tried this recipe? Please tell me all about it in the comments below. Happy cooking!
—Grace Ellington.

Easy Mint Chocolate Mini Cheesecakes Recipe
Description
These delightful mini cheesecakes combine a chocolate crust with a creamy mint filling, topped with melted chocolate and Andes mints.
Ingredients
Instructions
- Preheat oven to 325 degrees and spray the mini cheesecake pan with nonstick baking spray.
- Combine graham crackers, 2 tablespoons of sugar, and butter. Divide in the mini cheesecake pan evenly. Press down gently with a spoon.
- In a stand mixer, blend cream cheese and 1/4 cup plus 2 tablespoons of sugar until smooth and creamy.
- Add the egg, mint extract, and food coloring: mix just until incorporated on low.
- Spoon the cream cheese mixture over the chocolate graham crackers, dividing evenly.
- Bake for 20 minutes. Turn off the oven, prop open the oven door with a wooden spoon, and allow the cheesecakes to cool down slowly for only about 5-10 minutes, then remove them from the oven.
- Remove from oven and chill for several hours or overnight before removing from pan.
- Melt chocolate chips in the microwave according to the manufacturer’s instructions.
- Top each mini cheesecake with a heaping tablespoon of chocolate and a few pieces of Andes mints.
Notes
- For best results, ensure cream cheese is fully softened to room temperature for a smooth filling. Chill thoroughly before serving for perfect texture.