

My First Donut Disaster
I still laugh at that first time I tried to make donuts. I was about your age. I did not chill the dough. What a sticky mess! My fingers were glued together with sweet goo. It taught me a good lesson. Patience makes better treats. That’s why we chill this dough now. It makes everything so much easier to handle.
This matters because good food is about joy, not stress. A simple rest in the fridge turns a mess into magic. Have you ever had a kitchen disaster that made you smile later? I’d love to hear about it. You can always share your stories with me on my profile page. I read every one.
The Secret in the Spice
That little bit of nutmeg in the dough is my favorite part. It’s the old-fashioned secret. It smells like a cozy morning. It makes the whole kitchen feel warm. You don’t taste it strongly, but you’d miss it if it were gone. It whispers “this is special” with every bite.
*Fun fact:* Nutmeg comes from the seed of a tropical tree. People have loved its warm flavor for hundreds of years. This matters because the smallest details create the biggest memories. Doesn’t that smell amazing when you grate it? For more sweet ideas that warm the heart, peek at our dessert collection.
The Sizzle and Dance
Frying is my favorite part to watch. The cold dough meets the hot oil. It sizzles and dances. It puffs up so proudly. You wait for that perfect golden-brown color. It’s like the dough is coming to life. Just be sure your oil is hot enough, about 350 degrees.
If it’s too cool, the bars will soak up oil. If it’s too hot, they burn outside. Getting it right matters. It turns simple dough into something light and tender inside. Do you prefer treats that are baked or fried? I’m always curious about what makes people’s mouths happy.
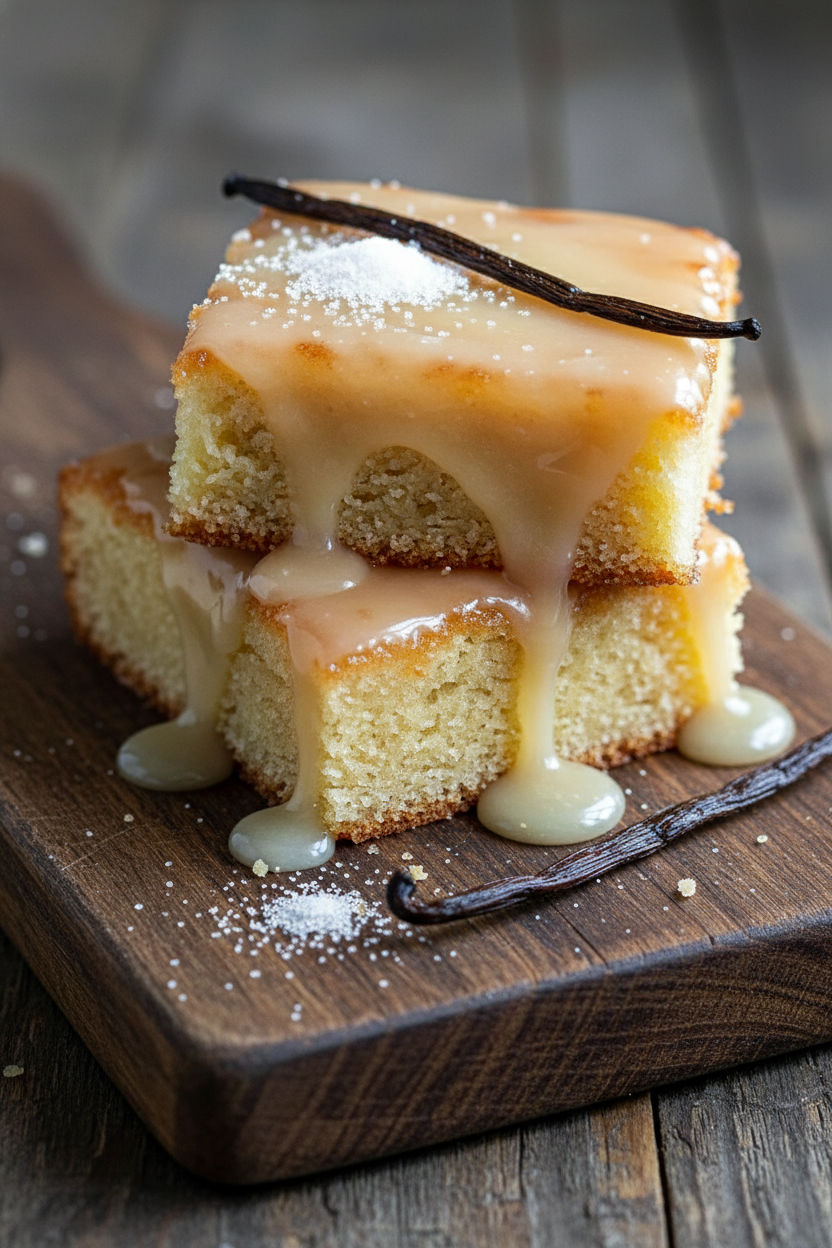
The Sweet, Simple Glaze
The glaze is just sugar, milk, and vanilla. But oh, what it does! You dip the warm bar in. The glaze clings like a shiny coat. Then it sets into a sweet, thin shell. It cracks just a little when you take a bite. That mix of soft donut and crisp glaze is pure happiness.
You can make it thicker or thinner to suit your taste. I like using whole milk for mine. If you want a richer flavor, try a brown butter maple glaze instead. It’s a wonderful twist. What’s your favorite kind of glaze on a donut?
Sharing the Warmth
These donut bars are best shared. I make a big batch. I pile them on a big plate. Then I call my grandchildren. They come running. We eat them while they’re still a tiny bit warm. The glaze gets on our fingers and smiles on our faces. That’s the real recipe.
This matters because food is about connection. It’s a way to say “I made this for you.” It’s a tradition you can start in your own kitchen. You can find all my recipes and stories back at the main page. I hope you’ll try making these bars. I hope you’ll share them with someone you love.

Instructions
Step 1: Let’s make our dough. First, whisk the flour, baking powder, soda, salt, and nutmeg together. I love that warm, spicy smell. Set this dry mix aside for now. You can find more cozy baking ideas on my dessert page.
Step 2: Now, cream the soft butter and sugar. Beat them until they look pale and fluffy. This gives our bars a lovely tender crumb. (Use room-temperature butter for this—it makes all the difference!).
Step 3: Beat in the eggs, one at a time. Then add the vanilla. Scrape the bowl sides so everything mixes well. The vanilla smell is just wonderful, isn’t it? Learn more about my kitchen adventures here.
Step 4: On low speed, mix in the dry ingredients and buttermilk. Start and end with the flour. Mix just until you don’t see streaks. The dough will be quite sticky! That’s perfectly okay. Why do we chill the dough? Share below!
Step 5: Wrap the dough and chill it for two hours. This makes it much easier to handle later. I sometimes make it the night before. Patience makes the best treats! For a different glaze idea, try this brown butter maple version.
Creative Twists
Roll them in cinnamon sugar instead of glaze.
Add a teaspoon of lemon zest to the dough for a sunny zing.
Drizzle with chocolate after the glaze sets.
Which one would you try first? Comment below!
Serving & Pairing Ideas
Serve these bars warm with a cold glass of milk. It’s a classic for a reason! For a special breakfast, add some fresh berries on the side. You can also dust them with powdered sugar for a simple, pretty finish. Which would you choose tonight? For all my recipes, please visit Savory Discovery.
Keeping Your Donut Bars Fresh and Ready
Let’s talk about storing these sweet treats. Once cooled, place them in a single layer. Use an airtight container at room temperature for two days. For longer storage, the freezer is your friend. Wrap each bar tightly in plastic wrap. Then pop them all into a freezer bag. They will keep for a month this way.
I remember my first batch of donut bars. I left them on the counter uncovered. They turned stale by morning! Now I never skip the container. To reheat, a quick 10 seconds in the microwave works wonders. It brings back that just-fried softness. You can also warm them in a low oven.
Batch cooking these bars saves so much time. Make the dough ahead and chill it overnight. You can even fry a double batch and freeze half. This matters because a ready treat makes any day special. It is a gift to your future, busy self. Have you ever tried storing it this way? Share below!
Simple Fixes for Common Donut Bar Hiccups
First, is your dough too sticky to handle? Do not add more flour right away. Just chill it thoroughly. A well-chilled dough is much easier to roll. I once tried to rush this step. My kitchen counter looked like a floury snowstorm! Patience here makes everything smoother.
Second, watch that oil temperature. If it is too low, the bars get greasy. If it is too high, they brown too fast. Use a thermometer for the best results. This matters because perfect frying gives you a crisp outside. It also leaves a tender, cakey inside you will love.
Third, a glaze that is too thin or thick is common. For a thin glaze, add a bit more sugar. For a thick one, add a splash more milk. Getting the glaze right improves the whole experience. It adds the final sweet touch without being messy. Which of these problems have you run into before?
Your Quick Questions, Answered
What is the best way to store buttermilk donut bars to keep them fresh?
Store cooled bars in a single layer inside an airtight container. Keep them at room temperature for up to two days. For longer freshness, freeze them. Wrap each bar tightly in plastic wrap first. Then place them all in a freezer bag. This stops them from drying out or tasting like other freezer foods.
Can I bake instead of fry buttermilk donut bars?
Yes, you can bake them for a lighter option. Preheat your oven to 350°F. Place the cut bars on a parchment-lined baking sheet. Bake for about 15-20 minutes until they are golden. They will be more like a soft cake but still delicious. Brush them with melted butter when hot for a richer taste.
What is a simple glaze recipe for buttermilk donut bars?
The recipe glaze is very simple. Whisk two cups of powdered sugar with three tablespoons of milk. Add one teaspoon of vanilla extract. Mix until it is completely smooth. For a different flavor, try a brown butter maple glaze. Dip your warm bars and let the glaze set. It creates a sweet, shiny coating.
Can I make the dough for donut bars ahead of time?
Absolutely! Making dough ahead is a great time-saver. After mixing, wrap the dough disc in plastic. You can refrigerate it for up to two days. Chilling it overnight actually improves the texture. The cold dough is much easier to roll and cut. This makes your dessert preparation calm and simple.
How do I get the classic buttermilk donut flavor in a bar?
The key is using real buttermilk and fresh nutmeg. Do not substitute the buttermilk if you can help it. Its tang is essential. Freshly grating a little nutmeg makes a big difference too. *Fun fact: nutmeg is the secret whisper in old-fashioned donuts.* Together, they create that warm, familiar flavor we all love.
Are donut bars the same as coffee cake?
No, they are quite different. Donut bars are fried, giving them a crisp edge. They have a denser, cakey crumb inside from the buttermilk dough. Coffee cake is usually baked and often has a streusel topping. While both are sweet treats, the method and texture set them apart. You can find more from this author on treats.
Which tip will you try first?
From My Kitchen to Yours
I hope you feel ready to make these wonderful bars. Cooking should be joyful, not stressful. Remember, my first batch was a sticky mess. Every attempt teaches you something new. I would love to hear about your baking adventures in the comments. Sharing stories is how we all learn and grow together in the kitchen.
Have you tried this recipe? Tell me how it went for you. Did you fry them or try baking? What was your family’s favorite part? Your stories make my day. For more tips and recipes, you can always visit our homepage. Happy cooking!
—Grace Ellington.

Grandmas Classic Buttermilk Donut Bars
Description
Old Fashioned Buttermilk Donut Bars. These classic, fried treats are soft, cakey, and coated in a sweet vanilla glaze.
Ingredients
For the Dough:
For Frying:
For the Glaze:
Instructions
- Step 1: Prepare Dough – Combine Dry Ingredients
In a large bowl, whisk together the all-purpose flour, baking powder, baking soda, salt, and freshly grated nutmeg. Set aside. - Step 2: Prepare Dough – Cream Butter and Sugar
In a stand mixer, cream softened butter and granulated sugar on medium speed for 3-5 minutes until light, fluffy, and pale. - Step 3: Prepare Dough – Incorporate Eggs and Vanilla
Add eggs one at a time, beating well after each addition. Scrape down the sides of the bowl. Stir in vanilla extract. - Step 4: Prepare Dough – Alternate Wet and Dry Ingredients
On low speed, alternately add the dry ingredient mixture and buttermilk to the wet mixture. Start and end with dry ingredients. Mix just until flour streaks disappear; avoid overmixing. The dough will be soft and sticky. - Step 5: Prepare Dough – Chill Dough
Turn dough onto a lightly floured surface and form it into a disc/rectangle. Wrap tightly in plastic wrap and refrigerate for at least 2 hours or overnight for better handling. - Step 6: Shape and Cut – Roll Dough
Lightly flour your work surface, rolling pin, and hands. Roll the chilled dough into a large rectangle about ½ inch thick. - Step 7: Shape and Cut – Cut Donut Bars
Using a sharp knife or pizza cutter, cut the dough into rectangular bars approximately 1 inch wide by 3-4 inches long. Place cut bars on lightly floured or parchment-lined baking sheets. - Step 8: Fry Donut Bars – Set Up Frying Station
In a heavy-bottomed pot, pour enough vegetable oil or canola oil to reach about 3-4 inches deep. Attach a deep-fry thermometer and heat oil over medium-high heat until it reaches 350°F (175°C). - Step 9: Fry Donut Bars – Fry Batches
Carefully lower 3-4 donut bars into hot oil using a slotted spoon; do not overcrowd. Fry for about 1-2 minutes on each side until golden brown. - Step 10: Fry Donut Bars – Drain Fried Donut Bars
Remove cooked donut bars with a slotted spoon; let excess oil drip off. Transfer them to a wire rack set over paper towels to drain and cool slightly before glazing. - Step 11: Prepare Glaze – Whisk Glaze Ingredients
In a medium bowl, whisk together sifted confectioners’ sugar, whole milk/heavy cream, pure vanilla extract, and salt until smooth. Adjust consistency with additional milk or sugar as needed. - Step 12: Glaze and Finish – Dip and Set Glaze
Dip each warm donut bar into the glaze either coating one side or fully submerging it. Lift each bar allowing excess glaze to drip off before placing them back on the wire rack to set for about 15-30 minutes.
Notes
- Nutrition per serving (1 donut bar, 50g): Calories: 250, Sugar: 22g, Sodium: 150mg, Fat: 12g (Saturated Fat: 7g, Unsaturated Fat: 4g, Trans Fat: 0g), Carbohydrates: 35g, Fiber: 1g, Protein: 3g, Cholesterol: 40mg.