

The Best Kind of Kitchen Mess
I love a recipe that feels like play. This one is just that. You start with butter and marshmallows. You stir until it’s a gooey, sweet cloud. Then you mix in the cereal. It makes the most wonderful sticky sound. I still laugh at that sound every time.
Pressing it into the pan is the best part. Butter your fingers first. This keeps the treat from sticking to you. It’s a simple trick that makes everything easier. Now, what was your favorite kitchen mess to make as a kid? Mine was cookie pie filling, without a doubt!
A Toasty, Golden Secret
Next comes the magic. You toast the coconut. Watch it closely in the oven. It goes from white to golden so fast. Doesn’t that smell amazing? It smells like sunshine and beach days. This toasting step matters. It wakes up the coconut’s flavor.
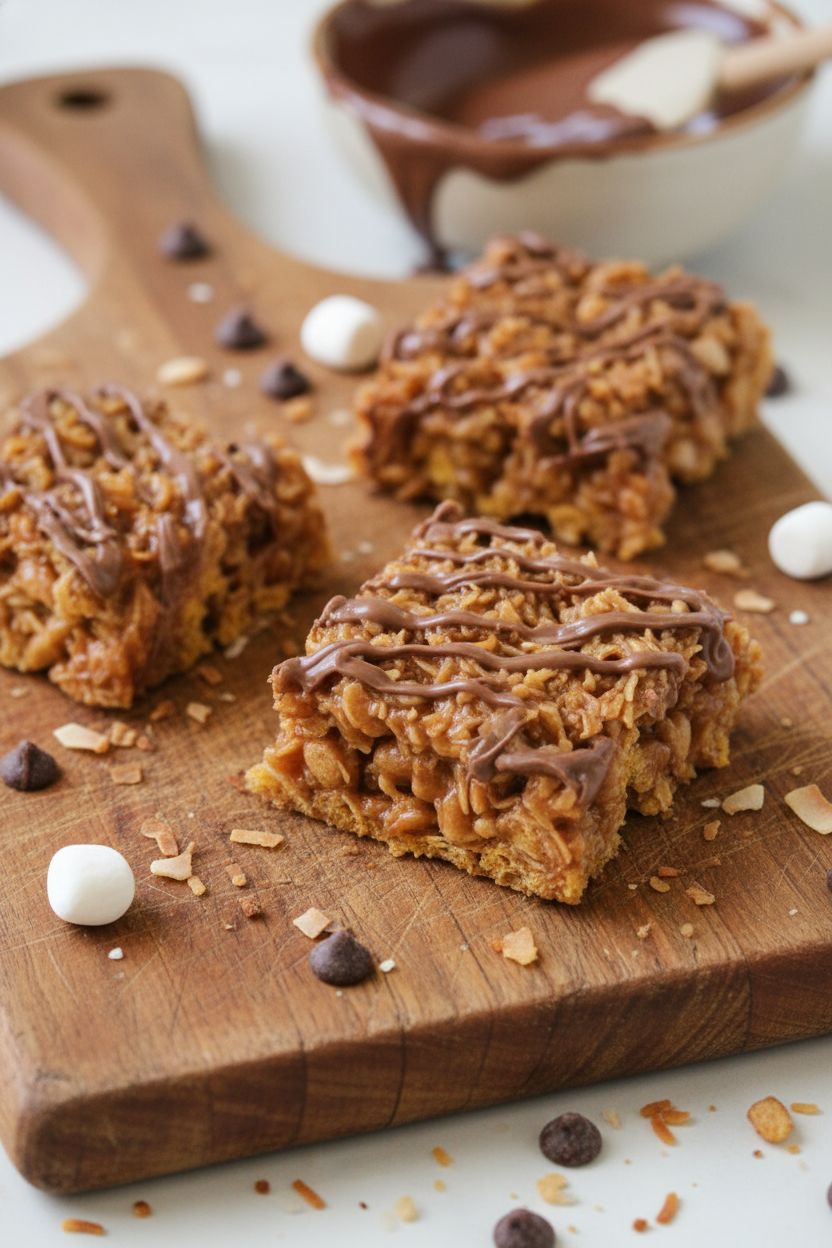
You stir that toasted coconut into melted caramel. It becomes a rich, chewy blanket. You pour it right over the crispy base. The mix of textures is everything. Crunchy, chewy, and sweet all at once. It reminds me of the topping on my favorite Samoa brownies.
The Chocolate Finish
Here is the fun fact. *The chocolate on the bottom isn’t just for taste.* It makes the treat less sticky to hold. Smart, right? You dip each square’s bottom in melted chocolate. Let it set on some parchment paper.
Then, you drizzle more chocolate on top. Use a small bag with the corner snipped off. It feels like you’re painting. This final touch matters. It ties all the flavors together beautifully. Have you ever tried drizzling chocolate before? It’s easier than it looks!
Why We Make Treats Like This
Food is more than eating. It’s about making memories. I once made these with my grandkids. We had coconut everywhere. But their smiles were worth the clean-up. Sharing treats you made yourself feels so special.
It connects us. These flavors of caramel, coconut, and chocolate are a classic trio. They feel like a celebration. You can find them in so many tropical treats. Do you prefer your treats chewy or crunchy? I can never decide!
Your Turn in the Kitchen
This recipe is a wonderful start. It uses simple cereal treats. Then it dresses them up so fancy. If you love this, you might also try Samoan coconut buns. They are a soft, sweet bread with similar flavors.
The best cooking comes from trying new things. Mix flavors you love. Make a little mess. Most of all, share what you make. Tell me, what is your favorite treat to share with friends? I would love to hear your stories.

Instructions
Step 1: First, let’s make our crispy base. Melt the butter in a big pot. Add all those mini marshmallows. Stir until it’s a smooth, gooey cloud. Doesn’t that smell amazing? (Use a wooden spoon—it won’t get too hot!)
Step 2: Pour in the cereal right away. Stir gently until every piece is coated. Press the mix into your greased pan. I use my fingers, just like when I was a kid. Press it down nice and even.
Step 3: Now, the magic layer! Melt caramels with cream, stirring lots. Toast your coconut until golden. Stir the coconut into the caramel. Pour this over the base. What’s your favorite part so far? Share below!
Step 4: Time for chocolate. Melt the chips carefully. Dip each treat’s bottom in chocolate. Let them set on parchment. I still laugh at my first messy tries. (A little parchment saves your counter!)
Step 5: Finally, drizzle the tops with leftover chocolate. Let everything set completely. The waiting is the hardest part. Then, share your Samoa-inspired treats with a smile.
Creative Twists
Sea Salt Sprinkle: Add a tiny pinch of sea salt on the warm caramel.
Cookie Base: Use a cookie pie crust instead of cereal for a chewy twist.
Dark Chocolate: Swap milk chocolate for dark. It’s wonderfully rich.
Which one would you try first? Comment below!
Serving & Pairing Ideas
Serve these on a pretty plate with a glass of cold milk. They’re perfect for a party. You could also crumble one over vanilla ice cream. For a real Samoan-inspired spread, try them with other sweet treats. A toasted coconut caramel brownie would be lovely too. Which would you choose tonight?
Keeping Your Samoa Treats Fresh
Let’s talk about storing these sweet treats. They keep best in a single layer. Use a container with a tight lid. Keep them in a cool spot, like your fridge. The chocolate will stay nice and firm there.
You can freeze them for a month, too. Just wrap them well. I once left a batch on the counter. The chocolate got all soft! Now I always use the fridge. Batch cooking is a wonderful time-saver. It lets you share joy with friends anytime. Have you ever tried storing it this way? Share below!
Making a double batch is smart. You can enjoy some now and save some for later. This matters because a ready-made treat brings a smile on busy days. It’s a little gift from your past self. For another great make-ahead dessert, try this gooey chocolate caramel coconut cookie pie.
Simple Fixes for Common Hiccups
First, is your caramel too thick? Just add a tiny bit more cream. Stir it slowly until it smooths out. I remember when my caramel seized up once. A little extra cream saved the day!
Second, watch that coconut toast. Stir it often for even color. No one likes a burnt batch. Third, press your cereal mix firmly into the pan. This gives you neat squares that won’t crumble. Which of these problems have you run into before?
Fixing small issues builds your cooking confidence. You learn that mistakes can be mended. It also makes the final flavor so much better. Every layer tastes just right. For a recipe with similar cozy flavors, explore these Samoan coconut buns.
Your Quick Questions, Answered
Can I make Samoa Rice Krispie Treats without coconut?
Yes, you absolutely can. Just leave the coconut out. The treats will still be delicious with caramel and chocolate. You could add chopped nuts for crunch instead. The recipe is very forgiving for your own tastes.
How do you get the caramel layer to stick to Rice Krispie Treats?
Press the cereal base down very firmly first. A smooth, compact surface helps. Then pour the warm caramel coconut mix right on top. Gently spread it to the edges. Let it cool completely before you cut. This helps all the layers bind together nicely.
What can I use instead of dulce de leche in Samoa treats?
This recipe uses soft caramels, which work perfectly. If you need another swap, try a thick caramel sauce. You could also use a can of store-bought dulce de leche. Just warm it slightly so it spreads easily. Fun fact: Dulce de leche is made by slowly cooking sweetened milk.
Can I use store-bought caramel for this recipe?
You can use a good-quality jarred caramel sauce. Look for one that is thick, not runny. You will need about one cup. Warm it up and mix in your toasted coconut. Then spread it over the treats. It’s a wonderful shortcut for busy bakers.
How do you prevent the chocolate from melting when cutting Samoa treats?
Make sure the chocolate is fully set first. Chilling the whole pan in the fridge helps a lot. Use a sharp knife for cutting. Wipe the knife clean between each slice. This keeps your chocolate drizzle looking pretty and neat.
Are there any shortcuts for making homemade Samoa Rice Krispie Treats?
Yes, a few shortcuts can save time. Use a pre-made caramel sauce, as mentioned. You can also buy pre-toasted coconut at the store. For another easy shortcut dessert, these easy Samoa brownies are fantastic. Which tip will you try first?
From My Kitchen to Yours
I hope you love making these treats as much as I do. The smell of toasting coconut is pure happiness. It always reminds me of my granddaughter’s first baking attempt. What a sweet mess that was!
I would love to hear about your baking adventures. Have you tried this recipe? Tell me all about it in the comments below. Sharing stories is the best part. For more island-inspired baking, you might also enjoy these Samoa-inspired brownies.
Happy cooking!
—Elowen Thorn

Easy Homemade Samoa Rice Krispie Treats Recipe
Description
A delicious no-bake twist on the classic Girl Scout cookie, featuring a crispy cereal base, a gooey caramel-coconut layer, and a rich chocolate coating.
Ingredients
For the Rice Krispie Treats:
For the Samoa Layer:
Instructions
- Melt butter over medium heat in a large sauce pan.
- Add in marshmallows and stir together till marshmallows are completely melted.
- Pour in cereal and stir together till cereal is completely coated.
- Pour cereal into a 9×13 in pan and press down evenly.
- In a medium sized sauce pan combine caramels and heavy cream over medium heat.
- Stir until caramel is melted and smooth.
- Toast coconut on a baking tray in an oven heated to 350 degrees for about 10 minutes, stirring regular to avoid burning.
- Stir toasted coconut into the melted caramel and pour evenly over the top of rice krispie treats.
- Melt chocolate chips in the microwave in 30 second increments (for about 90 seconds total), stirring after each until smooth.
- Slice rice krispie treats into pieces and remove from pan.
- Dip the bottom of each piece into the chocolate.
- Put remaining chocolate into a small ziplock bag and snip the corner.
- Drizzle chocolate over the top of each treat.
- Let chocolate set completely and serve.
Notes
- For easier slicing, line the 9×13 pan with parchment paper, leaving an overhang on the sides. Store treats in an airtight container at room temperature for up to 3 days.