

My First Red Velvet Surprise
I made these waffles for my grandson’s birthday. He loves red velvet cake. I thought, why not for breakfast? His eyes got so wide. I still laugh at that.
That’s the magic of a fun breakfast. It turns an ordinary morning into a small party. It matters because food can be a little gift. Do you have a favorite birthday breakfast? I’d love to hear about it.
Mixing Up the Magic
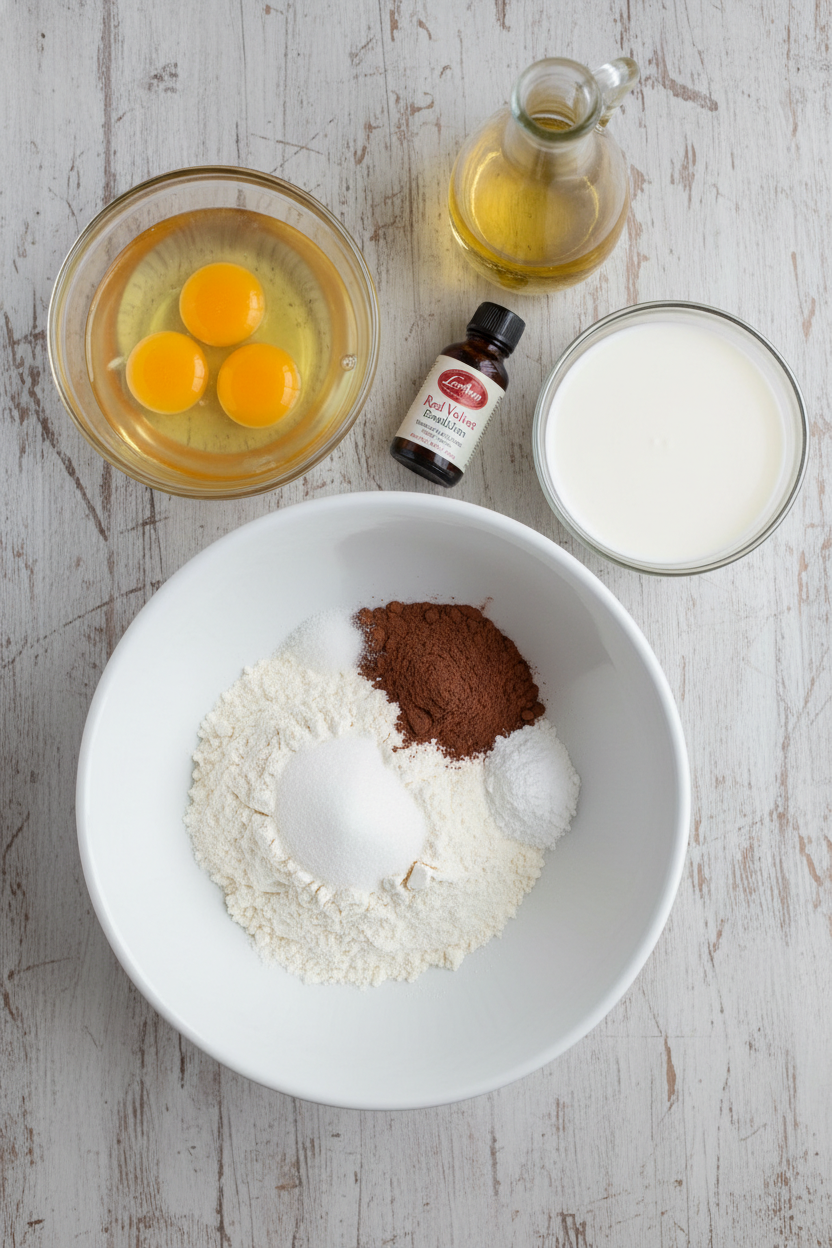
Start with your dry things in a big bowl. Flour, sugar, a bit of cocoa. The cocoa is the secret. It gives that deep, rich flavor. Whisk it all together.
In another bowl, mix the wet stuff. Eggs, milk, and oil. Now for the red! Use the special red velvet emulsion or food coloring. Doesn’t that color make you smile? *Fun fact: The red in red velvet used to come from beets!*
Gentle Folds and Hot Iron
Pour the red wet mix into the dry bowl. Stir gently. Stop when just combined. A few lumps are just fine. This keeps your waffles tender.
Pour batter onto your hot waffle iron. Wait for the steam to slow. That smell is amazing. It means they are done. For a different savory twist, you might try some cheddar cheese waffles another day.
Why This All Matters
This recipe is more than food. It’s about taking a moment for joy. A bright red waffle is pure fun. It slows you down to enjoy.
Sharing a special meal connects us. It says, “I thought of you.” That matters more than a perfect shape. Do you prefer sweet waffles or savory ones, like these waffle fry nachos?
Your Waffle Canvas
Serve them warm. The toppings are your art. Cream cheese frosting is classic. Whipped cream and berries are lovely too. Even just maple syrup works.
Every bite should make you happy. That’s the only real rule. If you love classic waffles too, a delicious homemade waffle recipe is a great staple. What will you put on your red velvet waffles first? Tell me your dream topping combo!
Instructions
Step 1: First, plug in your waffle maker to get it nice and hot. I always do this first thing. It reminds me of my own grandma’s kitchen. The warm smell would fill the whole house. (A hot iron makes the crispiest waffles!)
Step 2: Grab a big bowl for your dry things. Whisk the flour, salt, baking powder, sugar, and cocoa together. The cocoa is the secret for that deep, rich color. Doesn’t that smell amazing already? It’s like a chocolatey hug.
Step 3: Now, let’s make the red magic! In another bowl, beat the two eggs until they’re bubbly. Then stir in the milk, oil, and that special red velvet emulsion. If you use food coloring, add it slowly. What’s your favorite colorful food? Share below!
Step 4: Time to bring it all together. Pour your pretty red mixture into the dry ingredients. Stir it gently, just until you stop seeing dry flour. A few lumps are perfectly fine, I promise. Over-mixing makes tough waffles, and we want them fluffy.
Step 5: Carefully pour some batter onto the hot iron. Close the lid and let it work. I still laugh at how I used to peek too soon. Wait for the steam to slow down. You’ll have a perfect, crispy waffle recipe every time.
Creative Twists
Chocolate Chip Surprise: Fold mini chocolate chips into the batter for melty pockets.
“Cake Batter” Fun: Add a sprinkle of rainbow sprinkles right before cooking.
Savory-Sweet Switch: Top with a fried egg for a fun brunch. Try a savory cheddar cheese waffle next time! Which one would you try first? Comment below!
Serving & Pairing Ideas
These waffles are a celebration on a plate! I love a classic stack with cream cheese frosting drizzled on top. Fresh berries add a lovely, tart pop. For something different, try them with a dollop of lemon curd. It’s so bright and sunny! You could even make a waffle fry style dessert with these. Which would you choose tonight?

Keeping Your Waffles Warm and Wonderful
Let’s talk about keeping your red velvet waffles tasty for later. Cool them completely on a wire rack first. This stops sogginess. Then, you can stack them with parchment paper in between. Pop them in a freezer bag. They will keep for a month!
I remember my first batch cooking adventure. I made a huge stack of homemade waffles. I put them in the fridge warm. They got so soft! Now I always let them cool. To reheat, use your toaster or oven. It brings back that lovely crispness.
Batch cooking matters because it saves your morning. A busy day feels kinder with a ready-made treat. It turns cooking into a gift for your future self. Have you ever tried storing it this way? Share below!
Simple Fixes for Common Waffle Woes
Even grandmas have kitchen troubles sometimes. First, if your batter is too thick, add a splash more milk. Second, if the waffle sticks, your iron might need more oil. I once had a waffle tear in half! A little non-stick spray fixes that. Third, for soggy waffles, don’t stack them hot.
Let them cool on a rack, like for sourdough waffles. Solving these issues builds your cooking confidence. You learn that mistakes are just lessons. It also means every bite has the perfect texture and flavor. Which of these problems have you run into before?
Your Quick Questions, Answered
What makes red velvet waffles different from regular waffles?
Red velvet waffles have cocoa powder and a special red color. The cocoa gives a very mild chocolate flavor. It is not as strong as a chocolate waffle. The color makes them fun and festive for special days. They are perfect for a holiday breakfast or a sweet dessert treat.
Can I make red velvet waffles without food coloring?
Yes, you can skip the food coloring. Your waffles will be a light brown from the cocoa. They will still taste wonderful. For a natural red color, try beet powder. You mix it with the dry ingredients. It adds a earthy sweetness and a lovely pink-red hue to your batter.
What’s the best cream cheese frosting for waffles?
The best frosting is simple. Mix softened cream cheese with a little butter and powdered sugar. A dash of vanilla makes it perfect. Keep it slightly soft so it melts on the warm waffle. Drizzle it over the top like syrup. It pairs beautifully with the subtle cocoa flavor.
Are red velvet waffles served for breakfast or dessert?
They are wonderfully flexible! For breakfast, top them with yogurt and fruit. For dessert, add cream cheese frosting and berries. *Fun fact: The first red velvet cake was served as a fancy dessert*. Like pumpkin spice waffles, they fit any time of day. It just depends on your toppings.
Can I make red velvet waffle batter ahead of time?
You can mix the dry and wet ingredients separately the night before. Keep them in different bowls in the fridge. In the morning, just combine them. This works great for busy days. But do not mix them until you are ready to cook. The baking powder needs to be fresh to work.
How do I keep red velvet waffles crispy?
The key is to let steam escape. Place cooked waffles in a single layer on a wire rack. Do not stack them while hot. If making a big batch for a crowd, keep them crisp in a warm oven. This method also works for keeping savory cheese waffles perfectly textured. Which tip will you try first?
From My Kitchen to Yours
I hope you love making these special waffles. Cooking is about sharing joy and creating small, sweet memories. Every batch you make is a story. I would love to hear about your kitchen adventures. Tell me all about it in the comments below. Have you tried this recipe? Let me know how it turned out for you!
Happy cooking!
—Elowen Thorn

My Go-To Red Velvet Waffle Recipe
Description
Indulge in the classic flavor of red velvet in a fun, crispy waffle form. Perfect for a special breakfast or brunch treat.
Ingredients
Instructions
- Preheat the Waffle Maker. Begin by preheating your waffle maker according to the manufacturer’s instructions.
- Whisk the Dry Ingredients. In a large mixing bowl, combine the flour, salt, baking powder, sugar, and cocoa powder. Whisk until well blended.
- Mix the Wet Ingredients. In another bowl, beat the eggs, then add milk, vegetable oil, and Lorann Red Velvet Bakery Emulsion or red food coloring. Mix until well combined.
- Combine Wet and Dry Mixtures. Gradually pour the wet ingredients into the dry ingredients, stirring gently until just combined.
- Cook the Waffles. Pour the appropriate amount of batter onto the preheated waffle maker and cook until crispy and golden brown.
- Serve and Enjoy! Remove the waffles and serve warm with your favorite toppings.
Notes
- For best results, do not overmix the batter. Serve with cream cheese frosting, maple syrup, whipped cream, or fresh berries.