

My First Chocolate Disaster
I tried to make a fancy chocolate pie once. It was for my husband’s birthday. I was so nervous. I burned the first batch of cream. The kitchen smelled like toast, not dessert. I still laugh at that.
I started over. This time, I watched the pot like a hawk. Seeing that cream just start to bubble is the key. Then you pour it over the chocolate. Doesn’t that smell amazing? Watching it turn into a smooth, shiny pool is pure magic. That’s why the first step matters so much. It builds your chocolate foundation.
The Secret is in the Layers
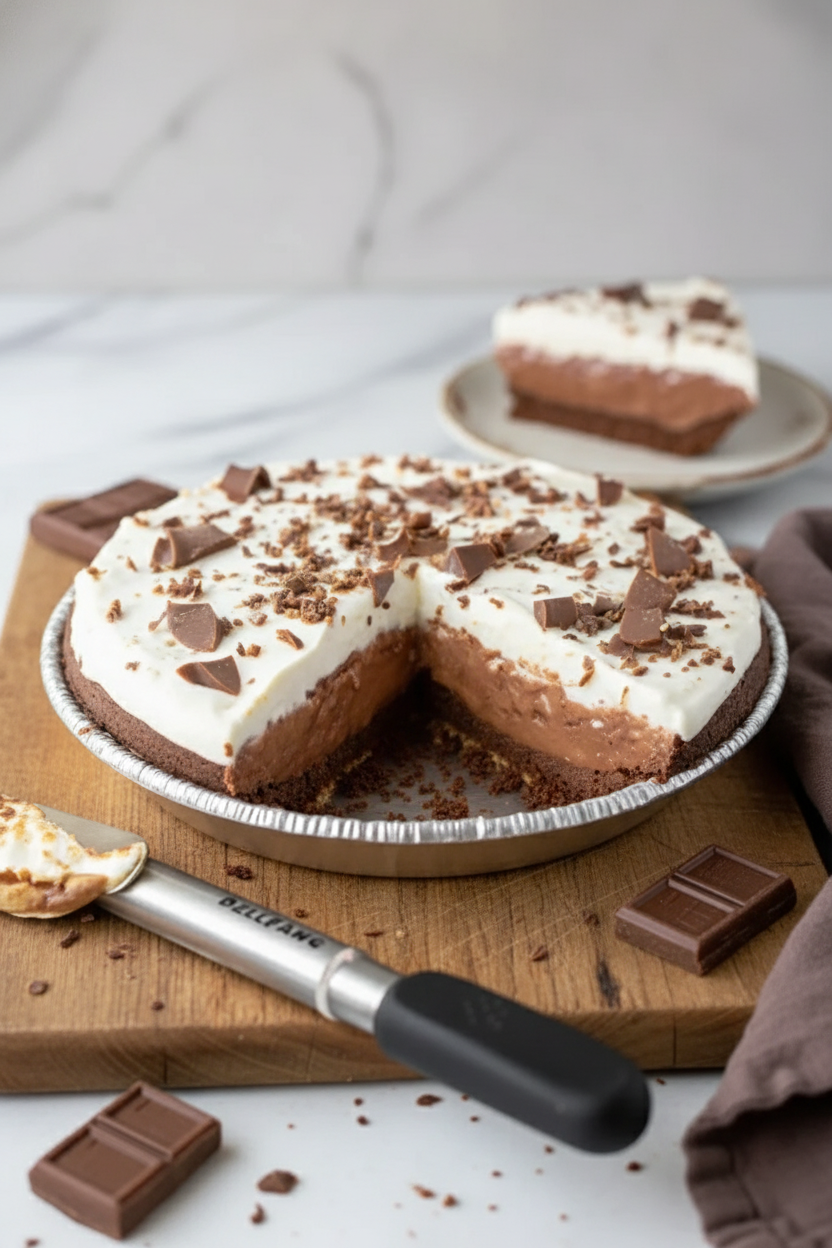
This pie is not just one chocolate flavor. It’s three! First, a firm truffle layer. It’s rich and deep. Then, a fluffy chocolate mousse layer. Finally, sweet whipped cream on top.
Each layer needs time to set. The waiting is the hardest part. But it matters. It lets the flavors become friends. They get to know each other in the fridge overnight. Have you ever tried a no-bake pie before? What’s your favorite kind?
A Little Graham Cracker Magic
Let’s talk about the crust. You just crush up graham crackers. You mix them with melted butter. It gets all sandy and sweet. Pressing it into the dish is my favorite part. You use your fingers to push it up the sides.
It feels like making mud pies, but tastier. That quick bake makes it crisp. It holds our creamy filling perfectly. *Fun fact: Graham crackers were invented for a healthy diet! I think they found their true calling in pie crust.
Whipping Cream Without Worry
Some folks get scared of whipping cream. Don’t be! Just make sure your bowl and beaters are cold. I sometimes pop them in the freezer for 10 minutes. Start slow, then go faster.
You’ll see soft waves, then firm peaks. It’s so satisfying. If you get it right, give yourself a little cheer. Do you have a kitchen task that used to scare you? For me, it was pie crust. Now it’s whipping cream!
Why This Pie Feels Special
This isn’t a weekday dessert. It’s for celebrations. A graduation. A promotion. Or just because it’s Tuesday and you need joy. Making it shows someone you care. You spend time on them.
Sharing it creates a memory. The rich chocolate makes people close their eyes and smile. That’s the real goal of any recipe. To make a moment of happiness. Will you make this for a special day, or create your own reason?
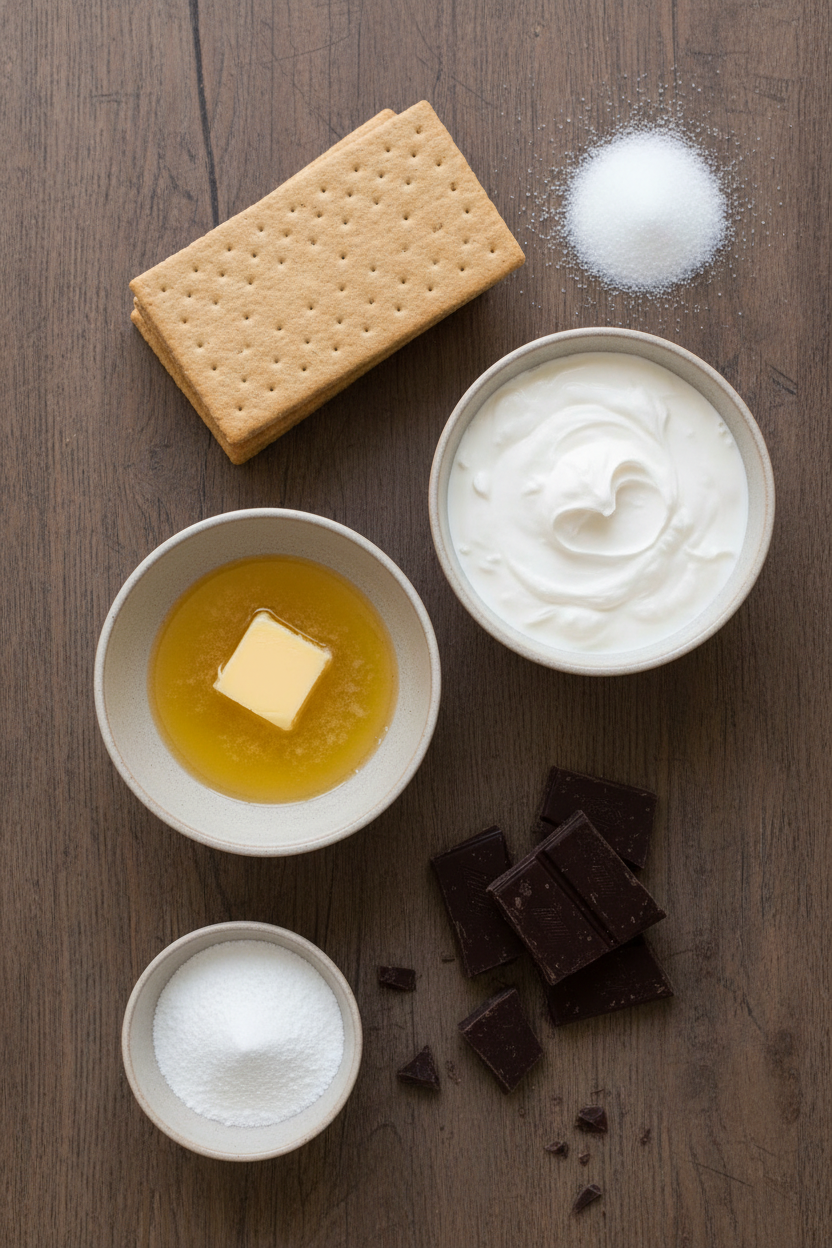
Ingredients:
| Ingredient | Amount | Notes |
|---|---|---|
| Graham crackers | 20 crackers | For the crust |
| Granulated sugar | 2 tablespoons | For the crust |
| Unsalted butter | 6 tablespoons | Melted, for the crust |
| Heavy cream | 2/3 cup | For the truffle filling |
| Bittersweet chocolate | 6 ounces | Chopped, for the truffle filling |
| Bittersweet chocolate | 6 ounces | Chopped, for the whipped chocolate filling |
| Heavy cream | 1 1/2 cups (divided) | For the whipped chocolate filling |
| Vanilla extract | 1/2 teaspoon | For the whipped chocolate filling |
| Heavy cream | 1 cup | For the whipped cream topping |
| Confectioners’ sugar | 1/4 cup | For the whipped cream topping |
| Shaved chocolate | As desired | For garnish (optional) |
Instructions
Step 1: First, make your crust. Crush the graham crackers into fine crumbs. Mix them with the sugar and melted butter. Press this sandy mix firmly into your pie dish. Bake it for just 7 minutes. Let it cool completely. (Press it in well so your slices hold together!)
Step 2: Now, the truffle layer. Heat the cream until it’s just steaming. Pour it over your chopped chocolate. Let it sit for a minute. Then whisk it into a smooth, shiny pool. Pour this into your cool crust. Pop it in the freezer to firm up. Doesn’t that smell amazing?
Step 3: Next is the fluffy chocolate filling. Melt chocolate with some cream and vanilla. Let it cool. Whip the rest of the cream until it’s thick. Gently fold the cool chocolate into the whipped cream. Spread this cloud over your firm truffle layer. Why do we let the chocolate cool first? Share below!
Step 4: Patience is key. Cover your pie and refrigerate it overnight. This lets all the flavors become best friends. I know waiting is hard. But trust me, it’s worth it. The next day, make the whipped cream topping. Whip the cream and sugar until it’s fluffy.
Step 5: Time to finish your masterpiece. Spread the fresh whipped cream over the pie. Shave a little chocolate on top for a fancy touch. Slice gently with a warm knife for clean pieces. I still smile seeing a perfect slice. Now, share it with someone special.
Creative Twists
Cookie Crunch: Use chocolate wafer cookies instead of graham crackers for the crust.
Peanut Butter Swirl: Swirl creamy peanut butter into the truffle layer before freezing.
Orange Zest: Add a little orange zest to the whipped cream topping for a bright surprise. Which one would you try first? Comment below!
Serving & Pairing Ideas
Serve each slice with a few fresh raspberries on the side. Their tartness is perfect with the rich chocolate. A small glass of cold milk is the classic pairing. For a fancy dinner, add a tiny sprig of mint. It makes the plate look so pretty. Which would you choose tonight?
Keeping Your Chocolate Truffle Pie Perfect
This pie is a dream to make ahead. The fridge and freezer are your best friends here. After adding the whipped chocolate filling, let it chill overnight. This sets everything perfectly.
You can freeze the whole pie for later, too. Just wrap it tightly in plastic wrap. Then add a layer of foil. It will keep for about a month. Thaw it in the fridge overnight before serving.
I remember my first time. I was so nervous it would melt. The freezer step for the truffle layer saved me. It made the next layer so easy to spread. Storing food well means less stress later. You get to enjoy your creation anytime.
Have you ever tried storing a pie this way? Share below!
Simple Fixes for Common Pie Problems
Sometimes the crust crumbles when you press it. Just use a flat-bottomed cup. Press the crumbs in firmly. This makes a solid base for your creamy fillings.
Is your whipped cream too runny? Make sure your bowl and beaters are very cold. I chill mine in the freezer for 10 minutes. I once made soup instead of cream! Chilling tools makes whipping faster and better.
Chocolate not melting smoothly? Always chop it finely. Heat your cream until it just simmers. Pour it over the chocolate and wait. Let it sit for a full minute before stirring. This patience gives you a silky, lump-free ganache. These small steps build your confidence. They also make the flavor wonderfully smooth.
Which of these problems have you run into before?
Your Quick Questions, Answered
What is the best chocolate to use for truffle pie filling?
Use good quality bittersweet chocolate. It should have about 60% cocoa. This chocolate is rich but not too sweet. It balances the sweet whipped cream perfectly. A baking bar is better than chocolate chips. Chips have additives that can make the texture grainy. Chopping the bar finely helps it melt smoothly with the hot cream.
How do you make a chocolate crumb crust for a pie?
Pulse graham crackers and sugar in a food processor. You want fine crumbs. Pour in melted butter and pulse again. The mix should look like wet sand. Press it firmly into your pie dish. Use a cup to press it flat and up the sides. Bake it for just 7 minutes. This quick bake makes the crust sturdy and tasty.
Can you make a chocolate truffle pie ahead of time?
Yes, this pie needs to be made ahead. You must refrigerate it overnight. This long chill sets all the layers firmly. You can also freeze the finished pie for a month. Wrap it well in plastic and foil. Thaw it slowly in the refrigerator. Making it ahead is the secret. It gives you a delicious, ready-to-serve dessert for your guests.
What is the difference between a truffle pie and a French silk pie?
A truffle pie has a firm, fudgy layer on the bottom. It is like a chocolate truffle candy. French silk pie is all about the airy filling. That filling has raw eggs and is whipped until very light. Our truffle pie uses a set ganache and whipped chocolate cream. *Fun fact: The name “truffle” comes from its resemblance to the fancy fungus!*
How do you garnish a chocolate truffle cream pie?
Keep it simple and elegant. More chocolate is always good. Use a vegetable peeler on a cool chocolate bar. This makes pretty chocolate shavings. Sprinkle them over the fresh whipped cream topping. You can also add a few fresh raspberries. Their tart taste is lovely with sweet chocolate. A dusting of cocoa powder works too. It looks beautiful on the white cream.
How do you prevent cracks in a chocolate cream pie?
The key is gentle, even cooling. Do not let the filling get too hot. Let the chocolate mixture cool to room temperature before adding it to whipped cream. Chill the pie slowly in the refrigerator, not the freezer. Sudden temperature changes cause cracks. Spreading the whipped cream topping over the filling also helps. It keeps the surface from drying out and cracking.
Which tip will you try first?
From My Kitchen to Yours
I hope you love making this pie as much as I do. It is a special treat for people you love. Sharing food is one of life’s great joys.
I would be so happy to hear about your baking adventure. Tell me all about it in the comments. Your stories make my day brighter.
Have you tried this recipe? Let me know how it turned out for you. I am here cheering you on in your kitchen.
Happy cooking!
—Danielle Monroe

My Decadent Chocolate Truffle Cream Pie
Description
Indulge in layers of rich chocolate with this decadent pie, featuring a graham cracker crust, a firm chocolate truffle layer, a silky whipped chocolate filling, and a fluffy whipped cream topping.
Ingredients
For the crust:
For the truffle filling:
For the whipped chocolate filling:
For the whipped cream topping:
Garnish:
Instructions
- Crust: Preheat oven to 375°F. In the bowl of a food processor, pulse graham crackers and sugar until finely ground. Add melted butter and pulse until mixture is moistened. Press into the bottom and up the sides of a 9-inch pie dish. Bake for 7 minutes. Place pie dish on a cooling rack and let cool completely.
- Truffle filling: In a small saucepan set over medium heat bring the cream just to a simmer. Place chocolate in a medium bowl and pour hot cream over chocolate. Let stand for 1 minute then whisk until smooth. Spread filling over the bottom of cooled crust. Freeze for 20 minutes, or until firm.
- Whipped chocolate filling: Place chocolate, 1/2 cup of the cream, and vanilla in a microwave-safe bowl. Microwave in 20-second bursts, stirring between each burst, until chocolate is melted and mixture is smooth. Do not overheat. Let cool to room temperature. In the bowl of an electric mixer beat the remaining 1 cup cream on medium speed until thick. Add chocolate mixture and beat until soft peaks form. Spread the whipped chocolate mixture over truffle filing in crust. Refrigerate overnight.
- Whipped cream topping: Before serving, beat cream on medium speed until it begins to thicken. Add confectioners’ sugar and whip until stiff peaks form. Spread whipped cream over top of pie. Garnish with chocolate shavings and serve.
Notes
- For best results, ensure all components are completely cooled before adding the next layer. The pie needs to refrigerate overnight to set properly.