

The Crunch That Started It All
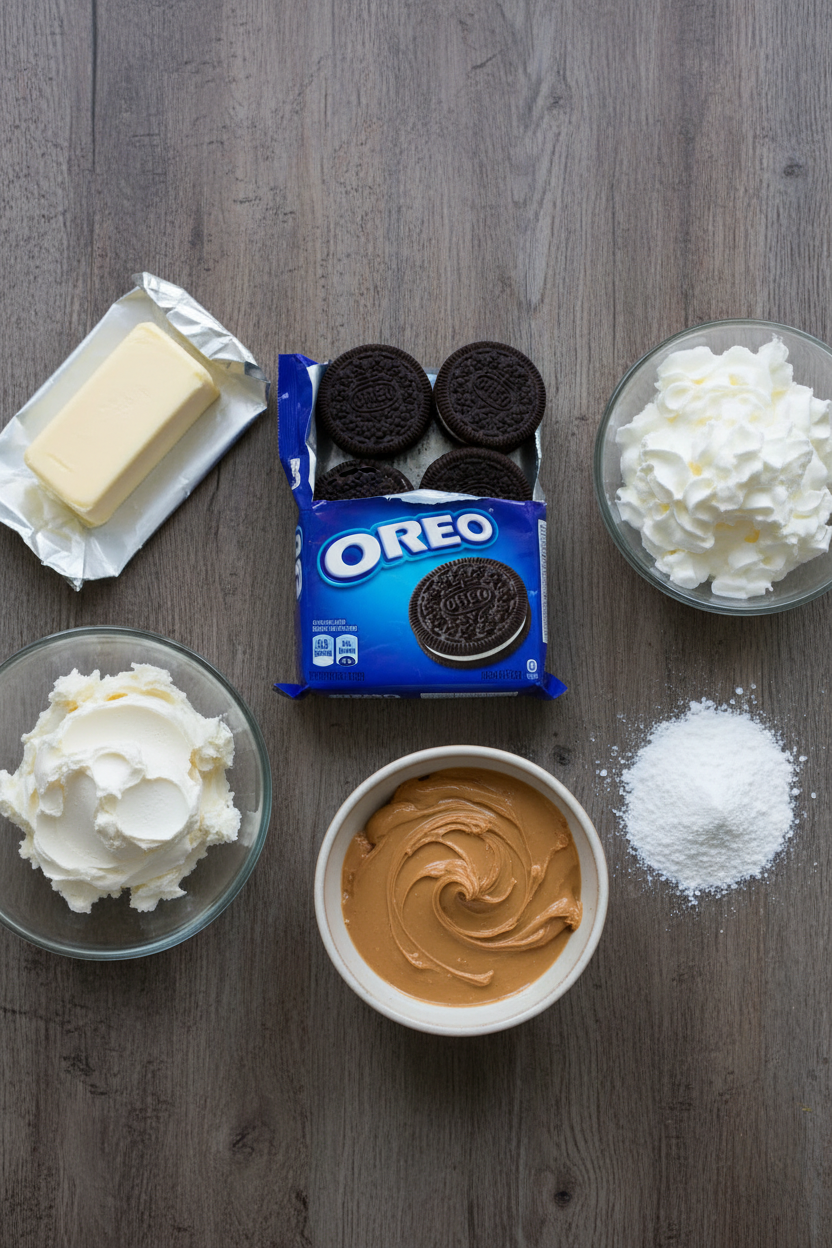
I love the sound of crushing Oreos. It reminds me of my grandson, Sam. He used to sit on the floor and do it with a rolling pin. I still laugh at that. Now I use my food processor. It makes quick work of those cookies.
You mix the crumbs with melted butter. It becomes a dark, sandy dough. Press it into your pie dish firmly. This creates a strong base for all the creamy filling. A good crust matters. It gives every bite a wonderful crunch.
The Heart of the Pie
The filling is pure magic. You beat softened cream cheese until it’s smooth. Then you add the powdered sugar and milk. The secret star is the peanut butter. Doesn’t that smell amazing? It makes everything rich and cozy.
*Fun fact: Peanut butter was first sold as a protein supplement!* Now we get to enjoy it in desserts. Folding in the whipped topping is key. Do it gently. This keeps the filling light and fluffy. It’s like folding a cloud into the mix.
A Little Story & A Big Lesson
I once brought this pie to a church supper. A little girl asked if it was “breakfast pie.” She said it had cookies and peanut butter! Her logic made everyone smile. Food should be fun. That’s why this matters. It turns a simple dessert into a happy memory.
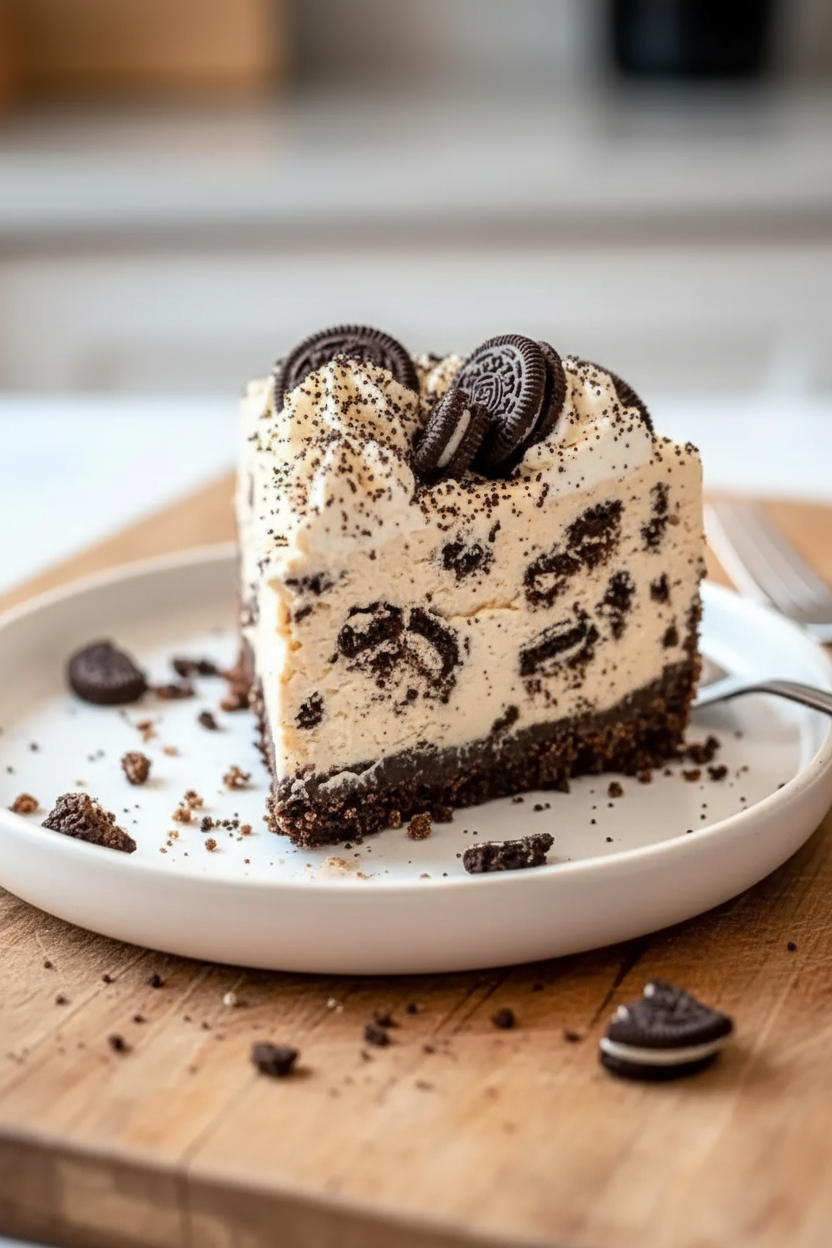
Chopping the extra Oreos for the filling is my favorite part. I save some for the top. The different sizes give you surprises in every bite. Texture matters in food. It keeps your mouth interested from start to finish. Have you ever tried a layered Oreo dessert? They play with texture, too.
The Grand Finale
After the pie freezes, you get to dress it up. I warm up some hot fudge sauce. Drizzling it over the top is the best part. It makes the pie look so special. You can add more whipped topping if you like.
This last step is important. It shows you care. Taking an extra minute to make it pretty matters. It tells your people they are worth it. Do you prefer your fudge drizzle in lines or swirls? I can never decide!
Make It Your Own
This pie is a wonderful blank canvas. You could use crunchy peanut butter for more bits. Or try a different cookie for the crust. Golden Oreos are lovely. The recipe is friendly to changes.
That’s the joy of baking. You start with a guide, then add your heart. What’s your favorite mix-in? Chocolate chips? Maybe some pretzel pieces? I’d love to hear your ideas. Some of my best recipes, like this triple-layer treat, came from friends sharing their twists.
Instructions
Step 1: First, crush those Oreos. I use my trusty food processor. It’s loud, but quick! Mix the crumbs with melted butter. Press it firmly into your pie dish. (Use a cup to press it down evenly.)
Step 2: Now, beat the softened cream cheese and powdered sugar. It should be super smooth. Slowly add the milk and vanilla. Doesn’t that smell amazing? Then, beat in the creamy peanut butter.
Step 3: Gently fold in the whipped topping. This makes the filling light and dreamy. Then, fold in most of your chopped Oreos. Save some for the top! Do you like crunchy or creamy fillings more? Share below!
Step 4: Pour the filling into your crust. Smooth the top with a spoon. Sprinkle on those saved Oreo bits. Now, the hard part: freeze it for two hours. (Freezing it solid makes slicing so much cleaner.)
Step 5: Time to serve! Drizzle with warm hot fudge. I still laugh at how messy this can get. Add an extra dollop of whipped topping if you like. It’s a celebration on a plate!
Creative Twists
Try a chocolate cookie crust for extra richness.
Swap in crunchy peanut butter for a fun, nutty texture.
Add mini chocolate chips right into the filling.
Which one would you try first? Comment below!
Serving & Pairing Ideas
Serve each slice with a cold glass of milk. It’s the perfect partner. For a party, add a scoop of vanilla ice cream on the side. You could also garnish with a few whole Oreos. It looks so pretty. Which would you choose tonight?
Keeping Your Pie Perfect
This pie loves the freezer. Cover it well with plastic wrap. It will keep for about a month. Thaw slices in the fridge for 30 minutes before eating. This makes the filling creamy, not rock-hard.
I once tried to rush and slice it frozen. My knife got stuck! Patience gives you perfect slices. You can also make the crust ahead. Store it right in the pan, wrapped tightly. This is a great batch-cook step for busy weeks.
Batch cooking parts of a meal saves future-you time. It turns a big job into small, easy steps. You will feel so clever and prepared. Have you ever tried storing it this way? Share below!
Simple Fixes for Happy Baking
First, a soggy crust. Always press your crumbs in firmly. Use a cup to really press them down. I remember when my first crust fell apart. I did not press it hard enough!
Second, lumpy filling. Your cream cheese must be soft. Leave it on the counter for an hour. This matters because smooth filling feels special in your mouth. It makes the whole pie seem more professional.
Third, whipped topping that deflates. Fold it gently with a spatula. Do not stir fast. This keeps the filling light and airy. A light pie feels like a happy treat. It builds your cooking confidence with every success. Which of these problems have you run into before?
Your Quick Questions, Answered
How to make a no-bake peanut butter pie with Oreos?
Crush Oreos with melted butter for the crust. Press it into a pan. Mix soft cream cheese, powdered sugar, milk, vanilla, and peanut butter. Gently fold in whipped topping and chopped Oreos. Pour filling into the crust. Freeze it for two hours. Drizzle with hot fudge before serving. It is a simple, crowd-pleasing no-bake dessert perfect for any gathering.
What are the ingredients for a frozen Oreo pie?
You need Oreos, melted butter, and cream cheese. Also get powdered sugar, milk, and vanilla extract. Do not forget creamy peanut butter and whipped topping. Finally, have hot fudge for drizzling. These simple items create magic together. The frozen result is a cool, creamy, and crunchy treat that everyone will love and ask you to make again and again.
Can you make peanut butter pie without cream cheese?
Yes, you can use a different base. Try mixing just peanut butter with cool whip. You could also use vanilla pudding mix. The texture will be softer and less tangy. It is a great option for a quicker, simpler version. This shows how flexible recipes can be. You can always adjust them to fit what you have in your kitchen.
How long does frozen peanut butter pie need to set?
It needs at least two hours in the freezer. This ensures it is firm enough to slice. For best results, let it freeze for four hours or overnight. A fun fact: letting it set fully means cleaner slices. If you are in a hurry, the fridge will work but takes much longer. Always plan for that freezing time for the perfect texture.
What’s an easy no-bake peanut butter dessert?
This Oreo pie is a fantastic choice. Another easy idea is peanut butter balls. Just mix peanut butter, powdered sugar, and butter. Roll them into balls and dip in chocolate. They set in the fridge. These are perfect little bites of joy. You can find more simple dessert ideas online for more inspiration.
How do you keep a frozen pie crust from getting soggy?
The key is to press the crust mixture very firmly. Use a flat cup to press it down hard. A tight crust resists moisture from the filling. Also, make sure your filling is thick and cold when you add it. This simple step makes a big difference. It gives you a perfect crunchy base with every single bite you take.
Which tip will you try first?
From My Kitchen to Yours
I hope you love making this pie. It is full of happy, simple flavors. Sharing it with people you love is the best part. The memories you make are the real recipe. I would love to hear about your baking adventure.
Have you tried this recipe? Tell me all about it in the comments. Let me know who you shared it with. I read every single note from my kitchen friends.
Happy cooking!
—Grace Ellington.

Frozen Peanut Butter Oreo Pie Recipe
Description
A rich, no-bake dessert with an Oreo crust, creamy peanut butter filling, and a chocolate fudge drizzle.
Ingredients
For the Crust:
For the Filling:
For the Topping:
Instructions
- Crush the Oreos: Place 28 Oreos into a food processor and pulse until you achieve coarse crumbs, perfect for a crunchy crust.
- Mix the crust: Add the melted butter to the crumb mixture and pulse until everything is well combined, creating a rich, cohesive base.
- Press into the dish: Firmly press the mixture into the bottom and sides of a pie dish or a 9″ springform pan. Set the crust aside to hold its shape.
- Chop the Oreos: Roughly chop 8 of the remaining Oreos for adding texture to the filling.
- Beat the cream cheese: In a large bowl, use an electric mixer to beat together the softened cream cheese and powdered sugar until smooth. Slowly add the milk while mixing until well combined.
- Add flavors: Incorporate the vanilla extract and creamy peanut butter into the mixture, beating until everything is blended perfectly.
- Fold in the whipped topping: Gently fold in the 8 oz of whipped topping to create a light and airy filling for the pie.
- Combine with Oreos: Carefully fold in 1 cup of the chopped Oreos, saving the rest for a delightful topping.
- Fill the crust: Pour the luscious peanut butter filling over the prepared crust, smoothing it out with a spatula. Sprinkle the remaining chopped Oreos on top.
- Freeze: Place the pie in the freezer for at least 2 hours to set, ensuring it holds together when sliced.
- Drizzle with fudge: Before serving, melt hot fudge topping and drizzle it over the pie for an irresistible finish.
Notes
- Optional: Serve with extra whipped topping for an added treat!