

A Pickle Story from My Kitchen
I still remember the first time I made pickles. It was a hot summer day, and my grandmother handed me a basket of cucumbers. She said, “Girl, we are going to make something magic.” I laughed because they were just green lumps in a bowl. Doesn’t that smell amazing when you first slice a fresh cucumber? That scent is pure summer.
The best part was seeing the vinegar hit the jar. It was like a science experiment in my own kitchen. Have you ever made something from scratch that surprised you? I bet you have a story like that too.
Why These Pickles Matter
These are called “refrigerator pickles” because you do not need a canning pot. You just pop them in the fridge. That means you can make them with a grown-up in under one hour. No scary boiling water baths. Just simple fun.
Why does that matter? Because you can enjoy homemade food without a big fuss. It teaches you that good things do not have to be hard. Also, you can eat them after just one day. That is fast for pickles.
The Big Pour: Hot Brine
When you heat the vinegar, water, salt, and sugar, it smells sharp and bright. That is the brine. You pour it hot over the cucumbers in the jar. *Fun fact: hot brine helps the flavors get inside the cucumber faster than cold liquid.*
You must leave a tiny space at the top of the jar. I learned this the hard way when I filled one too full and it leaked all over my fridge. Oops. Have you ever made a messy kitchen mistake that you still laugh about?
Patience Is a Tiny Ingredient
You let the jars sit on the counter until they cool down. Then you seal them and put them in the fridge. The hardest part? Waiting 24 hours. My kids used to peek in the fridge every hour asking, “Are they ready yet?” No, honey. Not yet.
Here is a truth I learned: if you can wait a whole week, they taste even better. The garlic and dill really get cozy with the cucumber. Why does this matter? Because patience makes food taste like love. You are giving the ingredients time to become friends.
Mix It Up Your Way
You can add whole peppercorns for a little pop. Or red pepper flakes if you like a kick. My neighbor adds a slice of onion to her jar. I never thought of that until she showed me. Now I do it too.
What would you put in your pickle jar? Maybe a bay leaf? Or a tiny piece of jalapeno? Tell me your ideas. I love hearing how folks make recipes their own.
The Best Snack Comes from a Jar
These pickles are great on a burger, next to a sandwich, or just eaten straight from the jar. I will not judge you if you stand at the fridge and grab one with your fingers. I do it all the time.
Think about all the things you can pickle after this. Carrot sticks. Green beans. Even hard-boiled eggs. The same simple brine works wonders. Do you have a favorite veggie you would try?
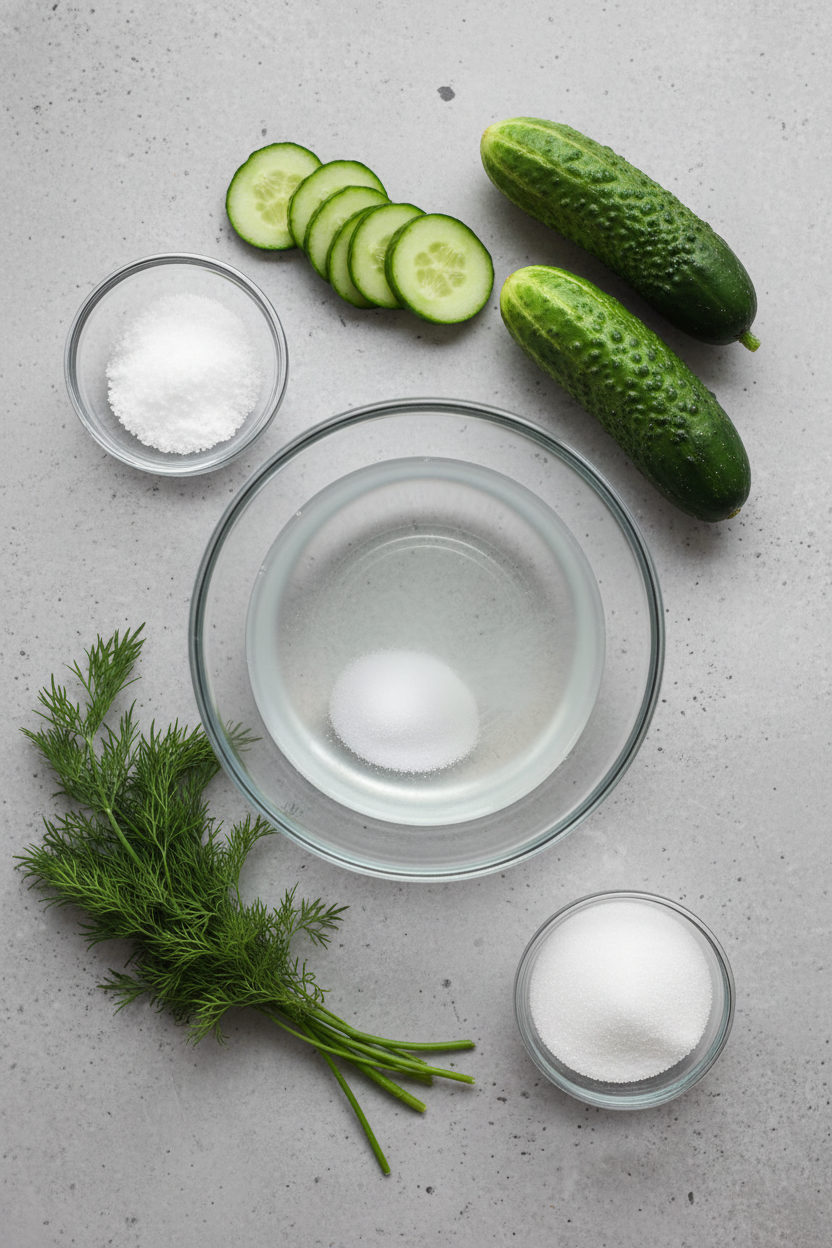
Ingredients:
| Ingredient | Amount | Notes |
|---|---|---|
| Small fresh cucumbers | 5-6 | Sliced into rounds or pickle spears; remove ends to prevent softening |
| Water | 2 cups | For the brine |
| White vinegar | 1 cup | For the brine |
| Kosher salt | 1 tablespoon | For the brine |
| Sugar | 1 teaspoon | For the brine |
| Fresh dill sprigs | 4 sprigs | Add to jars with cucumbers |
| Garlic cloves | 4 | Smashed; add to jars with cucumbers |
| Whole peppercorns or red pepper flakes | Optional, to taste | For spicy pickles; add to jars with cucumbers |
Instructions
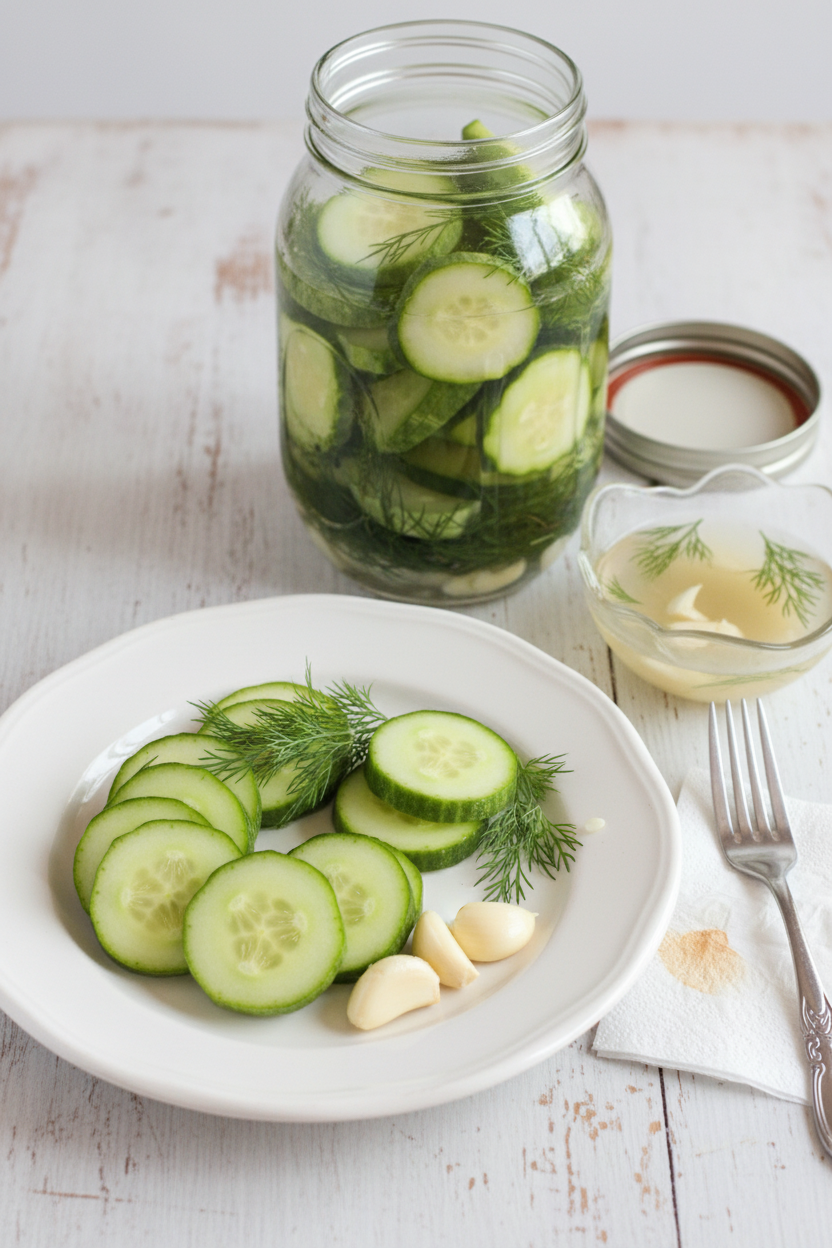
Step 1: Wash your cucumbers well and slice them into rounds or spears. I always leave the skins on for texture. (Removing the ends truly keeps them crunchier.)
Step 2: Smash the garlic cloves and add fresh dill to clean jars. My grandma said the smell of dill meant pickles were coming. What’s your favorite pickle-spice flavor? Share below!
Step 3: Layer the cucumber slices tightly into the jars with the garlic and dill. Push them down gently so they stay snug.
Step 4: In a saucepan, stir together water, vinegar, salt, and sugar over medium heat. Stir until everything dissolves and the brine is hot.
Step 5: Carefully pour the hot brine over the cucumbers until they are fully covered. Leave a little space at the top of each jar.
Step 6: Let the jars sit uncovered until they cool to room temperature. Then put the lids on and slide them into the refrigerator.
Step 7: Wait at least 24 hours before you taste them. They get even better if you let them sit for a whole week. Doesn’t that smell amazing?
Creative Twists
… Swap the dill for fresh basil or thyme for an herby surprise.
… Add thin slices of red onion for color and a little bite.
… Toss in a few slices of jalapeno if you like a spicy kick.
Which one would you try first? Comment below!
Serving & Pairing Ideas
These pickles are perfect on a sandwich or alongside a juicy burger. I love chopping them up for a tangy potato salad addition. You could also serve them on a cheese board with sharp cheddar and crackers. Which would you choose tonight?
Why Storing Your Pickles Right Matters
The fridge is your pickle’s best friend. These are quick pickles, not canned ones. They must stay cold to keep their crunch and flavor.
I remember my first batch of pickles. I left them on the counter by mistake. They got soft and mushy, and I was so sad. Now I always pop them straight into the fridge after they cool.
Batch cooking these is a great idea. Make a few jars at once. They last for weeks in the fridge, so you always have a crunchy snack. This matters because homemade pickles taste so much better than store-bought ones. You control the salt and spices. Have you ever tried storing it this way? Share below!
Three Common Pickle Problems and Easy Fixes
First, pickles can turn soft. This happens when cucumbers sit too long before pickling. Use the freshest cucumbers you can find. I once used old cucumbers from the back of the fridge. They were limp before I even started.
Second, the brine can taste too salty or too sour. Taste it before you pour it over the cucumbers. You can always add a little more water to fix it.
Third, the pickles might not be flavorful enough. Let them sit in the fridge for at least 24 hours. They get better with time. This matters because a good pickle is all about balance. Getting it right makes you feel proud and confident in the kitchen. Which of these problems have you run into before?
Your Quick Questions, Answered
How long do homemade dill pickles need to sit before they are ready to eat? They need at least 24 hours in the fridge. The flavors mingle and soak into the cucumbers during this time. They taste even better after a full week. The brine needs time to work its magic and give you that tangy crunch. Be patient and wait.
Can you use regular cucumbers instead of pickling cucumbers? You can, but they might not be as crunchy. Pickling cucumbers are smaller and have fewer seeds. Regular cucumbers have more water, which can make them soft. If you use a regular cucumber, slice it thick. This helps it stay firmer in the brine.
What is the best vinegar to use for quick dill pickles? White vinegar is the best choice. It has a clean, sharp flavor that does not overpower the dill. Apple cider vinegar works too, but it changes the taste. Stick with white vinegar for a classic dill pickle that tastes just like Grandma used to make.
How do you keep quick pickles crunchy? Use fresh, firm cucumbers and remove the ends. The ends have an enzyme that softens pickles. Always keep them cold in the fridge. Adding a few grape leaves or a pinch of alum to the jar can help. Cold storage is the real secret to crunch, though.
Do you have to boil the brine for quick refrigerator pickles? Yes, you should boil the brine. Heating the water, vinegar, salt, and sugar helps everything dissolve completely. Hot brine also pours easier over the cucumbers. Let it cool a little before pouring, but it needs to be warm to work right.
Can I add garlic or other spices to these pickles? Yes, you can add anything you like. Garlic cloves, red pepper flakes, and peppercorns are all great. I love adding a slice of onion for extra flavor. Experiment with your favorite spices and make the pickles your own. Which tip will you try first?
Before You Go, A Little Note From My Kitchen
Thank you for spending time with me today. I hope these tips help you make the best pickles. Cooking is about trying new things and having fun.
My kitchen is always open to you. I love hearing about your adventures. *Fun fact: Pickles date back over 4,000 years to ancient Mesopotamia.*
Have you tried this recipe? Tell me how it turned out in the comments. I read every single one and cheer for your success.
Happy cooking!
—Grace Ellington.

Quick Homemade Dill Pickles by a Home Cook
Description
Wash the cucumbers well. Slice into rounds, pickle spears, or your desired shape. Remove ends to prevent softening. Add garlic cloves, dill sprigs, and optional peppercorns or spices. Then tightly layer cucumber slices into clean jars. In a small saucepan, combine white vinegar, water, kosher salt, and sugar. Heat over medium heat, stirring until dissolved and hot. Carefully pour the hot brine over cucumbers, covering them completely. Leave a little space at the top of each jar. Let the jars sit uncovered until they reach room temperature. Then seal and refrigerate. Let the pickles chill at least 24 hours. They are even better if you can leave them refrigerated for a week.
Ingredients
Instructions
- Wash the cucumbers well. Slice into rounds, pickle spears, or your desired shape. Remove ends to prevent softening.
- Add garlic cloves, dill sprigs, and optional peppercorns or spices. Then tightly layer cucumber slices into clean jars.
- In a small saucepan, combine white vinegar, water, kosher salt, and sugar. Heat over medium heat, stirring until dissolved and hot.
- Carefully pour the hot brine over cucumbers, covering them completely. Leave a little space at the top of each jar.
- Let the jars sit uncovered until they reach room temperature. Then seal and refrigerate. Let the pickles chill at least 24 hours. They are even better if you can leave them refrigerated for a week.
Notes
- No nutrition information provided in the text.