

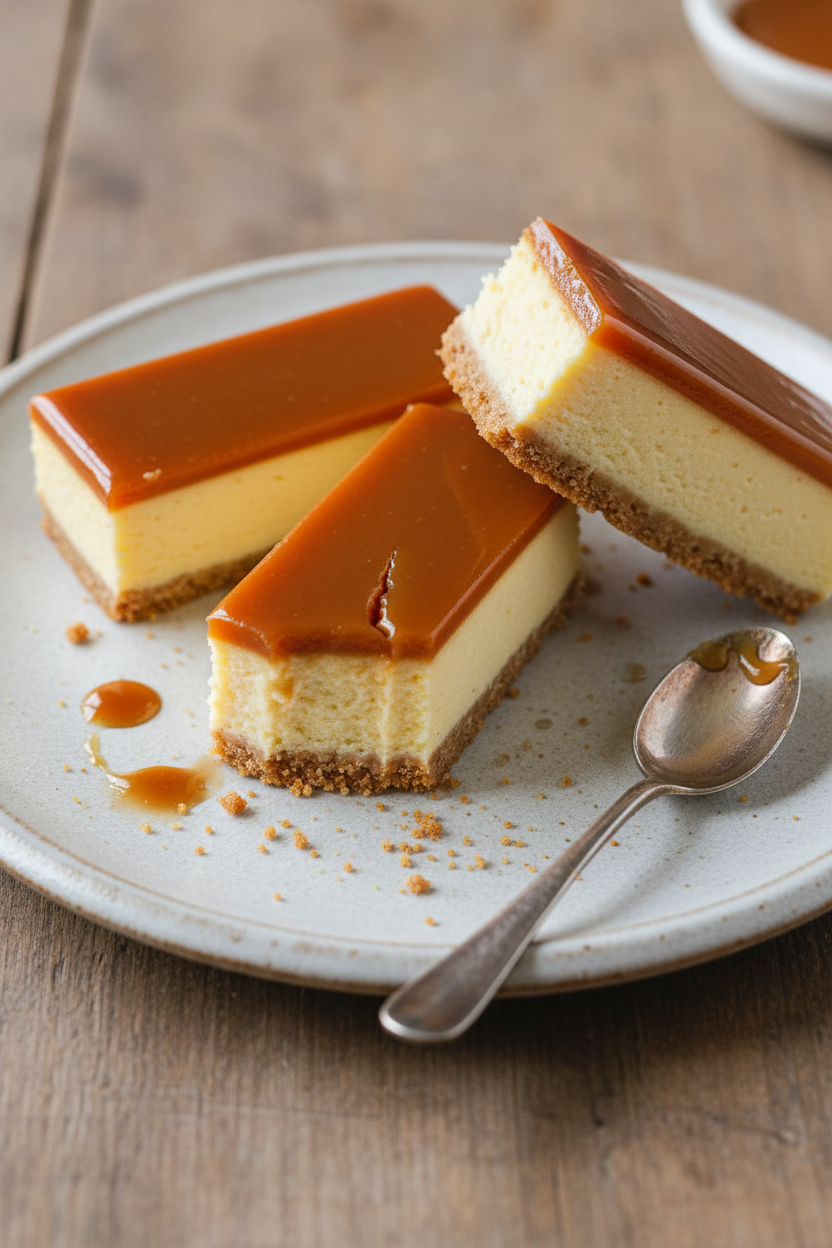
The Crunch Under Your Feet
Let’s start with the crunch. That biscuit base is like a sweet, buttery path. You press it into the pan. It must be firm and even. I think of it as making a bed for the custard. A good bed means no soggy bottoms! My grandson once pressed it with his toy dinosaur. The little footprints made us laugh. But it still tasted wonderful.
Why does this matter? A solid base holds everything together. It gives you that perfect contrast. A creamy bite followed by a gentle crunch. *Fun fact*: The brown butter you make for it is called “beurre noisette.” That’s just a fancy way of saying it smells like toasted nuts. Doesn’t that smell amazing? What’s your favorite thing to bake with a crunchy base? I love a good chewy brownie on a crisp crust.
The Heart of the Tart
Now, the custard. This is the heart of it all. You warm the cream with a real vanilla bean. Those tiny black seeds are magic. They make it taste like a hug. You must be slow and gentle when adding the eggs. Rushing makes it curdle. I still whisper “nice and easy” to myself every time.
Why does this matter? Patience here makes the texture silky. It becomes smooth as satin. Baking it low and slow gives that gentle wobble. It’s like a cloud setting in the pan. Do you prefer desserts that are creamy or more cakey? For me, a creamy cheesecake bite is hard to beat.
The Shiny Crown
The caramel glaze is the shiny crown. It turns simple custard into something grand. Watch the sugar melt in the pan. It goes from clear to deep gold. You must not stir it. Just swirl the pan. When you add the cream, it will bubble and hiss! That’s the good sound.
Let it cool until it’s like warm honey. Then pour it over your chilled tart. It will spread into a perfect, glossy sheet. It’s the final, sweet touch. Have you ever made caramel before? It can be tricky, but so worth it. If you like caramel, you might adore these root beer float brownies.
Putting It All Together
This tart is a project. You make three parts. The base, the custard, the glaze. Each needs its own time. Chilling is your friend here. I often make the base one day and the custard the next. It feels less like work and more like a happy ritual.
The best part is sharing it. Cutting that first slice is a joy. You see all the layers you built. It’s a dessert made with care. Would you make this for a special day or just a Tuesday treat? I think any day is special with a slice of this and a cup of tea. For another layered treat, try a triple layer brownie.
Instructions
Step 1: First, make your sweet biscuit dough. Rub cold butter into sugar and flour with your fingers. It should look like crumbly sand. Then, mix in the beaten egg just until it forms a ball. (Stop mixing the second it comes together!) Wrap this dough and let it chill. It needs a good rest, just like we do.
Step 2: Now, roll your dough nice and thin. Bake it until it’s golden and crisp. Let it cool completely. Next, make the magic brown butter. Cook regular butter until it turns a nutty, golden brown. Doesn’t that smell amazing? Mix it with crushed biscuits to make your tart base. Press it firmly into your pan and chill.
Step 3: Time for the vanilla custard. Steep a vanilla bean in warm cream and milk. This makes the flavor so special. Whisk your eggs and sugar together in a bowl. Then, slowly mix in the warm vanilla cream. What’s the most important rule for adding hot liquid to eggs? Share below! Always strain your custard for a silky finish.
Step 4: Pour your custard over the chilled base. Bake it low and slow until it has a gentle wobble. Patience is key here! Let it cool, then refrigerate it for hours. I know waiting is hard. For the glaze, cook sugar and water into a deep amber caramel. Carefully whisk in warm cream. Let it thicken slightly before pouring it over your chilled tart.
Creative Twists
Salty Surprise: Sprinkle a little flaky sea salt on the caramel glaze.
Berry Swirl: Add a layer of raspberry jam under the custard.
Chocolate Drizzle: Finish with dark chocolate over the caramel. Which one would you try first? Comment below!
Serving & Pairing Ideas
Serve a thin slice with fresh berries on the side. The tart fruit is perfect with the sweet custard. A dollop of whipped cream never hurts either. For a real treat, pair it with a cup of strong coffee. It reminds me of my favorite decadent treats from the bakery. Which would you choose tonight?
Keeping Your Tart Happy and Fresh
This tart is best kept in the fridge. Cover it lightly with plastic wrap. It will stay lovely for about three days. The freezer is not this dessert’s friend. The custard can become grainy when frozen and thawed.
I remember my first custard tart. I left it on the counter overnight. What a sad, soupy mess I found in the morning! Now I chill it right away. Batch cooking the biscuit base is a smart trick. You can make and press it days ahead. Just wrap and chill it until you’re ready.
This matters because good food deserves care. Storing it right saves your hard work and your treat. It makes a busy week feel special with a ready-made decadent treat. Have you ever tried storing it this way? Share below!
Little Fixes for Common Kitchen Hiccups
Is your biscuit dough too crumbly? You may have worked the butter too much. Just add a teaspoon of cold water. Gently knead it in until the dough holds together. I once added too much water. My crust shrank in the oven! Now I add water drop by drop.
Worried about a lumpy custard? Always strain your mix through a fine sieve. This catches any bits of cooked egg. It gives you a silky-smooth filling every single time. Is your caramel sauce too thin? Let it cool a bit longer. It will thicken as it sits. Patience is your best kitchen tool here.
Fixing these small issues builds your confidence. You learn that most mistakes have easy solutions. It also makes the flavor and texture perfect. Which of these problems have you run into before?
Your Quick Questions, Answered
What is the best type of tart pan for a custard tart?
A metal tart pan with a removable bottom is best. It conducts heat evenly for a crisp crust. The removable bottom lets you lift out the finished tart cleanly. This keeps your beautiful layers intact for serving. A square or round pan both work wonderfully for this recipe.
How do you prevent a soggy bottom on a custard tart?
Bake your pastry base until it is fully golden and crisp. Let it cool completely before adding the custard. The chilled, pressed biscuit base in this recipe also helps. It acts as a barrier. This step ensures every bite has a satisfying crunch, just like the best brownie recipes have a good base.
Can you make brown butter custard tart ahead of time?
Yes, you absolutely can. The whole tart needs to chill for hours anyway. Making it the day before is a great plan. The flavors meld and improve overnight. Just add the caramel glaze a few hours before serving. This makes it perfect for a stress-free dinner party dessert.
What is a good substitute for brown butter in baking?
Use the same amount of regular melted butter. Add a half teaspoon of vanilla extract. This will mimic some of brown butter’s depth. You won’t get the exact nutty taste, but it will still be delicious. It’s a handy swap if you’re short on time.
Why did my custard tart crack and how can I fix it?
Cracks happen if the oven is too hot. The custard cooks too fast and tightens. Baking low and slow at 120°C prevents this. If a small crack appears, your caramel glaze will cover it beautifully. No one will ever know it’s there!
What are some variations on a classic brown butter custard tart?
Try adding a pinch of cinnamon to the biscuit crumbs. You could use a gingersnap base instead of plain biscuits. A triple-layer effect is fun with a fruit compote under the custard. A fun fact: the caramel glaze method works for topping many desserts. Which tip will you try first?
From My Kitchen to Yours
I hope you feel ready to make this special tart. It looks fancy but is just careful steps. The smell of brown butter and vanilla is pure happiness. I love hearing your stories in the comments.
Tell me about your baking adventures. Have you tried this recipe? Did you try a fun variation? Your notes help all of us learn. Thank you for spending time in my kitchen today.
Happy cooking! —Elowen Thorn.

A Bakers Guide to Brown Butter Custard Tart
Description
A sophisticated tart featuring a crisp pâte sucrée, a nutty brown butter biscuit base, a silky vanilla custard, and a glossy caramel glaze.
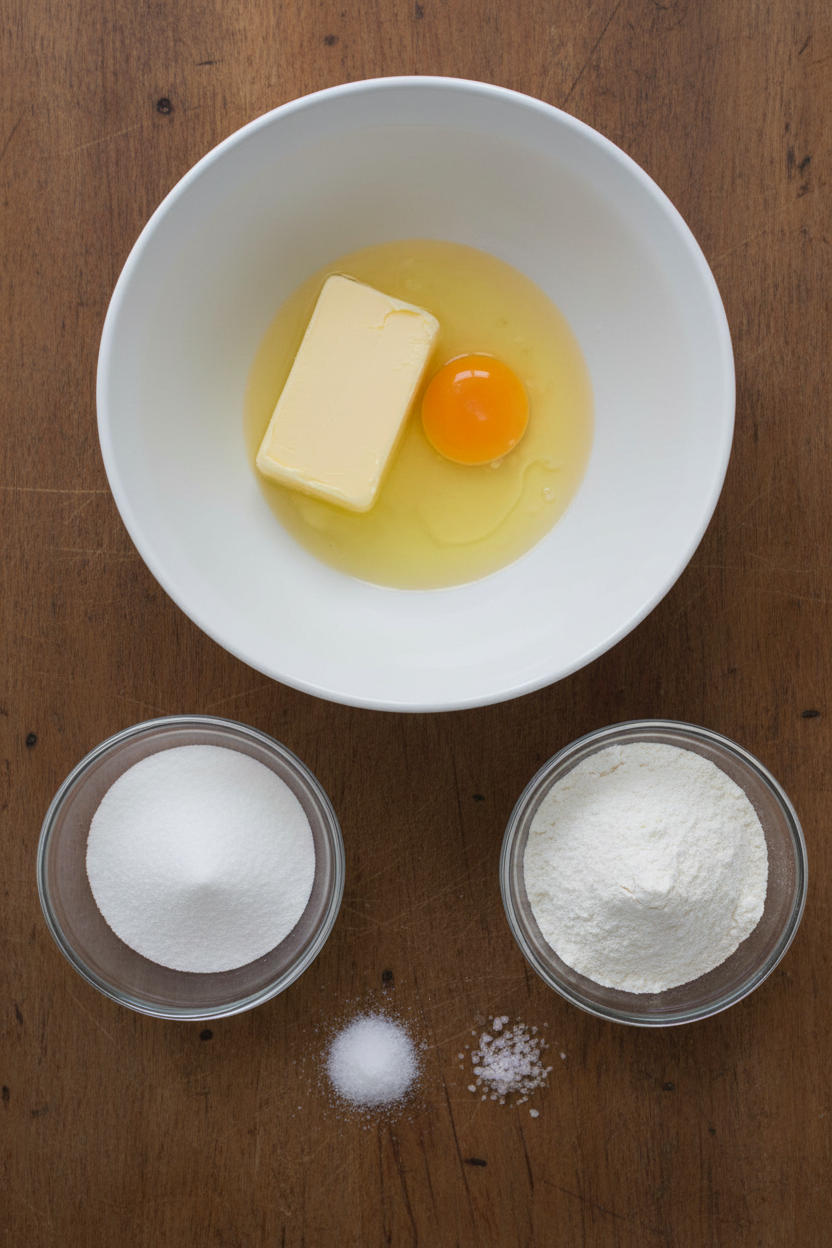
Ingredients
Biscuit dough (Pâte Sucrée):
Brown butter pressed biscuit base:
Vanilla custard:
Caramel glaze:
Alternative finishing option:
Instructions
- Make the biscuit dough (Pâte Sucrée): Sift the icing sugar, flour, cornstarch, and salt into a bowl. Add the cold diced butter and rub it in with your fingertips, or mix on low speed, until the mixture resembles coarse sand with no visible butter pieces.
- Add the beaten egg and mix just until the dough comes together. Stop as soon as it forms a cohesive dough; do not overwork.
- Shape the dough into a flat disc, wrap, and chill until firm, about 30 minutes.
- Roll the dough between two sheets of parchment to about 3mm thickness.
- Remove the top parchment paper and bake at 160°C fan for about 15-20 minutes, until evenly golden and fully crisp. Let cool. Reduce the oven temperature to 120°C for the custard.
- Make the brown butter pressed biscuit base: Melt the butter in a saucepan over medium heat, swirling occasionally, until it turns a deep golden brown and smells nutty. Immediately pour into a heatproof bowl to stop the cooking. Let cool until warm and still liquid.
- Combine the crushed biscuits and salt in a bowl. Pour the warm brown butter over the crumbs and mix thoroughly until all the crumbs are evenly coated and look like wet sand.
- Tip the mixture into a 20cm square ring set on a parchment-lined baking sheet. Press firmly and evenly across the base and into the corners using the back of a spoon or a flat-bottomed glass. Chill until set, about 30 minutes.
- Make the vanilla custard: Split the vanilla bean pod lengthwise and scrape out the seeds. Place the pod and seeds in a medium saucepan with the cream and milk. Heat over medium until it just begins to simmer, then remove from heat, cover, and infuse for 30 minutes.
- Whisk the egg yolks, whole egg, sugar, and salt in a large bowl until smooth and slightly pale.
- Remove the vanilla pod from the cream mixture. Slowly pour the warm cream into the egg mixture while whisking constantly.
- Strain the custard through a fine sieve into a jug. Skim off any surface foam with a spoon.
- Place the chilled biscuit base (still in its ring) on a baking sheet. Carefully pour the strained custard over the base.
- Bake at 120°C for about 60-70 minutes, until the custard is set with a slight wobble in the very center. Let cool completely on a wire rack, then refrigerate until fully chilled and firm, at least 4 hours or overnight.
- Make the caramel glaze: Combine the sugar and water in a small, clean saucepan. Heat over medium, swirling the pan gently to dissolve the sugar, but do not stir. Cook until it turns a deep amber color.
- Immediately remove from heat and carefully pour in the warm cream (it will bubble vigorously). Whisk until smooth. Let cool until it thickens to a pourable glaze consistency, about 10-15 minutes.
- Pour the glaze over the chilled tart, tilting the tart to spread it evenly. Return to the fridge for about 15 minutes to set the glaze before serving.
Notes
- For an alternative finish, omit the caramel glaze. Sprinkle the chilled tart with a thin, even layer of granulated sugar and caramelize it with a kitchen torch until golden and crisp.