

The First Time I Tasted These
A friend from up north brought these to a church potluck. I had never heard of butter tart squares before. She set the pan down and said “Try one, they’re from my grandma’s kitchen.”
I took a bite and just stood there. That buttery crust and that rich, sweet filling. My own grandma would have loved this recipe.
Have you ever had a dessert that felt like a hug from a stranger? That was this one for me.
The Crust Is the Foundation
You start with flour and powdered sugar. That icing sugar makes the crust tender in a way plain sugar just cannot. Then you cut in cold butter until it looks like little peas.
My mama always said cold butter is the secret to a good crust. She was right. You press it into the pan and bake it just ten minutes.
And that is what makes all the difference. It stays crisp under that gooey filling.
Do you press your crusts by hand or use a glass? I use my fingers. It feels right.
The Filling Is Simple Magic
Melt the butter and whisk in brown sugar until it is smooth. Then add eggs one at a time. The vinegar sounds odd, I know, but it cuts the sweetness just enough.
I still make it this way. My kids never complained about this one. That vinegar trick came from my grandma’s neighbor, Miss Ruth. She said it was the secret to a good butter tart.
Here is a fun thing I just remembered. You can use lemon juice instead of vinegar. Both work fine. It just changes the flavor a little.
Raisins or No Raisins?
That is the big question with these squares. Some folks leave them out. Some folks double them. I put them in because my husband loves them.
But here is what matters. The raisins soak up a little of that buttery syrup. They get plump and soft. If you hate raisins, just skip them. The filling is still perfect.
What do you think? Raisins or no raisins? I have seen people argue about this like it is politics.
Why You Must Chill Before Cutting
I learned this the hard way. The first time I made these, I cut them warm. They fell apart like a wet sandcastle. The filling ran everywhere.
You have to let them cool on the counter. Then put them in the fridge for a few hours. The filling sets up firm and clean. Then you get those perfect little squares.
This is why patience matters in baking. You cannot rush a good thing. That is what my grandma always said.
How to Keep Them Fresh
These squares keep in the fridge for about five days. If they last that long. Around my house, they are gone in two.
You can also freeze them for two months. Wrap each square in wax paper, then put them in a bag. They taste just as good thawed out.
I always make a double batch. One for now and one for later. It is nice to have something sweet waiting in the freezer.
This Recipe Feels Like Home
There is something honest about a butter tart square. It does not try to be fancy. It just tastes like someone cared enough to bake.
I think that is what we all need more of. Food that comes from love, not from a box or a fancy magazine. Food that makes you close your eyes for a second.
I would love to hear your story. What dessert reminds you of your mama’s kitchen? Tell me, I am all ears.
Butter Tart Squares
My aunt Vera used to bring these to every church potluck back home. She’d set the pan down and folks would just gather around like bees to honey. I still make them the same way she taught me, with brown sugar so dark it almost smells like molasses. No one ever leaves with an empty plate.
The crust is the secret here. You want it tender, not tough, so handle that butter like you’re patting a sleepy cat. Cold butter cut into flour makes all the difference. My kids never complained about this one, even when I forgot the raisins. Have you ever baked with cold butter straight from the fridge? It changes everything.
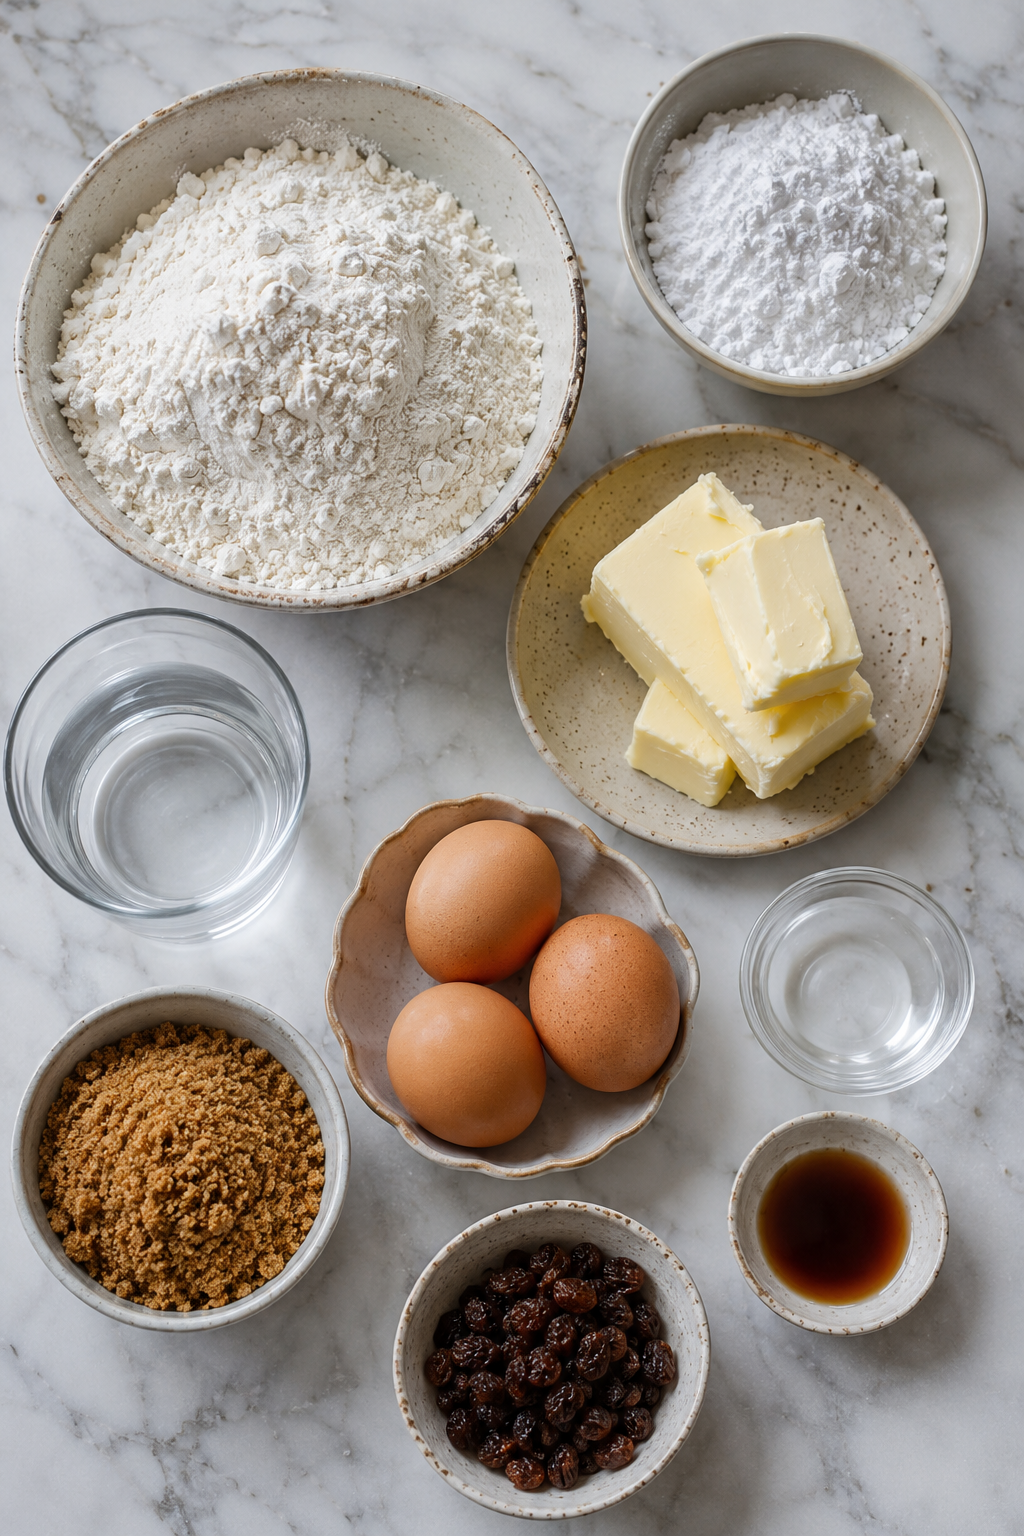
Ingredients – Crust
You’ll need 2 cups all-purpose flour and 4 tablespoons icing sugar. Grab 1 cup cold unsalted butter and cut it into small cubes. Keep 1 to 2 tablespoons cold water handy, just in case the dough feels too dry. That’s it. Simple and honest.
Ingredients – Filling
The filling is where the magic happens. You need half a cup of unsalted butter and 3 cups of brown sugar, lightly packed. Add 4 large eggs, 1 to 2 tablespoons white vinegar, and a full tablespoon of vanilla extract. Throw in ¾ cup raisins if you like, but my husband says they’re optional. I leave them out half the time myself.
Instructions
Step 1: Line a 9×13 inch pan with parchment paper and spray it with cooking spray. Preheat your oven to 350°F. Do this first so the pan is ready when you are. My grandma always said prep saves the day.
Step 2: Mix the flour and icing sugar together in a big bowl. Cut in the cold butter until you see pea-sized pieces and the mixture holds together when you squeeze it. Add a little cold water if it’s too dry. (Pro tip: If your butter gets warm while cutting, pop the bowl in the fridge for 5 minutes.)
Step 3: Press the crust mixture evenly into the bottom of your prepared pan. Bake it for 10 minutes, just until it’s set and barely golden. The smell will start filling your kitchen right about now.
Step 4: Melt the butter in a microwave-safe bowl. Whisk in the brown sugar until it’s smooth and glossy. Add the eggs one at a time, whisking well after each one. Then stir in the vinegar and vanilla. Fold in the raisins if you’re using them. What’s your go-to add-in for butter tarts—raisins or nuts? Share below!
Step 5: Pour the filling over the baked crust. Return the pan to the oven and bake for 25 to 30 minutes. You want it mostly firm with a slight jiggle in the center, like a gentle wobble. Don’t overbake or it’ll get too firm and sad.
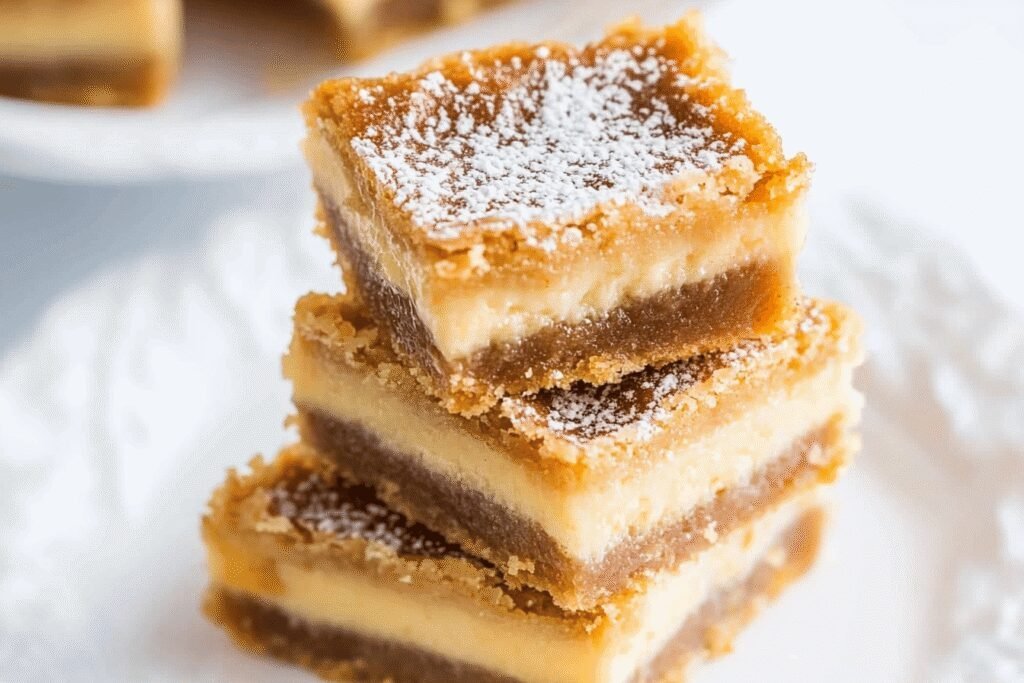
Step 6: Cool the pan to room temperature on a wire rack. Then refrigerate for a few hours until fully set. Cut into squares and serve cold or at room temperature. I always sneak one before anyone else sees.
Creative Twists
Swap the raisins with chopped pecans or walnuts. Toasting them first brings out a warm, nutty flavor. My neighbor swears by this one.
Drizzle melted dark chocolate over the top after chilling. Let it set before cutting for a fancy finish.
Add a pinch of cinnamon and nutmeg to the filling. It makes the whole kitchen smell like autumn in a pan.
Which one would you try first? Comment below!
Serving & Pairing Ideas
Serve these squares with a scoop of vanilla ice cream or a dollop of whipped cream. A dusting of powdered sugar on top looks real pretty, too. Pair them with hot coffee or a cold glass of milk for an afternoon treat. I like mine with a strong black tea, something bold to match the sweet. Which would you choose tonight?
My grandma never wrote down a single recipe. She just knew when dough felt right by touching it. Elowen Thorn remembers that feeling every time she bakes.
Butter tart squares are my little shortcut to that same love. All the gooey, sweet goodness of a butter tart. None of the fuss of making individual pastries. Save this one on Pinterest for later.
I found this recipe years ago at a church potluck. One bite and I begged the woman for the details. She laughed and just said, “Butter, sugar, and a little patience.” Follow along on Facebook for more stories like that.
She was right. This dessert is simple. But it tastes like you fussed for hours. My kids never complained about this one. Try my German chocolate cake too if you love sweet things.
The Crust and the Filling
You start with the crust. It is just flour, icing sugar, and cold butter. Cut that butter in until it looks like small peas. This creamy chicken pasta needs a different kind of prep, but this crust is fast.
Press it into the pan. Do not worry if it looks crumbly. Bake it for ten minutes. That is all it needs. This Big Mac casserole has a crust too, but nothing beats this buttery one.
The filling is where the magic happens. Melt butter, whisk in brown sugar until it is smooth. Add eggs one at a time. Then a splash of vinegar and some vanilla. I learned from the best home cooks to always trust my whisk.
Stir in raisins if you like them. I always do. My husband picks them out anyway. Some things never change. Pin this recipe for your next bake sale.
A Few Notes I Learned the Hard Way
You can swap white vinegar for lemon juice. Both work the same. I use lemon when I have it. Share your swap on Facebook and tell me how it goes.
Do not skip the chilling step. I did once. The squares fell apart into a sugary mess. Still tasted good though. This white cake needs chilling too, so plan ahead.
You can store these in the fridge for five days. Or freeze them for two months. I always make a double batch now. This chicken pasta freezes well too, for busy nights.
Fun fact call-out: Butter tarts are as Canadian as maple syrup and saying “sorry.” I first had one at a diner in Ontario.
Storage and Batch Cooking
Let the squares cool completely before you even think about storing them. Then wrap them tight in plastic wrap. Pop them in the fridge for up to five days. I keep a batch in the freezer for surprise guests.
For freezing, layer them between wax paper in a container. They keep for two months easy. I once forgot a batch for three months and they were still perfect. Save this tip on Pinterest for holiday baking.
To reheat, just let them sit out for ten minutes. Or warm them for a few seconds in the microwave. I ate one cold from the fridge last night. No regrets. Have you ever tried storing it this way? Share below! Let me know on Facebook how yours turn out.
Troubleshooting
Problem one: Your crust is too crumbly. This happens when the butter is not cold enough. I once used soft butter and the crust fell apart. This chicken pasta needs patience too, but for crusts, keep that butter cold.
Problem two: The filling is runny. That means you did not bake it long enough. Look for a slight jiggle in the center, not a full wobble. This casserole has a similar doneness test, but trust the jiggle.
Problem three: The squares stick to the pan. Always use parchment paper. I learned this when I had to chip squares out with a butter knife. Real cooks use parchment every single time.
Why this matters: Fixing these small problems makes you feel like you really know what you are doing in the kitchen. And the food tastes way better when you get it right. Which of these problems have you run into before? Pin this for later so you do not forget.
Your Quick Questions, Answered
Can I use margarine instead of butter?
I would not recommend it. Butter gives the crust that flaky texture and the filling that rich flavor. Margarine has more water in it, so your crust might turn out soggy. Stick with real butter for the best results. I always say butter is worth it for desserts like this.
Do I have to use raisins?
Not at all. The raisins are optional. Some folks leave them out and the squares are still delicious. My friend adds chopped walnuts instead for a little crunch. Do whatever makes your family happy. That is the beauty of this recipe. Tell me your twist on Facebook.
Can I double this recipe for a bigger pan?
Yes, you can. Just use a larger pan and add a few extra minutes to the bake time. Keep an eye on the center for that slight jiggle. I doubled it for a family reunion once and it vanished in ten minutes. Batch cooking for holidays is a lifesaver. Save this doubled batch tip on Pinterest. Which tip will you try first?
One Last Thing Before You Go
I hope you make these squares for someone you love. They are simple enough for a Tuesday night. Special enough for a holiday table. Elowen Thorn believes every kitchen should have a recipe like this one.
Drop a comment below and tell me how they turned out. Did you use raisins? Did you chill them long enough? I want to hear all about it. Have you tried this recipe? Come share your photo on Facebook too.
Happy cooking!
— Elowen Thorn

Butter Tart Squares
Description
Butter Tart Squares are a classic Canadian dessert with a buttery shortbread crust and a rich, sweet brown sugar filling, optionally studded with raisins.
Ingredients
½ cup unsalted butter
Instructions
- Line a 9×13 inch pan with parchment paper and spray with cooking spray. Preheat oven to 350°F.
- Mix flour and icing sugar. Cut in cold butter until pea-sized pieces form and mixture holds when squeezed. Add cold water if too dry.
- Press crust mixture evenly into bottom of pan. Bake 10 minutes.
- Melt butter in a bowl. Whisk in brown sugar until smooth. Add eggs one at a time, whisking after each. Mix in vinegar and vanilla. Stir in raisins if using.
- Pour filling over baked crust. Return to oven and bake 25–30 minutes until mostly firm with a slight jiggle in the center.
- Cool to room temperature, then refrigerate a few hours until set. Cut into squares and serve.
Notes
- Notes: Use lemon juice in place of white vinegar. Must chill before cutting. Store up to 5 days in fridge or freeze up to 2 months.