

A Cozy Kitchen Memory
My grandson calls these my “magic biscuits.” I still laugh at that. He couldn’t believe a potato could be in a bread. But it makes them so soft inside. It feels like a warm hug on a plate.
We make them every Christmas morning now. The smell of chives and butter fills the whole house. It tells everyone the day has officially begun. Doesn’t that smell amazing?
Why the Potato Matters
You might wonder about the potato flakes. They are the secret. They give the biscuits a wonderful tenderness. This matters because it makes them impossible to eat just one.
The potato also keeps them moist for days. That’s a handy trick for busy holidays. Fun fact: This idea comes from old-fashioned potato bread recipes. Cooks used mashed potatoes to stretch flour long ago.
Hands in the Dough
Now, the key is to keep everything cold. I chill the butter and buttermilk. I even chill my bowl sometimes. This makes little pockets of fat in the dough.
Those pockets melt in the hot oven. That’s what makes the biscuits rise up fluffy and tall. So don’t rush this part. What’s your favorite kitchen job—mixing, kneading, or tasting?
The Simple Joy of Making
When you stamp out the biscuits, press straight down. Don’t twist the cutter. Twisting seals the edges. Then they can’t rise as high.
I gather the scraps gently. We never waste good dough. This matters because cooking teaches us care. It shows us how to make something beautiful from what’s left.
Sharing the Warmth
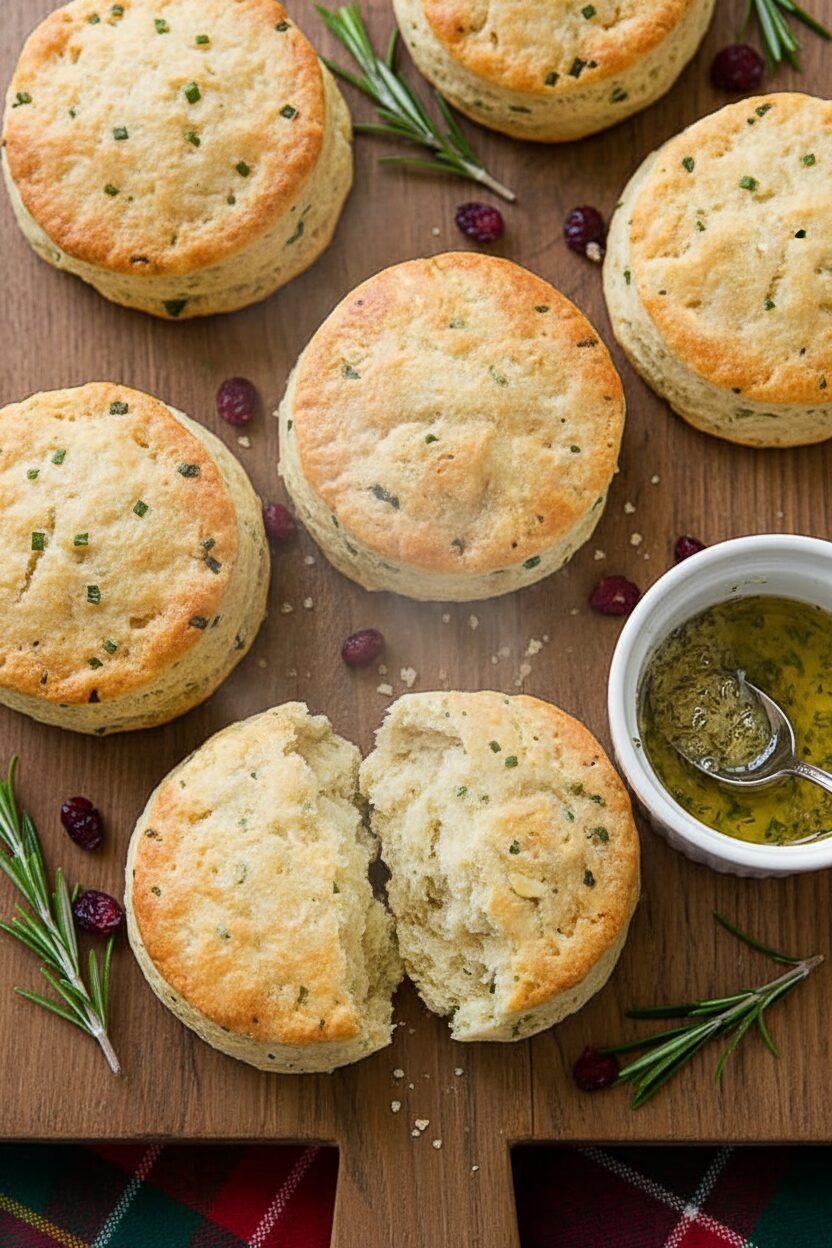
That final brush of melted butter is my favorite step. It gives them a golden glow and rich flavor. Let them cool just five minutes. Then pull one apart and watch the steam rise.
They are perfect with soup, stew, or just more butter. They turn a simple meal into a celebration. Would you serve these for breakfast or dinner? Tell me your plan.
Ingredients:
| Ingredient | Amount | Notes |
|---|---|---|
| All-purpose flour | 2 ½ cups (12 ½ ounces/354 grams) | |
| Instant potato flakes | ¾ cup | |
| Fresh chives | ⅓ cup | Chopped |
| Baking powder | 4 teaspoons | |
| Baking soda | ½ teaspoon | |
| Sugar | 1 tablespoon | |
| Salt | 1 teaspoon | |
| Unsalted butter | 8 tablespoons | Cut into ½-inch pieces and chilled |
| Unsalted butter, melted | 2 tablespoons | For brushing after baking |
| Vegetable shortening | 4 tablespoons | Cut into ½-inch pieces and chilled |
| Buttermilk | 1 ¼ cups | Chilled |
Instructions
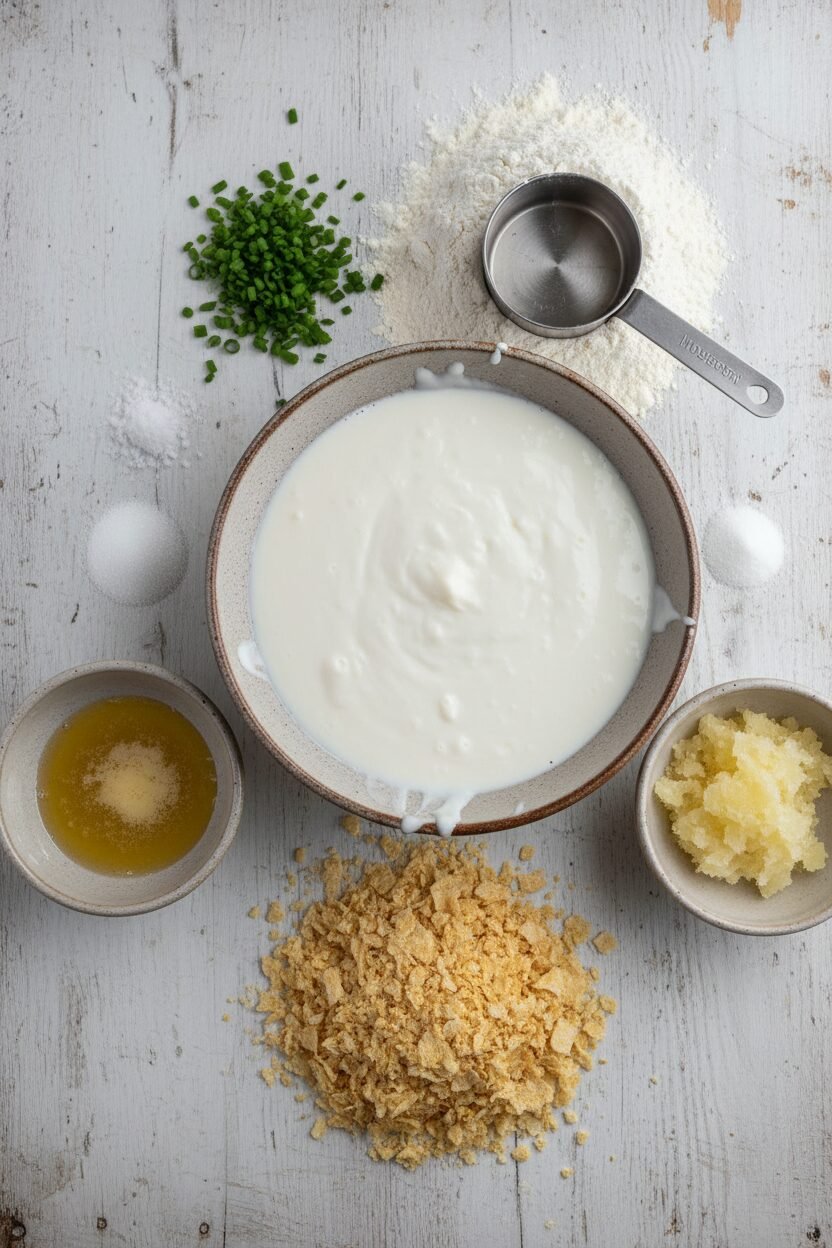
Step 1: First, get your oven ready at 450 degrees. Line your baking sheet with parchment paper. Now, let’s mix the dry things. Put the flour, potato flakes, chives, baking powder, baking soda, sugar, and salt in your food processor. Give it a good whir for about 15 seconds. It will smell a bit like a garden and a pantry mixed together. (A hard-learned tip: make sure your butter and shortening are very cold. It makes the biscuits so flaky later!)
Step 2: Next, add the cold butter and shortening pieces to the processor. Pulse it until the mix looks like little pebbles. Then, pour everything into a big bowl. Pour in the cold buttermilk and stir it gently with a spatula. Keep turning the dough until no dry spots are left. This part is messy and fun. Do you think the dough will be sticky or dry? Share below!
Step 3: Now, put the dough on a floured counter. Knead it just 8 to 10 times. You want a smooth ball. Then, roll it out into a circle. Make it about 3/4 inch thick. I still laugh at my first lopsided circle. Yours will be lovely. Use a floured cutter to stamp out your first biscuits. Place them upside-down on your sheet. This helps them rise tall and proud.
Step 4: Gather your dough scraps and pat them out again. Stamp out the last few biscuits. Pop the sheet into the hot oven. After 5 minutes, lower the heat to 400 degrees. Bake until they are a perfect golden brown. Doesn’t that smell amazing? Brush the warm tops with melted butter. Let them cool for just 5 minutes. Then, they are ready for a cozy bite.
Creative Twists
These biscuits are a wonderful blank canvas. You can make them your own so easily. Try adding a handful of shredded cheddar cheese for a cheesy pull. A pinch of garlic powder makes them extra savory. Or, brush the tops with a little garlic butter after baking. Which one would you try first? Comment below!
Serving & Pairing Ideas
These biscuits are a hug on a plate. They are perfect next to a big bowl of soup or stew. I love them split open with a pat of honey butter. For a festive touch, add a sprinkle of flaky salt on top after the butter. For drinks, a crisp apple cider is wonderful. For the grown-ups, a glass of chilled white wine pairs nicely. Which would you choose tonight?
Keeping Your Biscuits Cozy
Let’s talk about keeping these biscuits happy after baking. They are best the day you make them. But I always bake a double batch. You can freeze the unbaked dough circles for a future treat.
Just place them on a tray until frozen solid. Then pop them into a bag. Bake straight from the freezer, adding a few extra minutes. I once forgot I had a bag in the freezer. Finding it felt like a gift from past me!
To reheat day-old biscuits, wrap them in foil. Warm them in a 300-degree oven for 10 minutes. This brings back their soft inside. Batch cooking matters because it gives you a head start on joy.
A warm biscuit on a busy morning is a small comfort. Have you ever tried storing biscuits this way? Share below!
Biscuit Troubles and Simple Fixes
Even grandmas have biscuit troubles sometimes. Here are common fixes. First, flat biscuits often mean your butter was too warm. Your ingredients must stay cold for fluffy layers.
I remember my first batch spreading into one big cookie. The kitchen was too hot! Second, tough biscuits come from over-kneading. Handle the dough gently, like a baby bird.
This matters because gentle hands make tender bites. Third, if they are pale, your oven might not be hot enough. A hot oven gives them a good rise and golden top.
That golden color means delicious flavor. Getting these right builds your kitchen confidence. Which of these problems have you run into before?
Your Quick Questions, Answered
Q: Can I make these gluten-free? A: Yes. Use a good gluten-free flour blend. Add a teaspoon of xanthan gum if your blend does not have it.
Q: Can I make the dough ahead? A: Absolutely. Mix the dry and wet ingredients separately. Combine them just before you bake for the best rise.
Q: What if I don’t have chives? A: Try chopped green onion tops. Dried chives work too, but use half the amount. *Fun fact: Chives are the smallest member of the onion family!*
Q: Can I double the recipe? A: You sure can. Just mix in two separate batches to keep the texture perfect.
Q: Any optional tips? A: For extra flavor, add a pinch of garlic powder with the dry ingredients. It’s lovely. Which tip will you try first?
From My Kitchen to Yours
I hope you love making these biscuits. They always remind me of snowy mornings and a full, happy table. Cooking is about sharing stories and simple joys.
I would love to hear about your baking adventure. Tell me about your kitchen. Have you tried this recipe? Let me know how it turned out for you in the comments below.
Happy cooking!
—Elowen Thorn.
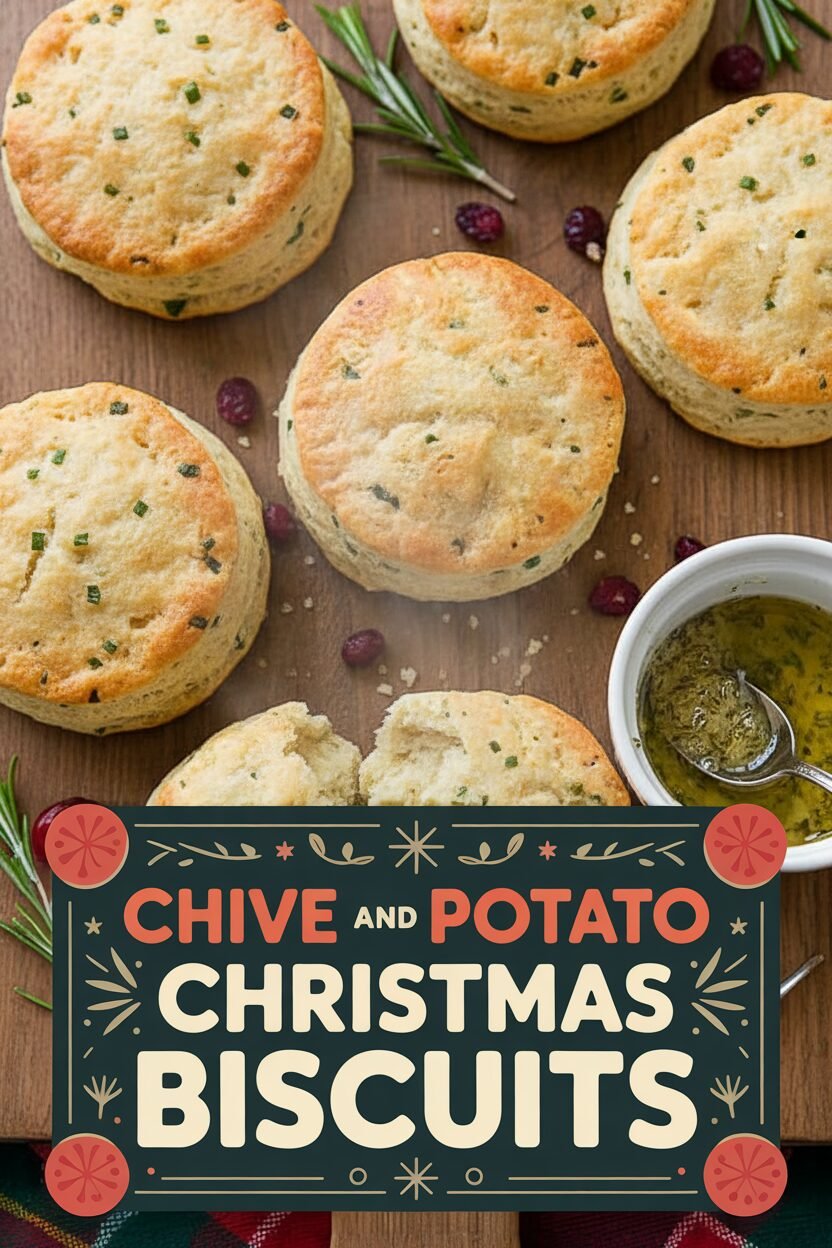

Chive and Potato Christmas Biscuits
Description
Potato Biscuits with Chives
Ingredients
Instructions
- Adjust oven rack to middle position and heat oven to 450 degrees. Line rimmed baking sheet with parchment paper. Process flour, potato flakes, chives, baking powder, baking soda, sugar, and salt in food processor until combined, about 15 seconds. Add chilled butter and shortening and pulse until mixture resembles coarse crumbs, 7 to 9 pulses.
- Transfer flour mixture to large bowl. Stir in buttermilk with rubber spatula until combined, turning and pressing until no dry flour remains. Turn out dough onto lightly floured surface and knead briefly, 8 to 10 times, to form smooth, cohesive ball. Roll out dough into 9-inch circle, about 3/4 inch thick.
- Using floured 2 1/2-inch round cutter, stamp out 8 to 9 biscuits and arrange upside down on prepared sheet. Gather dough scraps and gently pat into 3/4-inch-thick circle. Stamp out remaining 3 to 4 biscuits and transfer to sheet.
- Bake until biscuits begin to rise, about 5 minutes, then rotate sheet and reduce oven temperature to 400 degrees. Continue to bake until golden brown, 10 to 12 minutes longer. Brush biscuit tops with melted butter. Transfer to wire rack and let cool for 5 minutes before serving.
Notes
- Nutritional information is referenced in the text but specific values are not provided. Estimated calories are per biscuit.