

A Sweet Little Idea
Hello, my dear. Come sit. I want to tell you about my pie pops. They are like little pies on a stick. I made them for my grandkids last winter. Their eyes got so wide. They couldn’t believe their luck.
A pie you can hold is a happy thing. It makes a big dessert feel friendly and small. This matters because food should be fun, not fussy. Have you ever eaten a dessert straight from your hand?
The Heart of the Matter
The filling is simple. We use cherry preserves and chocolate chips. You warm the jam until it’s loose. Then you push it through a strainer. This gives you a smooth liquid and soft fruit bits.
You keep both parts. The solids go inside the pop. The liquid makes a shiny pink glaze later. Fun fact: straining the jam is the secret. It keeps the filling from bubbling out and making a mess. Doesn’t that smell amazing already?
Putting Them Together
Roll your dough nice and thin. Cut little circles. Now, here’s the trick. Lay the stick on one circle first. Press it in. Then add the filling right on top of the stick.
This holds the stick in place. It’s like giving the pop a strong backbone. I learned this after my first batch. The sticks kept sliding out. I still laugh at that messy kitchen. What’s your funniest kitchen mistake?
Why the Chill Matters
You must chill the filled rounds. Ten minutes in the freezer is perfect. This step matters so much. A cold filling won’t melt the dough before it bakes.
It gives the crust a head start. Then it can get golden and flaky. A warm kitchen makes dough soft. A little chill fixes everything. Don’t you think that’s true for people sometimes, too?
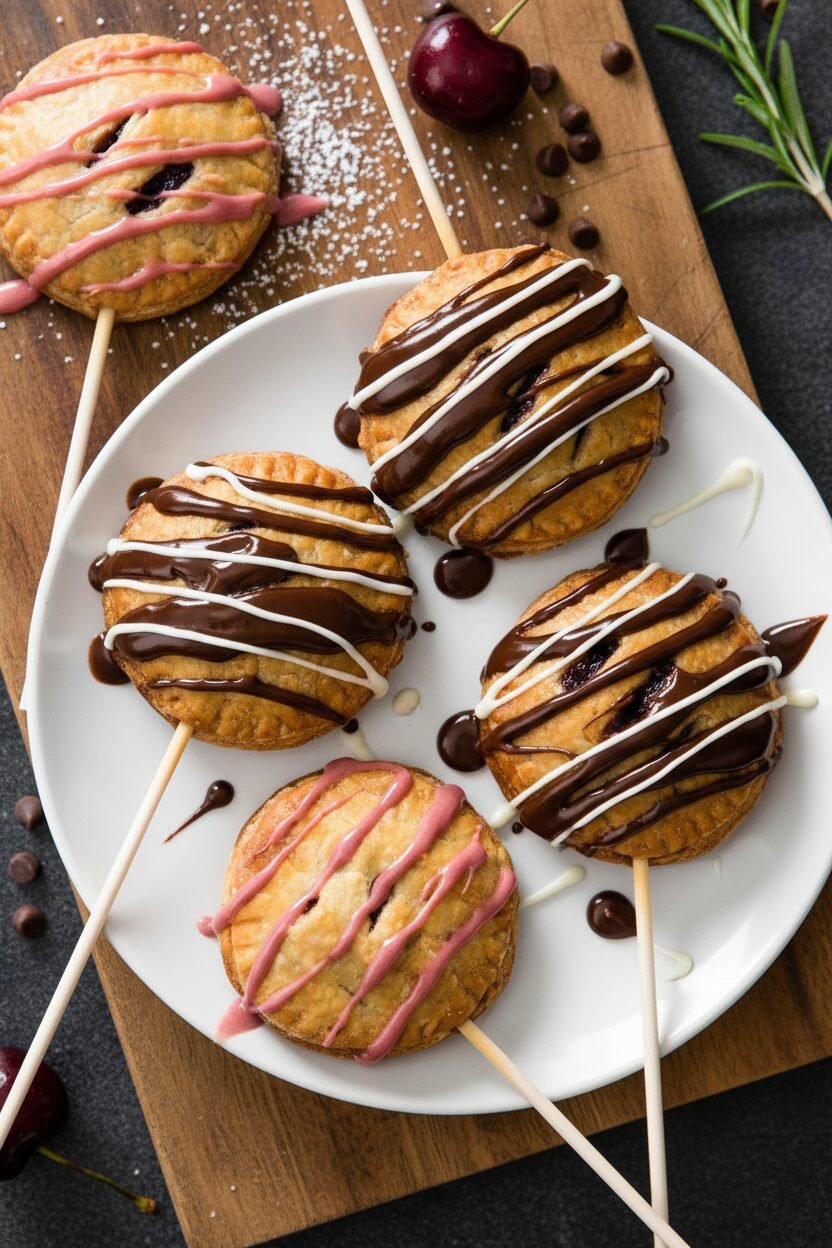
The Magic Finish
After baking, let them cool completely. This is hard because they smell so good. But be patient. A warm pie pop is too soft. It might fall off the stick.
Then, make the glaze. Just mix the powdered sugar with that pink cherry liquid. Drizzle it over the cool pops. It dries into a pretty, sweet shell. Will you use pink glaze, or try a different color?
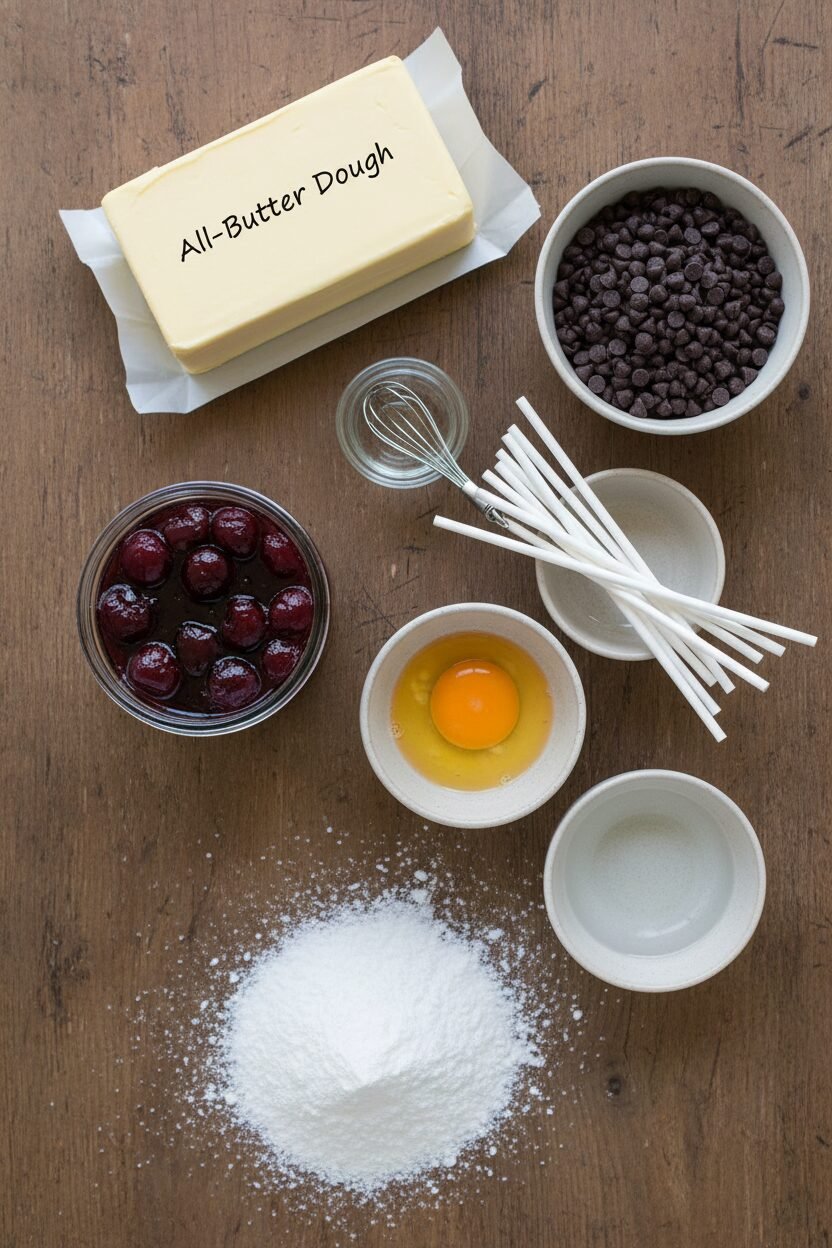
Ingredients:
| Ingredient | Amount | Notes |
|---|---|---|
| cherry preserves | 1 cup | Strained, solids and liquid reserved separately |
| Foolproof All-Butter Dough | 1 recipe | For a single-crust pie |
| chocolate chips | 2 tablespoons plus 2 teaspoons | |
| lollipop or popsicle sticks | 8 (4- to 6-inch) | |
| large egg | 1 | Lightly beaten with 1 tablespoon water (egg wash) |
| confectioners’ sugar | ½ cup (2 ounces/57 grams) |
Instructions
Step 1: Warm your cherry preserves in the microwave. Stir them halfway through. You want them nice and runny. Pour them through a strainer into a bowl. Press the fruit with a spoon to get all the good juice. Save both the juicy fruit and the liquid separately. Let them cool down a bit. (A fine mesh strainer works best here, trust me).
Step 2: Roll your pie dough into a big circle. Use a round cutter to make sixteen little circles. Place them on a baking sheet. Put any leftover dough away for another day. Cover the circles with plastic wrap. Pop them in the fridge for ten minutes. This makes them easier to handle. Do you know why we chill pie dough? Share below!
Step 3: Get another baking sheet ready. Move eight dough circles to it. Now, take a lollipop stick. Lay it flat on a circle with the end in the middle. Press it in gently. Add a small mound of the cherry fruit and chocolate chips right on top. Put this whole sheet in the freezer for ten minutes. This keeps everything from leaking. (Freezing is the secret to a neat seal).
Step 4: Heat your oven to 375 degrees. Brush the edges of your filled circles with the egg wash. Top each with a plain dough circle. Press the edges together hard to seal them. Use a fork to crimp the edges. Cut three little slits on top and brush with more egg wash. Bake until they are a beautiful golden brown. Let them cool completely on a rack. Doesn’t that smell amazing?
Step 5: Make a simple glaze. Whisk two tablespoons of your saved cherry liquid with the powdered sugar. Let it sit to thicken just a little. You want it to drizzle nicely. Drizzle that pink glaze over your cooled pie pops. Let them sit for ten minutes so the glaze sets. Then they are ready to share. I still laugh at how quickly these disappear.
Creative Twists
You can make these little pops your own. Try using different jam flavors. Raspberry or apricot would be lovely. You could also roll the dough edges in coarse sugar before baking. It adds a sweet, sparkly crunch. For a festive touch, sprinkle the wet glaze with crushed candy canes. Which one would you try first? Comment below!
Serving & Pairing Ideas
These pops are a party on a stick. Serve them standing up in a mug filled with sugar or dried beans. For a fancy plate, drizzle extra glaze and add a dollop of whipped cream. A warm mug of spiced apple cider is the perfect non-alcoholic friend. For the grown-ups, a small glass of cherry port wine is a magical match. Which would you choose tonight?
Keeping Your Pie Pops Perfect
Let’s talk about keeping these treats happy. They are best the day you make them. But leftovers need a cozy spot. Let them cool completely first. Then store them in a single layer. Use a container with a tight lid. They will keep on the counter for two days.
You can freeze them before baking for later. Assemble the pops up to step three. Freeze them solid on the baking sheet. Then pop them into a freezer bag. Bake straight from the freezer, adding a few minutes. I once forgot a batch in my freezer for a month. They baked up beautifully for a surprise guest!
Batch cooking like this saves holiday stress. It means fresh, warm treats are always ready. Your future busy self will thank you. Have you ever tried storing it this way? Share below!
Little Fixes for Big Smiles
Sometimes our baking needs a small helper. First, the filling might leak. This happens if the edges are not sealed well. Press the dough edges together firmly. Use that fork to crimp them tight. I remember when my first batch leaked everywhere. The kitchen smelled great, but the pan was a mess!
Second, the stick might fall out. Chill the dough with the stick pressed in. This helps the dough grip the stick. Third, the glaze might be too thick. Just add a tiny bit more cherry liquid. Stir until it drips nicely from your spoon.
Fixing small problems builds your kitchen confidence. It also makes sure every bite tastes perfect. Which of these problems have you run into before?
Your Quick Questions, Answered
Q: Can I make this gluten-free?
A: Yes! Use your favorite gluten-free pie dough. Roll it between two sheets of parchment paper.
Q: Can I make them ahead?
A: You can make the dough a day early. Keep it wrapped in the fridge. Assemble the pops the next day.
Q: What can I swap for cherry preserves?
A: Raspberry or strawberry jam works wonderfully. *Fun fact: I used my neighbor’s peach jam once. They were a delicious surprise!*
Q: Can I make a bigger batch?
A: Absolutely. Just double all the ingredients. You may need to bake them on two sheets.
Q: Is the glaze optional?
A: It is. The pops are sweet enough without it. But the glaze makes them look extra special. Which tip will you try first?
From My Kitchen to Yours
I hope you have fun making these pie pops. They always make my kitchen feel festive. I love seeing your creations. Please tell me all about your baking adventure.
Leave a comment and let me know how it went. Have you tried this recipe? I read every single note from you. Thank you for cooking with me today.
Happy cooking!
—Elowen Thorn.
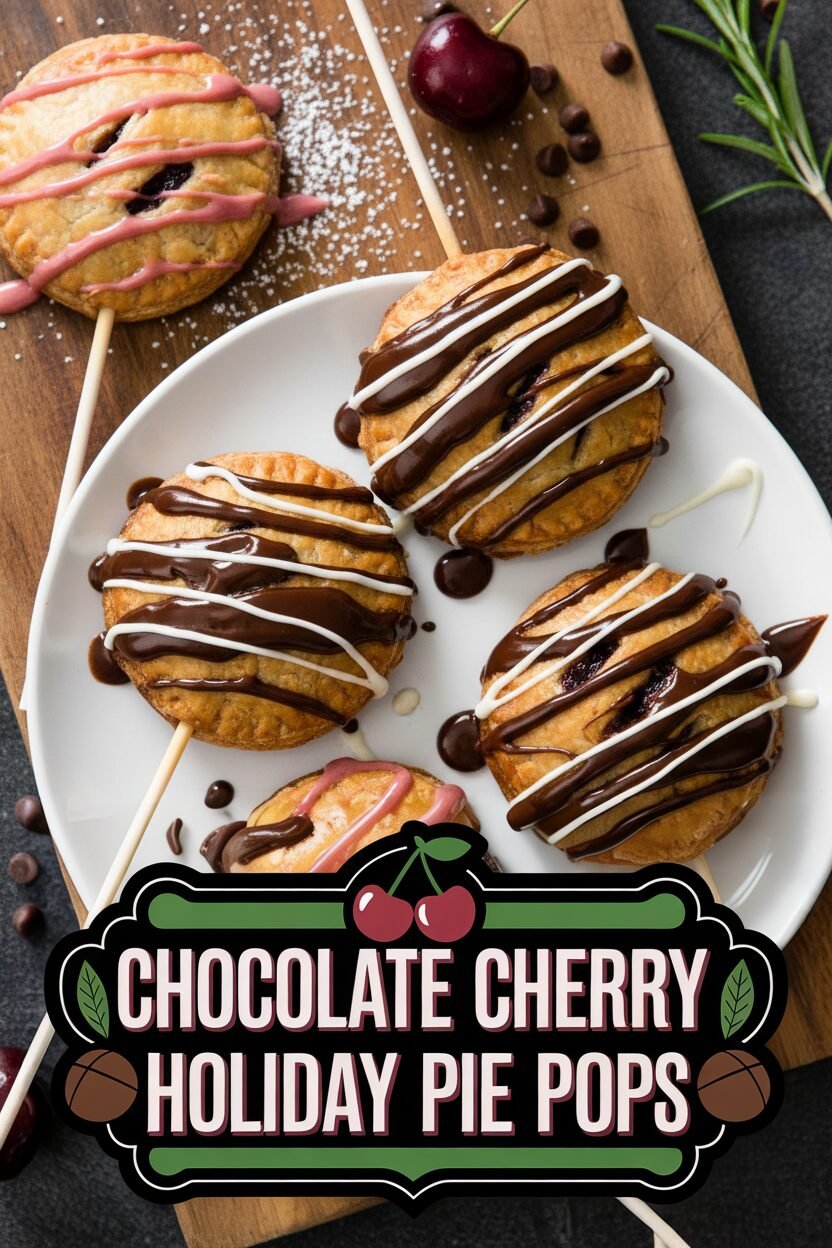

Chocolate Cherry Holiday Pie Pops
Description
A festive handheld treat featuring a flaky all-butter crust filled with cherry preserves and chocolate chips, finished with a sweet cherry glaze.
Ingredients
Instructions
- Microwave cherry preserves in bowl until fluid, 45 to 60 seconds, stirring halfway through microwaving. Strain preserves through fine-mesh strainer set over bowl, pressing on solids to extract as much liquid as possible; reserve solids (you should have about ⅓ cup) and liquid separately. Set aside to cool.
- Roll dough into 15-inch circle on floured counter. Using 3-inch round biscuit or cookie cutter, cut 16 rounds from dough circle and transfer to parchment paper–lined rimmed baking sheet. Reserve dough scraps for another use. Cover rounds loosely with plastic wrap and refrigerate until firm but still pliable, about 10 minutes.
- Line second rimmed baking sheet with parchment. Transfer 8 dough rounds to second prepared sheet, spaced evenly apart. Working with 1 dough round at a time, lay lollipop stick flat on top of dough with 1 end in center of dough round. Press stick firmly into dough. Mound 2 teaspoons cherry solids and 1 teaspoon chocolate chips in center of each dough on top of stick. Transfer sheet with filled rounds to freezer and chill for 10 minutes.
- Adjust oven rack to upper-middle position and heat oven to 375 degrees. Brush edges of filled dough rounds with egg wash, then top with remaining chilled dough rounds, pressing edges firmly to seal. Crimp edges of each pie with fork. Cut three ½-inch slits in top of each pie and brush with remaining egg wash. Bake until crusts are golden brown, 22 to 26 minutes, rotating sheet halfway through baking. Transfer sheet to wire rack and let pies cool for 10 minutes. Using spatula, carefully transfer pies to wire rack and let cool completely, about 1 hour.
- Whisk 2 tablespoons reserved cherry preserve liquid and confectioners’ sugar together in small bowl until smooth. Let glaze sit until slightly thickened but still able to be drizzled, about 10 minutes. Adjust thickness with up to 1 teaspoon extra cherry liquid as needed. Drizzle pies with glaze and let sit for 10 minutes. Serve.
Notes
- Ensure the dough rounds are well chilled before assembling to make handling easier. The reserved cherry solids can be used in yogurt or oatmeal.