

The Secret is in the Butter
Let me tell you about the butter. You will cook it until it turns a lovely brown. It will smell like toasted nuts. Doesn’t that smell amazing?
This is called browning the butter. It gives the cookies a deep, rich flavor. I learned this trick from my friend Martha years ago. We burned a batch first! I still laugh at that. Why does this matter? That nutty taste makes these cookies feel special, like a holiday hug.
A Little Patience Makes Magic
After you mix the sugars and egg, you must wait. Whisk, then rest for three minutes. Do this three times. The mixture gets thick and shiny.
It seems silly, but trust me. This waiting lets the sugars dissolve just right. Your cookies will be the perfect chewy inside with crisp edges. Do you like chewy or crispy cookies more? Tell me your favorite.
Choosing Your Chips and Nuts
Use good chocolate chips. I like the semi-sweet ones. They are not too sweet. The nuts are your choice. I always add toasted pecans.
Toasting nuts wakes up their flavor. Just bake them for a few minutes first. Fun fact: The chocolate chip cookie was invented by accident in the 1930s! Why does this matter? Using what you love makes the recipe yours. Will you add nuts, or keep it just chocolate?
Baking With Your Eyes
Do not just watch the clock. Watch the cookies. Bake them until the edges are set. The centers should still look soft and puffy.
They will finish cooking on the hot tray out of the oven. This keeps them from getting hard. What is your biggest cookie baking worry? Is it them spreading too much? Let’s talk about it.
The Joy of Sharing
This recipe makes 16 big, beautiful cookies. That is just enough to share. I always pack some for my neighbor.
Food tastes better when we give it away. The work is an act of love. The smell fills your whole house with warmth. That is the real Christmas magic. Now, who will you share your first batch with?
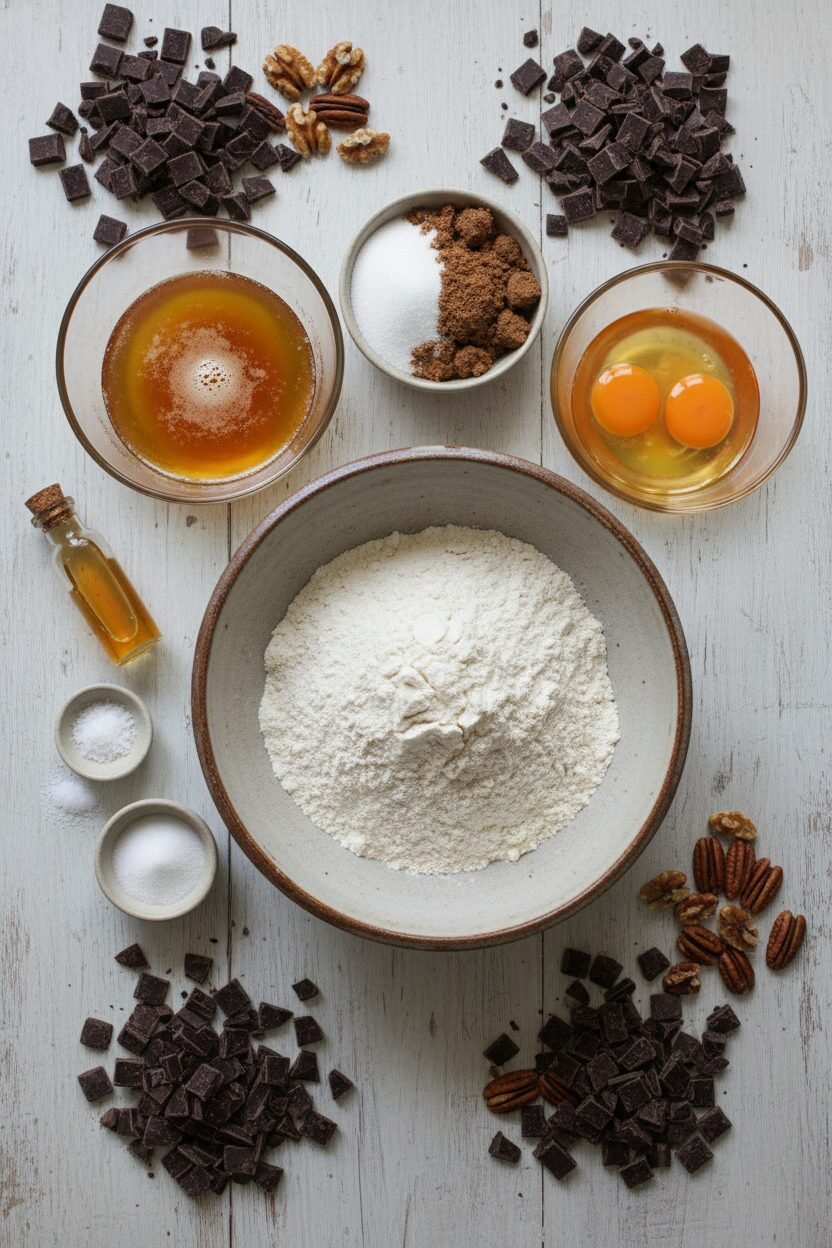
Ingredients:
| Ingredient | Amount | Notes |
|---|---|---|
| unbleached all-purpose flour | 1 ¾ cups (8 ¾ ounces/248 grams) | |
| baking soda | ½ teaspoon | |
| unsalted butter | 14 tablespoons (1 ¾ sticks) | Divided for browning |
| granulated sugar | ½ cup (3 ½ ounces/99 grams) | |
| packed dark brown sugar | ¾ cup (5 ¼ ounces/149 grams) | |
| table salt | 1 teaspoon | |
| vanilla extract | 2 teaspoons | |
| large egg | 1 | |
| large egg yolk | 1 | |
| semisweet chocolate chips or chunks | 1 ¼ cups | |
| pecans or walnuts, chopped | ¾ cup | Toasted (optional) |
Christmas Chocolate Chip Cookie Perfection
Hello, my dear. Come sit at the counter. I want to share my favorite cookie secret. It starts with browned butter. Doesn’t that smell amazing? It makes the kitchen smell like toffee and warm nuts. I learned this trick from my own grandma, you know. She called it “liquid gold.” I still laugh at that.
These cookies are a special Christmas tradition. We make them on the first snowy afternoon. The dough is rich and shiny. You must let it rest, just like I’m telling you. Patience makes them perfect. Trust your kitchen grandma on this one.
Instructions
Step 1: Move your oven rack to the middle. Heat your oven to 375 degrees. Line two big baking sheets with parchment paper. Whisk your flour and baking soda together. Set this bowl aside for now. This gets everything ready for our fun.
Step 2: Melt 10 tablespoons of butter in a skillet. Keep swirling it over the heat. Watch it turn a lovely dark gold. It will smell wonderfully nutty. This is the magic step. (Tip: Use a light-colored pan so you can see the color change.)
Step 3: Pour that hot brown butter into a big bowl. Stir in the rest of the butter until it melts. Add both sugars, salt, and vanilla. Whisk it all together. It will feel gritty, but that’s okay. Now, what ingredient makes cookies soft and chewy? Share below!
Step 4: Whisk in the whole egg and the extra yolk. Let the bowl sit for three minutes. Then whisk again. Do this three times total. The mix will become thick and glossy. This waiting is the secret to a perfect texture.
Step 5: Gently stir in your flour mixture. Stop when you see no more white. Now, fold in those lovely chocolate chips. Add toasted nuts if you like them. I always do. Scoop 16 big mounds of dough onto your sheets.
Step 6: Bake one sheet at a time. Rotate it halfway through. They are done when golden but still soft in the middle. Let them cool completely on the sheet. I know, waiting is hard. But it makes them just right.
Creative Twists
Sea Salt Sparkle: Press a little flaky sea salt on each dough ball before baking.
Peppermint Swirl: Swap the vanilla for a tiny drop of peppermint extract. It tastes like Christmas!
Candy Cane Chip: Use white chocolate chips and crushed candy canes instead of chocolate.
Which one would you try first? Comment below!
Serving & Pairing Ideas
Serve these cookies warm on a pretty plate. A small glass of cold milk is the classic choice. For a festive treat, crumble one over a bowl of vanilla ice cream. It’s simply heavenly. For the grown-ups, a glass of tawny port wine pairs beautifully. It sips like liquid raisins. For a cozy non-alcoholic drink, try hot spiced apple cider. The cinnamon and apple taste wonderful with chocolate.
Which would you choose tonight?

Keeping Cookie Magic for Later
Fresh cookies are a special treat. But sometimes you want to save some. Let me tell you how. Cool cookies completely first. Then store them in a tin at room temperature. They will stay soft for four days.
You can freeze the dough, too. Scoop the dough balls onto a tray. Freeze them solid. Then pop the frozen balls into a bag. I once forgot a bag in my freezer for months. They baked up perfectly for a surprise guest!
To reheat, place a cookie on a plate. Warm it in the microwave for just ten seconds. It will taste like it just came from the oven. Batch cooking matters because it saves time. You can have fresh cookies anytime you want. Have you ever tried storing it this way? Share below!
Cookie Troubles? Easy Fixes Right Here
Sometimes cookies don’t turn out right. Do not worry. Here are three common problems. First, cookies spread too much. Your butter was probably too warm. Chill your dough for thirty minutes before baking.
Second, cookies are too cakey. You might have used too much flour. Spoon the flour into your cup. Then level it off with a knife. I remember when my first batch was puffy like muffins. I had packed the flour in!
Third, cookies burn on the bottom. Your baking sheet is too dark. Use parchment paper. It protects the bottoms. Fixing these issues builds your cooking confidence. It also makes your cookies taste just right. Which of these problems have you run into before?
Your Quick Questions, Answered
Q: Can I make these gluten-free?
A: Yes. Use a good gluten-free flour blend. Make sure it has xanthan gum in it.
Q: Can I make the dough ahead?
A: Absolutely. You can refrigerate the dough for up to three days. This actually improves the flavor.
Q: What if I don’t have brown sugar?
A: Use all white sugar. The cookies will be crisper and less chewy. They will still be good.
Q: Can I make a smaller batch?
A: You can cut all the ingredients in half. Just use a smaller bowl for mixing.
Q: Are the nuts important?
A: They are optional but lovely. Toasting them first brings out a warm, cozy flavor. Fun fact: browning the butter gives a similar nutty taste! Which tip will you try first?
From My Kitchen to Yours
I hope you enjoy baking these cookies. The smell of browned butter is pure happiness. It fills your kitchen with love. Share them with someone you care about.
I would love to hear about your baking adventure. Tell me how it went in the comments. Your stories are my favorite thing to read. Have you tried this recipe? Let me know. Happy cooking!
—Elowen Thorn.


Christmas Chocolate Chip Cookie Perfection
Description
Perfect Chocolate Chip Cookies
Ingredients
Instructions
- Adjust oven rack to middle position and heat oven to 375 degrees. Line 2 large (18- by 12-inch) baking sheets with parchment paper.
- Whisk together 1¾ cups unbleached all-purpose flour and ½ teaspoon baking soda in medium bowl; set aside.
- Heat 10 tablespoons unsalted butter in 10-inch skillet over medium-high heat until melted, about 2 minutes. Continue cooking, swirling pan constantly until butter is dark golden brown and has nutty aroma, 1 to 3 minutes.
- Remove skillet from heat and use heatproof spatula to transfer browned butter to large heatproof bowl. Stir remaining 4 tablespoons unsalted butter into hot butter until completely melted.
- Add ½ cup granulated sugar, ¾ cup packed dark brown sugar, 1 teaspoon table salt, and 2 teaspoons vanilla extract to bowl with butter and whisk until fully incorporated.
- Add 1 large egg and 1 large egg yolk and whisk until mixture is smooth with no sugar lumps remaining, about 30 seconds. Let mixture stand for 3 minutes, then whisk for 30 seconds. Repeat process of resting and whisking 2 more times until mixture is thick, smooth, and shiny.
- Using rubber spatula or wooden spoon, stir in flour mixture until just combined, about 1 minute. Stir in 1¼ cups semisweet chocolate chips or chunks and ¾ cup toasted and chopped pecans or walnuts, if using. Give dough final stir to ensure no flour pockets remain.
- Divide dough into 16 portions, each about 3 tablespoons (or use #24 cookie scoop). Arrange 2 inches apart on prepared baking sheets, 8 dough balls per sheet.
- Bake cookies 1 tray at a time until cookies are golden brown and still puffy, and edges have begun to set but centers are still soft, 10 to 14 minutes, rotating baking sheet halfway through baking.
- Transfer baking sheet to wire rack; cool cookies completely before serving.
Notes
- For a classic version, omit the nuts. Ensure butter is properly browned for the best nutty flavor. Cookies can be stored in an airtight container for up to 3 days.