

The Story of a Happy Mistake
I once tried to make pumpkin pie bars. My cream cheese filling fell right into the blondie batter. I still laugh at that. I gave it a quick swirl and baked it anyway. The result was pure magic.
That’s how these swirled blondies were born. Sometimes the best things come from little kitchen accidents. This matters because cooking should be fun, not perfect. Have you ever had a happy cooking mistake? I’d love to hear about it.
Why Brown the Butter?
Let’s talk about that butter. You cook it until it turns a cozy brown. Doesn’t that smell amazing? It smells like toasted nuts and caramel. This step adds a deep, rich flavor.
It makes the whole kitchen feel warm. This matters because good food starts with good smells. It tells your family something wonderful is coming. Fun fact: This is called “browned butter.” It’s a simple trick that makes everything taste special.
The Swirl is the Best Part
Now for the fun. You plop the pumpkin cream cheese right on top. Then you add little dollops of the saved blondie batter. Take a knife and swirl it all together.
Don’t swirl too much. You want beautiful ribbons of filling. Every piece will look unique. Do you like making patterns in your food? I find it very relaxing.
Waiting is the Hardest Part
These need to cool completely. I know, it’s tough. The smell is so tempting. But if you cut them warm, they will be gooey and fall apart.
Let them cool for a full hour in the pan. Then lift them out and cool another hour. It’s worth the wait. You’ll get perfect, neat squares. What’s your favorite treat to eat while you wait for dessert to cool?
A Cozy Mix of Flavors
You get two treats in one bite. The blondie is buttery and chewy. The swirl is tangy and spiced with pumpkin. The cinnamon and ginger make it taste like a hug.
It’s not too sweet. It’s just right. This matters because sharing food made with care is a way to show love. Bringing this to a friend says you were thinking of them. Which part do you think you’ll like more, the blondie or the creamy swirl?
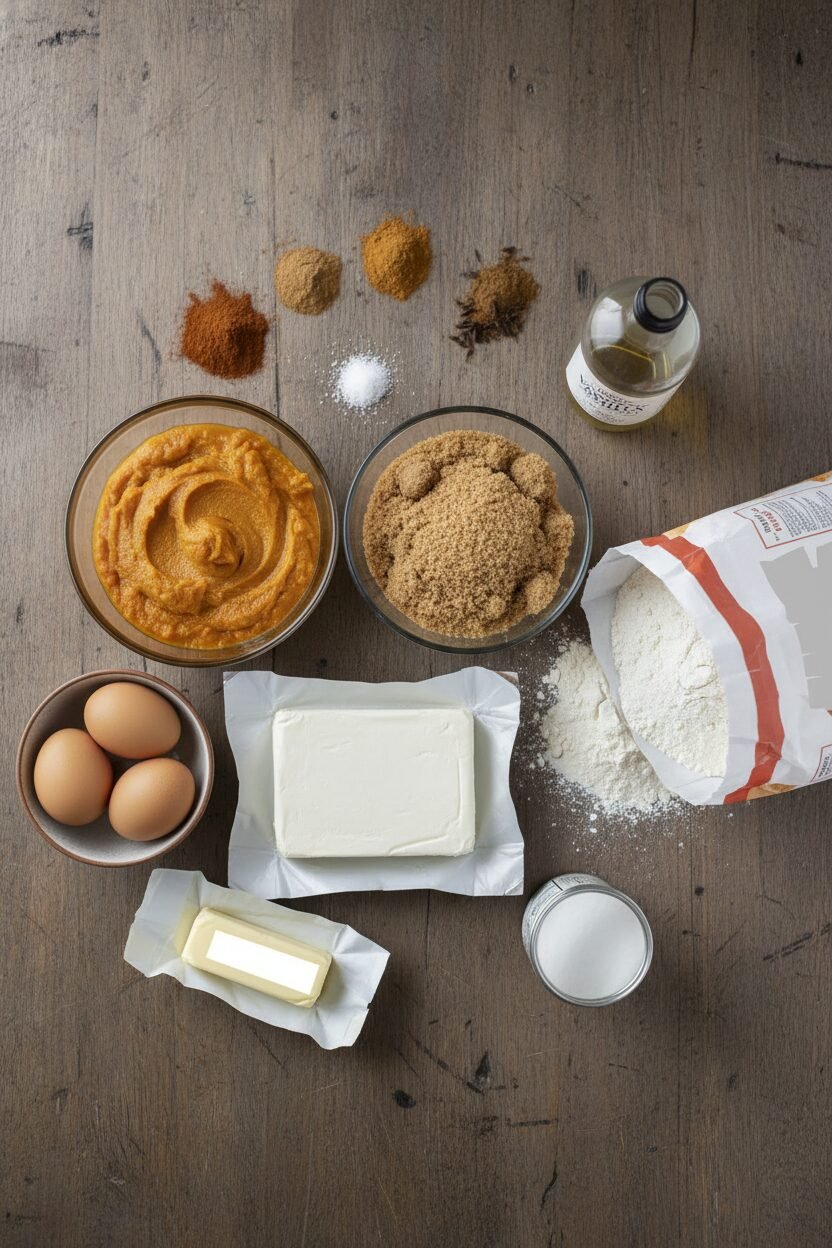
Ingredients:
| Ingredient | Amount | Notes |
|---|---|---|
| Cream cheese | 4 ounces | cut into 4 pieces and softened |
| Light brown sugar | 1½ cups (10½ ounces) | divided |
| Canned unsweetened pumpkin puree | ¼ cup | |
| Large eggs plus large yolk | 2 eggs + 1 yolk | |
| Ground cinnamon | ½ teaspoon | |
| Ground ginger | ¼ teaspoon | |
| Ground cloves | ⅛ teaspoon | |
| Ground nutmeg | ⅛ teaspoon | |
| Table salt | ⅛ tsp + ¾ tsp | divided |
| All-purpose flour | 1½ cups (7½ ounces) | |
| Baking powder | ¾ teaspoon | |
| Unsalted butter | 12 tablespoons | |
| Vanilla extract | 1½ teaspoons |
Instructions
Step 1: First, get your oven ready at 350 degrees. Line your 8-inch pan with parchment paper. Make a sling so you can lift the blondies out later. Grease the paper so nothing sticks. This little trick saves so much fuss. (A hard-learned tip: let the parchment hang over the sides like little handles.)
Step 2: Now, make the pretty pumpkin swirl. Mix the soft cream cheese with pumpkin, one egg yolk, spices, and a bit of brown sugar. Whisk it until it’s smooth and dreamy. Doesn’t that color look like autumn leaves? Set this lovely bowl aside. In another bowl, mix your flour, baking powder, and salt.
Step 3: Time for the magic butter! Melt it in a skillet. Swirl it until it smells like toasted nuts. It will get a beautiful brown color. Pour it into a big bowl and let it cool for five minutes. This step makes all the flavor. What’s your favorite smell from the kitchen? Share below!
Step 4: Whisk the vanilla, eggs, and the rest of the brown sugar into your browned butter. It will look glossy. Then gently stir in the flour mixture. Save just half a cup of this blondie batter. We’ll use it for swirling later. I always sneak a tiny taste here.
Step 5: Spread most of the batter into your pan. Now, dollop on the pumpkin cream cheese and your saved batter. Use a knife to swirl it all together. Make about ten pretty figure-eight motions. Don’t overmix, or you’ll lose the swirl! I still laugh at the first time I made a muddy mess.
Step 6: Bake for 35 to 40 minutes. The edges will turn a light gold. A toothpick should come out with just a few crumbs. Your kitchen will smell amazing. Let them cool in the pan for a whole hour. Patience is the hardest part!
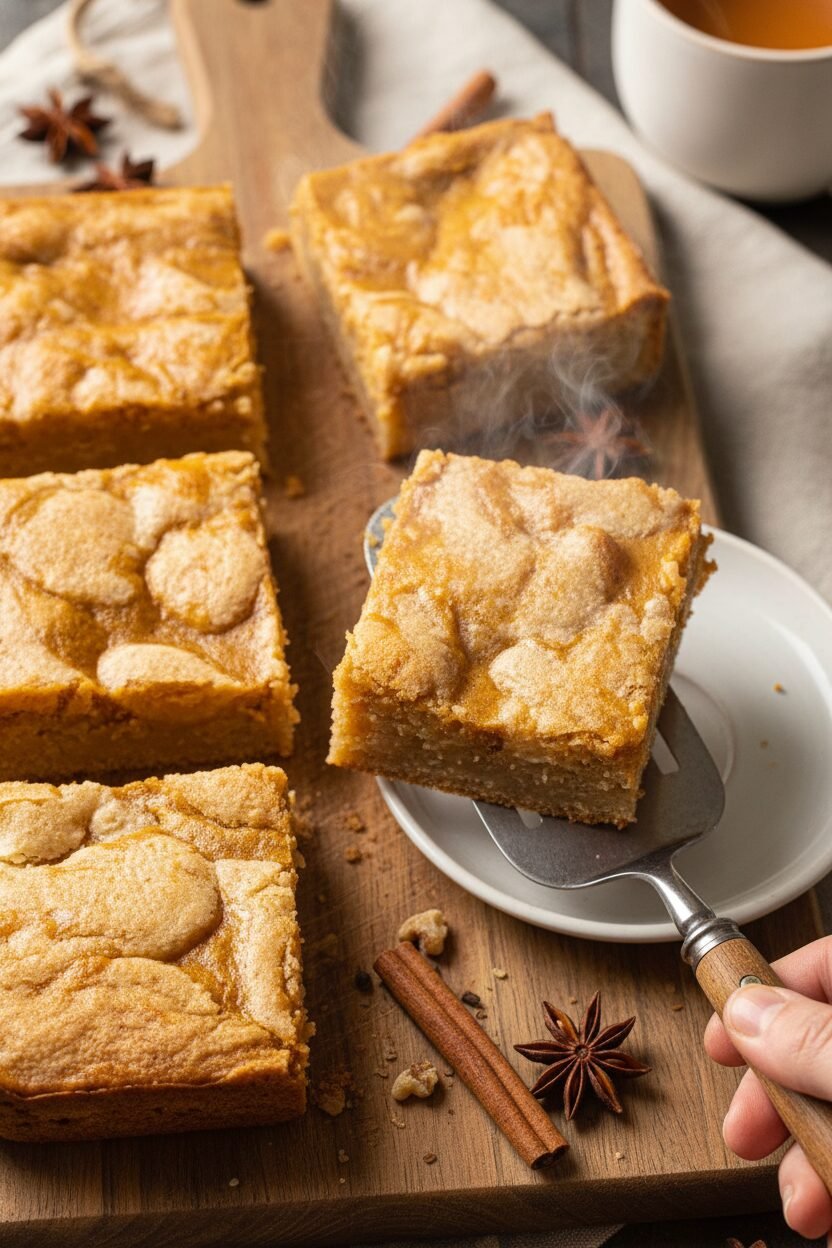
Step 7: Use the parchment handles to lift the blondies out. Let them cool completely on a rack. This makes them easier to cut. Then, slice into squares. I love seeing the marbled pattern in each piece. Now, the best part—sharing!
Creative Twists
You can make this recipe your own. Try a different swirl for a fun change. I love playing with flavors.
Maple Swirl: Use maple syrup instead of pumpkin in the cream cheese mix.
Chocolate Chip Fold-In: Add a handful of dark chocolate chips to the blondie batter.
Pecan Crunch: Sprinkle chopped pecans on top before you bake.
Which one would you try first? Comment below!
Serving & Pairing Ideas
These blondies are wonderful all on their own. But a little extra touch makes them special. I like to serve them slightly warm. A small scoop of vanilla ice cream on top is pure joy. For a pretty plate, dust them with a whisper of powdered sugar.
For drinks, a glass of cold milk is always perfect. For the grown-ups, a sweet cream sherry pairs beautifully. It sips like a cozy hug. Which would you choose tonight?
Keeping Your Blondies Cozy
Let’s talk about keeping these treats happy. Cool them completely first. Then, store them in a tight container. They will stay fresh on the counter for three days. For longer, freeze them! Wrap squares in plastic wrap. Then pop them into a freezer bag.
I once froze a whole batch for my grandson’s visit. He said they tasted just-baked! This is why batch cooking matters. It lets you share a little joy anytime. A sweet surprise is always welcome.
To reheat, warm a square in the microwave for 10 seconds. It makes the cream cheese swirl soft again. Have you ever tried storing it this way? Share below!
Simple Fixes for Common Hiccups
First, your blondies might be too cakey. This often means you mixed the batter too much. Stir just until you see no more flour. I remember when I did this. My first batch was more like pumpkin cake!
Second, the swirl might sink. Your main batter should be thick. If it’s runny, the filling will disappear. Let your browned butter cool for five minutes. This step matters for texture. It gives you that perfect, chewy bite.
Third, the edges could get too dark. Use a light-colored metal pan if you can. Dark pans bake hotter. Which of these problems have you run into before? Fixing small things builds your cooking confidence. You learn what to do next time.
Your Quick Questions, Answered
Q: Can I make these gluten-free? A: Yes! Use a good gluten-free flour blend. Make sure it has xanthan gum in it.
Q: Can I make them ahead? A: Absolutely. Bake them up to two days before. Store them as I mentioned above.
Q: What if I don’t have all the spices? A: Just use pumpkin pie spice instead. Use one full teaspoon for the filling.
Q: Can I double the recipe? A: For sure. Use a 9×13 inch pan. You may need to bake it a few minutes longer.
Q: Any optional tips? A: A sprinkle of sea salt on top is lovely. Fun fact: The browned butter adds a wonderful, nutty flavor. Which tip will you try first?
From My Kitchen to Yours
I hope you love making these swirled blondies. The smell alone will fill your home with warmth. Baking is about sharing stories and sweet bites.
I would be so delighted to see your creation. Have you tried this recipe? Tag us on Pinterest at @ElowensKitchen. Show me your beautiful swirls!
Happy cooking! —Elowen Thorn.
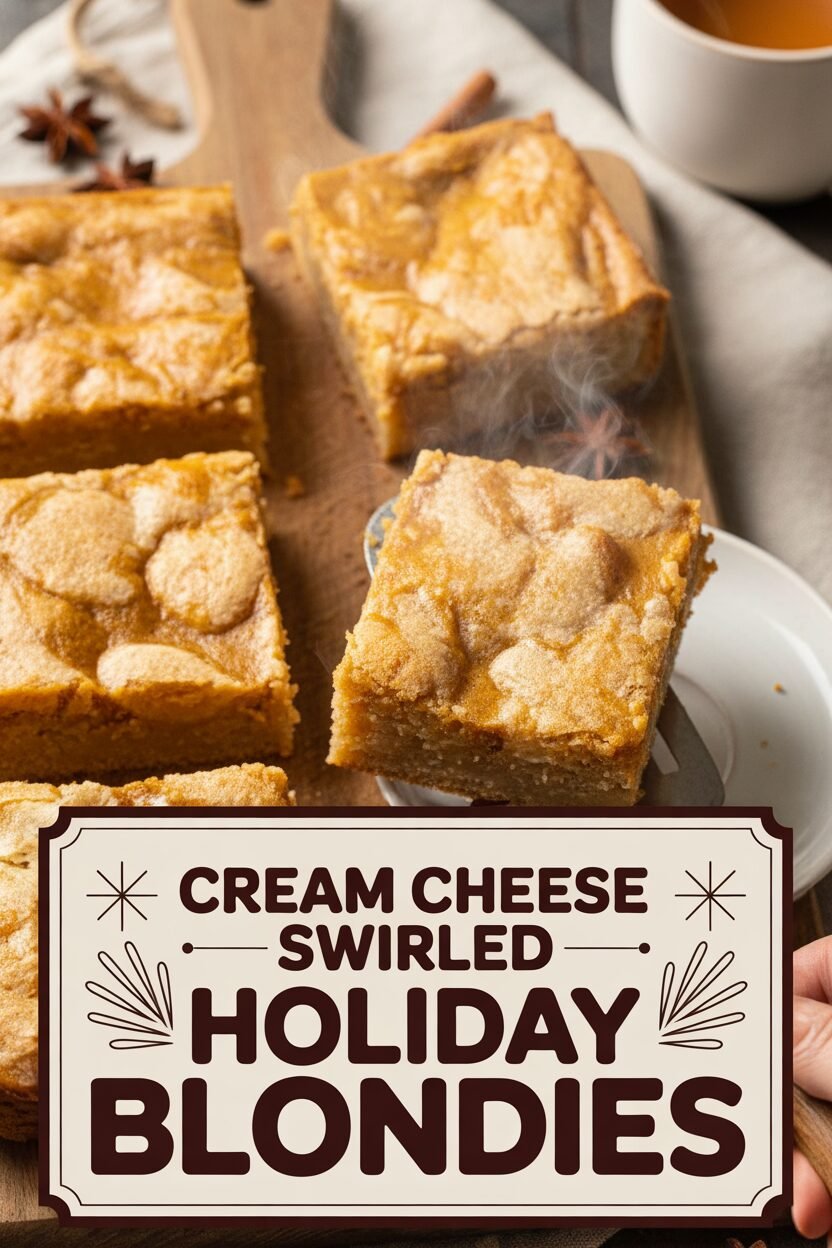

Cream Cheese Swirled Holiday Blondies
Description
Pumpkin Cream Cheese Blondies. These festive blondies feature a rich, spiced pumpkin cream cheese filling swirled into a brown sugar blondie base made with browned butter.
Ingredients
Instructions
- Adjust oven rack to middle position and heat oven to 350 degrees. Make parchment paper sling by lining 8-inch square baking pan with 2 long sheets of parchment arranged perpendicular to each other. Push parchment into corners and up sides of pan, smoothing parchment flush to pan. Grease parchment.
- Whisk 4 ounces cream cheese, cut into 4 pieces and softened; ¼ cup packed (1¾ ounces) light brown sugar; ¼ cup canned unsweetened pumpkin puree; 1 large egg yolk; ½ teaspoon ground cinnamon; ¼ teaspoon ground ginger; ⅛ teaspoon ground cloves; ⅛ teaspoon ground nutmeg; and ⅛ teaspoon table salt in bowl until smooth; set aside. Combine 1½ cups (7½ ounces) all-purpose flour, ¾ teaspoon baking powder, and remaining ¾ teaspoon salt in separate bowl; set aside.
- Melt 12 tablespoons unsalted butter in 10-inch skillet over medium heat. Cook, swirling skillet constantly, until milk solids in butter are color of milk chocolate and have toasty aroma, 3 to 5 minutes. Immediately remove skillet from heat and scrape browned butter into large bowl. Let cool 5 minutes.
- Add 1½ teaspoons vanilla, 2 large eggs, and remaining 1¼ cups packed (8¾ ounces) light brown sugar to butter and whisk until smooth. Stir in flour mixture until just combined. Reserve ½ cup blondie batter.
- Transfer remaining blondie batter to prepared baking pan and smooth into even layer. Using spoon, dollop cream cheese filling and reserved batter over top, about 6 to 8 dollops each. Drag knife through batter and filling, making swirled pattern, 10 to 12 strokes.
- Bake until edges are light golden brown and toothpick inserted in center comes out with few moist crumbs attached, 35 to 40 minutes.
- Let cool in pan on wire rack for 1 hour. Using parchment overhang, lift blondies out of pan. Return blondies to wire rack and let cool completely, about 1 hour. Cut into squares and serve.
Notes
- For clean cuts, chill the blondies completely before slicing. Store in an airtight container in the refrigerator for up to 5 days.