

The Humble Egg’s Big Moment
Let’s talk about deviled eggs. They are simple party food. But they feel like a tiny celebration. I think everyone smiles when they see a platter.
I made these for my grandson’s birthday. He said they were “little flavor clouds.” I still laugh at that. It’s true. A creamy bite that just melts away. What food makes you smile at a party? Tell me your favorite.
Why We “Devil” Them
The name sounds a bit scary. But it’s not. It just means the yolks are spiced. Long ago, “deviling” meant adding pepper or mustard. It made food zesty and exciting.
*Fun fact: People have been stuffing eggs like this for centuries! The Romans did it. I love that. It connects us to so many kitchens of the past. This matters because food is a living history. Every recipe has a story.
The Secret to Perfect Eggs
Do not let the eggs boil hard. That is the trick. Bring the water to a boil. Then turn the heat off. Let them sit in the hot water for ten minutes.
This gives you tender whites. The yolks stay sunny yellow. No ugly green ring! Pour out the hot water. Then cool the eggs with cold water. This stops the cooking. Simple steps make the best base.
Building the Flavor Cloud
Now for the fun part. Mash those yolks in a bowl. Add mayo slowly. Start with a little. You can always add more. We want creamy, not soupy.
Then comes the Dijon mustard. It adds a gentle tang. Garlic powder and salt wake everything up. Doesn’t that smell amazing? The filling should taste good on its own. This matters. If the filling is bland, the whole egg is bland.
The Crispy, Cheery Toppings
While the eggs cook, make the bacon. Cook it until crispy. Let it drain on a paper towel. Then chop it into tiny bits.
The chives are the final touch. Their fresh, oniony bite is perfect. It cuts through the rich filling. Do you prefer chives or green onions on your eggs? I’m team chive for this one.
A Neat Little Trick
Filling the egg whites can be messy. Here is my grandma trick. Put all the filling in a zip-top bag. Squeeze it down to one corner.
Snip a small piece off that corner. Now you have a piping bag. Gently squeeze filling into each white. It looks pretty and is so easy. Top with bacon and chives. They are ready to share.
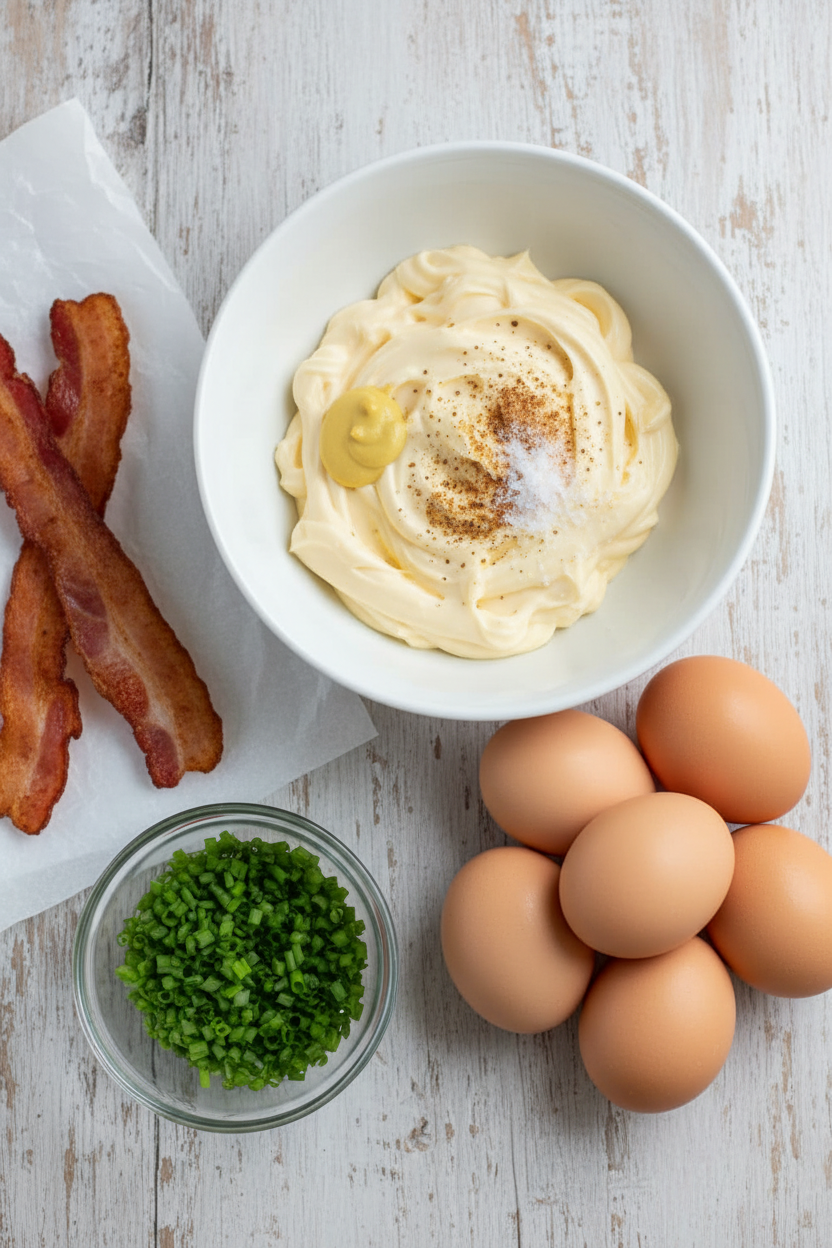
Ingredients:
| Ingredient | Amount | Notes |
|---|---|---|
| Eggs | 8 | Hard-boiled |
| Mayonnaise | up to 1/2 cup | Add in batches to desired consistency |
| Dijon mustard | 1 teaspoon | |
| Garlic powder | 1/2 teaspoon | |
| Kosher salt | 1/2 teaspoon | |
| Bacon | 3 slices | Cooked until crispy and crumbled |
| Chives | 1 tablespoon | Fresh, chopped |
Instructions
Step 1: Let’s boil the eggs. Cover them with cold water in a pot. Bring it to a boil, then turn off the heat. Cover the pot and let it sit for 10 minutes. (This gentle cooking keeps the yolks sunny yellow!)
Step 2: Now, cook the bacon. Use a small pan over medium heat. Cook until it’s nice and crispy. Drain it on a paper towel. Doesn’t that smell amazing? I still laugh at how fast bacon disappears here!
Step 3: Cool the eggs. Pour out the hot water. Fill the pot with cold water and ice. Let them cool for 10 minutes. Then, gently peel off the shells. What’s your favorite way to peel an egg? Share below!
Step 4: Slice each egg in half lengthwise. Gently scoop the yolks into a bowl. Place the white halves on your serving plate. They look like little boats waiting for cargo!
Step 5: Make the filling. Mash the yolks with a spatula. Add mayo a little at a time until creamy. Stir in mustard, garlic powder, and salt. (Always start with less mayo—you can add more, but you can’t take it out!)
Step 6: Time to fill them. Scoop filling into a zip-top bag. Snip a corner off the bag. Gently squeeze filling into each egg white. It’s like frosting little savory cakes!
Step 7: Finally, the best part! Crumble the crispy bacon. Sprinkle it and the fresh chives on top. These look almost too pretty to eat. Almost!
Creative Twists
Pickle Power: Add a teaspoon of sweet pickle relish to the filling. Smoky Swap: Use smoked paprika instead of garlic powder. Green Goddess: Mix in some very finely chopped spinach. Which one would you try first? Comment below!
Serving & Pairing Ideas
Place them on a platter with lettuce leaves. It makes for a pretty presentation. They’re perfect with a simple green salad. A glass of iced tea is a lovely companion. Which would you choose tonight?

Keeping Your Deviled Eggs Delicious
Let’s talk about keeping these treats fresh. You can store them in the fridge for two days. Just cover the plate tightly with plastic wrap. The bacon might soften a bit, but they will still taste wonderful.
I do not recommend freezing deviled eggs. The filling gets a strange texture. It is just not worth it. Always keep them chilled until you are ready to serve.
You can be a batch-cooking champion. Hard-boil and peel the eggs a day ahead. Make the filling and keep it separate in a container. Assemble everything right before your party or picnic.
I once brought undressed eggs to a church social. I assembled them on a picnic table. It was so easy and they were perfectly fresh. Have you ever tried storing it this way? Share below!
This little bit of planning matters. It takes the rush out of cooking. You get to enjoy your own party with everyone else.
Simple Fixes for Common Egg Troubles
Sometimes cooking does not go as planned. That is okay. Here are three easy fixes for deviled eggs.
First, eggs that are hard to peel. Use older eggs, not super fresh ones. Adding a splash of vinegar to the boiling water can help too. I remember when I used brand-new eggs from my hens. What a sticky mess that was!
Second, filling that is too runny. Start with less mayonnaise. You can always add more. But you cannot take it out. Mash your yolks very well first. This makes them creamier.
Third, bland filling. Do not forget the salt. Taste your filling before you pipe it. A tiny pinch more salt makes all the difference. Which of these problems have you run into before?
Fixing these small issues matters. It builds your confidence in the kitchen. It also means your food will always taste its very best. Good flavor makes people happy.
Your Quick Questions, Answered
How to make bacon chive deviled eggs?
You start by perfectly boiling your eggs. Cook your bacon until it is very crispy. Then you mix the yolks with creamy mayonnaise and a little mustard. The secret is to add the mayo slowly. Pipe the filling back into the whites. Finally, top each one with crunchy bacon bits and fresh green chives for the perfect bite.
What are the best tips for perfect deviled eggs?
Do not overcook your eggs. Turn off the heat once they boil. Let them sit for ten minutes. Cool them quickly in ice water. This stops a grey ring from forming on the yolk. Also, taste your filling and adjust the salt. A fun fact: that grey ring is safe to eat, but it does not look pretty.
Can I make deviled eggs ahead of time?
Yes, you absolutely can. Prepare the hard-boiled eggs and peel them one day early. You can also make the filling a day ahead. Keep the whites and filling in separate containers in the fridge. Wait to assemble them until just before you are ready to serve. This keeps the whites firm and the bacon nice and crispy.
What are some creative deviled egg topping ideas?
You can have so much fun with toppings. Try a tiny piece of smoked salmon with a dill sprig. A sprinkle of paprika or everything bagel seasoning is classic. For a crunch, use fried onions or chopped pickles. A small slice of jalapeno adds a nice kick. Let your imagination guide you.
How do you keep deviled eggs from getting watery?
The key is to dry your egg whites well. After peeling and slicing, pat the insides with a paper towel. Make sure your cooked bacon is completely cool before crumbling it. Any warmth can create steam. Also, do not add too much mayonnaise to the yolk mixture. A thick filling will not weep.
What are good substitutes for mayonnaise in deviled eggs?
Greek yogurt or sour cream work very well. They give a similar creamy texture with a tangy taste. For a richer option, use mashed avocado. A little softened cream cheese is also delicious. Remember, with substitutes, start with a small amount and add more until it feels right. Which tip will you try first?
From My Kitchen to Yours
I hope you feel ready to make these tasty eggs. They are perfect for sharing with people you love. Cooking is about making memories, not just meals.
I would love to hear about your cooking adventures. Tell me all about it in the comments. Have you tried this recipe? What did your family think?
Thank you for spending this time with me. Happy cooking!
—Grace Hollander.


Bacon Chive Deviled Eggs
Description
Deviled Eggs with Bacon and Chives
Ingredients
Instructions
- Place the eggs in a medium pot and cover them by an inch with cold water. Bring the water to a boil and, once boiling, turn off the heat, cover the pot and remove it from the heat. Let the eggs sit in the hot water for 10 minutes.
- While the eggs are cooking, cook the bacon in a small pan over medium heat until crispy. Remove the bacon from the pan and drain it on a plate lined with a paper towel.
- Once the eggs have cooked for 10 minutes, pour the hot water out (keeping the eggs in the pan) and cover them with cold water to stop the cooking process (throwing some ice cubes in helps, too). Let them cool for about 10 minutes or so. Once they’ve cooled, remove the shells.
- Slice each egg in half lengthwise. Gently scoop out the yolks and place them in a medium-sized bowl. Place the egg whites on a plate or serving platter.
- To make the filling, first mash the eggs yolks with a rubber spatula. Next, add the mayonnaise starting with just a quarter cup. Stir the two together using a rubber spatula. Keep adding a little bit more mayonnaise in batches until you get a creamy consistency. Add the mustard, garlic powder, and salt and give it all a good stir.
- Scoop the filling into a large zip lock bag. Give it a squeeze so the filling fills one bottom corner of the bag. Snip the corner off and then gently squeeze enough filling to fill each egg white half.
- Top each deviled egg with some of the bacon and a sprinkling of chopped fresh chives.
Notes
- For a smoother filling, you can push the yolk mixture through a fine-mesh sieve before mixing with the mayonnaise. Adjust mayonnaise quantity to your preferred consistency.