

My First Alfajor
I tried my first alfajor in a little market. It was powdery and sweet. I took one bite and my eyes got wide. I knew I had to learn to make them.
I asked the kind lady for her secret. She just smiled and said “maicena.” That’s cornstarch. It makes the cookies tender. They melt in your mouth like snow. Have you ever had a cookie that just disappears on your tongue?
Why These Cookies Feel Special
These are not crunchy cookies. They are soft and delicate. The cornstarch is the magic. It gives them a sandy, gentle texture. This matters because food should be a feeling, not just a taste.
The filling is pure comfort. Dulce de leche is just milk and sugar, cooked slow. It becomes sweet, sticky joy. Stirring in the vanilla makes the whole kitchen smell like a hug. Doesn’t that smell amazing?
A Little Kitchen Trick
The dough is very soft. My trick is the parchment paper. Roll it right between the sheets. No messy flour everywhere! Then you freeze it. This makes it easy to cut.
When you cut the rounds, get them close together. You want to re-roll the scraps only once. Too much handling makes tough cookies. This matters for keeping that melt-away feel. What’s your favorite kitchen shortcut?
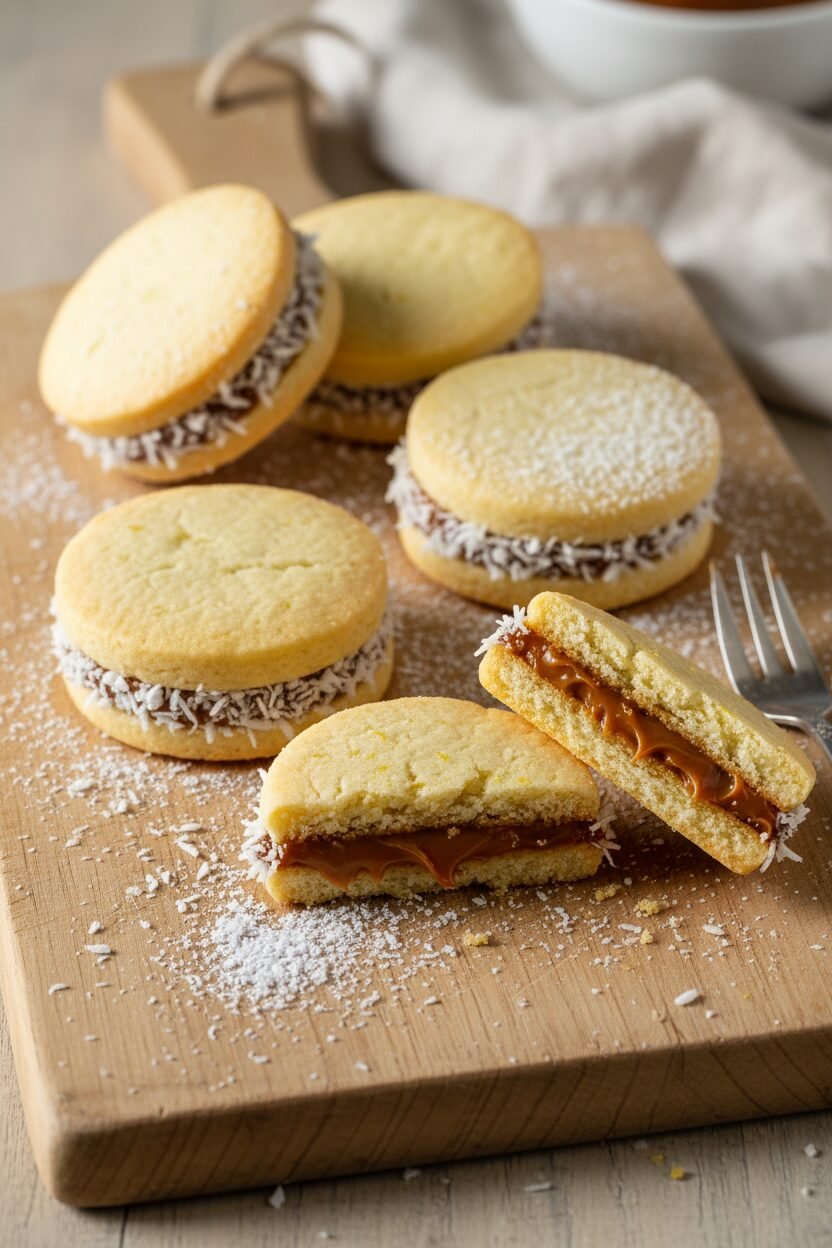
The Fun Part: Assembly
Let the cookies cool completely. If they are warm, the filling will run. I still laugh at that. My first batch was a delicious, messy puddle.
Put the filling on the flat bottom of a cookie. Then gently press another on top. The filling should peek out the sides. Now, roll that edge in coconut. It looks like a little snowdrift. *Fun fact: In some places, these cookies are called “alfajores de nieve” or “snow alfajores.”*
Share the Sweetness
These cookies are for sharing. They are small and sweet. Perfect with a cup of tea or milk. I always make a double batch. They disappear so fast!
Making them is an act of love. You take simple things and make magic. That is the best kind of cooking. Do you have a family recipe that feels like a hug? I would love to hear about it.
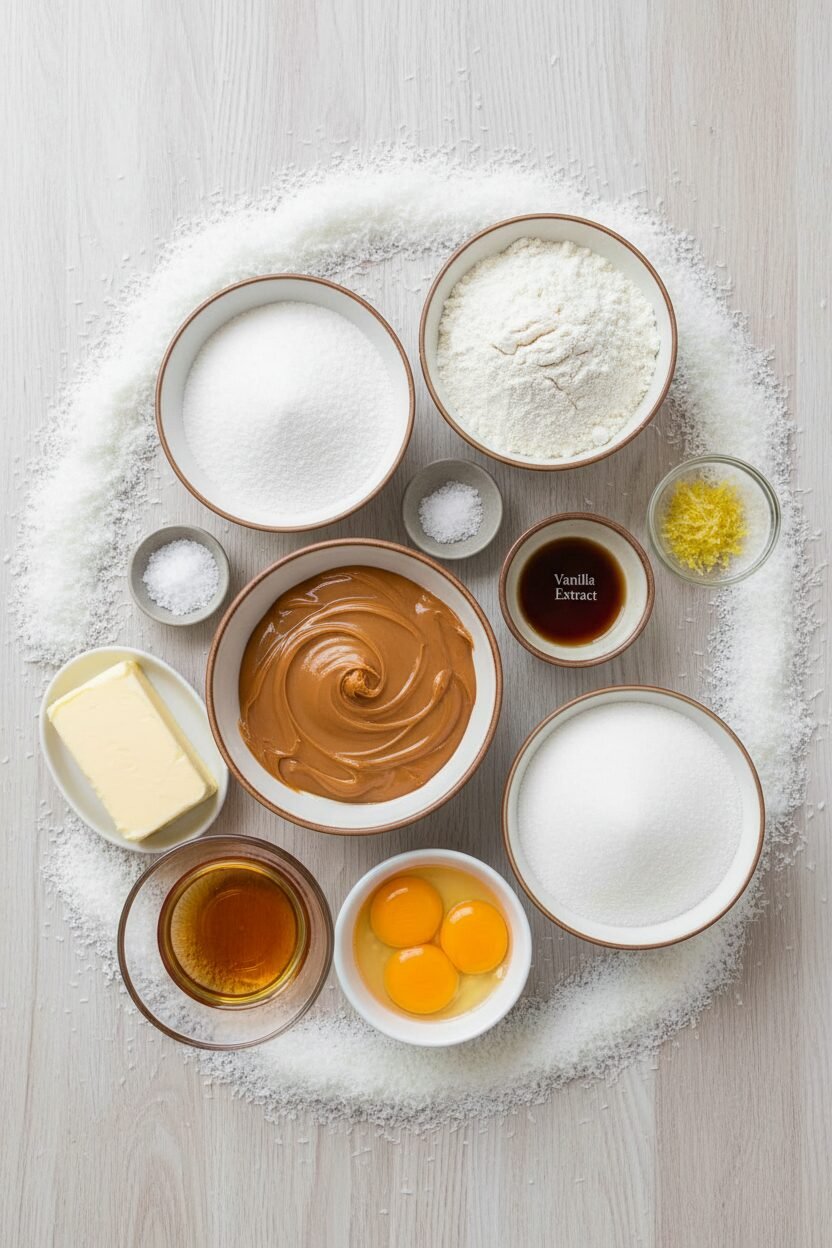
Ingredients:
| Ingredient | Amount | Notes |
|---|---|---|
| Dulce de Leche (canned) | 2 cans (13.4 oz / 380g each) | e.g., Nestlé La Lechera |
| Vanilla Extract | 1 tsp (filling) + 1 tsp (cookies) | Divided use |
| Table Salt | ¼ tsp (filling) + ¼ tsp (cookies) | Divided use |
| Cornstarch | 1½ cups (6 oz / 170g) | |
| All-Purpose Flour | 1⅓ cups (6⅔ oz / 189g) | |
| Baking Powder | 1 teaspoon | |
| Unsalted Butter | 16 tablespoons, softened | 2 sticks / 8 oz / 227g |
| Sugar | ½ cup (3½ oz / 99g) | |
| Large Egg Yolks | 3 | |
| Brandy | 1 tablespoon | Optional |
| Lemon Zest | 1 teaspoon, grated | |
| Unsweetened Shredded Coconut | 1 cup (3 oz / 85g) | For rolling assembled cookies |
Instructions
Step 1: Let’s start with the sweet heart of these cookies. Scoop your dulce de leche into a medium bowl. Stir in the vanilla and salt until it’s all one happy family. Cover the bowl and tuck it into the fridge. It needs to get completely cold, for at least two hours. (A cold filling is much easier to handle later, trust me!)
Step 2: Now, for the cookie dough. Whisk the cornstarch, flour, baking powder, and salt in a bowl. In your mixer, beat the soft butter and sugar until it’s pale and fluffy. It takes about three minutes. Add the egg yolks, brandy (if you’re using it), lemon zest, and vanilla. Mix it all together. Finally, add your flour mixture and mix on low until the dough is smooth. Doesn’t that smell amazing already?
Step 3: Divide your soft dough in half. Place one piece between two big sheets of parchment paper. Press it flat with your hand first. Then, roll it out to about a quarter-inch thick. Smooth out any wrinkles with your palm. Do you know what makes rolling dough easier? (Always roll from the center outwards!) Repeat with the second piece. Stack them on a baking sheet and freeze for 30 minutes. This makes them firm and easy to cut.
Step 4: Heat your oven to 350 degrees. Take one dough sheet out. Peel off the top parchment, then flip it over. Peel off the second sheet. Use a two-inch round cutter to cut out cookies. Place them on a baking sheet, a little apart. Bake for 10 to 12 minutes until the bottoms are light gold. Switch the pans halfway through. The tops should stay pale. Let them cool for five minutes before moving them. What’s your favorite part of baking: mixing, rolling, or the smell? Share below!
Step 5: Time to build our snowdrift sandwiches! Flip half the cookies over. Place about two teaspoons of your chilled filling on each one. Gently press a second cookie on top. The filling should peek out to the edges. Now, pour your coconut into a small bowl. Roll the sides of each cookie in the coconut. Press lightly so it sticks to the filling. I still laugh at how messy my fingers get. Serve them right away with a big glass of milk.
Creative Twists
These little cookies love to play dress-up. You can give them a whole new look. Try a different coating for the sides for a fun change. It makes them feel special for holidays or tea parties.
Swap the coconut for crushed freeze-dried strawberries. It gives a pretty pink color and a fruity taste.
Roll the sides in mini chocolate chips or sprinkles. This is perfect for a birthday treat.
Add a pinch of cinnamon to the cookie dough. It gives a lovely, warm spice note. Which one would you try first? Comment below!
Serving & Pairing Ideas
These cookies are a delight all on their own. But I love making a moment feel special. For a pretty plate, dust them with a little powdered sugar. It looks like a fresh snowfall. You could also serve them with a bowl of fresh berries. The tart fruit is lovely with the sweet filling.
What to drink? For a cozy evening, a small glass of cream sherry is just right. For everyone, a cup of steamy hot chocolate is the best friend. The rich chocolate and sweet cookie are a dream team. Which would you choose tonight?
Keeping Your Snowdrift Cookies Perfect
These cookies are best kept cold. Store them in an airtight container in the fridge. They will stay lovely for up to five days. Let them sit out for ten minutes before serving. This softens the filling just right.
You can freeze the baked, unfilled cookies too. Layer them with parchment paper in a container. They freeze well for a month. Thaw them at room temperature before filling. This is perfect for getting ahead for a party.
I once left a whole batch on the counter overnight. The dulce de leche became a sticky mess! The fridge is your friend here. Storing properly means your treats are always ready to share. It turns baking from a chore into a gift for future-you.
Have you ever tried storing cookies this way? Share your tips below!
Cookie Troubles? Here Are Easy Fixes
Is your dough too sticky to roll? This is common. Just chill it longer in the freezer. Firm dough is much easier to handle. Your cookie shapes will be nice and clean.
Do your cookies spread too much? Your butter might have been too soft. I remember my first batch melting into odd shapes! Chilling the dough thoroughly prevents this. This matters because neat cookies hold the filling better.
Is the filling oozing out the sides? You might have used too much. Two teaspoons is the perfect amount. Press the top cookie gently until it reaches the edge. Getting this right makes each bite balanced and delicious.
Fixing small problems builds your kitchen confidence. You learn more each time. Which of these problems have you run into before?
Your Quick Questions, Answered
Q: Can I make these gluten-free?
A: Yes! Use a gluten-free flour blend. Replace the all-purpose flour measure for measure.
Q: Can I make parts ahead?
A: Absolutely. Make the dough and filling two days ahead. Keep them covered in the fridge.
Q: What if I don’t have brandy or lemon zest?
A: Just leave them out. The cookies will still be wonderfully tender and sweet.
Q: Can I double the recipe?
A: You can, but mix it in two separate batches. This ensures everything blends together smoothly.
Q: Any other coating besides coconut?
A: Try rolling the sides in powdered sugar or crushed nuts. Fun fact: In some places, these cookies are called “alfajores.”
Which tip will you try first?
From My Kitchen to Yours
I hope you love making these snowy sandwich cookies. They always remind me of cozy afternoons. Sharing food is one of life’s sweetest joys.
I would love to hear about your baking adventure. Tell me all about it in the comments below. Have you tried this recipe? Your stories make my day brighter.
Happy cooking!
—Elowen Thorn.
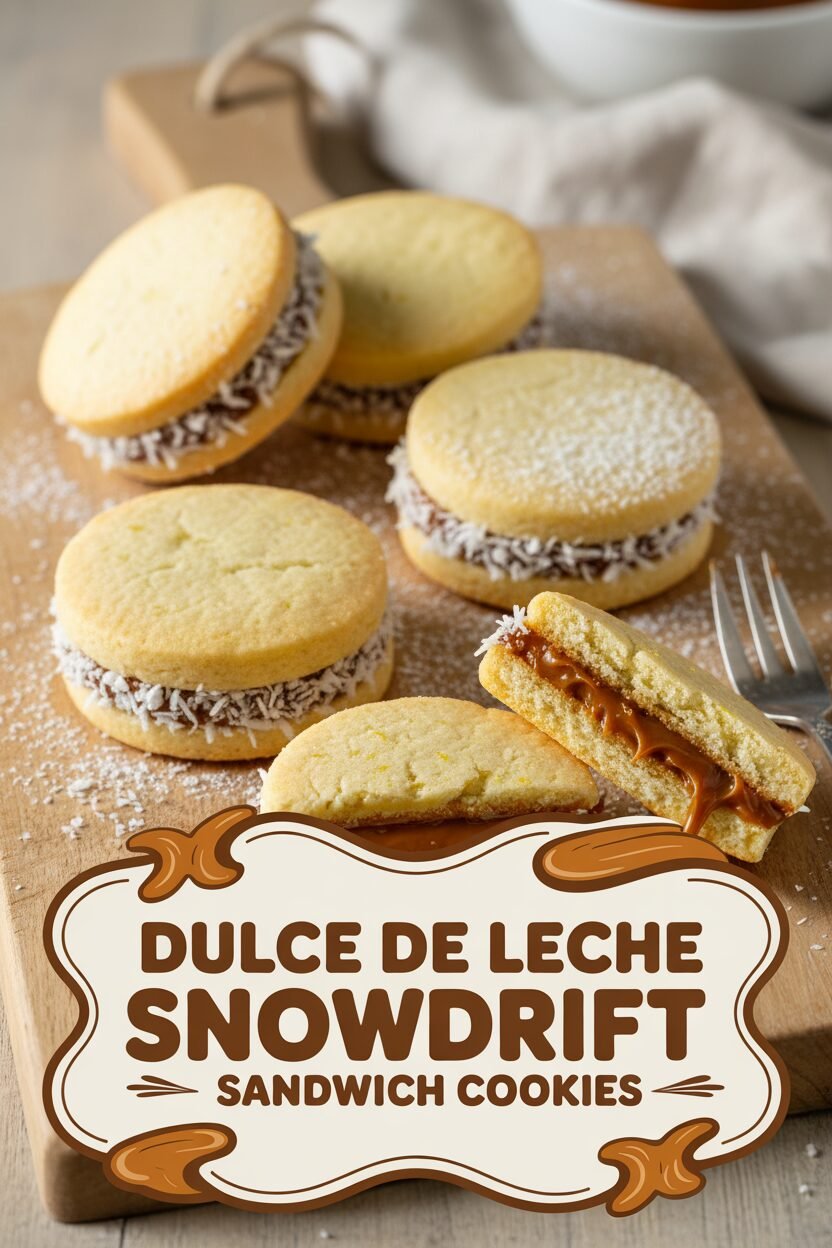

Dulce de Leche Snowdrift Sandwich Cookies
Description
Alfajores de Maicena (Buttery Cornstarch Cookies Filled with Dulce de Leche)
Ingredients
Filling
Cookies
For Coating
Instructions
- For the filling: Transfer dulce de leche to medium bowl. Stir in vanilla and salt until thoroughly incorporated. Cover and refrigerate until mixture is completely chilled, at least 2 hours.
- For the cookies: While filling chills, in medium bowl, whisk together cornstarch, flour, baking powder, and salt. Using stand mixer fitted with paddle, beat butter and sugar on medium-high speed until pale and fluffy, 2 to 3 minutes. Add egg yolks; brandy, if using; lemon zest; and vanilla and beat until combined. Add cornstarch mixture; reduce speed to low; and mix until dough is smooth, scraping down bowl as needed.
- Divide dough in half. Place 1 piece of dough in center of large sheet of parchment paper and press with your hand to ½-inch thickness. Place second large sheet of parchment over dough and roll dough to ¼-inch thickness. Using your flat hand on parchment, smooth out wrinkles on both sides. Transfer dough with parchment to rimmed baking sheet. Repeat pressing, rolling, and smoothing second piece of dough, then stack on top of first piece on sheet. Freeze until dough is firm, about 30 minutes.
- Adjust oven racks to upper-middle and lower-middle positions and heat oven to 350 degrees. Transfer 1 piece of dough to counter. Peel off top layer of parchment and replace loosely. Flip dough and parchment. Peel away second piece of parchment and place on rimmed baking sheet. Using 2-inch round cutter, cut dough into rounds. Transfer rounds to prepared sheet, about ½ inch apart. Repeat with remaining dough and second rimmed baking sheet. Reroll, chill, and cut scraps until you have 26 rounds on each sheet.
- Bake until tops are set but still pale and bottoms are light golden, 10 to 12 minutes, switching and rotating sheets halfway through baking. Let cookies cool on sheets for 5 minutes, then carefully transfer to wire rack to cool completely.
- To assemble, place half of cookies upside down on counter. Place about 2 teaspoons filling on each upside-down cookie. Hold 1 topped cookie on fingers of 1 hand. Place second, untopped cookie on top of filling, right side up, and press gently with fingers of your other hand until filling spreads to edges. Repeat with remaining cookies.
- Place coconut in small bowl. Working with 1 cookie at a time, roll sides of cookies in coconut, pressing gently to help coconut adhere to exposed filling. Serve immediately or refrigerate in airtight container for up to 5 days. Allow refrigerated cookies to sit out at room temperature for 10 minutes before serving.
Notes
- Ensure the dulce de leche filling is thoroughly chilled before assembling, as this makes it easier to handle and helps the cookies hold their shape.