

My Messy Easter Tradition
I first made this for my grandkids. They called it “worm dirt.” I still laugh at that. It is not a fancy dessert. It is a happy, messy pile of chocolate and cream. It looks like a garden gone wild. That is the whole fun of it.
Food does not always have to be perfect. Sometimes, the best foods are the silly ones. This cake matters because it is about play. It turns dessert time into a game. What was the silliest dessert you ever made?
The Secret is in the Layers
Let’s start with the chocolate cake base. Bake it just like the box says. Your kitchen will smell amazing. Let that cake cool all the way. This is very important. A warm cake will melt our fluffy cloud.
That cloud is the cream cheese filling. Beat the soft cheese until it’s smooth. Then mix in the powdered sugar. Finally, gently fold in the whipped topping. *Fun fact: “folding” just means mixing slowly. It keeps the fluffiness. Doesn’t that look like delicious mud?
Making Edible Dirt
Now for the best part. Take those Oreo cookies. Put them in a bag and crush them. You can use a rolling pin. Or just squeeze the bag with your hands. It is a great way to get out a little energy.
Spread the creamy layer over the cool cake. Then, sprinkle your cookie “dirt” all over. Be generous. The final touch is the gummy worms. Poke them into the dirt so they look real. Do you like the worms on top or buried inside?
Why This Silly Cake Matters
This cake matters because it gets everyone involved. Kids love to crush cookies and place worms. It is not a “look but don’t touch” dessert. It is made for sharing and laughing.
It also teaches a little lesson. The best things often need patience. You must wait for the cake to cool. Then you must wait again for it to chill. That waiting makes the first bite so much better.
Your Turn to Create
This is your garden. You are the gardener. You can use different cookies. Maybe try mint Oreos for a fresh taste. You could even add jellybean “rocks.” There are no rules here.
Making food your own is the real joy of cooking. What would you add to your dirt cake casserole? Tell me about your creation. I would love to hear your ideas. Now, go make a wonderful, messy, happy dessert.
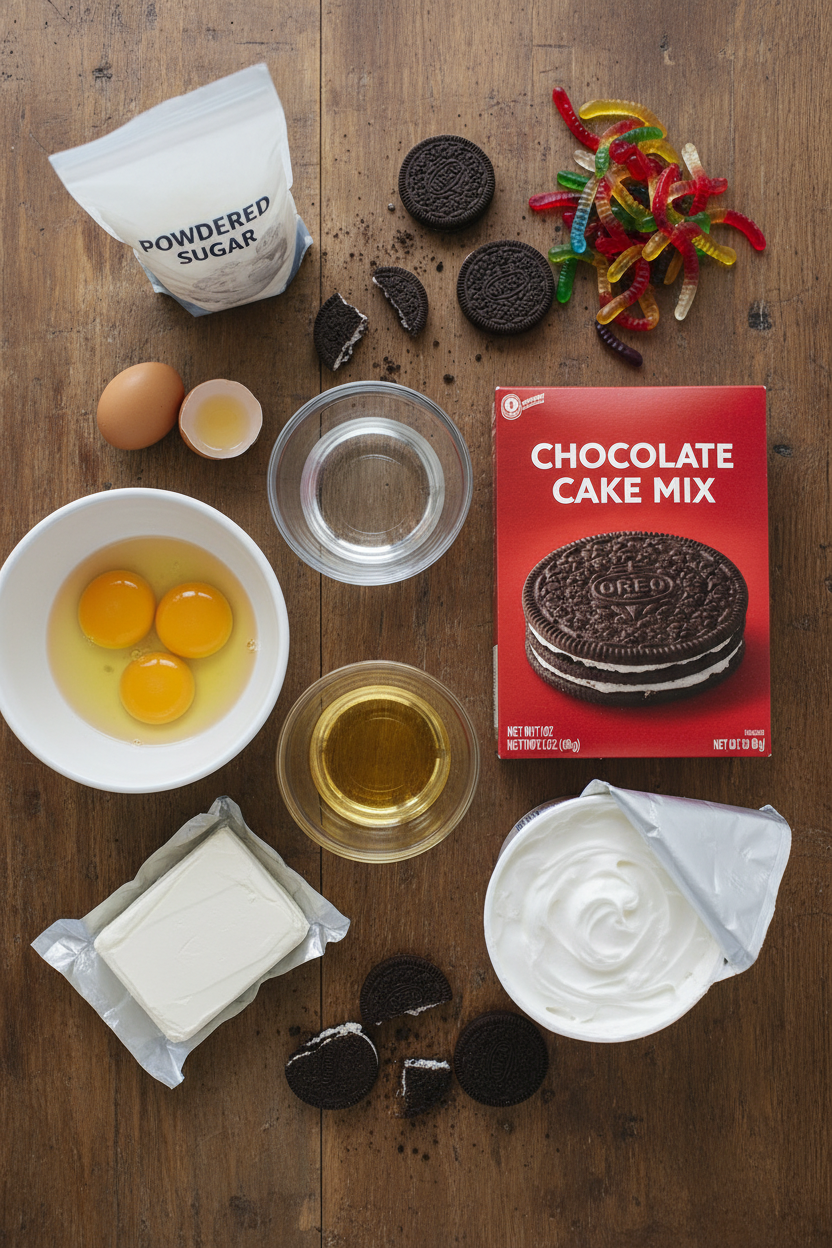
Ingredients:
| Ingredient | Amount | Notes |
|---|---|---|
| Chocolate cake mix | 1 box | For the cake |
| Eggs | 3 large | For the cake |
| Water | 1 cup | For the cake |
| Vegetable oil | 1/3 cup | For the cake |
| Cream cheese | 1 package (8 oz) | For the filling; softened |
| Whipped topping (e.g., Cool Whip) | 1 container (12 oz) | For the filling |
| Powdered sugar | 1 cup | For the filling |
| Oreos | 1 package (about 24 cookies) | For the topping; crushed |
| Gummy worms | For topping | For decoration |
Instructions
Step 1: First, warm your oven to 350°F. Grease your big casserole dish. Doesn’t that smell amazing? I love the smell of a kitchen warming up. It feels like a hug. Now, mix the cake mix, eggs, water, and oil in a bowl. (Use a big bowl so it doesn’t splash!) Mix until it’s nice and smooth.
Step 2: Pour your smooth batter into the greased dish. Slide it into the oven. Bake for about 30 minutes. You’ll know it’s done when a toothpick poked in the middle comes out clean. Let the cake cool completely. I know, waiting is hard! But a warm cake will melt our fluffy topping.
Step 3: Time for the fluffy cloud! Beat the softened cream cheese until it’s smooth. No lumps! Add the powdered sugar and mix it well. Now, gently fold in the whipped topping. What does “fold in” mean? Share below! You want it creamy and light. I still laugh at the time I mixed it too fast.
Step 4: Spread your creamy cloud over the cooled cake. Be gentle. Next, crush the Oreos in a bag. (A rolling pin works great for this!) Sprinkle the crumbs all over the top. It looks like garden dirt already, doesn’t it? Now for the fun part—add the gummy worms!
Step 5: Finally, let your “garden” chill in the fridge. Wait at least one hour. This helps all the flavors become friends. The waiting makes it taste even better, I promise. Then, scoop it out and serve with a big smile. Everyone will dig right in!
Creative Twists
Use crushed peppermint patties for a minty “dirt.” Try vanilla pudding mixed with cream cheese for the filling. Add jellybeans as “Easter eggs” hiding in the dirt. Which one would you try first? Comment below!Serving & Pairing Ideas
Serve this on a bright green plate for a real garden look. A scoop of vanilla ice cream on the side is heavenly. For a party, use a clean flower pot as your serving dish! It’s so silly and fun. Just add a new trowel for scooping. Which would you choose tonight?

Keeping Your Easter Dirt Cake Fresh
Let’s talk about storing this fun cake. First, cover the dish tightly with plastic wrap. Keep it in the fridge for up to three days. The cold keeps the creamy layer perfect.
You can freeze it for a month, too. Just wrap the whole dish well in foil. Thaw it in the fridge overnight before serving. I remember my first dirt cake melting on a warm day. Now I never skip the fridge step!
Storing it right matters. It keeps every bite tasting just-made. It also means less stress on your special day. You can make it ahead and just relax. Have you ever tried storing it this way? Share below!
Simple Fixes for Common Cake Troubles
Sometimes our bakes need a little help. First, a soggy cake layer. Always let the cake cool completely before adding filling. A warm cake makes the cream melt.
Second, lumpy cream cheese. Make sure it is very soft before mixing. I once used cold cream cheese. My filling had tiny lumps all through it!
Third, Oreos losing their crunch. Crush them just before sprinkling. Storing them crushed makes them soft. Fixing these small issues matters. It makes your dessert look and taste wonderful. It also builds your cooking confidence. Which of these problems have you run into before?
Your Quick Questions, Answered
What is the secret to a good dirt cake?
The secret is texture and contrast. A moist chocolate cake base is key. Pair it with a smooth, tangy cream cheese filling. The final touch is crunchy Oreo crumbs on top. This mix of soft, creamy, and crunchy makes it magic. Letting it chill fully blends the flavors together perfectly. Every bite should be a fun surprise.
Can I make dirt cake ahead of time?
Yes, you absolutely can! This is a great make-ahead dessert. Assemble the complete casserole the day before you need it. Cover it tightly and keep it in the refrigerator. The chilling time makes it even better. The flavors get to know each other. Just add the gummy worms right before you serve it so they stay perfect.
What can I use instead of gummy worms?
You have many fun options. Try candy flowers or butterflies for spring. Chocolate rocks or pebbles look great too. Fresh berries like raspberries are a tasty choice. For Easter, use jelly beans or small chocolate eggs. Let your imagination guide you. The goal is to make your “dirt” garden look special and delicious for your celebration.
Is there a no-bake version of dirt cake?
There is a classic no-bake version. You use chocolate pudding instead of cake. Layer the pudding with cream cheese filling and Oreos. Do this in a big bowl or a clean flower pot. It is very easy and no oven is needed. It is perfect for hot days or when you are short on time. Kids love helping to layer it.
Can I use Cool Whip instead of homemade frosting?
The recipe already uses whipped topping like Cool Whip. You mix it with cream cheese and sugar. So yes, it is the standard choice. It makes the filling light and fluffy. A fun fact: using Cool Whip helps the filling set nicely in the fridge. You do not need to make a separate frosting. This mixture is perfect as it is.
How do you keep dirt cake from getting soggy?
The key is a completely cool cake. Let the baked cake cool in the pan. Wait until no warmth comes from it at all. Then add the creamy filling. Also, crush the Oreos right before sprinkling. Store the cake covered in the fridge. This keeps the Oreo layer crunchy and the cake firm. Which tip will you try first?
From My Kitchen to Yours
I hope you love making this Easter treat. It is such a joyful dessert to share. Seeing those gummy worms peek out always makes me smile.
I would love to hear about your baking adventure. Tell me about your family’s reaction. Did you use different candy on top? Your stories are my favorite thing to read. Have you tried this recipe? Please leave a comment below and tell me all about it.
Happy cooking!
—Marina Caldwell
