

My Kind of Kitchen Magic
Some treats feel like a warm hug. These little cheesecake cups are just that. You don’t even need to turn on the oven. I love that. It’s pure, simple kitchen magic. Doesn’t that sound nice for a warm day?
I learned this from my neighbor, Lila. She brought some over one summer. My grandson ate three in a row! I still laugh at that. It matters because joy is often found in small, sweet things. If you love easy treats, you might enjoy these creamy Japanese cheesecake cupcakes too.
The Heart of It: The Caramel
Let’s talk about the caramel. Making it is a fun show. The sugar melts and turns a beautiful amber. Then you add the warm cream. It bubbles and hisses like a happy little dragon. *Fun fact: that sizzle is called “the volcano stage” by bakers.*
Please be careful with the hot sugar. Use a big pot. The reward is a sauce you can be proud of. A good homemade caramel matters. It adds a deep, rich flavor that store-bought just can’t match. Have you ever made caramel from scratch before?
Building Your Little Cups of Joy
The crust is just crumbs and butter. Press it down firmly in your cups. This gives a nice base to hold the creamy filling. Then comes the fun part. You mix the soft cheese with a bit of that lovely caramel.
Folding in the whipped cream is key. Do it gently. You want it light and fluffy. This gentle touch matters. It makes the filling smooth as silk. For another no-bake idea, these layered brownie cheesecake mousse cups are fantastic.
The Best Part: Waiting and Topping
Now, you must be patient. Let them chill for a few hours. I know, it’s hard to wait! But it makes them set perfectly. It’s worth it. When you take them out, the fun begins.
Drizzle on more caramel. Then add that tiny pinch of flaky salt. Oh, that salt is magic. It makes the sweet caramel taste even sweeter. Do you prefer nuts on top, or just the caramel and salt?
Sharing the Sweetness
These are perfect for sharing. Make them for a friend having a tough week. Or let your family build their own toppings. Food shared is happiness doubled. That’s a rule in my kitchen.
Cheesecake is so versatile. If you like fruit, my favorite strawberry cheesecake is a summer star. Or for a fun twist, try these strawberry cheesecake tacos. What’s your favorite way to enjoy a sweet treat with others?
Instructions
Step 1: First, get your jars ready. I use little glasses from a thrift shop. Let your cream cheese get soft on the counter. Cold cream whips up best. This makes everything so much easier later.
Step 2: Make the caramel. Watch the sugar turn amber. It smells like magic. Pour in the warm cream carefully. (It will bubble up, so don’t be scared!). Let it cool completely. Do you like making caramel? Share below!
Step 3: Mix crumbs and melted butter. It should look like wet sand. Press it into your cups firmly. I still use the bottom of a small glass for this. Pop them in the fridge to set.
Step 4: Now, the fluffy part! Whip the cold cream until it forms soft peaks. It should look like a cloudy dream. Gently fold it into your creamy cheesecake mixture. This makes it light as air.
Step 5: Layer the filling on the crust. Smooth the tops. Let them chill for hours. (Waiting is the hardest part, I know!). Before serving, drizzle with caramel. Add a tiny pinch of flaky salt. It makes all the flavors sing.
Creative Twists
Apple Pie Twist: Mix a spoonful of cinnamon into the crust. Top with tiny cooked apple pieces.
Chocolate Dream: Add cocoa powder to the filling. Drizzle with chocolate sauce instead of caramel.
Berry Burst: Skip the caramel. Layer with fresh raspberries or a quick berry sauce. So pretty and tart!
Which one would you try first? Comment below!
Serving & Pairing Ideas
Serve these cups straight from the fridge. They are perfect for a party. For a fancy touch, add a whipped cream dollop and a pecan half. A cup of strong coffee makes a wonderful friend to the sweet caramel. You could even crumble a brownie on top for extra fun. Which would you choose tonight?
Keeping Your Cheesecake Cups Happy
These little cups are perfect for making ahead. They keep well in the fridge for three days. Just cover them tightly. You can also freeze them for a month. Thaw them overnight in the fridge before serving.
I remember my first batch. I didn’t cover them well. The fridge made them taste like my leftover onion soup! A good lid keeps flavors fresh. Batch cooking means dessert is ready anytime. It saves you from a last-minute rush. You can enjoy a sweet treat without the work.
Have you ever tried storing it this way? Share below! For more make-ahead ideas, see this swirled brownie cheesecake bars recipe. It’s another great freezer-friendly option.
Simple Fixes for Common Hiccups
Is your filling too runny? Your cream was likely not cold enough. Always use chilled cream and a cold bowl. I once tried to whip warm cream. It just would not get fluffy! A runny filling won’t set properly. Getting it right means a perfect, creamy texture.
Is the crust too crumbly? You may need a bit more melted butter. The crumbs should look like wet sand. Press it down very firmly in the cup. A firm crust gives you a nice base to bite into. It makes the whole dessert feel more special.
Is the caramel too hard or too thin? Let your homemade sauce cool completely before using. *Fun fact: caramel continues to thicken as it chills.* If it’s too thin, just chill it longer. Which of these problems have you run into before? For a different creamy treat, try these creamy Japanese cheesecake cupcakes.
Your Quick Questions, Answered
How do you make salted caramel cheesecake filling?
First, beat soft cream cheese and sugar until smooth. Then, mix in two tablespoons of your cooled caramel sauce. Finally, gently fold in freshly whipped heavy cream. This makes the filling light, creamy, and full of caramel flavor. The salt in the caramel balances the sweetness perfectly.
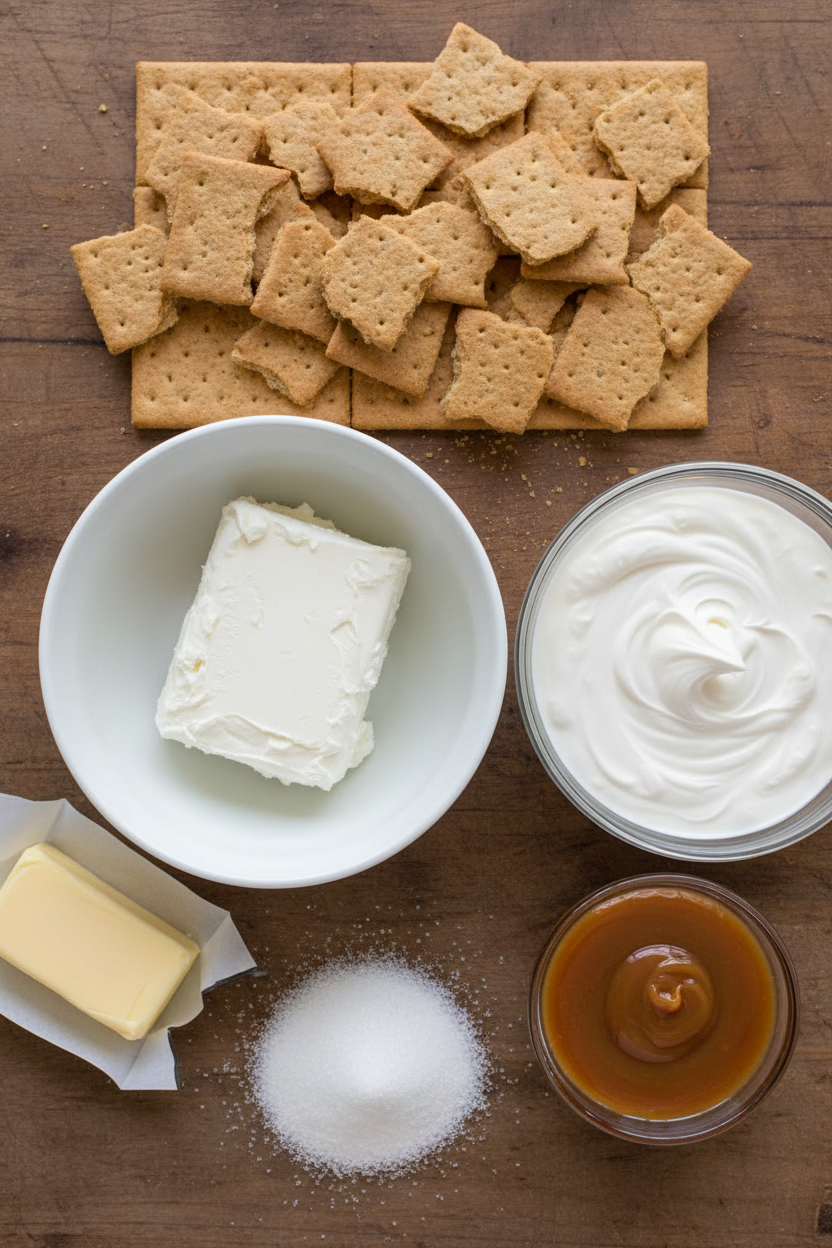
What are the ingredients for no-bake cheesecake cups?
You need cream cheese, sugar, and heavy cream for the filling. For the crust, use graham cracker crumbs and melted butter. The caramel sauce needs sugar, water, heavy cream, butter, and salt. That’s it! Simple ingredients make a fancy dessert. For a fruity version, check out this favorite strawberry cheesecake recipe.
Can I use store-bought caramel sauce for this recipe?
Yes, you absolutely can. Choose a thick, good-quality caramel sauce. Let it chill before you mix it into the filling. This helps keep your cheesecake filling nice and firm. Homemade is wonderful, but store-bought saves time. The most important thing is that you enjoy making and eating them.
How long do cheesecake cups need to set in the fridge?
They need at least four hours to set properly. Overnight is even better. This patience gives the filling time to firm up. It makes the texture just right. Rushing this step can lead to a soupy dessert. Good things come to those who wait.
What type of crust works best for cheesecake cups?
A graham cracker crust is classic and easy. Just mix crumbs with melted butter. You can also use crushed digestive biscuits or vanilla wafers. The buttery crunch pairs so well with the creamy filling. It’s the perfect first layer. For a chocolate twist, this gooey cheesecake brownie swirl has a great base.
Can I make salted caramel cheesecake cups ahead of time?
Yes, they are ideal for making ahead. Assemble them completely. Then cover and chill for up to three days. You can also freeze them for a month. This makes them perfect for parties or a week of sweet treats. Which tip will you try first?
From My Kitchen to Yours
I hope you love making these little cups. They always bring a smile. Cooking is about sharing joy and simple pleasures. I would love to hear about your kitchen adventures.
Have you tried this recipe? Tell me how it went in the comments below. You can share a picture or your own twist. For another fun, shareable dessert, these strawberry cheesecake nachos are a crowd-pleaser.
Happy cooking! —Elowen Thorn.

Easy Salted Caramel Cheesecake Cups Recipe
Description
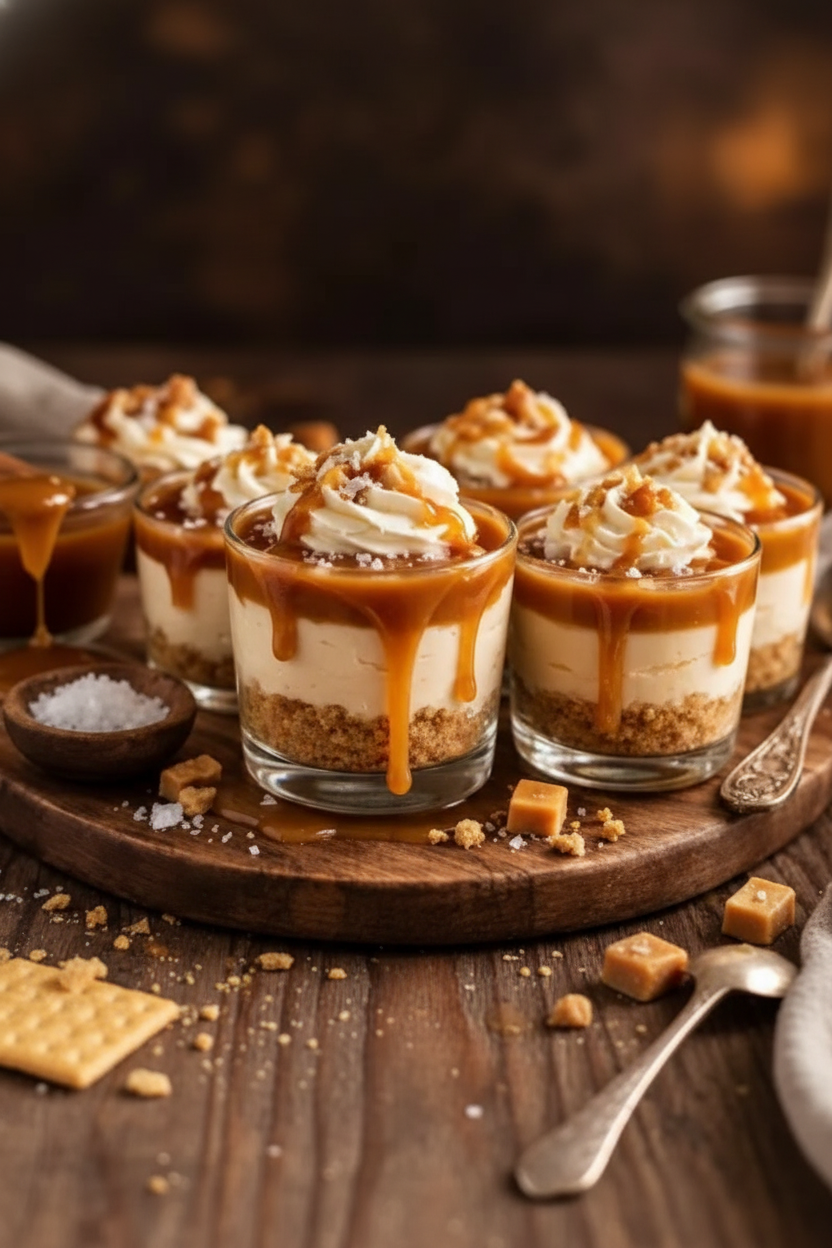
Indulge in these decadent, no-bake salted caramel cheesecake cups with a buttery graham cracker crust, creamy filling, and a rich salted caramel topping.
Ingredients
Caramel sauce:
Graham cracker crust:
Cheesecake filling:
Topping and garnish:
Instructions
- Set up your cups and ingredients. Pick 6 small jars or dessert cups. Place them on a tray. Ensure the cream cheese is soft, the heavy cream for whipping is cold, and the caramel is cooled.
- Make the caramel sauce. Warm the heavy cream until warm to the touch. In a medium saucepan, add the sugar and water. Let it dissolve, then cook over medium heat until it turns a deep amber color. Carefully pour in the warm cream while whisking. Once it calms down, whisk until smooth, then whisk in the softened butter until glossy. Let it cool fully, then chill until thickened. Alternatively, use a thick store-bought caramel sauce.
- Make the graham cracker crust. Stir the graham cracker crumbs and melted butter in a bowl until the crumbs look like wet sand. Spoon the mixture into your cups and press it down firmly. Place the cups in the fridge.
- Whip the cream. Pour the cold heavy cream into a cold bowl. Whip until soft peaks form.
- Mix the cheesecake base. In a separate bowl, beat the softened cream cheese and sugar until creamy and lump-free. Add 2 tablespoons of cooled caramel sauce and mix until the color is even.
- Fold in the whipped cream. Add the whipped cream to the cream cheese mixture in two parts. Fold it in gently with a spatula until smooth and fluffy.
- Assemble the cups. Spoon or pipe the cheesecake filling on top of the chilled crusts. Fill each cup about three-quarters full. Smooth the surface.
- Chill until fully set. Cover the cups and chill in the fridge for at least 4 hours, or overnight.
- Add the salted caramel topping and finish. Spoon or drizzle caramel over each cup. Finish with a small pinch of flaky sea salt. Add chopped toasted nuts if desired. Serve cold.
Notes
- For best results, ensure all ingredients are at the specified temperatures. The caramel sauce must be completely cooled before adding to the cheesecake filling. You can make the caramel sauce a day ahead.