

The Joy of Little Treats
Hello, my dear. Come sit. I want to tell you about little bites of joy. These strawberry crunch cheesecake bites are just that. They are small, so you can share them easily. I still laugh at that. I made a batch for my book club last week. They were gone in minutes!
Why does this matter? A small treat can turn a normal day into a special one. It is a little act of kindness for yourself or friends. Do you have a favorite small dessert to share? I love hearing about family favorites. My friend Lila makes wonderful mini cheesecakes in jars. They are so clever.
Getting the Crust Just Right
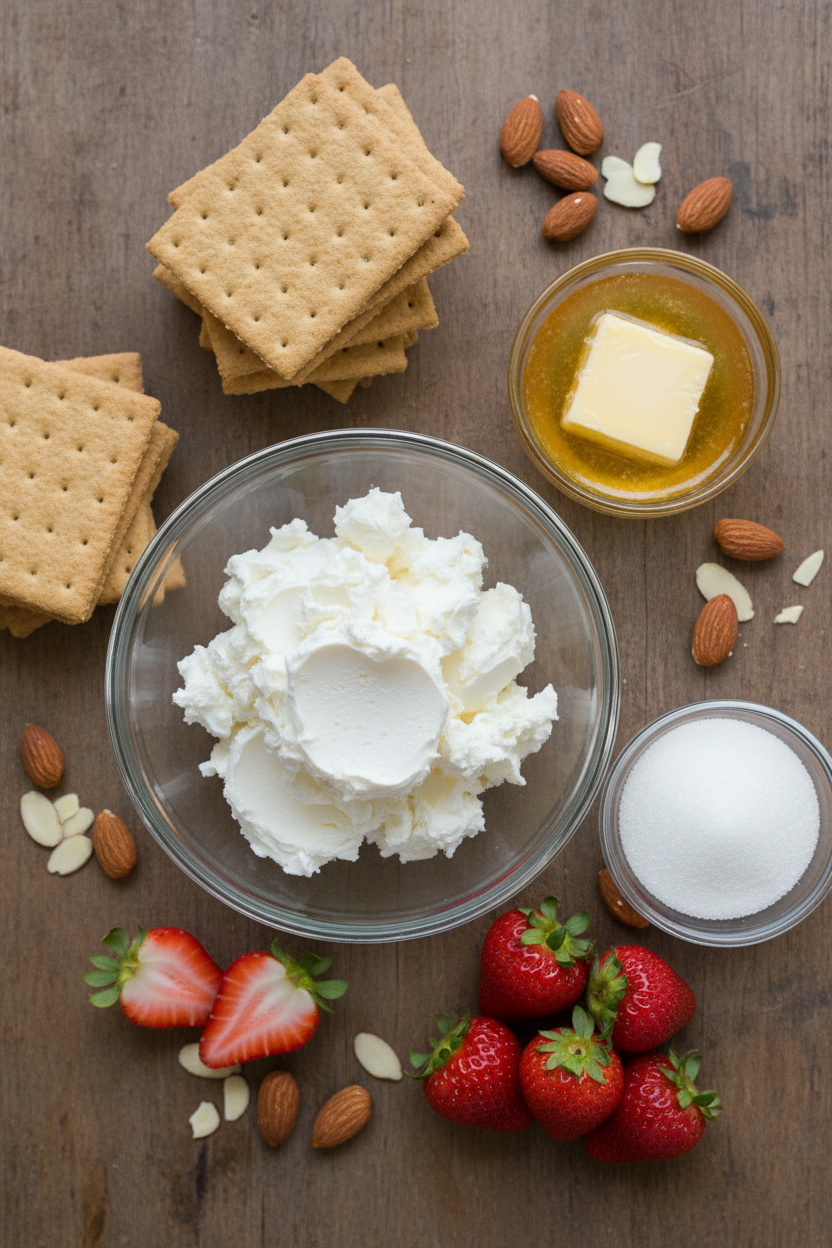
Let’s start with the base. It is like the foundation of a house. Graham crackers, melted butter, and a bit of sugar. You mix it and press it down firmly. Use your fingers. Feel it pack into the pan. Doesn’t that smell amazing? It is buttery and sweet.
This step matters. A firm crust holds everything together. It gives a nice crunch with every bite. *Fun fact:* Graham crackers were first made to be a healthy snack! Now we use them for delicious things like this crust or even gooey red velvet cheesecake brownies.
The Heart of the Bite
Now, the creamy heart. Room-temperature cream cheese is key. It mixes smooth with sugar and vanilla. Add one egg. Mix just until it is one happy, creamy family. Do not mix too much. We want it smooth, not fluffy.
Spoon it over your crust. Gently smooth the tops. This creamy layer is what makes a cheesecake, well, cheesecake! It is rich and comforting. If you enjoy this, you might also like the creamy layers in a triple layer red velvet cheesecake brownie. So good.
The Strawberry Crunch Magic
Here is the magic part. Fresh strawberries, a sprinkle of sugar, and toasted nuts. The sugar pulls out the strawberry juice. The nuts give a wonderful crunch. Scatter it all over the creamy filling. The colors are so pretty.
This topping matters because it gives you a surprise in every bite. Sweet berry, creamy filling, crunchy nut. It is a party in your mouth! What is your favorite fruit to bake with? I think berries are the best. They remind me of my best blackberry cheesecake recipe from summer.
A Little Patience for Perfection
Bake them until the edges are set. The center should still have a little jiggle. Then comes the hard part. Waiting. Let them cool. Then chill them for two hours. This sets the cream cheese perfectly. It makes the texture just right.
This waiting time is important. Good things come to those who wait, my mother always said. It is true for cheesecake. The chill makes it firm and delicious. While you wait, you could dream up your next treat. Maybe some springtime mini cheesecakes for a sunny day.
Instructions
Step 1: First, make your crust. Mix the crumbs, melted butter, and sugar. Press it firmly into a muffin tin. A good, hard press is the secret to a crust that holds together. (A little trick: use a small glass to press it down evenly!).
Step 2: Now, the creamy filling. Beat the room-temperature cream cheese and sugar. Add the vanilla and egg, mixing just until smooth. Doesn’t that smell amazing? I still laugh at the time I forgot to soften the cheese first!
Step 3: Spoon that lovely filling onto your crusts. Smooth the tops gently. Then, make your strawberry crunch topping. Toss diced berries with a bit of sugar. Mix in the crunchy, toasted nuts. What’s your favorite nut for crunch? Share below!
Step 4: Bake them until the edges look set. The center should still have a tiny wiggle. Let them cool completely on the counter. Then, the hardest part: chill them for two hours! This patience gives you the perfect mini cheesecakes texture.
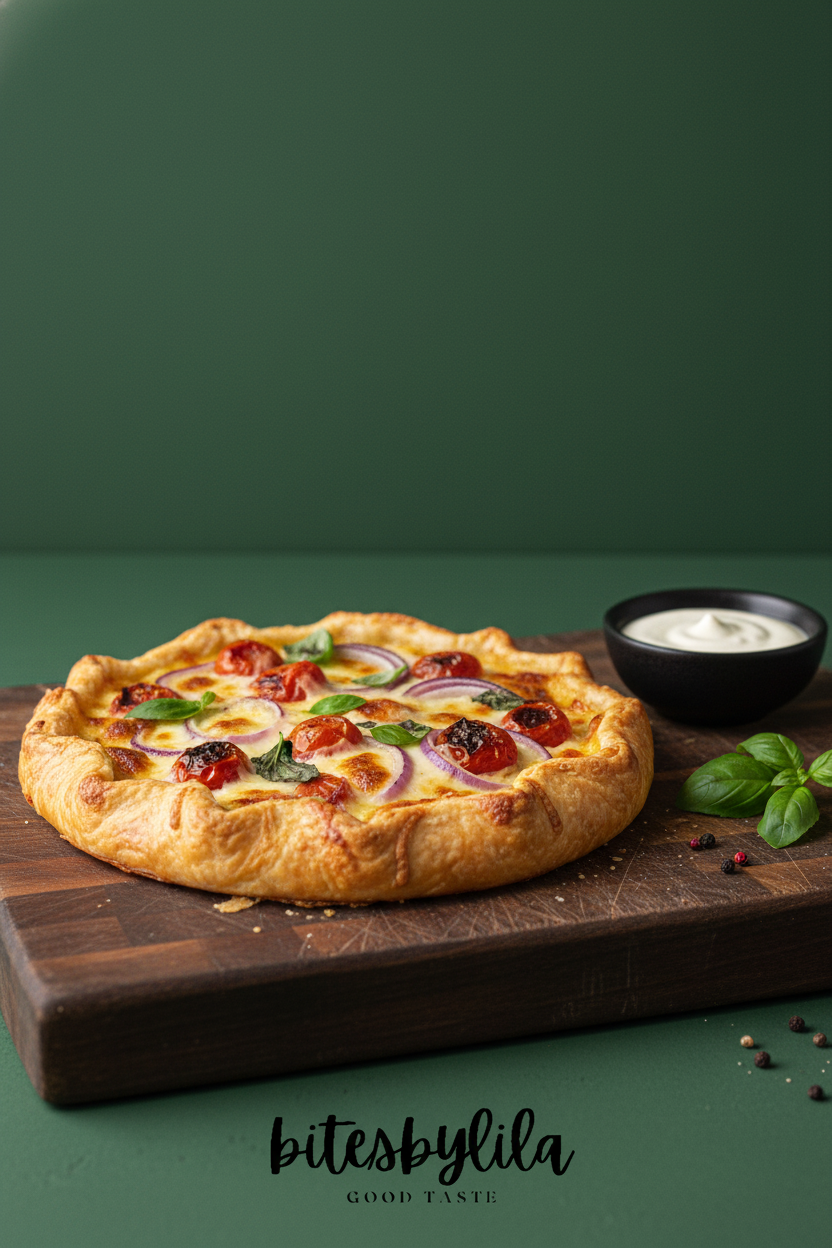
Step 5: Carefully pop your bites out of the tin. Arrange them on a pretty plate. For a fancy touch, a tiny drizzle of melted chocolate is lovely. These are perfect for a party or a springtime treat!
Creative Twists
Berry Swap: Use raspberries or blackberries instead of strawberries. A blackberry cheesecake twist is so tasty!
Chocolate Dream: Add a teaspoon of cocoa powder to the filling. It’s like a red velvet surprise inside!
Cookie Crunch: Use crushed vanilla wafers or oreos for the crust. It changes the whole flavor game! Which one would you try first? Comment below!
Serving & Pairing Ideas
Serve these bites on a big platter. A dollop of whipped cream on top looks so pretty. For a fun side, fresh berries on a skewer are nice. They also pair wonderfully with a cup of milky tea. These are even more festive than Easter delights. Which would you choose tonight?
Keeping Your Bites Fresh and Tasty
Let’s talk about storing these little delights. They need a cool home. Place them in a single layer in an airtight container. Then pop them in the fridge for up to four days. You can also freeze them for a month. I remember my first batch. I left them out too long. The topping got soggy. I learned my lesson fast.
Batch cooking is a wonderful time-saver. Make a double recipe of the crust and filling. You can freeze the unbaked bites on a tray first. This matters because a ready treat brings joy on busy days. It turns a regular Tuesday into a small celebration. Have you ever tried storing it this way? Share below!
For reheating, let frozen bites thaw in the fridge overnight. A quick chill keeps their perfect texture. For more make-ahead magic, explore my easy mini cheesecakes in jars. They are perfect for planning ahead.
Simple Fixes for Common Kitchen Hiccups
We all face little problems in the kitchen. First, a soggy crust. Press it very firmly into the pan. Use the bottom of a glass to help. I once rushed this step. My crust crumbled everywhere. A firm press makes all the difference.
Second, cracked cheesecake filling. Do not over-mix after adding the egg. Just blend until combined. This matters for a smooth, creamy texture. It builds your confidence when it turns out right. Third, a topping that sinks. Make sure your filling is thick. It should not be runny.
Which of these problems have you run into before? For another creamy, no-stress option, try these springtime mini cheesecakes. They are wonderfully simple. A fun fact: letting bites cool slowly prevents most cracks.
Your Quick Questions, Answered
How do you make strawberry almond cheesecake bites without baking?
You can make a no-bake version. Use the same crust but skip the egg. Mix softened cream cheese with sugar and vanilla. Fold in whipped cream for fluffiness. Spoon it over the crust. Top with fresh strawberries and almonds. Chill until firm. It is a cool and creamy treat for warm days.
What are the ingredients for no-bake strawberry cheesecake bites?
You need graham crumbs, melted butter, and sugar for the crust. The filling uses cream cheese, sugar, vanilla, and whipped cream. The topping is fresh strawberries and toasted almonds. It is a simple list. You likely have most items already. It comes together in no time at all.
Can I use frozen strawberries for cheesecake bites?
Yes, frozen strawberries work well. Thaw them completely first. Drain all the extra liquid very well. Pat them dry with a paper towel. This step is important. Too much juice will make your topping watery. Dried berries will stay nice and crunchy on your bites.
How long do strawberry almond cheesecake bites need to set?
They need at least two hours in the fridge. This chills them thoroughly. It makes them firm enough to handle. For the best texture, I chill mine overnight. Patience gives you the perfect bite. The wait is always worth it for that creamy result.
What can I use instead of almond flour for the crust?
You can use more graham cracker crumbs. Crushed vanilla wafers or gluten-free oats also work. Just use the same amount your recipe calls for. The goal is a tasty, sturdy base. It will hold your delicious filling without any trouble.
Are strawberry cheesecake bites gluten-free and keto-friendly?
They can be with simple swaps. Use almond flour for the crust instead of graham crackers. Choose a keto-friendly sweetener for the filling. Be mindful of the strawberries and sugar topping. This makes a treat that fits many diets. For a rich, berry-filled dessert, my best blackberry cheesecake is a lovely choice. Which tip will you try first?
From My Kitchen to Yours
I hope you love making these little bites. Cooking is about sharing joy. It is about creating sweet memories with every stir. I would love to hear about your kitchen adventures. Did you add a special twist? Maybe you tried them with a friend.
Have you tried this recipe? Tell me all about it in the comments below. For another festive idea, these springtime sweets are always a hit. Thank you for spending this time with me.
Happy cooking!
—Elowen Thorn

Easy Strawberry Almond Cheesecake Bites Recipe
Description
Easy, no-bake cheesecake bites with a graham cracker crust, creamy filling, and fresh strawberry almond crunch.
Ingredients
Instructions
- Prepare the crust: Mix 1 ½ cups crushed graham crackers with ½ cup melted butter and ¼ cup sugar. Press firmly into the bottom of muffin tins or a silicone mold for bite-sized shapes. The crust should be compact and hold together.
- Make cheesecake filling: Beat 8 oz cream cheese (room temp) with ½ cup granulated sugar until smooth. Add 1 tsp vanilla extract and 1 large egg; mix just until combined. The filling should be creamy but thick enough to stay on the crust without spreading.
- Layer the bites: Spoon cheesecake filling evenly over the cooled crust base. Smooth tops gently with a spatula for uniformity.
- Prepare strawberry crunch topping: Combine 1 cup diced fresh strawberries with 2 tbsp sugar and ½ cup crushed toasted almonds or pecans for crunch. Scatter this mixture generously over cheesecake filling.
- Bake: Bake at 325°F (163°C) for 18-22 minutes until edges are set but center still slightly jiggly. This ensures a creamy, melt-in-your-mouth texture.
- Cool and chill: Let bites cool at room temperature, then refrigerate at least 2 hours before serving. Chilling firms up the cheesecake perfectly.
- Serve: Remove carefully from tins and arrange on a platter. Optionally drizzle with melted dark chocolate or extra strawberry sauce.
Notes
- For best results, ensure cream cheese is at room temperature for a smooth filling. Store leftovers covered in the refrigerator for up to 3 days.