

The Story of a Chocolatey Mess
My first babka was a funny sight. I was so eager. I braided the dough too fast. Chocolate filling squirted everywhere. My counter looked like a mud puddle. I still laugh at that.
But you know what? That messy bread was still delicious. The lesson is in the trying. That’s why this matters. Cooking is about joy, not perfection. Have you ever had a kitchen mess turn out great? I’d love to hear your story.
Why We Use a Dutch Oven
This pot is like a magic box. The heavy lid traps the steam. That steam makes the bread rise tall. It also gives you a wonderful crust. Doesn’t that smell amazing when you lift the lid?
You can use any heavy pot with a lid. A cast iron one is my favorite. It holds heat so well. This matters because good tools help us. They make baking feel less tricky.
The Secret is in the Chill
This recipe asks you to wait. You chill the dough twice. That might seem boring. But it is the most important step.
Cold dough is much easier to handle. It won’t stick as much. It rolls out nicely. This patience gives you a beautiful braid. Fun fact: Chilling the dough also makes the flavor richer and deeper. Trust the wait.
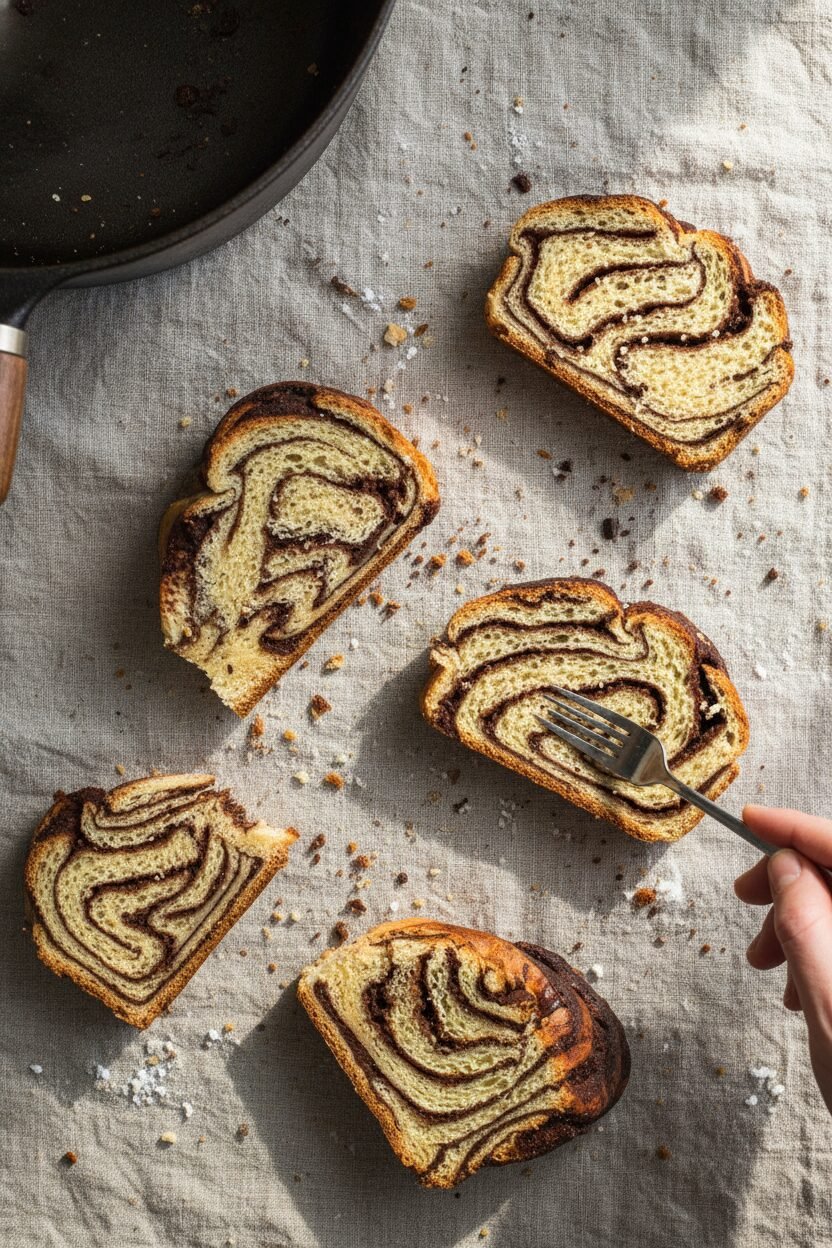
Braiding With Heart, Not Fear
Do not be scared of the braid. Think of it as folding a piece of rope. You just cross one piece over the other. Keep the chocolate swirl facing up. That’s the whole trick.
If it looks messy, just tuck the ends under. The oven hides small mistakes. What’s your favorite shape to bake? A simple round loaf or a fancy braid like this?
A Bread for Sharing
This bread is special. It is not for every day. It is for a slow Sunday. Or for when family visits. The rich chocolate makes it a treat.
Let it cool completely before you slice. I know, the waiting is hard. But a warm slice will be gooey. A cool slice shows perfect swirls. Which do you prefer, warm and messy or cool and neat?
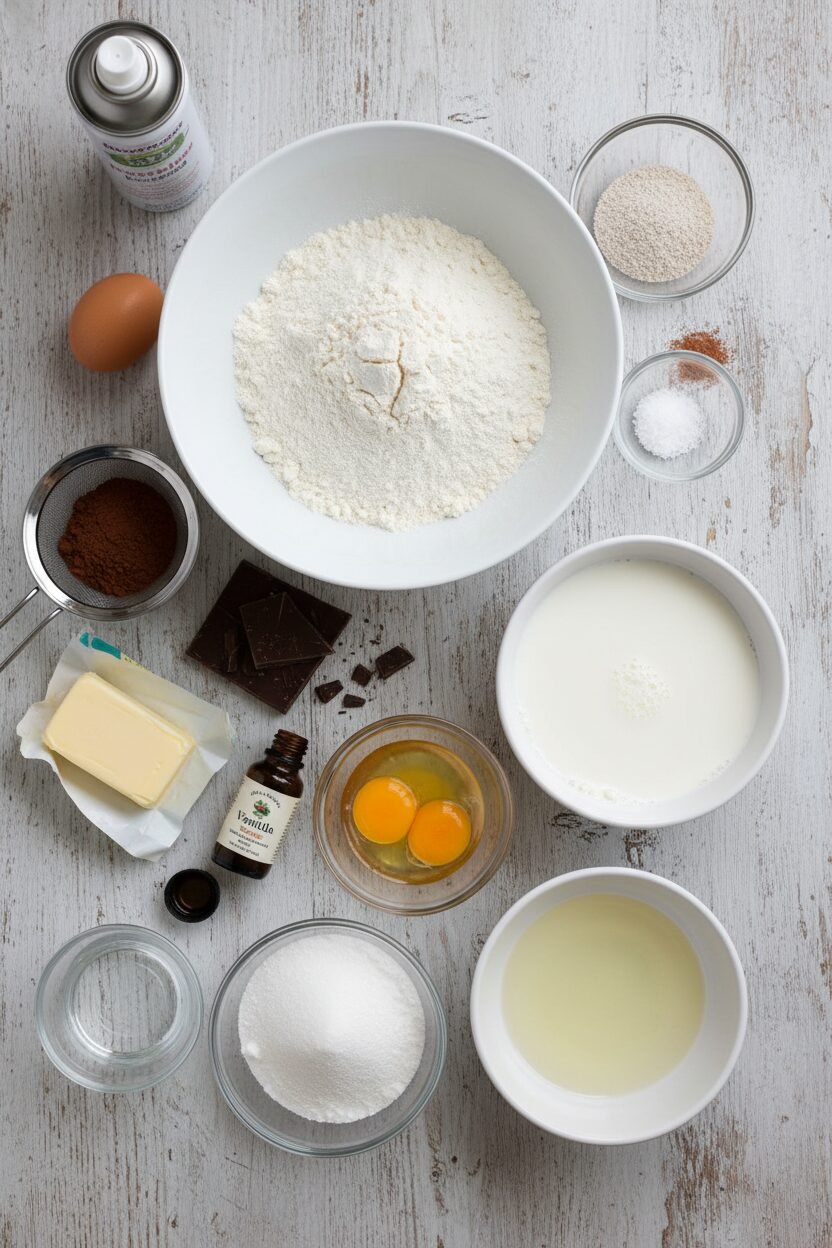
Ingredients:
| Ingredient | Amount | Notes |
|---|---|---|
| All-purpose flour | 4 cups (20 ounces/567 grams) | For the dough |
| Instant or rapid-rise yeast | 1 tablespoon | For the dough |
| Salt | 1 teaspoon | For the dough |
| Whole milk | 1 cup (8 ounces) | Room temperature, for the dough |
| Granulated sugar | ½ cup (3½ ounces/99 grams) | For the dough |
| Large egg yolks | 4 | Room temperature, for the dough |
| Vanilla extract | 2 teaspoons | For the dough |
| Unsalted butter | 16 tablespoons | Softened, for the dough |
| Bittersweet chocolate | 4 ounces (113 grams) | Chopped, for the filling |
| Unsalted butter | 8 tablespoons | For the filling |
| Unsweetened cocoa powder | 6 tablespoons (1⅛ ounces/32 grams) | For the filling |
| Confectioners’ sugar | ½ cup (2 ounces/57 grams) | For the filling |
| Large egg whites | 2 | For the filling |
| Large egg (for wash) | 1 | Lightly beaten with 1 tbsp water and pinch salt |
Instructions
Step 1: First, let’s make the dough. Whisk your flour, yeast, and salt in your mixer’s bowl. In another jug, whisk the milk, sugar, egg yolks, and vanilla. With the mixer on low, slowly pour the wet into the dry. Mix until it comes together. This part is always a bit messy, but that’s okay. (A tip: make sure your milk isn’t cold, or the yeast will sleep!)
Step 2: Now, add the soft butter. Do it one tablespoon at a time. Let the mixer knead it all in. It will look slippery at first. Keep going until the dough is smooth and pulls from the bowl. This takes patience, about 10 minutes. I use this time to wipe the counter.
Step 3: Shape the dough into a nice ball. Place it in a greased bowl, cover it, and let it rise. It should grow by about half. Then, tuck it into the fridge to firm up. You can leave it there overnight. I love starting bread the night before. Do you prefer baking in the morning or evening? Share below!
Step 4: Time for the chocolate filling. Melt the chocolate, butter, and cocoa together. Let it cool completely. This is important. Then whisk in the egg whites. It will become shiny and wonderful. Doesn’t that smell amazing? I still lick the spoon.
Step 5: Roll your chilled dough into a big rectangle. Spread the filling all over, leaving a small border. Roll it up tightly, like a rug. Pinch the seam to seal it. Wrap it and chill it again for 30 minutes. (A hard-learned tip: if the filling is warm, it will melt right out!)
Step 6: Make a foil sling for your Dutch oven. This is your bread’s lift. Lay two foil strips in the pot, crossing them. Spray them well. Now, take your dough log. Cut it in half lengthwise to see the pretty swirls.
Step 7: Here’s the fun braiding part. Lay the two pieces side-by-side, cut sides up. Pinch the top ends together. Cross one piece over the other, keeping the chocolate showing. Repeat to the end and pinch. Twist the whole braid into a spiral. Place it in your prepared pot.
Step 8: Cover the pot and let the dough rise again. It will get puffy. Heat your oven. Gently brush the loaf with the beaten egg wash. This gives it that gorgeous color. Bake it covered for 20 minutes, then uncover.
Step 9: Finish baking until it’s deep golden brown. Use the foil to lift your beautiful bread out. Let it cool completely on a rack. I know waiting is hard. But slicing it warm makes the chocolate ooze. Trust me, it’s worth the wait.
Creative Twists
This bread is a wonderful canvas. You can make it your own. Try a cinnamon-sugar filling instead of chocolate. Just use the same method. Or, sprinkle chopped toasted hazelnuts over the chocolate before rolling. The crunch is lovely. For a festive touch, add a handful of dried cranberries. They look like little jewels in the slices. Which one would you try first? Comment below!
Serving & Pairing Ideas
A slice of this bread is a celebration. For breakfast, just a pat of soft butter is perfect. In the afternoon, try it with a dollop of whipped cream. It feels so fancy. For drinks, a glass of cold milk is the classic choice. It just belongs. For the grown-ups, a small glass of cherry port wine is magical with the chocolate. Which would you choose tonight?
Keeping Your Babka Beautiful
This bread is a special treat. You will want to save some for later. Let it cool completely first. Then wrap it tightly in plastic wrap.
It will stay fresh on the counter for two days. For longer storage, freeze it. Slice it first and wrap each piece. This way you can grab one slice anytime.
I once froze a whole loaf. I had to thaw the entire thing just for one piece! Slicing first is much smarter. To reheat, warm a slice in the toaster.
It brings back that fresh-baked smell. This matters because good food should never be wasted. A little planning means joy for days. Have you ever tried storing it this way? Share below!
Babka Troubles? Easy Fixes Right Here
Sometimes the dough feels too sticky. Do not add more flour right away. Just let it rest for ten minutes. The flour will drink up the moisture.
The filling might leak out during baking. I remember when my first babka looked messy. Make sure your dough log is sealed tightly. Pinch that seam very well.
Your bread might not rise enough. Check that your yeast is fresh. Use warm milk, not hot. Hot milk will make the yeast sleepy.
Fixing small problems builds your cooking confidence. You learn how ingredients work together. It also makes the flavor perfect every time. Which of these problems have you run into before?
Your Quick Questions, Answered
Q: Can I make this gluten-free?
A: I have not tried it myself. A good gluten-free flour blend might work. The texture will be a little different.
Q: How far ahead can I make it?
A: The dough chills for up to 24 hours. This is perfect for making ahead. You can finish it the next day.
Q: What if I don’t have bittersweet chocolate?
A: Semi-sweet chocolate chips will work just fine. The filling will be a bit sweeter. That is okay with me.
Q: Can I make two smaller loaves?
A: Yes, you can split the dough in half. Just use two smaller pots. The baking time will be a little less.
Q: Is the egg wash necessary?
A: It gives the crust a lovely shiny, golden color. You can use just milk instead. But the egg wash is traditional. Which tip will you try first?
From My Kitchen to Yours
I hope you try this festive bread. It is a labor of love. The braiding is like telling a delicious story. Fun fact: The word “babka” means “grandma” in Polish!
I would love to hear about your baking adventure. Did your kitchen smell amazing? Was the braiding fun? Tell me all about it in the comments. Have you tried this recipe?
Happy cooking!
—Elowen Thorn.
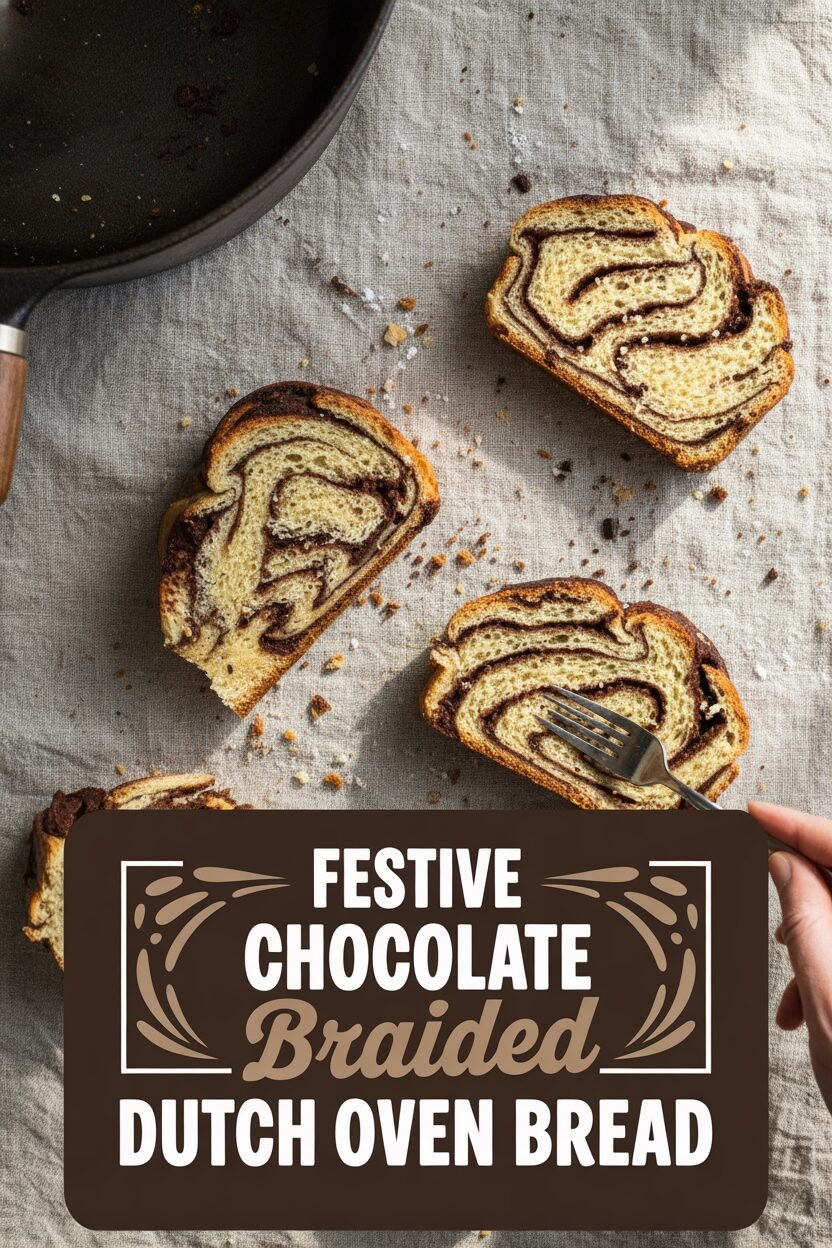

Festive Chocolate Braided Dutch Oven Bread
Description
A stunning, festive loaf of Dutch Oven Braided Chocolate Babka, featuring a rich, buttery dough swirled with a glossy chocolate filling.
Ingredients
Dough:
Filling:
For Brushing:
Instructions
- For the dough: Whisk flour, yeast, and salt together in bowl of stand mixer. Whisk milk, sugar, egg yolks, and vanilla in 4-cup liquid measuring cup until sugar has dissolved. Using dough hook on low speed, slowly add milk mixture to flour mixture and mix until cohesive dough starts to form and no dry flour remains, about 2 minutes, scraping down bowl as needed.
- Increase speed to medium-low, add butter, 1 tablespoon at a time, and knead until butter is fully incorporated, about 4 minutes, scraping down bowl as needed. Continue to knead until dough is smooth and elastic and clears sides of bowl, 10 to 12 minutes.
- Transfer dough to lightly floured counter and knead by hand to form smooth, round ball, about 30 seconds. Place dough, seam side down, in lightly greased large bowl or container, cover tightly with plastic wrap, and let rise until increased in size by about half, 1½ to 2 hours. Place in refrigerator until dough is firm, at least 1 hour or up to 24 hours. (If dough is chilled longer than 1 hour, let rest at room temperature for 15 minutes before rolling out in step 5.)
- For the filling: Microwave chocolate, butter, and cocoa together in medium bowl at 50 percent power, stirring occasionally, until melted, about 3 minutes. Stir in sugar until combined and let cool completely, about 30 minutes. Whisk in egg whites until fully combined and mixture turns glossy.
- Press down on dough to deflate, then transfer to lightly floured counter. Press and roll dough into 18 by 24-inch rectangle, with short side parallel to counter edge. Spread filling over dough, leaving ½-inch border around edges.
- Roll dough away from you into firm, taut cylinder. Pinch seam closed, then reshape cylinder as needed to be 18 inches in length with uniform thickness. Wrap in plastic, transfer to rimmed baking sheet, and refrigerate until firm but still supple, about 30 minutes.
- Make foil sling for Dutch oven by folding 2 long sheets of aluminum foil so each is 7 inches wide. Lay sheets of foil in pot perpendicular to each other, with extra foil hanging over edges of pot. Push foil into bottom and up sides of pot, smoothing foil flush to bottom of pot, then spray with vegetable oil spray.
- Transfer dough log to lightly floured counter, with short side facing you. Using bench scraper or sharp knife, cut log in half lengthwise. Turn dough halves cut sides up and arrange side by side. Pinch top ends together. Lift and place 1 dough half on opposite side of second half. Repeat, keeping cut sides up, until dough halves are tightly braided. Pinch remaining ends together. Twist braided dough into spiral and tuck end underneath. Transfer loaf to prepared pot, cover with lid, and let rise until increased in size by about half, 1½ to 2 hours.
- Adjust oven rack to middle position and heat oven to 350 degrees. Gently brush loaf with egg mixture. Cover pot, transfer to oven, and bake loaf for 20 minutes. Uncover, rotate pot, and continue to bake until loaf is deep golden brown and registers 190 to 195 degrees, 40 to 50 minutes.
- Using foil overhang, lift loaf out of pot and let cool completely on wire rack, about 3 hours.
Notes
- For best results, ensure all ingredients are at room temperature before starting. The dough is very rich and soft; chilling is essential for easy handling. The loaf can be stored, well-wrapped, at room temperature for up to 3 days.