

The Heart of the Home
My kitchen table has seen many pies. This apple pie is a special one. It is deep and full of joy. Making it is like giving a long, warm hug.
It takes a little time. But that time is a gift to yourself. You are making memories, not just dessert. What is your favorite smell from your childhood kitchen? Mine will always be cinnamon and baking apples.
A Little Story About Butter
Good crust needs cold butter. I learned this from my Aunt Mae. She used to say, “Nervous hands make tough pastry.” I still laugh at that.
She meant we should be gentle. Use a light touch. When you mix in the sour cream and water, just pulse the machine. You want little bits of butter left. Fun fact: Those cold butter bits melt in the oven. They create little steam pockets. That is what makes the crust so wonderfully flaky!
Why We Cook the Apples First
This step matters. It fixes the soggy bottom problem. Nobody wants a soggy pie! Cooking the apples first lets out extra juice.
You drain that juice away. Then your filling is just tender apples and spice. It will not make the crust wet. This is the secret to a perfect slice. Do you prefer your apple pie filling soft or with a little bite?
The Patience Part
Chill the dough. Cool the apples. Wait for the pie to bake. Then wait again for it to cool. I know, it is hard!
But this waiting matters too. It lets the filling set. If you cut it too soon, it will run all over the plate. Let it rest for a good, long while. The wait makes that first perfect slice worth it. Doesn’t that smell amazing?
For a Future Sweet Treat
Life gets busy. So you can freeze this pie. You have two choices. Freeze the whole pie ready to bake. Or freeze the parts separately.
I like freezing the cooked apples in a bag. The dough disks go in another. Then, on a busy day, a homemade pie is not so far away. It feels like a gift from your past self. Have you ever successfully frozen a baked good? What was it?
The Apples You Choose
Use two kinds of apples. One tart, like Granny Smith. One sweet, like Honeycrisp. This mix gives you the best flavor.
The tart ones keep their shape. The sweet ones get lovely and soft. Together, they sing. The lemon zest and juice wake everything up. It is a balance, just like life. A little sweet, a little sharp, all held together with love.
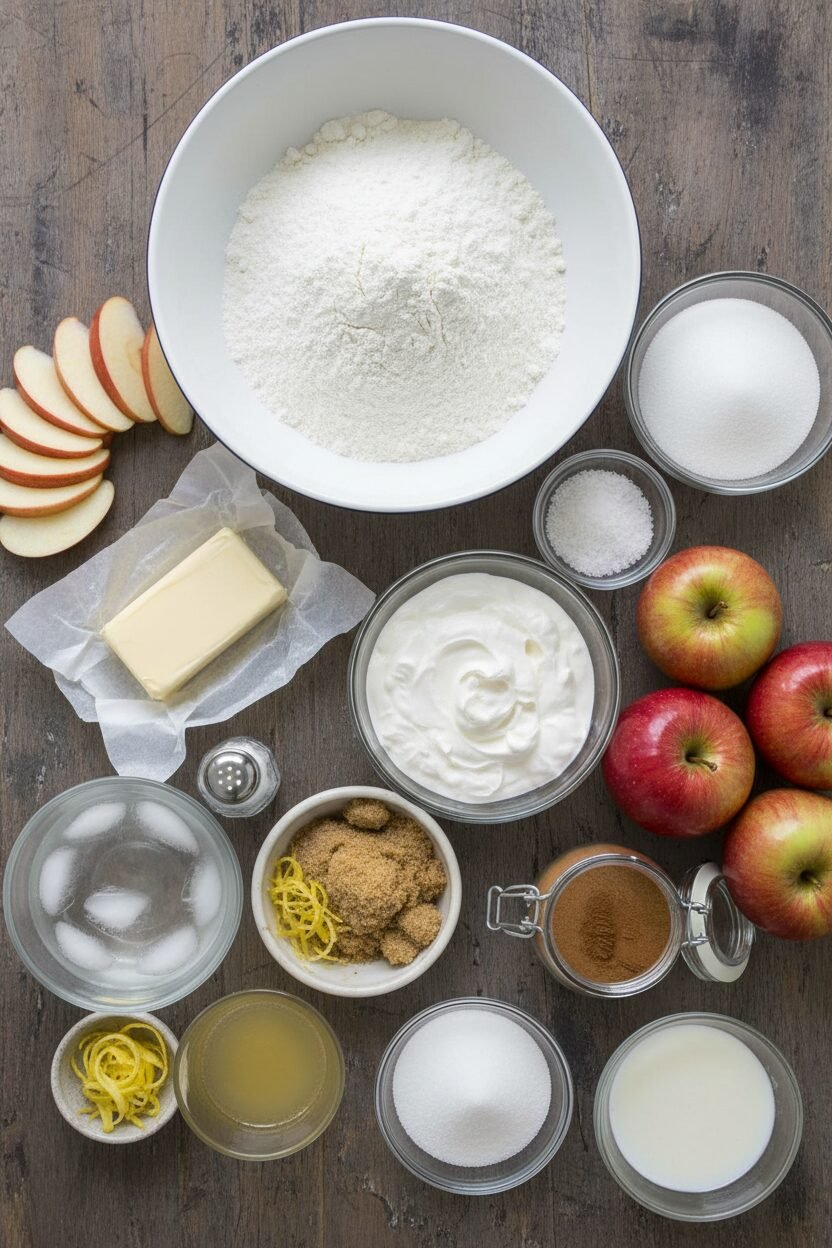
Ingredients:
| Ingredient | Amount | Notes |
|---|---|---|
| Unbleached all-purpose flour | 2 1/2 cups (12 1/2 ounces/354 grams) | Plus additional for work surface |
| Table salt | 1 teaspoon (pastry) + 1/4 teaspoon (filling) | |
| Sugar | 1 tablespoon (pastry) + 1/2 cup + 1 teaspoon (filling) | Granulated |
| Unsalted butter | 16 tablespoons (2 sticks), cold | Cut into 1/2-inch cubes and frozen for 10 minutes |
| Sour cream | 3 tablespoons | |
| Ice water | 1/3 cup | Or more if needed |
| Light brown sugar | 1/4 cup (packed) | |
| Lemon juice | 1 tablespoon | |
| Lemon zest | 1/2 teaspoon (grated) | |
| Ground cinnamon | 1/8 teaspoon | |
| Tart apples (firm) | 2 1/2 pounds (about 5 medium) | Peeled and cut into 1/4-inch-thick slices |
| Sweet apples (firm) | 2 1/2 pounds (about 5 medium) | Peeled and cut into 1/4-inch-thick slices |
| Egg white | 1 | Beaten lightly |
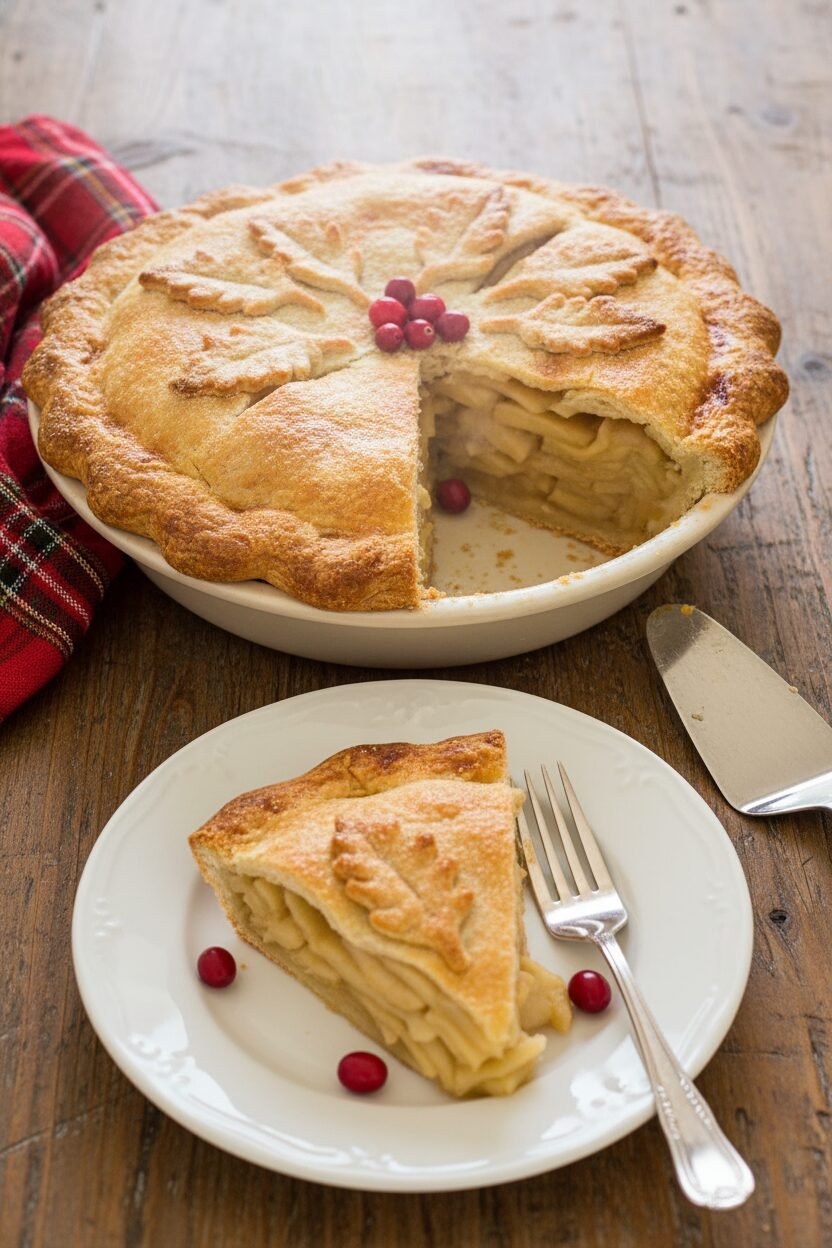
My Festive Deep-Dish Apple Holiday Pie
Hello, my dear. Come sit at the table. Let’s talk about pie. This isn’t just any apple pie. It’s a deep-dish holiday hug. I make it every year when the air turns crisp. The secret is cooking the apples first. It makes them wonderfully tender. Doesn’t that smell amazing? I still laugh at the year I used every bowl in the kitchen. We’ll keep things neat, I promise. This recipe is a gift of time and love. Your family will gather around it. I just know they will.
Instructions
Step 1: Make your pastry dough first. Put the flour, salt, and sugar in your food processor. Give it a quick whirl. Add the very cold butter cubes. Pulse until they look like large peas. Now, mix the sour cream with ice water. Add half to the flour and pulse. Then add the rest. Pinch the dough. Does it hold together? If it’s too dry, add a touch more water. (A hard-learned tip: Keep everything cold for a flaky crust!).
Step 2: Turn the dough onto your counter. Divide it into two balls. Flatten each into a disk. Wrap them tightly in plastic. Let them rest in the fridge. This relaxes the dough so it’s easier to roll. I always do this after lunch for a dinner pie. It needs at least an hour. What’s your favorite part of pie-making so far? Share below!
Step 3: Time for the apples! Mix the sugars, salt, lemon zest, and cinnamon. Toss your apple slices in this sweet mix. Cook them in a big pot until just tender. They should still hold their shape. Let them cool completely on a baking sheet. This step is so important. It keeps your bottom crust from getting soggy.
Step 4: Roll out your first dough disk. Roll it between two sheets of parchment paper. Aim for a 12-inch circle. Peel off one parchment sheet and flip it into your pie plate. Gently press it in. Trim the overhang later. Pop it in the fridge. Roll out the top crust next. Refrigerate it on the parchment sheet. Chilled dough is much easier to handle.
Step 5: Drain your cooled apples well. Shake them in a colander over a bowl. Discard the extra juice. Pile the apples high into your pie plate. Sprinkle them with lemon juice. Now, place your top crust over the mountain of apples. Pinch the top and bottom edges together firmly. Cut a few slits in the top so steam can escape.
Step 6: Brush the top with a beaten egg white. Sprinkle it with a little sugar. This makes it shiny and sweet. Bake your pie on a hot baking sheet. This helps the bottom cook perfectly. Bake until the crust is a deep, golden brown. Let it cool for a good, long while. I know waiting is hard! But it lets the filling set.
Creative Twists
Add a handful of fresh cranberries to the apples for a tart, red surprise.
Mix a spoonful of caramel sauce into the apples before filling the pie.
Sprinkle a crumble topping on the apples instead of using a top crust.
Which one would you try first? Comment below!
Serving & Pairing Ideas
Serve a warm slice with a scoop of vanilla ice cream. The melt is the best part. A sharp cheddar cheese slice on the side is a classic, cozy choice. For a drink, a hot mug of spiced apple cider is perfect. For the grown-ups, a small glass of sweet sherry pairs beautifully. It tastes like the holidays should. Which would you choose tonight?
Keeping Your Pie Perfect
Let’s talk about keeping your pie lovely. A cooled pie stays fresh on the counter for two days. Just cover it with a bowl. For longer, pop it in the fridge.
You can freeze this pie, too. I once froze a whole pie for my grandson’s surprise visit. It baked up beautifully! Freeze it before baking for up to two weeks.
For a longer freeze, keep the filling and dough separate. This way, you can have a pie ready anytime. Batch cooking matters. It turns a busy day into a cozy one.
Have you ever tried storing it this way? Share below!
Simple Fixes for Common Pie Problems
First, a soggy bottom crust. Pre-cook your apples. This removes extra juice. Your crust will stay crisp and flaky.
Second, tough pastry. Use very cold butter. I remember when my butter was too soft. The crust was hard. Cold butter makes it tender.
Third, the filling is too runny. Drain those cooked apples well. Shake them in a colander. This step is key for perfect slices.
Fixing these issues builds your confidence. It also makes your pie taste amazing. Every bite will be just right.
Which of these problems have you run into before?
Your Quick Questions, Answered
Q: Can I make this gluten-free?
A: Yes! Use your favorite gluten-free flour blend. The texture will be a bit different, but still tasty.
Q: Can I make it ahead?
A: Absolutely. Make the dough disks up to a day ahead. Keep them in the fridge until you’re ready.
Q: What if I don’t have sour cream?
A: Plain yogurt works just fine. It adds the same nice tang to your pastry.
Q: Can I make a smaller pie?
A: You can halve the recipe. Use a smaller pie dish. Just watch the baking time.
Q: Any optional tips?
A: Try a pinch of nutmeg in the filling. *Fun fact: Nutmeg was once worth more than gold!*
Which tip will you try first?
From My Kitchen to Yours
I hope you love making this deep-dish pie. It fills your home with the best smell. That smell is love and memories.
I would love to see your creation. Share a photo of your slice. Let’s build a little community of bakers.
Have you tried this recipe? Tag us on Pinterest!
Happy cooking!
—Elowen Thorn.
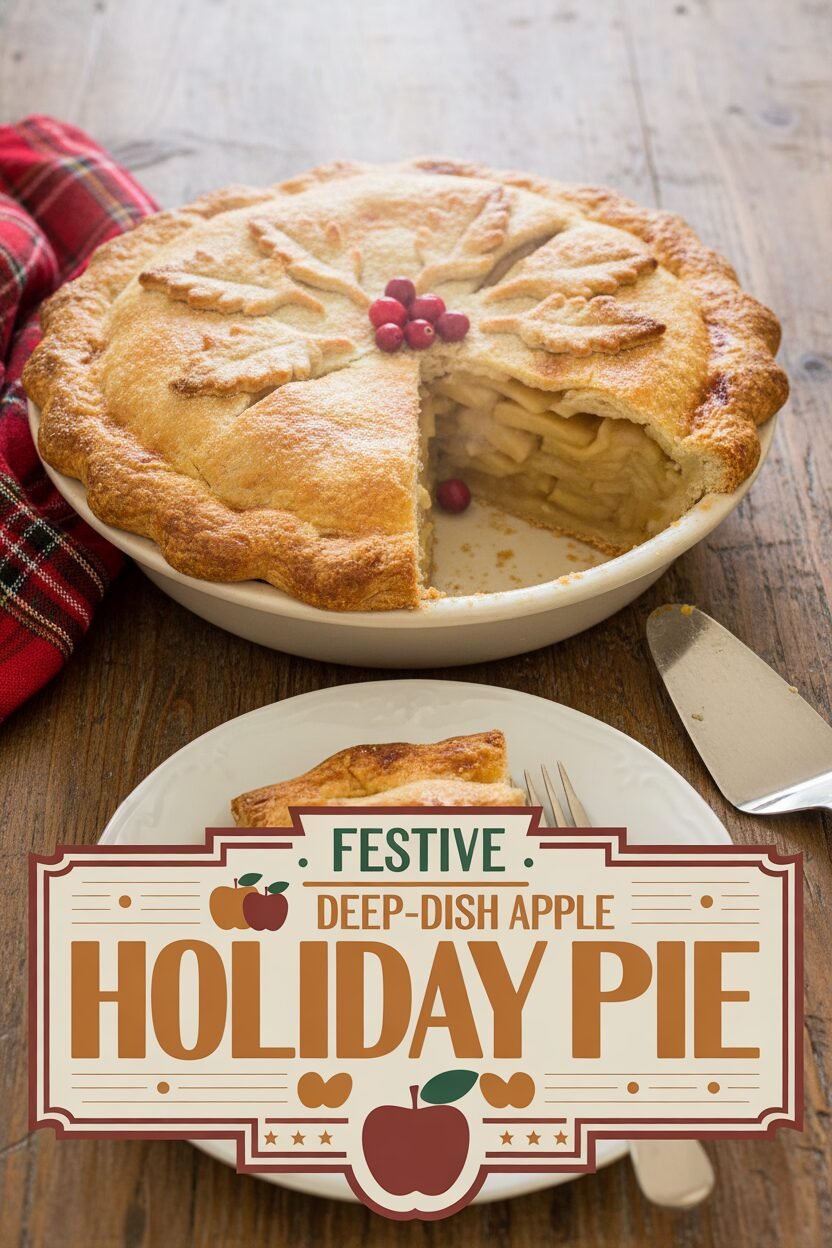

Festive Deep-Dish Apple Holiday Pie
Description
A classic, rich deep-dish apple pie with a flaky all-butter crust and a perfectly spiced, tender apple filling.
Ingredients
All-Butter Pie Pastry
Apple Filling
Instructions
- For pastry: Process flour, salt, and sugar together in food processor until combined, about 3 seconds. Add butter and pulse until butter is size of large peas, about ten 1-second pulses.
- Using fork, mix sour cream and 1/3 cup ice water in small bowl until combined. Add half of sour cream mixture to flour mixture; pulse for three 1-second pulses. Repeat with remaining sour cream mixture. Pinch dough with fingers; if dough is floury, dry, and does not hold together, add 1 to 2 tablespoons ice water and process until dough forms large clumps and no dry flour remains, three to five 1-second pulses.
- Turn dough out onto work surface. Divide dough into 2 balls and flatten each into 4-inch disk; wrap each disk in plastic and refrigerate until firm but not hard, 1 to 2 hours, before rolling. (Dough can be refrigerated for up to 24 hours. Let thoroughly chilled dough stand at room temperature for 15 minutes before rolling.)
- For pie: Mix 1/2 cup granulated sugar, brown sugar, salt, zest, and cinnamon in large bowl; add apples and toss to combine. Transfer apples to Dutch oven (do not wash bowl) and cook, covered, over medium heat, stirring frequently, until apples are tender when poked with fork but still hold their shape, 15 to 20 minutes. Transfer apples and juices to rimmed baking sheet and cool to room temperature, about 30 minutes. While apples cool, adjust oven rack to lowest position, place empty rimmed baking sheet on rack, and heat oven to 425 degrees.
- Remove 1 disk of dough from refrigerator and roll out between 2 large sheets of parchment paper or plastic wrap to 12-inch circle, about 1/8 inch thick. (If dough becomes soft and/or sticky, return to refrigerator until firm.) Remove parchment from one side of dough and flip onto 9-inch pie plate; peel off second layer of parchment. Ease dough into plate. Leave overhang; refrigerate until firm, about 30 minutes.
- Meanwhile, roll second disk of dough between 2 large sheets of parchment paper or plastic wrap to 12-inch circle, about 1/8 inch thick. Refrigerate, leaving dough between parchment sheets, until firm, about 30 minutes.
- Set large colander over now-empty bowl; transfer cooled apples to colander. Shake colander to drain off as much juice as possible; discard juice. Transfer apples to dough-lined pie plate; sprinkle with lemon juice.
- Remove parchment from one side of remaining dough and flip dough onto apples; peel off second piece of parchment. Pinch edges of top and bottom dough rounds firmly together. Trim and seal edges, then cut four 2-inch slits in top of dough. Brush surface with beaten egg white and sprinkle evenly with remaining teaspoon sugar.
- Set pie on preheated baking sheet; bake until crust is dark golden brown, 45 to 55 minutes. Transfer pie to wire rack and cool at least 1 1/2 hours. Cut into wedges and serve.
- Freezing instructions: For an assembled pie, freeze for 2-3 hours after sealing crust (no egg wash), then wrap tightly in plastic and foil. To bake, add egg wash and sugar, cut slits, and bake 5-10 minutes longer. For longer storage, freeze cooked apple filling and pie dough disks separately. Thaw in fridge overnight before assembling and baking as directed.
Notes
- Use a mix of firm tart (like Granny Smith) and firm sweet (like Honeycrisp) apples for the best texture and flavor balance.