

My First Whoopie Pie
I made my first whoopie pie at age ten. It was a messy, wonderful disaster. My brother ate three before dinner. I still laugh at that.
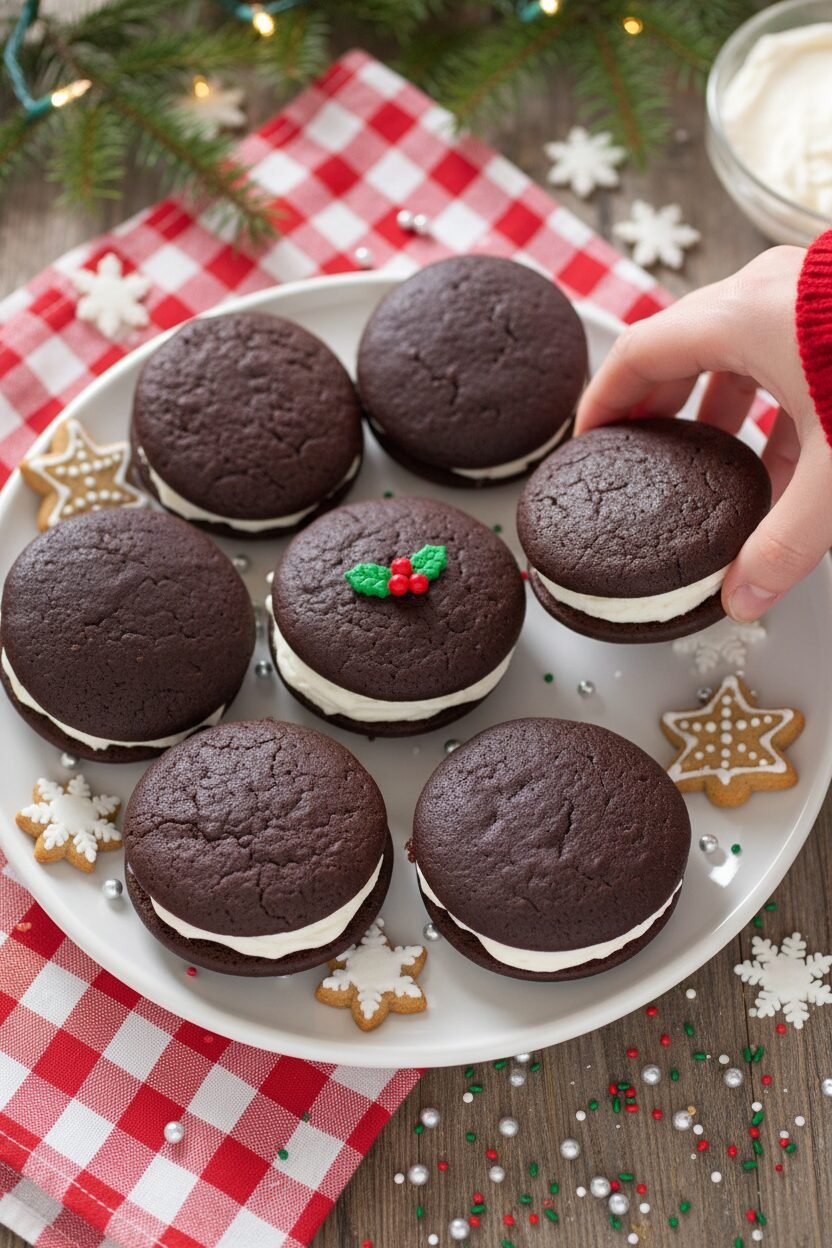
This recipe is my favorite. It feels like a hug. The cakes are soft and dark. The filling is sweet and fluffy. Doesn’t that sound good?
Why We Make Them
Sharing food is sharing love. That is why this matters. A whoopie pie is made for sharing. You split it with a friend.
Making them together is even better. It is not just about eating. It is about the time spent. That time is a gift.
Kitchen Talk & Tips
Let’s talk about the batter. Do not over-mix it. Just stir until it comes together. A few lumps are just fine.
Give the cakes space on the pan. They need room to grow. Switch the pans in the oven. This helps them bake evenly. What is your favorite thing to bake with a friend?
The Magic of the Filling
The filling must be fluffy. Beat the butter and sugar well. It should look like a cloud. Then you add the Fluff.
Fun fact: Some say the name “whoopie pie” came from happy shouts. People would yell “Whoopie!” when they saw them. Chilling the filling is key. It makes the pies easier to put together. Trust me on this.
Putting It All Together
Be generous with the filling. Use a big dollop in the middle. Gently press the top cake on. Watch the filling reach the edges.
That moment is so satisfying. This is why it matters. You made something whole from two parts. Do you like your treats chewy or cakey?
Your Turn to Share
These pies are perfect for a party. They make people smile. Wrap one up for someone special. It is a little surprise.
I would love to hear your stories. Did you try this recipe? What flavor would you make next? Tell me all about it.
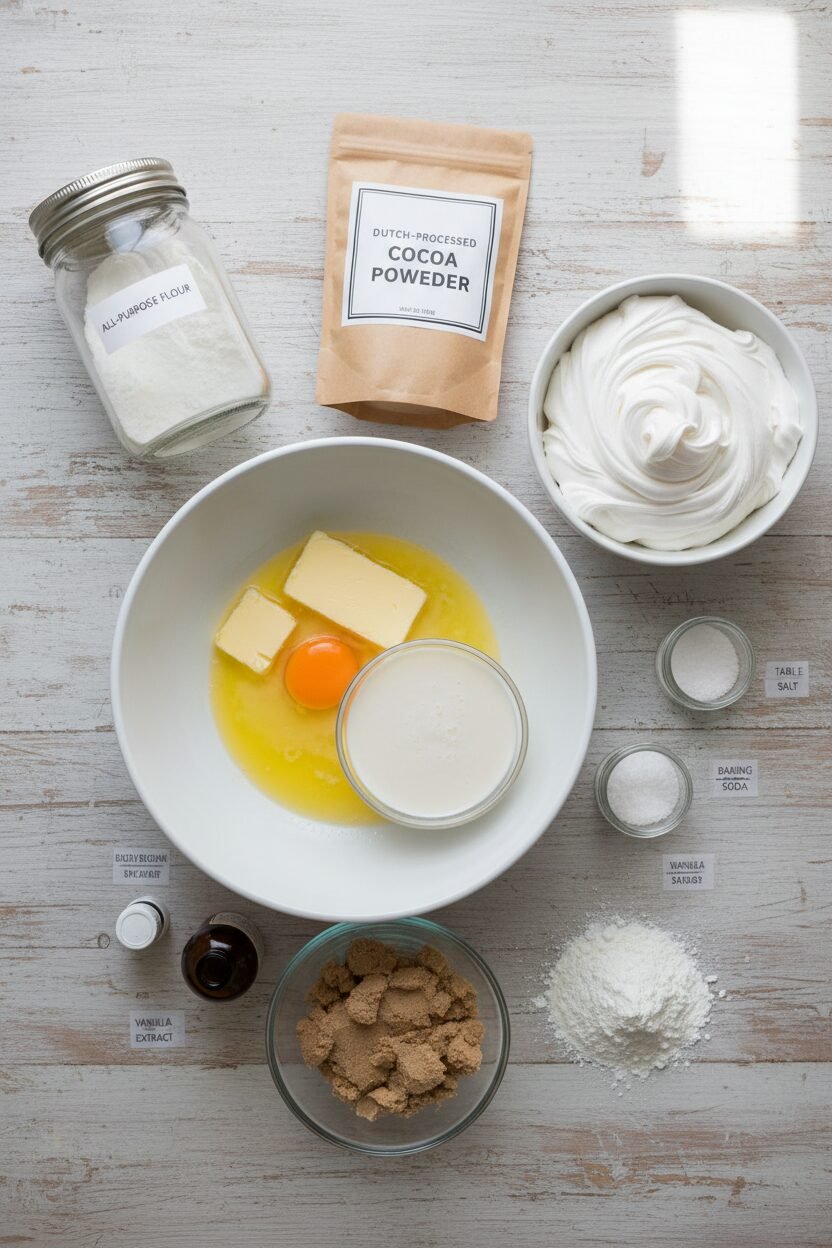
Ingredients:
| Ingredient | Amount | Notes |
|---|---|---|
| All-purpose flour | 2 cups (10 ounces/283 grams) | For the cakes |
| Dutch-processed cocoa powder | ½ cup (1½ ounces/43 grams) | For the cakes |
| Baking soda | 1 teaspoon | For the cakes |
| Table salt | ½ teaspoon | For the cakes |
| Light brown sugar | 1 cup packed (7 ounces/198 grams) | For the cakes |
| Unsalted butter | 8 tablespoons (1 stick) | For the cakes; softened but still cool |
| Large egg | 1 | For the cakes; room temperature |
| Vanilla extract | 1 teaspoon | For the cakes |
| Buttermilk | 1 cup | For the cakes |
| Unsalted butter | 12 tablespoons (1½ sticks) | For the filling; softened but still cool |
| Confectioners’ sugar | 1 ¼ cups (5 ounces/142 grams) | For the filling |
| Vanilla extract | 1 ½ teaspoons | For the filling |
| Table salt | ⅛ teaspoon | For the filling |
| Marshmallow Fluff | 2 ½ cups | For the filling |
Instructions
Step 1: First, get your oven ready. Move your racks to the top and bottom spots. Heat the oven to 350 degrees. Line two pans with parchment paper. Now, grab a medium bowl. Whisk your flour, cocoa, baking soda, and salt together. Doesn’t that cocoa smell wonderful? It reminds me of my old baking cupboard.
Step 2: Let’s make the cake batter. Use your mixer to beat the brown sugar and butter. Do this until it looks fluffy and light. This takes about 4 minutes. Add the egg and vanilla, mixing well. Now, add the dry ingredients and buttermilk in parts. Start and end with the flour mix. (A little tip: scrape the bowl sides often for a smooth batter.)
Step 3: Scoop the batter onto your pans. Use a 1/3 cup for each mound. You should get 6 mounds per pan. Give them space to spread. Bake for 15 to 18 minutes. Switch the pan positions halfway through. The cakes are done when they spring back from a gentle press. Let them cool completely right on the pans. This takes about an hour. What’s your favorite part of waiting for treats to cool? Share below!
Step 4: Time for the fluffy filling! Beat the butter and powdered sugar together. Do this for 2 minutes until it’s creamy. Mix in the vanilla and salt. Now, add the Marshmallow Fluff. Beat it all for another 2 minutes. Pop the bowl in the fridge. Let it get slightly firm for 30 minutes. I still laugh at how fluffy this gets.
Step 5: Let’s assemble our whoopie pies! Take a cooled cake. Dollop a big 1/3 cup of filling on its flat side. Gently press another cake on top. The filling will squish to the edges. That’s perfect! You can eat them right away. Or, chill them for a bit. The filling gets even nicer when it’s cool. (Always store extras in a sealed container in the fridge.)
Creative Twists
These little cakes love to play dress-up. You can make them special in so many ways. Try adding a dash of peppermint extract to the filling. It tastes like a winter holiday. Or, roll the edges in festive sprinkles or crushed candy canes. They look so cheerful. For a cozy flavor, add a pinch of cinnamon to the cocoa batter. It smells like my grandma’s kitchen. Which one would you try first? Comment below!
Serving & Pairing Ideas
These are a treat all on their own. But I love serving them on a big platter. A dusting of powdered sugar on top looks like snow. A glass of cold milk is the classic choice. It’s the perfect partner. For the grown-ups, a cup of hot coffee with a splash of Irish cream is lovely. The chocolate and coffee are best friends. Which would you choose tonight?
Keeping Your Whoopie Pies Happy
These treats are best enjoyed fresh. But I always make a double batch. Store cooled whoopie pies in an airtight container. They will keep in the fridge for up to three days.
You can freeze them for a month, too. Wrap each pie tightly in plastic wrap. Then place them all in a freezer bag. I once forgot a batch in my freezer for weeks. They were still a delightful surprise later!
Let them thaw in the fridge overnight before serving. This little bit of planning matters. It means you always have a sweet homemade gift ready. Have you ever tried storing it this way? Share below!
Baking Troubles? Easy Fixes Right Here
First, flat cakes. Your butter might be too warm. It should be soft but still cool to the touch. I remember when my cakes spread into pancakes. Now I check my butter first.
Second, dry cakes. Do not overmix the batter. Stir just until the flour disappears. This keeps them tender and soft. Good texture makes every bite a joy.
Third, runny filling. Your filling must be chilled. If it’s too soft, pop the bowl back in the fridge. A firm filling holds the cakes together nicely. It makes your creation look professional. Which of these problems have you run into before?
Your Quick Questions, Answered
Q: Can I make these gluten-free? A: Yes. Use a good gluten-free flour blend. I like the ones labeled for baking.
Q: Can I make parts ahead? A: Absolutely. Bake the cakes a day early. Make the filling up to two days ahead.
Q: No buttermilk? A: Make your own. Mix one cup milk with one tablespoon lemon juice. Let it sit for five minutes.
Q: Can I make them smaller? A: For sure. Use a smaller scoop. Just bake them for less time.
Q: Any fun twist? A: Add a pinch of cinnamon to the cake batter. It gives a warm, cozy flavor. Which tip will you try first?
*Fun fact: Whoopie pies are the official state treat of Maine!*
Share Your Kitchen Stories
I hope you have fun making these. Baking is about sharing joy with others. It is one of my favorite things to do.
I would love to hear about your baking adventures. Tell me all about it in the comments below. Have you tried this recipe? Let me know how it turned out for you.
Happy cooking!
—Elowen Thorn.


Festive Whoopie Pie Holiday Collection
Description
A festive holiday treat featuring soft, chocolatey cakes sandwiched with a sweet and fluffy marshmallow filling.
Ingredients
Cakes:
Filling:
Instructions
- For the cakes: Adjust oven racks to upper-middle and lower-middle positions and heat oven to 350 degrees. Line 2 baking sheets with parchment paper. Whisk flour, cocoa powder, baking soda, and salt in medium bowl.
- With electric mixer on medium speed, beat sugar and butter in large bowl until fluffy, about 4 minutes. Beat in egg until incorporated, scraping down sides of bowl as necessary, then beat in vanilla. Reduce speed to low and beat in one-third of flour mixture, then half of buttermilk. Repeat with half of remaining flour mixture, then remaining buttermilk, and finally remaining flour mixture. Using rubber spatula, give batter final stir.
- Using 1/3-cup measure, scoop 6 mounds of batter onto each baking sheet, spacing mounds about 3 inches apart. Bake until cakes spring back when pressed, 15 to 18 minutes, switching and rotating pans halfway through baking. Cool completely on baking sheets, at least 1 hour.
- For the filling: With electric mixer on medium speed, beat butter and sugar together until fluffy, about 2 minutes. Beat in vanilla and salt. Beat in Fluff until incorporated, about 2 minutes. Refrigerate filling until slightly firm, about 30 minutes. (Bowl can be wrapped and refrigerated for up to 2 days.)
- Dollop 1/3 cup filling on center of flat side of 6 cakes. Top with flat side of remaining 6 cakes and gently press until filling spreads to edge of cake. Serve. (Whoopie pies can be refrigerated in airtight container for up to 3 days.)
Notes
- Nutritional information is an estimate based on the ingredients listed. For best results, ensure cakes are completely cool before assembling.