

My First Pita Surprise
I remember my first try at homemade pita bread. I was so nervous. The dough felt sticky and strange. But then, it puffed up like a little pillow in the pan. I still laugh at that. It felt like a small kitchen miracle. Seeing it puff tells you the heat is just right. That’s the joy of this easy pita bread. You don’t need any special tools. Just a bowl and a pan. Making it yourself matters. You know exactly what’s in your food. No mystery ingredients. Just simple, good stuff.Why Instant Yeast is Your Friend
Let’s talk about that instant yeast pita bread. The recipe uses instant yeast. It’s a wonderful little helper. You just mix it right in with the flour. No waiting for it to foam first. It makes everything quicker. *Fun fact: yeast is actually tiny living things!* They eat the sugar and make the dough rise. That’s how you get that soft, fluffy pita bread. If your dough doesn’t puff, your yeast might be sleepy. Just start fresh with a new packet. Have you ever baked with yeast before? What did you make?The Magic of Garlic Herb Butter
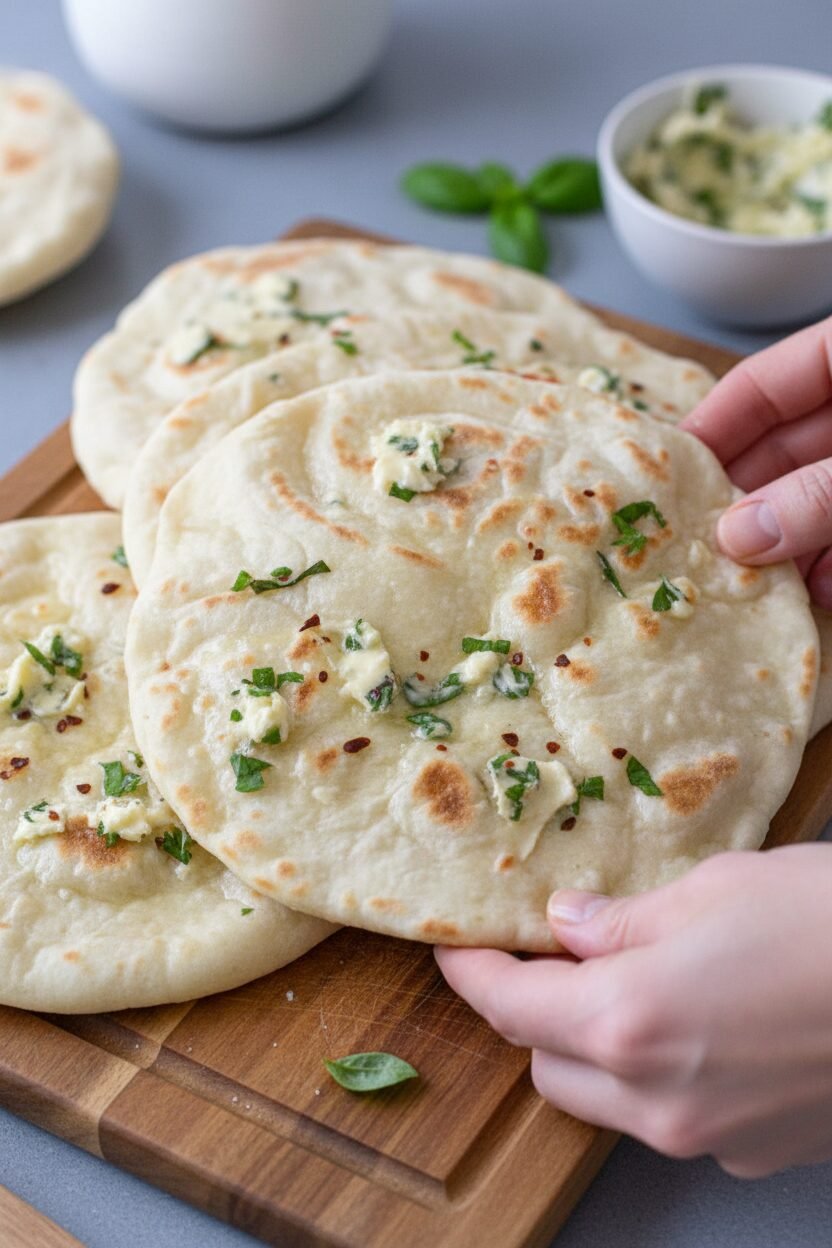
Now, for the best part. The garlic herb butter pita topping. You mix soft butter with fresh garlic and herbs. Doesn’t that smell amazing? I like to add a little parmesan cheese. It makes it salty and rich. You brush this on the warm bread right from the pan. The heat melts the butter into every pore. This step matters. It turns simple bread into something special. It’s warm, fragrant, and utterly delicious. What’s your favorite herb? I love basil in mine.How to Make Pita Bread Perfectly
The key to learning how to make pita bread is the pan. Get it nice and hot before you add the dough. A medium-high heat is perfect. Cook each side for just a minute or two. Look for those golden spots and a little puff. Then, roll out your next ball while one cooks. It’s a fun little rhythm. This garlic pita bread recipe is so forgiving. Even if they don’t all puff, they still taste wonderful. They will be soft, warm, and ready for that garlic butter. Do you prefer your pita cut into triangles or left whole for dipping?More Than Just Bread
This isn’t just a snack. This homemade pita bread is a start to a meal. It’s like the Greek pita bread you get at restaurants. You can use it for souvlaki pita bread, stuffed with grilled meat and veggies. My favorite way is to serve it with a cool bowl of tzatziki and pita. The creamy yogurt sauce is perfect with the garlic. It’s a simple, happy meal. It connects us to places and people. Food is a story you can eat. What’s a food that brings back a happy memory for you? I’d love to hear your story.Ingredients:
| Ingredient | Amount | Notes |
|---|---|---|
| Fleischmann’s instant yeast | 1 packet (8g or 2 1/4 tsp) | |
| Lukewarm water | 1 cup | |
| Sugar | 1/4 teaspoon | |
| Olive oil (for dough) | 1/4 cup | |
| All-purpose flour | 2 ½ cups + 1 tablespoon | |
| Salt (for dough) | 1/2 teaspoon | |
| Olive oil (for frying) | 1/4 cup | |
| Garlic cloves | 2-3 cloves | Peeled, grated or minced |
| Butter | 1/4 cup | Softened |
| Fresh parsley & basil | 1 tablespoon total | Diced, adjust to taste |
| Salt (for butter) | 1/8 teaspoon | Adjust to taste |
| Parmesan cheese | 1 tablespoon | Optional, adjust to taste |

Instructions
Step 1: Let’s wake up the yeast. Mix the lukewarm water, yeast, and sugar. Give it a good stir. Let it sit for five minutes. It should get foamy and happy. I still laugh at that. It looks like a tiny science experiment!
Step 2: Now, make your dough. Pour in the olive oil and flour. Add the salt too. Mix it all until a soft ball forms. Let it rest in a warm spot. It will grow big and puffy. (Always use a warm, draft-free spot for the best rise.)
Step 3: Make the garlic herb butter while you wait. Smash the garlic cloves. Mix them with soft butter and herbs. Doesn’t that smell amazing? Add a pinch of salt. This butter makes your homemade pita bread so special.
Step 4: Time to shape and cook! Divide your dough into eight balls. Roll each one out flat. Heat a pan with a little oil. Cook each piece for a minute or two per side. What do you think makes pita bread puff up? Share below! You’ll see golden spots.
Step 5: Finish your garlic pita bread recipe. Take the warm bread from the pan. Brush it right away with your garlic herb butter. The butter will melt into every little pore. Slice it into triangles or keep it whole. Your easy pita bread is ready to eat!
Creative Twists
… Add a sprinkle of everything bagel seasoning on the butter.… Mix a spoonful of sun-dried tomato paste into your dough.
… Use your fluffy pita bread as a pizza crust!
Which one would you try first? Comment below!
Serving & Pairing Ideas
This garlic herb butter pita is perfect with a bowl of soup. It’s also great for dipping in tzatziki and pita. You can even use it for souvlaki pita bread sandwiches. Just fill it with grilled chicken and veggies. Which would you choose tonight?
Keeping Your Garlic Pita Bread Fresh and Tasty
Let’s talk about storing your homemade pita bread. Keep it soft by storing it in a bread bag or airtight container. It will last about two days on the counter. For longer storage, the freezer is your friend. I wrap each pita in plastic wrap first.
Then I place them all in a freezer bag. This stops them from sticking together. You can grab just one whenever you want it. To reheat, a warm skillet works best. Just warm it for 30 seconds per side. The microwave can make it chewy.
I remember my first batch of pita. I left it out uncovered. It turned into a cracker by morning! Batch cooking matters because it saves you time. Having fluffy pita bread ready means a quick, delicious meal is always close. Have you ever tried storing it this way? Share below!
Simple Fixes for Common Pita Problems
Even grandmas have kitchen troubles sometimes. Here are three common issues with easy fixes. First, your dough didn’t rise. Your yeast might be old. Always test it in warm water with a pinch of sugar. It should get foamy in five minutes.
Second, your pita didn’t puff up. Your pan might not be hot enough. Wait until a drop of water sizzles on the surface. I once was too impatient and my pita stayed flat. Third, the garlic butter tastes too sharp. Raw garlic can be strong. Letting the butter sit for an hour mellows the flavor beautifully.
Fixing these issues matters for your confidence. Knowing why things happen makes you a better cook. It also matters for flavor. A perfect, fluffy pocket holds more tasty fillings! Which of these problems have you run into before?
Your Quick Questions, Answered
How to make garlic infused olive oil for pita bread?
Warm 1/4 cup olive oil in a small pan over low heat. Add two sliced garlic cloves. Cook for 3-5 minutes until the garlic is soft and fragrant. Do not let the garlic brown or burn. Let the oil cool completely. Then strain out the garlic pieces. Brush this flavorful oil on your warm pita bread for a delicious taste.
Can you use garlic powder instead of fresh garlic for pita bread?
Yes, you can use garlic powder. It gives a different, milder flavor. For the garlic herb butter, use about 3/4 teaspoon of garlic powder. Mix it directly with the softened butter and herbs. The powder blends in smoothly. Remember, you cannot make garlic infused oil with dry powder. Fresh garlic is best for that method. Both ways make tasty pita.
What dishes pair well with garlic pita bread?
This easy pita bread is a perfect side. It is classic with soups and salads. Tear it apart for dipping in hummus or tzatziki. It makes a great wrap for souvlaki pita bread with grilled meat. You can also serve it with pasta dishes. My family loves it with a simple chickpea stew. It soaks up all the good juices.
How to store homemade garlic pita bread to keep it soft?
Let the pita bread cool completely first. Then place it in a plastic bread bag or an airtight container. Keep it at room temperature for 1-2 days. For longer storage, freeze it. Wrap each pita in plastic wrap. Put all wrapped pitas in a freezer bag. This garlic pita bread recipe yields soft bread that stays soft when stored right.
Can you make garlic pita bread without a yeast dough?
You can make a flatbread without yeast. Use baking powder as the leavener. The texture will be different, more like a dense naan. It will not puff up to form a pocket. But it will still be tasty with garlic herb butter brushed on top. For traditional fluffy pita bread with a pocket, instant yeast pita bread dough is best.
Tips for getting the perfect pocket in garlic pita bread?
Your pan must be very hot before you add the dough. A drop of water should sizzle and dance. Roll the dough balls evenly, not too thin. Do not move the pita for the first minute of cooking. You will see it start to bubble and puff. *Fun fact: The steam from the dough creates the pocket!* Flip it once large bubbles form.
Which tip will you try first?
From My Kitchen to Yours
I hope you love this easy pita bread recipe. Cooking is about sharing and making memories. The smell of garlic and warm bread is a happy one. It reminds me of family gathered around the table. I would love to hear about your cooking adventure.
Have you tried this recipe? Tell me how it turned out for you. Did your pita puff up? What did you serve it with? Your stories make my day. Please share them in the comments below. Thank you for spending time in my kitchen today.
Happy cooking!
—Danielle Monroe

Garlic Infused Homemade Pita Bread
Description
Quick, Easy and Homemade Garlic Pita Bread Recipe
Ingredients
Instructions
- Prepare the yeast mixture. In the bowl of a stand mixer, combine lukewarm water, one packet of instant rise yeast, and sugar. Whisk until dissolved. This next step isn’t necessary with instant yeast, but I like to cover the bowl with a clean towel and let the mixture rest for 5-10 minutes. The yeast should start to bubble. If it didn’t then the yeast could be expired. If that’s the case, it’s best to start over with a new packet of fresh instant yeast.
- Add the olive oil and dry ingredients. Add the olive oil to the yeast mixture. With the mixer on low, using a paddle attachment, add in the flour and salt. Mix until a dough ball forms, then turn off the mixture. Lightly grease a large clean bowl with olive oil. Place the dough ball in the bowl, cover with a kitchen towel, and let it rise in a warm spot for 30-45 minutes, or until doubled in size.
- Make the garlic herb butter. In a small bowl, combine the softened butter, minced or grated garlic, salt, fresh Italian parsley or fresh basil. Mix together and set aside. You could also add a tablespoon of grated parmesan cheese and red chilli flakes.
- Portion the dough and fry the pita bread. Once the dough has doubled in size, transfer it to a clean surface and knead for a few minutes. Roll the dough into a ball, then cut it into four pieces. Cut each piece in half, giving you eight pieces. Roll each piece into a ball and cover them with a clean kitchen towel to prevent the dough from drying out. Heat a non-stick frying pan with a little olive oil over medium-high heat, and ensure that the frying pan is hot. Fry the rolled-out pita on medium-high heat for 1-2 minutes on either side or until golden brown and slightly puffy.
- Brush one side generously with the garlic herb butter mixture. Spread the herb garlic butter over the warm pitas. Cut the pita bread into triangles or leave them whole. Enjoy!
Notes
- For added flavor, top with spicy Sriracha mayo, mango salsa, or use marinated tofu for a vegetarian option.