

The Heart of the Hearth
My kitchen smells like a warm hug today. I’m making my Golden Honey Wheat Christmas Rolls. The honey is from Mr. Jenkins’ farm down the road. It tastes like summer flowers.
Baking bread is a quiet kind of magic. You mix simple things. Then you wait. The dough grows all puffy and full of air. It feels like a little miracle every single time. That’s why this matters. It teaches you patience and hope.
A Little Story About Waiting
My grandson Leo used to peek in the oven. He’d ask if the rolls were done every two minutes. I still laugh at that. I told him the yeast was having a tiny party. They needed time to dance and make the dough fluffy.
That’s what the rising time is for. The yeast eats the honey and gets happy. It makes the bread soft and light. Rushing it makes tough rolls. Good things need their own sweet time. Do you have a food you loved watching someone make?
Why This Recipe Works
This recipe uses two flours. The whole wheat gives a nutty, hearty taste. The all-purpose flour makes sure the rolls stay tender. They work together like old friends. Doesn’t that smell amazing when they bake?
The honey does two jobs. It feeds the yeast to help the dough rise. It also gives a gentle sweetness. You taste it, but it’s not like cake. Fun fact: honey has been used in bread for thousands of years. It even helps keep bread moist!
The Shape of Comfort
Shaping the rolls is my favorite part. You take a piece of dough. You pinch and pull the edges underneath. You cup it in your hand and roll it on the counter. This makes a smooth, tight ball.
Why does this matter? A tight shape helps the roll rise up, not just spread out. You get a tall, pretty bun. All your rolls will be the same size. That means they bake evenly. Everyone gets a perfect one. Do you like your rolls round, or do you shape them differently?
A Trick for Busy Days
Life gets busy. You can make these rolls ahead. After you shape them, cover the dish. Put it in the fridge for a whole day. The slow, cold rise makes the flavor even deeper.
When you’re ready, let them sit on the counter for half an hour. Then bake. The smell will fill your house. It tells everyone that something good is coming. That final brush of honey butter? It gives a shiny, sweet crust. Pure joy. What’s your favorite make-ahead dish for busy weeks?
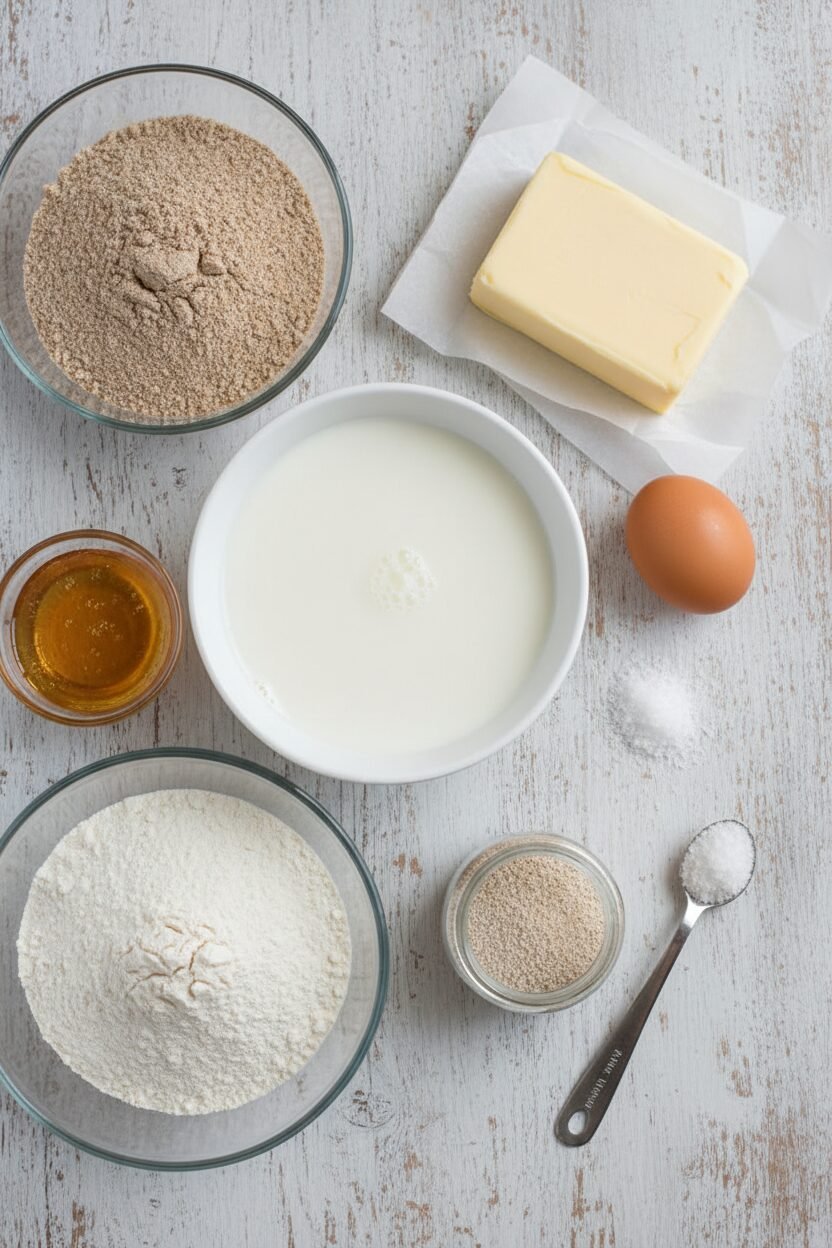
Ingredients:
| Ingredient | Amount | Notes |
|---|---|---|
| whole milk | 1 ¾ cups, plus 1 tablespoon | heated to 110°F |
| honey | 6 tablespoons plus 1 teaspoon | divided |
| unsalted butter | 5 tablespoons | melted and cooled, divided |
| large egg | 1 | |
| whole-wheat flour | 2 ½ cups (13 ¾ oz / 390 g) | |
| all-purpose flour | 1 ¾ cups (8 ¾ oz / 248 g) | |
| instant or rapid-rise yeast | 1 tablespoon | |
| salt | 2 ¼ teaspoons |
Instructions
Step 1: First, make your oven cozy. Heat it to 200 degrees, then turn it off. Grease a big bowl and a baking dish. Now, get your liquid ingredients ready. Combine the warm milk, most of the honey and butter, and the egg in a measuring cup. Doesn’t that smell amazing already? It’s like a sweet, warm hug.
Step 2: Time for the mixer! Put your flours, yeast, and salt in the bowl. Mix them on low until they’re friends. Slowly pour in your milk mixture. Let the mixer work on medium for several minutes. The dough will become smooth and pull away from the sides. (A sticky bottom is just fine, that means it’s perfect!)
Step 3: Put your dough ball into the greased bowl. Cover it tightly with plastic wrap. Place the bowl in your warm, turned-off oven. Let the dough rest and grow until it doubles in size. This takes about 45 minutes. I love this quiet waiting time. What’s your favorite thing to do while dough rises? Share below!
Step 4: Gently punch the dough down on a floured counter. Divide it into 16 equal pieces. Shape each piece into a smooth, tight ball. I cup my hand and roll them in little circles. Arrange all the balls in your baking dish. Cover them loosely and let them rise again in the warm oven for 20 minutes.
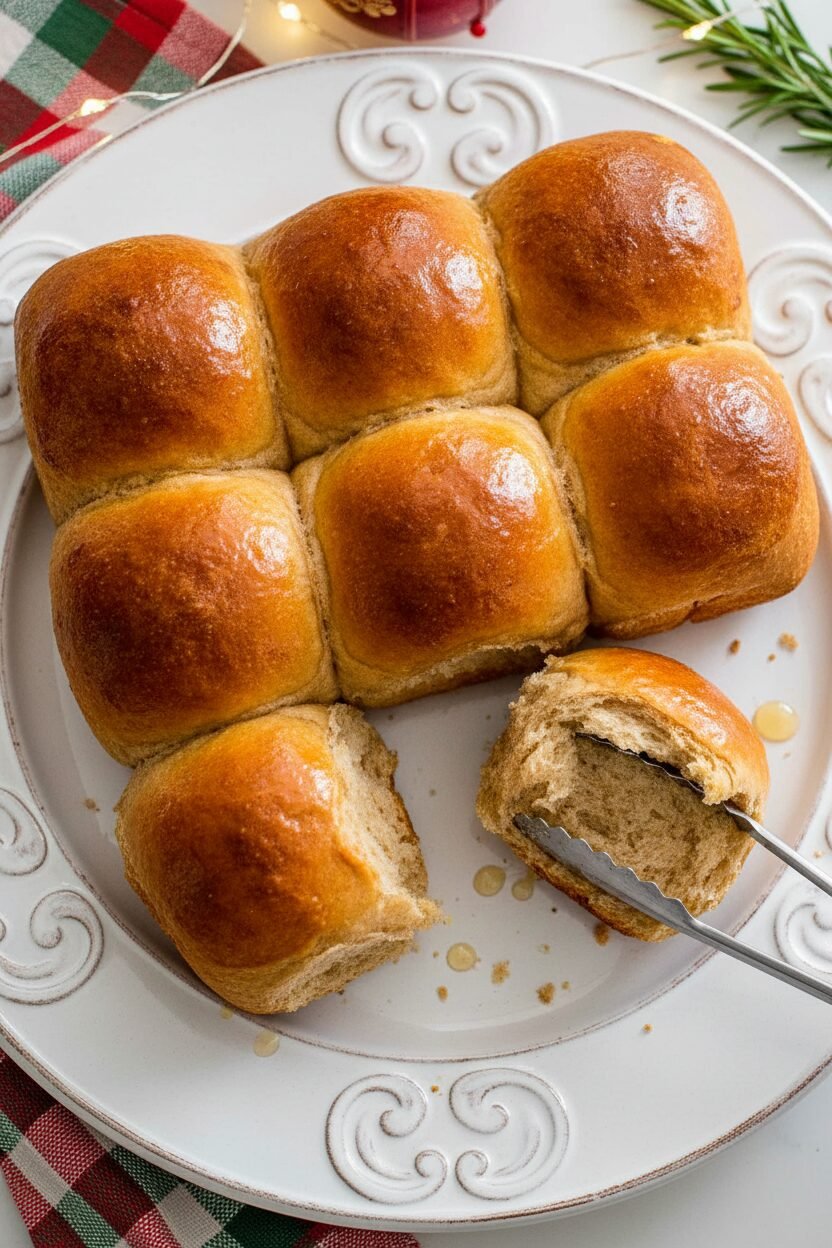
Step 5: Take the rolls out and heat your oven to 400 degrees. Mix the last bit of butter and honey together. Brush the rolls with a little milk. Bake them until they are a beautiful golden brown, about 20 minutes. Right when they come out, brush them with the honey butter. Let them cool just a bit before serving. That glossy finish makes them extra special.
Creative Twists
These rolls are wonderful just as they are. But sometimes, a little twist is fun! Here are three ideas for you. Add orange zest: A teaspoon of zest in the dough makes it taste like sunshine. Seed sprinkle: Press poppy or sesame seeds on top before baking for a nice crunch. Herb butter brush: Mix a pinch of rosemary into the honey butter. It’s so fragrant and cozy. Which one would you try first? Comment below!
Serving & Pairing Ideas
These golden rolls deserve a grand spot on your table. Tear them apart and let the steam out. I love them with a big pat of salted butter melting inside. They are perfect next to a hearty soup or a holiday roast. For a drink, a cold glass of sparkling apple cider is just right. For the grown-ups, a smooth glass of amber ale pairs beautifully. The malty flavors are such good friends. Which would you choose tonight?
Keeping Your Golden Rolls Warm and Wonderful
These honey wheat rolls freeze beautifully. Let them cool completely first. Then wrap each one tightly in plastic wrap. Pop them all into a big freezer bag. They will keep for a month. To reheat, just warm them in a 300-degree oven for 10 minutes. It brings back that fresh-baked feel.
You can also make the dough ahead. Follow the “make ahead” note in the recipe. I love doing this on a busy Friday. It makes Saturday morning so special. I remember my first big holiday dinner. I made all the rolls two days early. What a relief that was!
Batch cooking like this matters. It turns cooking from a chore into a gift for your future self. You get more time to enjoy your family. Have you ever tried storing rolls this way? Share below!
Simple Fixes for Common Roll Troubles
Is your dough not rising? Check your yeast. Make sure your milk is warm, not hot. Hot milk will stop the yeast from working. I once used milk that was too hot. My rolls were like little stones! Getting this right matters. It brings life and fluffiness to your bread.
Are the rolls too dense? You might need to knead longer. The dough should be smooth and pull away from the bowl. Give it the full 6 to 8 minutes. This builds a good structure for your rolls.
Are they browning too fast? Just lay a piece of foil loosely over the top. This lets them cook through without burning. A perfect golden crust matters. It gives you that wonderful mix of soft inside and slightly crisp outside. Which of these problems have you run into before?
Your Quick Questions, Answered
Q: Can I make these gluten-free?
A: I have not tried it myself. A good all-purpose gluten-free flour blend might work. The texture will be different.
Q: How far ahead can I make them?
A: You can shape the rolls and refrigerate the dough for 24 hours. This is perfect for getting a head start.
Q: What can I use instead of honey?
A: Maple syrup is a lovely swap. It will give a different, but still delicious, flavor.
Q: Can I make a half batch?
A: Yes, you can cut all the ingredients in half. Use an 8-inch square pan for baking.
Q: Any optional tips?
A: Fun fact: A pinch of cinnamon in the dough makes it smell like Christmas morning! You can also sprinkle oats on top before baking. Which tip will you try first?
From My Kitchen to Yours
I hope you love making these golden rolls. The smell filling your kitchen is the best part. It is a smell of warmth and home. I would love to hear about your baking adventure.
Tell me about your family’s favorite bread. Did your rolls turn out soft and golden? Have you tried this recipe? Please share your story in the comments below. I read every one.
Happy cooking!
—Elowen Thorn.
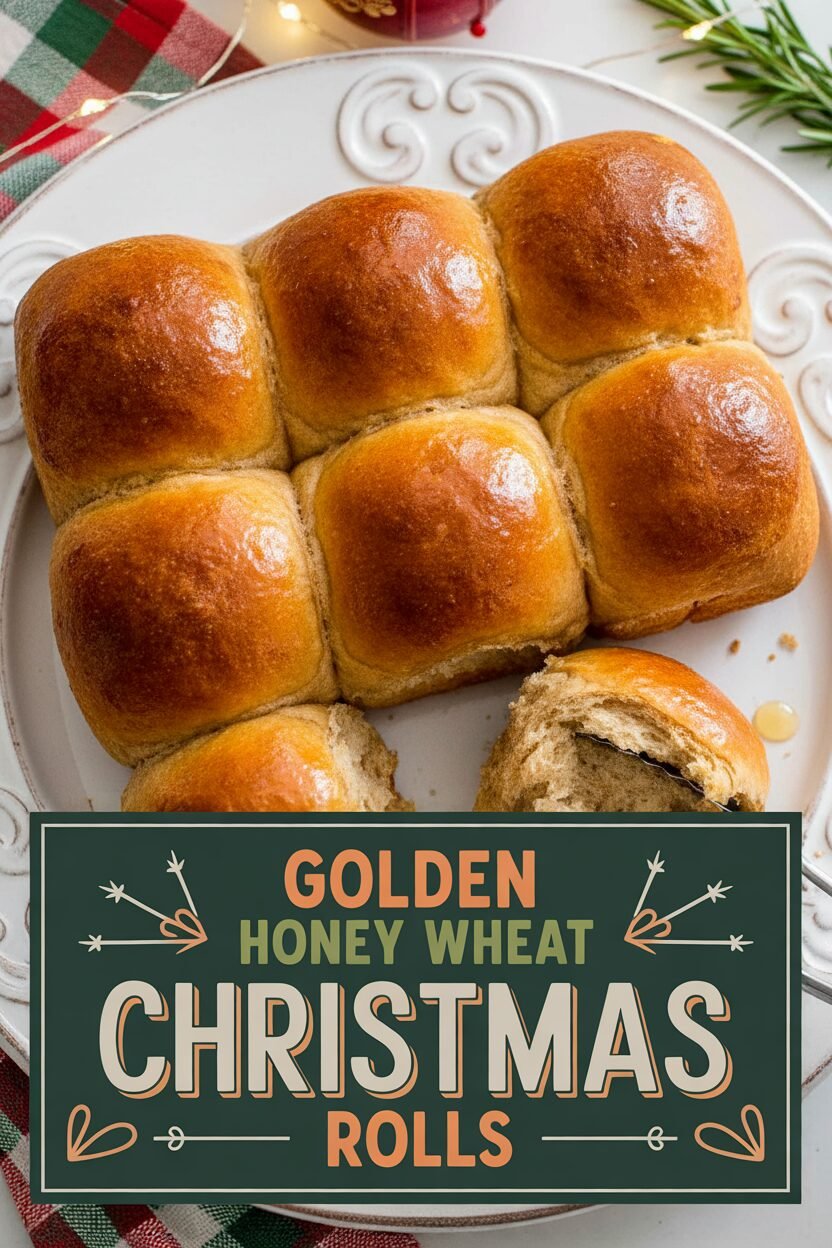

Golden Honey Wheat Christmas Rolls
Description
Soft, fluffy, and slightly sweet, these honey-wheat dinner rolls are perfect for your holiday table.
Ingredients
Instructions
- Adjust oven rack to lower-middle position and heat oven to 200 degrees. When oven reaches 200 degrees, turn it off. Grease large bowl and 13 by 9-inch baking dish. Combine 1¾ cups milk, 6 tablespoons honey, 4 tablespoons butter, and egg in 4-cup liquid measuring cup.
- Using stand mixer fitted with dough hook, mix whole wheat flour, all-purpose flour, yeast, and salt on low speed until combined. Slowly add milk mixture and mix until dough comes together, about 1 minute. Increase speed to medium and mix until dough is smooth and almost clears sides of bowl yet still sticks to bottom, 6 to 8 minutes.
- Transfer dough, scraping sides of bowl, to greased bowl. Cover with plastic wrap and place in turned-off oven until dough has doubled in size, about 45 minutes.
- Punch down dough on lightly floured counter. Divide dough into quarters and cut each quarter into 4 equal pieces. Form each piece into rough ball by pinching and pulling dough edges under so that top is smooth. On clean counter, cup each ball with your palm and roll into smooth, tight ball. Arrange in prepared baking dish and cover loosely with plastic. Let rolls rest in turned-off oven until doubled in size, about 20 minutes.
- Remove rolls from oven and discard plastic. Heat oven to 400 degrees. Combine remaining 1 tablespoon butter and remaining 1 teaspoon honey in bowl. Brush rolls with remaining 1 tablespoon milk. Bake rolls until golden brown and register 200 degrees, about 20 minutes, rotating dish halfway through baking. Brush with honey butter and let cool in dish on wire rack for 10 minutes. Remove rolls from dish. Serve.
- Make ahead: Instead of 20-minute rise in step 4, baking dish with formed rolls can be refrigerated, covered, for 24 hours. Let dough sit at room temperature for 30 minutes before brushing with milk and baking.
Notes
- For best results, ensure your milk is warmed to the correct temperature (110°F) to properly activate the yeast.