

The Story of a Messy, Happy Tart
My first free-form tart was a funny mess. The dough tore. Apples spilled out. I just folded the dough over anyway. It baked up golden and wonderful. I still laugh at that.
This tart is meant to be rustic. That’s a fancy word for “homemade and proud of it.” Perfect circles are for factories. Our kitchens are for joy. Have you ever had a kitchen disaster turn out great?
Why the Two Apples Matter
We use two kinds of apples here. Granny Smith apples are firm and tart. McIntosh apples get soft and sweet when cooked. Together, they make magic.
The firm ones hold their shape. The soft ones make a lovely, juicy filling. This matters because texture is everything in a pie. You get a little bite and a little melt in every forkful. Fun fact: This trick works for apple sauce, too!
The Secret in the Dough
Cold butter makes flakes. Cold cream cheese makes tenderness. Our dough has both. You pulse it in the machine until it looks like wet sand. That’s just right.
When you add the water, it will seem too dry. Trust your hands. Squeeze a bit. If it holds, it’s ready. This matters because patience here gives you a crust that’s both sturdy and melts in your mouth. What’s your biggest baking mystery? Is it dough, like mine was?
Building Your Edible Basket
Roll the dough out on parchment paper. No need to move it yet. Pile your apples in the middle. Leave a big empty border of dough all around.
Now, fold that border up over the apples. Pleat it like you’re folding a cloth. Don’t worry about neatness. Gently press the dough to the apples. Doesn’t that smell amazing already with the lemon and cinnamon?
The Bake and The Flip
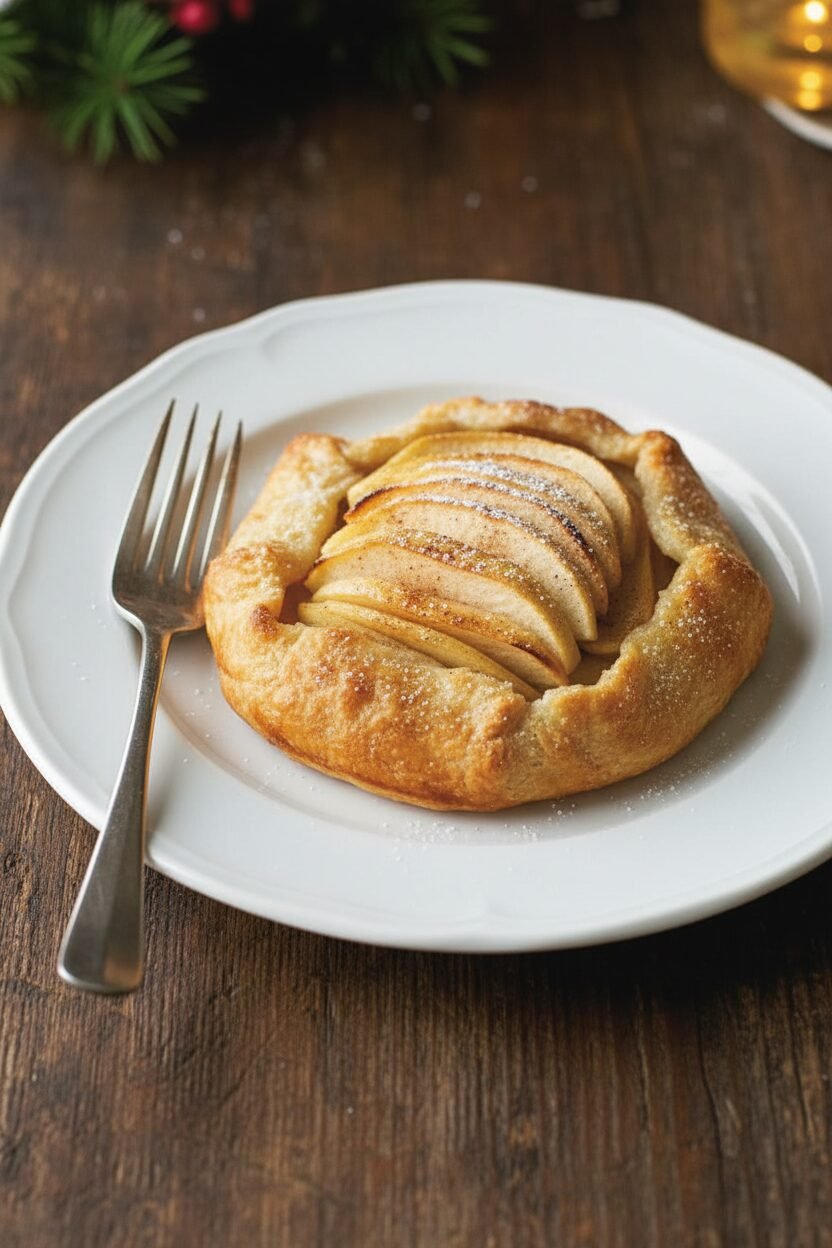
Bake it until it’s pale gold. Then, do the clever part. Put the pan on another pan. This keeps the bottom from burning. Brush the crust with egg white and sprinkle sugar.
Back in the oven it goes. Wait for a deep, golden brown. The cool part is the flip. You turn it onto a plate, peel off the paper, and flip it right-side up. The bottom becomes the top, all crisp and shiny. Which part sounds most fun to you? The folding or the flipping?
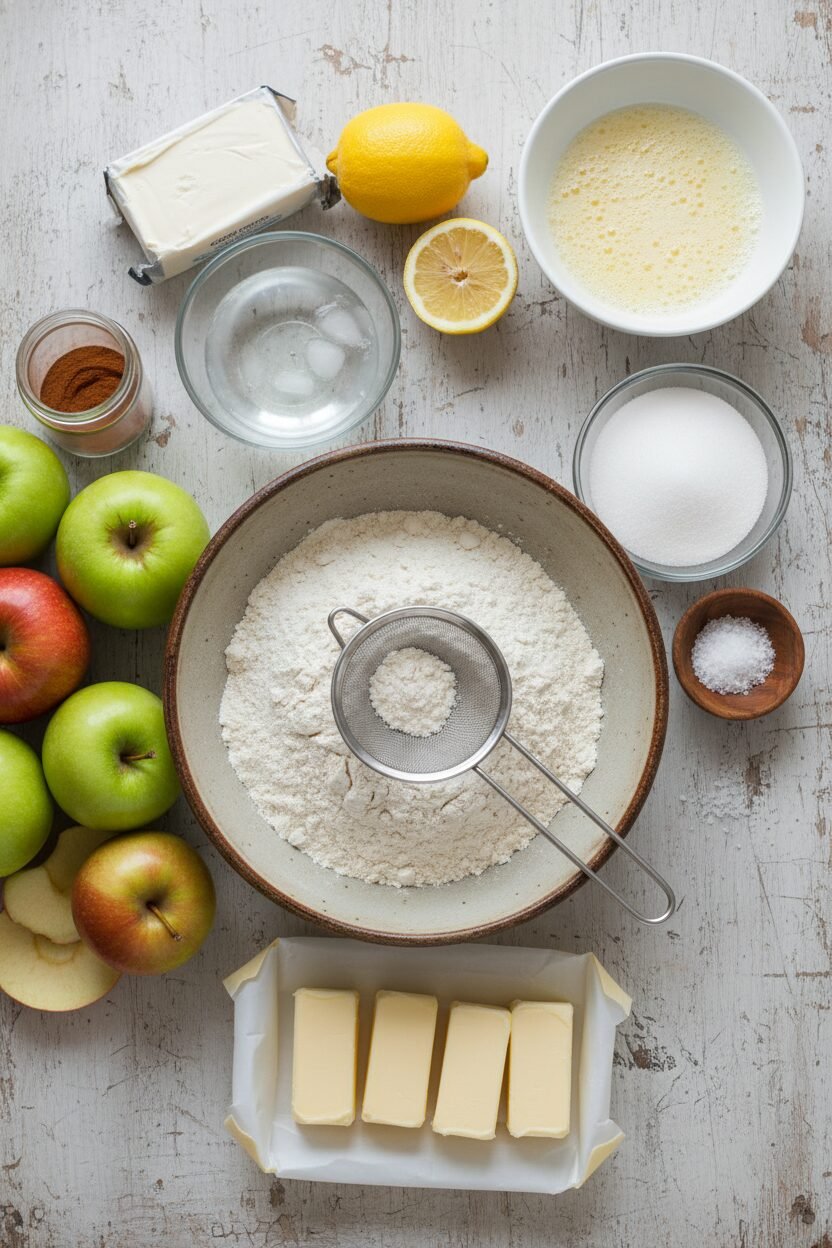
Ingredients:
| Ingredient | Amount | Notes |
|---|---|---|
| unbleached all-purpose flour | 1 ¼ cups | For the tart dough |
| granulated sugar | 2 tablespoons | For the tart dough |
| table salt | ¼ teaspoon | For the tart dough |
| unsalted butter | 8 tablespoons (1 stick) | Cold, cut into ½-inch pieces |
| cream cheese | 4 ounces (113 grams) | Cold, cut into ½-inch pieces |
| lemon juice | 2 teaspoons | From 1 lemon, for the dough |
| ice water | 1 – 2 tablespoons | As needed for the dough |
| Granny Smith apples | 1 ¼ pounds (567 grams, about 3 medium) | For the filling |
| McIntosh apples | 1 ¼ pounds (567 grams, about 3 medium) | For the filling |
| lemon juice | 2 tablespoons | From 1 lemon, for the filling |
| granulated sugar | ¼ cup + 2 tablespoons | ¼ cup for filling, 2 tbsp for sprinkling |
| ground cinnamon | ¼ teaspoon | For the filling |
| egg whites | 2 | Beaten lightly, for brushing crust |
Instructions
Step 1: Let’s make our dough. Pulse the flour, sugar, and salt in your food processor. Drop in the cold butter and cream cheese pieces. Pulse until it looks like wet sand. (Keep everything cold for a flaky crust.) Turn it all out into a medium bowl.
Step 2: Sprinkle the lemon juice and one tablespoon of ice water over the mixture. Fold it gently with a spatula. Squeeze a bit in your hand to see if it sticks. Add a tiny bit more water only if needed. Press the dough into a flat disk, wrap it, and let it rest in the fridge. I always use this time to wash my apples.
Step 3: Heat your oven to 375 degrees. Roll the dough between two parchment sheets. You want a big, rustic circle. Peel off the top parchment and slide the dough, on its paper, onto a baking sheet. Pop it back in the fridge. This keeps the butter firm. Why do we chill the dough? Share below!
Step 4: Now for the fun part! Peel and slice your apples. Toss them with lemon juice, sugar, and cinnamon. Pile the apples in the center of your dough circle. Leave a big empty border. Fold that dough border up over the apples, pleating it as you go. It should look messy and wonderful. I still laugh at my first tart. It looked like a happy apple volcano.
Step 5: Bake your tart for 30 minutes. Then, place the pan on another pan to protect the bottom. Brush the crust with egg white and sprinkle with sugar. Bake for 30 more minutes until golden. Let it cool for just 10 minutes. Then, flip it onto a plate, peel off the parchment, and flip it again. (The double-flip saves your beautiful crust!) Doesn’t that smell amazing?
Creative Twists
This tart is a wonderful blank canvas. You can make it your own so easily. Try a different fruit filling for a new adventure. A little spice can make it feel extra cozy. Even the crust can get a fun upgrade. Which one would you try first? Comment below!
Berry Best Friend: Swap half the apples for frozen mixed berries. It makes a gorgeous, juicy purple filling.
Spiced Sugar Sprinkle: Mix a pinch of cardamom or ginger with the sugar you sprinkle on top.
Nutty Crust Edge: Press chopped pecans or walnuts into the dough border before baking. It adds a lovely crunch.
Serving & Pairing Ideas
This tart is perfect warm from the oven. I love a big scoop of vanilla ice cream melting on top. A dollop of softly whipped cream is lovely too. For a fancy touch, drizzle a little caramel sauce over each slice. It turns a simple dessert into a celebration.
For drinks, a hot mug of spiced apple cider is my favorite. It just feels right. For the grown-ups, a small glass of sweet sherry pairs beautifully. It tastes like holidays and happy conversations. Which would you choose tonight?
Keeping Your Tart Happy
This tart is best eaten the day it’s made. But leftovers are a treat! Let it cool completely first. Wrap it tightly in plastic wrap. It will keep on the counter for one day.
For longer storage, freeze it. Place the wrapped tart on a flat pan until solid. Then you can pop it in a freezer bag. It keeps for a month. I once froze a whole tart for my grandson’s surprise visit. He was so happy!
To reheat, warm slices in a 300-degree oven for 10 minutes. This brings back the crisp crust. You can make the dough disk up to two days ahead. This is a great batch-cook step.
Planning ahead makes holiday cooking calm. You can enjoy your guests more. Have you ever tried storing it this way? Share below!
Simple Fixes for Common Hiccups
Is your dough too crumbly? You may need a touch more water. Sprinkle it in slowly. The dough should just hold together when squeezed. I remember when my dough was too dry. I added water one teaspoon at a time.
Are your apples leaking juice? This usually means they were sliced too thin. Aim for 1/4-inch slices. Thicker slices hold their shape better. This matters for a tart that isn’t soggy.
Is the bottom crust pale? Using that second pan to insulate is key. It stops the bottom from burning. This trick gives you a perfectly golden crust every time. Getting the basics right builds your kitchen confidence. Which of these problems have you run into before?
Your Quick Questions, Answered
Q: Can I make this gluten-free? A: Yes! Use a good gluten-free flour blend. The one with xanthan gum works best here.
Q: Can I make it ahead? A: Absolutely. Make and chill the dough disk up to two days early. You can also assemble the tart a few hours before baking.
Q: What if I don’t have both apple types? A: Use what you have! All Granny Smith gives a tart, firm filling. All McIntosh gives a softer, sweeter filling.
Q: Can I make a smaller tart? A: You can halve the recipe. Just make a smaller dough disk. Use a smaller baking sheet too.
Q: Any optional tips? A: A fun fact: adding a pinch of nutmeg to the filling is my secret. It smells like the holidays. Which tip will you try first?
From My Kitchen to Yours
I hope you love making this tart. It fills the house with the best smell. The rustic look is part of its charm. No need for it to be perfect.
I would love to hear about your baking adventure. Tell me all about it. Have you tried this recipe? Please share your story in the comments below. Happy cooking!
—Elowen Thorn.


Holiday Rustic Apple Tart
Description
A beautiful, free-form tart with a tender cream cheese crust and a sweet, spiced apple filling. Perfect for holiday gatherings.
Ingredients
Tart Dough:
Apple Filling:
Instructions
- In bowl of food processor fitted with steel blade, pulse flour, sugar, and salt to combine. Add butter and cream cheese; pulse until mixture is sandy, with small, pebblelike curds, 10 to 12 one-second pulses (mixture should not form cohesive ball). Turn mixture into medium bowl.
- Sprinkle lemon juice and 1 tablespoon ice water over mixture. With rubber spatula, use folding motion to evenly distribute water and lemon juice into flour mixture until small portion of dough holds together when squeezed in palm of hand, adding up to 1 tablespoon more ice water if necessary. Turn dough onto clean, dry work surface; gather and gently press together into cohesive ball, then flatten into a 6-inch disk. Place disk on a flat dinner plate, wrap plate in plastic, and refrigerate until firm, about 30 minutes (can be refrigerated up to 2 days).
- Adjust oven rack to lower-middle position and heat oven to 375 degrees. Remove dough from refrigerator (if refrigerated longer than 30 minutes, let stand at room temperature until malleable). Roll dough between 2 large sheets of lightly floured parchment paper into circle about 15 inches wide. Peel off top layer of parchment and, using parchment lining, slide dough onto jelly-roll pan or rimmed cookie sheet; cover with plastic wrap and refrigerate while preparing fruit.
- Peel, core, and cut apples into 1/4-inch-thick slices and toss with lemon juice, 1/4 cup sugar, and cinnamon. Arrange parchment-lined dough round on work surface. Arrange apple slices, thick edges out, in circular mound, leaving 3-inch border of dough. Fold dough border up over filling, pleating dough to fit snugly around apples. With cupped hands, gently press dough to filling, reinforcing shape and compacting apples.
- Bake until pale golden brown, about 30 minutes. Place pan with tart onto second pan of same size to insulate bottom crust; brush crust with beaten egg whites and sprinkle with remaining 2 tablespoons sugar. Return to oven and bake until crust is deep golden brown and apples are tender, about 30 minutes longer.
- Cool tart on pan 10 minutes, loosen parchment where it may have stuck to pan, then, using parchment lining, slide tart onto cooling rack. Place a large, round plate on top of tart, invert tart, peel off parchment, and re-invert tart onto serving platter.
Notes
- For best results, use a mix of tart (Granny Smith) and sweet (McIntosh) apples. The double-pan method prevents the bottom crust from burning.