

My First Key Lime Pie Cheesecake
I tried this recipe for my grandson’s birthday. He loves key lime pie. I thought, why not make it a cheesecake? I was a little nervous. It felt like a big project.
But you know what? It was so worth it. The creamy filling and the tangy lime just sing together. Doesn’t that sound amazing? Have you ever tried mixing two desserts into one?
The Secret to a Happy Crust
Let’s start with the crust. It’s the foundation. You want it firm and sweet. Press those crumbs down hard in the pan. Use the bottom of a cup. Really pack it in there.
This matters because a good crust holds everything up. It gives you a nice bite. A soft crust just falls apart. And here’s a fun fact: Graham crackers were invented to stop bad thoughts! A minister made them. I still laugh at that.
The Big Water Bath Trick
Now, the water bath sounds fancy. It’s not. You just wrap your pan in foil. Then you set it in a bigger pan with hot water. The steam from the water is the magic.
This is the most important step. It keeps your cheesecake creamy. Without it, the top can crack and it gets dry. Trust me on this. It makes all the difference. What’s the trickiest baking step you’ve ever tried?
Patience is a Flavor
After baking, you must wait. Let it cool in the oven. Then cool on the counter. Then chill all night. I know, it’s hard! The smell is so good.
But this matters. The waiting lets the flavors settle and become friends. The texture turns perfect and smooth. Rushing it just gives you a mess. Good things take time, in baking and in life.
Your Turn to Make Memories
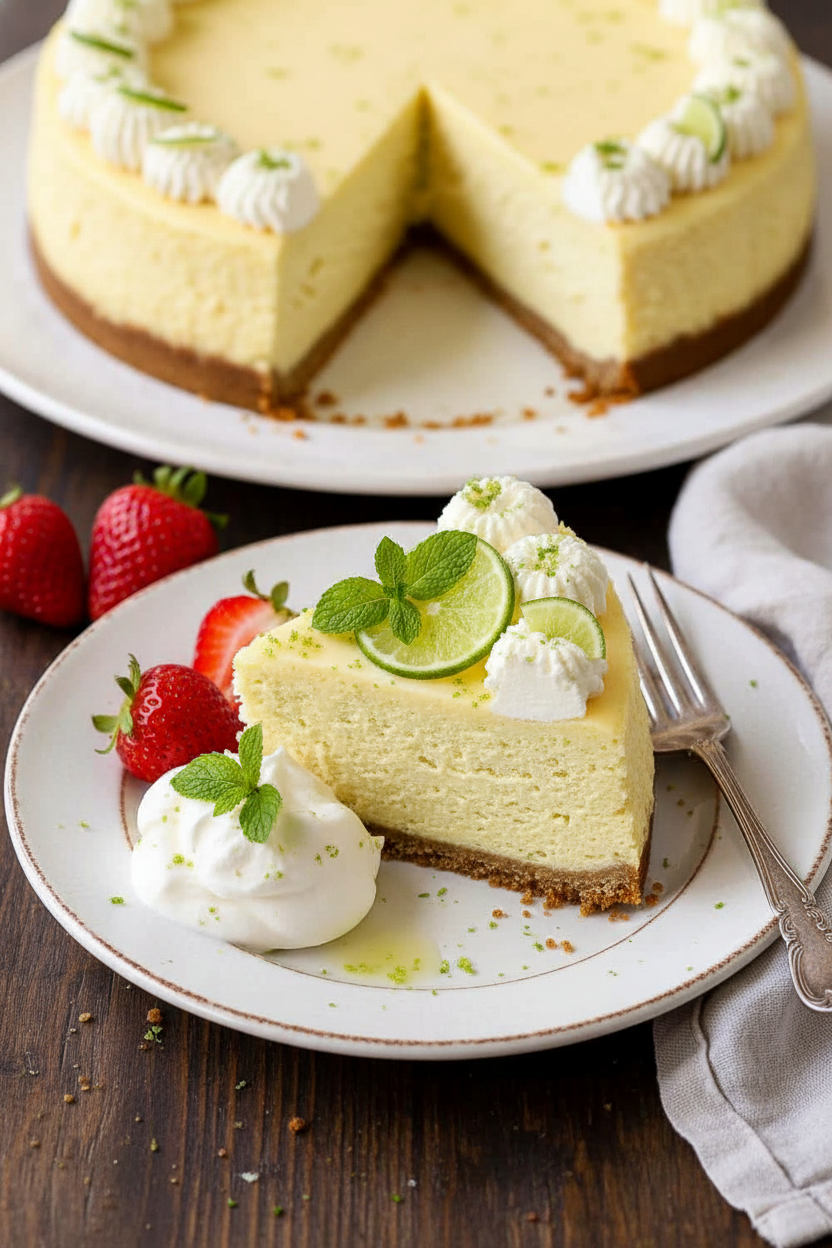
Finally, decorate! I love the white whipped cream on the pale green filling. Add a berry or a lime twist. It’s like putting on a pretty dress.
Making this is about sharing joy. It’s a special treat for special people. Who would you make this for? Tell me if you try it. I’d love to hear your story.
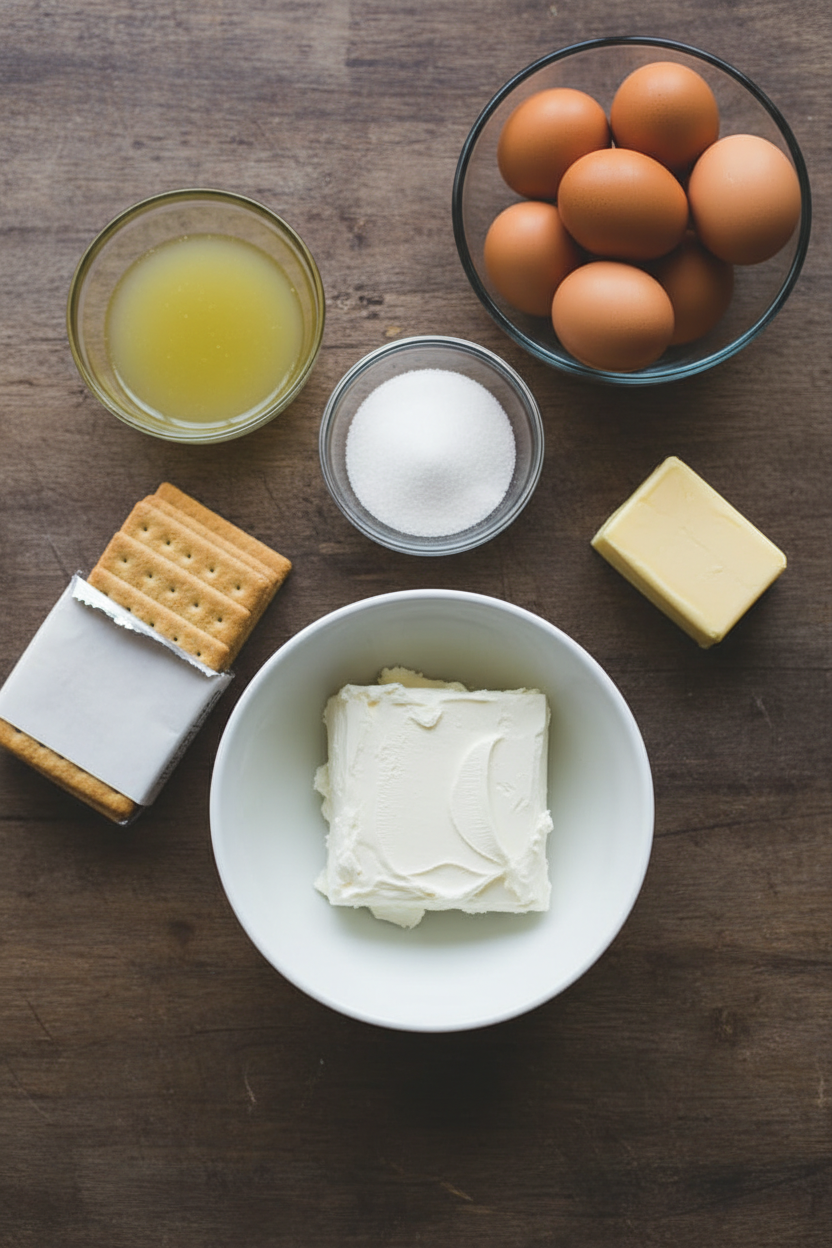
Ingredients:
| Ingredient | Amount | Notes |
|---|---|---|
| Graham crackers | 14 full sheets (2 scant cups crumbs) | For the crust |
| Granulated sugar | 3 tablespoons | For the crust |
| Butter | 8 tablespoons, melted | For the crust |
| Cream cheese | 4 (8 oz.) packages, very soft | Full fat is best; for the filling |
| Granulated sugar | 1 cup + 2 tablespoons | For the filling |
| Cornstarch | 2 tablespoons | For the filling |
| Sour cream | 1 cup | At room temperature; for the filling |
| Key lime juice | 1/2 cup | At room temperature; see notes for substitute; for the filling |
| Key lime zest | 1 teaspoon | Or regular lime zest; for the filling |
| Vanilla extract | 1 1/2 teaspoons | For the filling |
| Large eggs | 4 | At room temperature; for the filling |
| Large egg yolk | 1 | At room temperature; for the filling |
| Unflavored gelatin | 1 teaspoon | Optional; for stabilized whipped topping |
| Water | 1 1/2 tablespoons | Optional; cold; for stabilized whipped topping |
| Heavy whipping cream | 1 cup | Cold; for whipped topping |
| Powdered sugar | 3 tablespoons | For whipped topping |
| Vanilla extract | 1 teaspoon | For whipped topping |
| Fresh berries, lime, mint | As desired | Optional toppings |
Instructions
Step 1: First, make your crust. Crush those graham crackers until they look like sand. Mix them with melted butter and sugar. Press it firmly into your pan. (A good, hard press stops a crumbly crust later!) Bake it for 10 minutes. Let it cool completely.
Step 2: Now, wrap your pan in foil. This keeps water out. It feels silly, like putting boots on a cake. But trust me, it works. Place the wrapped pan inside a slow cooker liner. Tie the top in a knot. This is your best waterproof suit.
Step 3: Time for the filling. Beat the soft cream cheese until it’s fluffy. Add sugar, then sour cream and lime juice. Doesn’t that smell amazing? Add eggs one at a time, mixing gently. Pour it onto your cool crust. Give the pan a few gentle taps on the counter.
Step 4: Place your pan in a bigger roasting pan. Pour boiling water into the big pan. The water should come halfway up your cheesecake pan. This water bath makes the baking gentle. It helps prevent cracks on top. Why do we use a water bath? Share below!
Step 5: Bake it until the edges are set but the center jiggles. Turn off the oven. Crack the door open and let it sit for an hour. This slow cool-down is so important. Then, chill it overnight. Patience makes the creamiest slice!
Creative Twists
Cookie Crust: Use crushed vanilla wafers instead of graham crackers.
Berry Swirl: Swirl some raspberry jam into the filling before baking.
Coconut Dream: Toast some coconut and sprinkle it on top with the whipped cream.
Which one would you try first? Comment below!
Serving & Pairing Ideas
Serve a slice with fresh berries on the side. A little mint leaf makes it look fancy. For a fun treat, crumble some extra graham cracker on top. It adds a nice little crunch. A cold glass of lemonade pairs perfectly. Which would you choose tonight?
Keeping Your Sunshine Slice Fresh
Let’s talk about storing your beautiful cheesecake. It keeps the sunshine flavor bright. First, cool it completely on the counter. Then, cover it tightly and put it in the fridge. It will be happy there for up to five days.
You can also freeze slices for later. Wrap each piece well in plastic wrap. Then place them in a freezer bag. They will keep for about two months. Thaw a slice in the fridge overnight when you want it.
I remember my first key lime pie. I left it out too long. The topping wept and the crust got soggy. I learned my lesson about chilling things quickly. Storing food right matters. It keeps your hard work safe and delicious.
You can even make the crust ahead for busy weeks. Batch cooking parts of a recipe saves time. It makes a special dessert feel easy. Have you ever tried storing it this way? Share below!
Three Cheesecake Hiccups and How to Fix Them
Even grandmas have kitchen troubles sometimes. Here are three common ones. First, a soggy crust. Always bake your crust first. Let it cool completely before adding filling. This creates a strong, crispy base.
Second, a cracked top. This often happens from rushing. The key is a water bath and slow cooling. I once pulled a cake out too fast. It sighed and cracked right down the middle. Patience makes a smooth, pretty top.
Third, a filling that won’t set. Your ingredients must be room temperature. Cold cream cheese makes lumps. Cold eggs can make the batter split. Letting ingredients warm up matters. It creates a silky, smooth mixture that bakes evenly. Which of these problems have you run into before?
Your Quick Questions, Answered
What is the best crust for a key lime cheesecake?
A classic graham cracker crust is perfect. It is sweet and a little crunchy. The flavor pairs so well with the tangy lime. You can add a pinch of cinnamon or ginger for warmth. Just crush the crackers finely and press the crust firmly into the pan. This gives you a solid foundation that holds together when you slice it.
Can I use regular limes instead of key limes?
Yes, you absolutely can. Key limes are a bit more tart and aromatic. But regular Persian limes work wonderfully. You will need about 4-5 regular limes for the juice. The flavor will still be bright and delicious. My fun fact is that most key lime juice sold in bottles is actually a blend. So using fresh regular limes is a great choice.
How do I prevent my cheesecake from cracking?
The secret is gentle, even heat and no drafts. Use a water bath during baking. This adds steam to the oven. Do not open the oven door early. After baking, let it cool slowly in the cracked oven. This prevents sudden temperature changes that cause cracks. Running a knife around the edge after cooling also helps it release smoothly.
What’s the secret to a creamy, not grainy, cheesecake texture?
Start with very soft, room-temperature cream cheese. Beat it alone until it is fluffy. This breaks up any lumps. Add the sugar and beat it well. Then add other room-temperature ingredients like eggs and sour cream. Mix just until combined after adding eggs. Over-mixing eggs adds too much air. This can lead to a puffy, then grainy, texture.
How long should a key lime cheesecake chill before serving?
Chill it for at least 12 hours. Overnight is even better. A full 24 hours is ideal. This long chill lets the flavors deepen and marry. It also lets the texture firm up perfectly. Slicing a well-chilled cheesecake gives you neat, beautiful pieces. Patience here makes all the difference between good and great.
Can I make a key lime cheesecake without baking it?
Yes, you can make a no-bake version. It uses gelatin to set instead of eggs. You would mix softened cream cheese with sweetened condensed milk and lime juice. Then fold in whipped cream. Pour it over the crust and chill until firm. It is lighter and faster, but the baked version has that classic, rich cheesecake feel. Which tip will you try first?
From My Kitchen to Yours
I hope you love making this sunny dessert. It always brings a smile to my table. Baking is about sharing joy and creating sweet memories. Each slice is a little celebration.
I would love to hear about your baking adventure. Tell me how it turned out for you. Have you tried this recipe? Let me know in the comments below. Your stories are my favorite thing to read.
Happy cooking!
—Danielle Monroe

Key Lime Cheesecake Recipe with Expert Tips
Description
A creamy, tangy, and perfectly balanced Key Lime Cheesecake with a graham cracker crust and optional stabilized whipped cream topping.
Ingredients
Instructions
- Preheat oven to 325 degrees F. Begin boiling a large pot of water (about 4 quarts) for the water bath.
- Line the bottom of a 9-inch springform pan with parchment paper. Lightly grease the inside of the entire pan with nonstick cooking spray.
- Make the crust: Add graham crackers to a food processor and pulse until finely ground (or crush in a bag with a rolling pin). Add melted butter and granulated sugar and pulse (or stir) until evenly combined. Add to the greased springform pan and firmly press the crumbs down on the bottom of the pan using the bottom of a small bowl or measuring cup until you have a compact, even layer. Bake crust at 325 degrees F for 10 minutes. Cool completely on a wire rack.
- Waterproof the pan: Place 2 large 18-inch x 18-inch pieces of aluminum foil on a flat surface underneath the pan in the form of a “+” Gently fold (to avoid holes) up the sides of the foil around the pan. Optionally, place the foil-lined springform pan in the center bottom of a slow cooker liner or oven roasting bag. Bring the liner bag up to the top of the pan, gather excess to one side, and tie it in a knot.
- Make the cheesecake filling: Add very soft cream cheese to the bowl of an electric mixer fitted with the paddle attachment and beat on medium speed until light and fluffy, about 4 minutes. Add sugar and cornstarch and beat 5 additional minutes on medium speed. Add the sour cream, lime juice, lime zest, and vanilla, and beat until blended. Add the eggs one at a time followed by the egg yolk, beating as little as possible, just until combined after each addition. Pour mixture onto the cooled crust. Drop the pan on the counter a few times to get rid of any air bubbles.
- Prepare the water bath: Place the waterproofed cheesecake in a large roasting pan, then place the roasting pan in the preheated oven. Using a glass liquid measuring cup or pitcher, carefully pour in enough boiling water (add it low in the corner of the pan) until it reaches halfway up the side of the springform pan.
- Bake: Bake the cheesecake at 325 degrees F for 65-85 minutes or until edges are firm and the center 2-3 inches of the cheesecake is still wobbly. Do not open the oven door before 65 minutes.
- Chill: Turn off the oven and crack the oven door open. Allow the cheesecake to cool in the oven for 60 minutes, then remove it to a wire rack. Gently run a hot knife along the edges of the cheesecake and unclamp the springform pan. Continue to cool for 2-3 hours or until cheesecake is completely cooled. Cover the cheesecake with foil or transfer to a cake caddy and chill in the refrigerator overnight, best if 24 hours.
- Make the whipped topping (stabilized version): Add unflavored gelatin to a microwave-safe bowl, then pour the cold water over top; let stand for 5 minutes. Microwave for 10 seconds. Stir the mixture, then set aside to cool. Add heavy cream, powdered sugar, and vanilla extract to a large mixing bowl. Whip using an electric hand mixer just until soft peaks form. Turn the mixer to low and slowly pour in the gelatin mixture. Mix until well combined, then increase the speed to medium and continue mixing until stiff peaks form. Transfer whipped cream to a piping bag fitted with a large tip. You can pipe the stabilized whipped cream onto the room temperature cheesecake before refrigerating or any time after. If using regular whipped cream, top just before serving.
- Slice and serve: Use a hot knife (dipped in hot water and wiped clean) for clean cuts. Garnish cheesecake with berries, lime wedges, lime zest, and mint if desired.
Notes
- If key lime juice is unavailable, use a mix of regular lime juice and lemon juice for a similar tart flavor. For best results, ensure all filling ingredients are at room temperature. The stabilized whipped cream can be piped on before the final chill, but regular whipped cream should be added just before serving.