

Little Jars of Spring Joy
Hello, my dear. It’s Elowen. Come sit a moment. I want to tell you about my favorite spring treat. These mini cheesecake jars are pure sunshine. They are no-bake, which is perfect for a warm day. You just layer and chill. Doesn’t that sound simple?
I started making these for my grandkids. They loved having their own little jar. It felt special. I still laugh at that. Their faces light up every time. Making food feel personal matters. It turns a simple dessert into a happy memory. Do you have a dessert that makes you feel that way?
The Story of the Crust
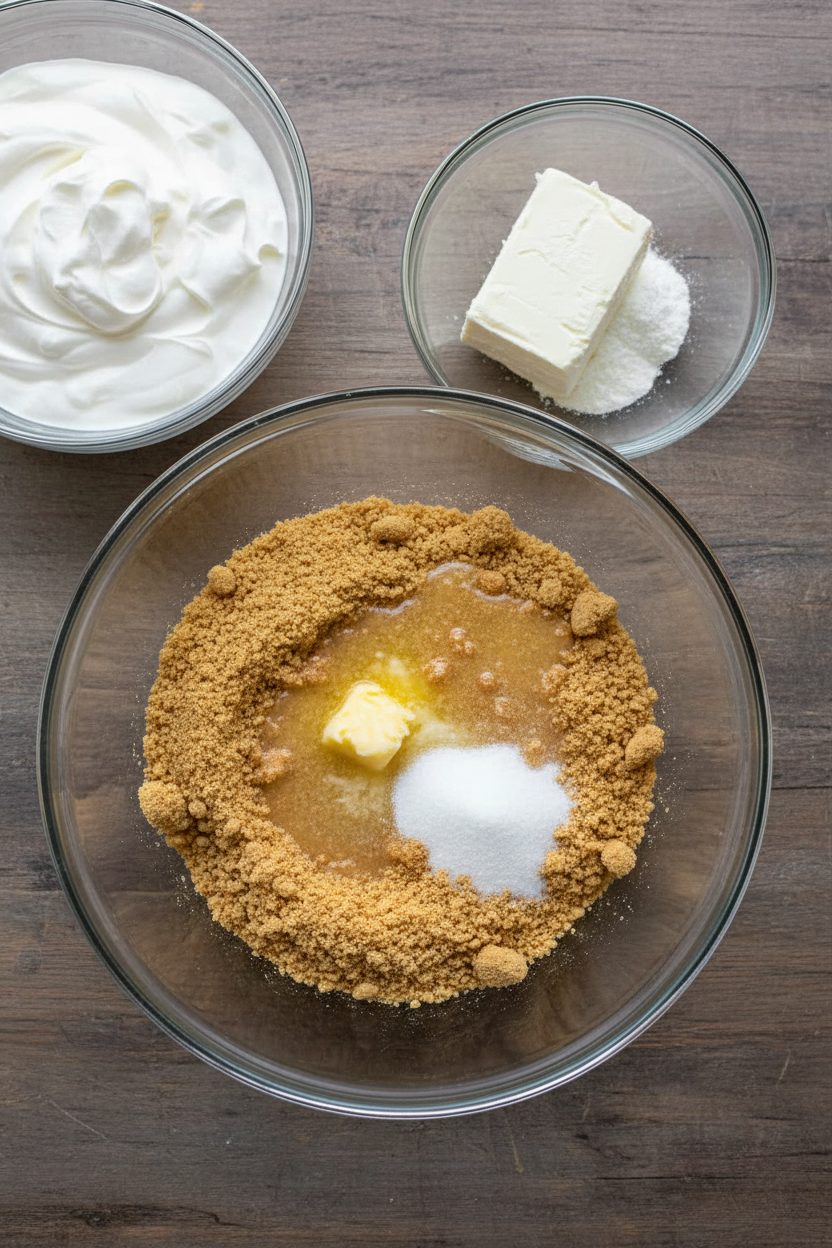
Let’s start from the bottom. The crust is just crumbs and butter. You stir it until it looks like wet sand. I use graham crackers. But you can use any sweet biscuit you like. Press it into the jar firmly. This gives you a nice crunch later.
Why does this step matter? A good base holds everything together. It’s the foundation. Without it, your lovely filling would just be a puddle. *Fun fact*: The first cheesecakes were made in ancient Greece! They were quite different from ours. Have you ever tried making a crust with different cookies?
The Magic of the Filling
Now, the creamy part. The secret is cold cream and soft cheese. Whip the cream until it’s fluffy. Then mix the cream cheese until it’s smooth. Fold them together gently. This keeps the filling light and airy.
You can add a bit of color. I use a drop of pastel gel. Pink, yellow, or light blue. It looks so cheerful. This is where you can play. A little lemon zest makes it fresh. This lemon and blueberry version is a favorite of mine. What pastel color would you choose for your jars?
Patience Makes Perfect
Here is the hard part. You must wait. After you fill the jars, they need to chill. At least two hours. I know, it’s tough! But this wait matters. It lets the flavors settle and the filling get firm. It’s worth it.
I use this time to clean up. Or to plan the decorations. These springtime mini cheesecakes are so pretty when done. The wait teaches us something good. The best things often need a little time. Do you find it hard to wait for a treat?
The Grand Finale: Toppings!
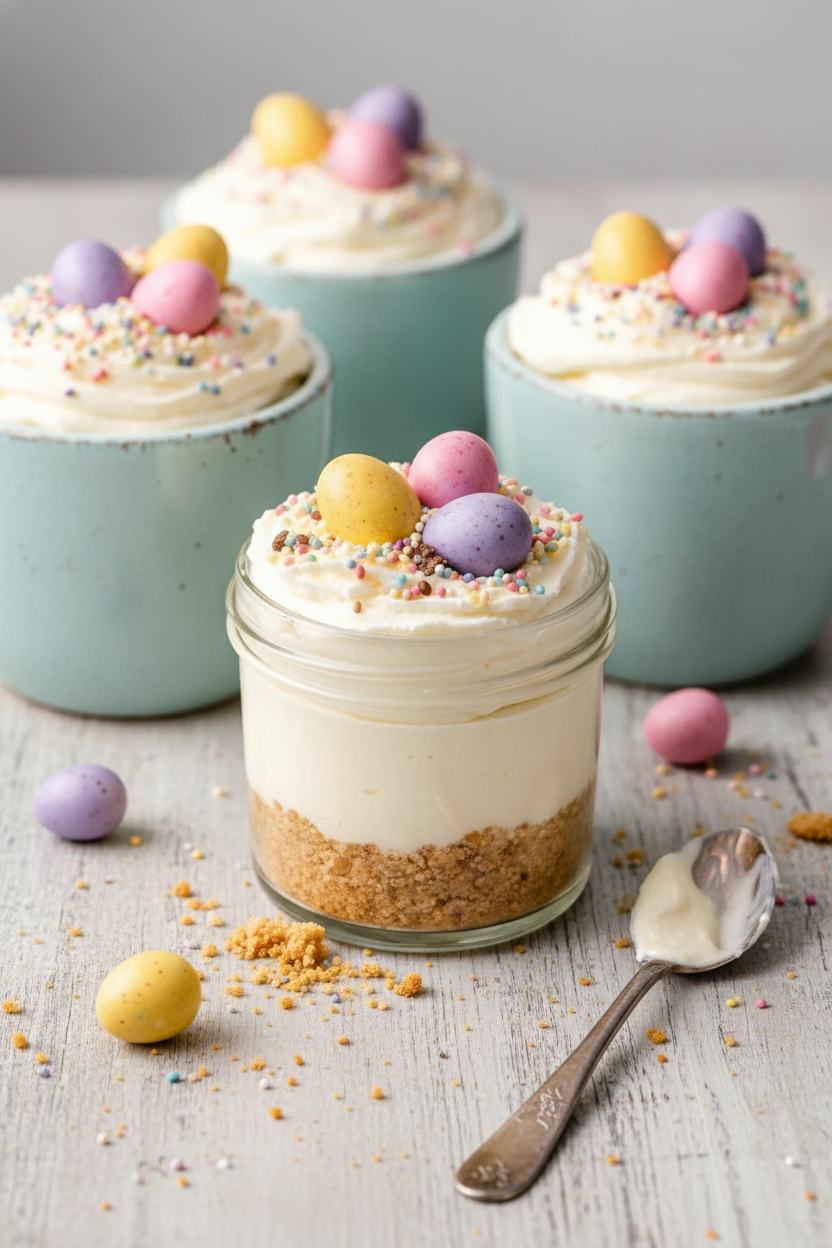
Now for the fun! Right before serving, add your toppings. I love making coconut “grass.” Just mix a little green food coloring into shredded coconut. It looks like a tiny garden. Then nestle in mini eggs. Add some sprinkles for sparkle.
This final touch makes everyone smile. It’s a celebration of the season. These Easter delights are a joy to share. Hand them out with small spoons. The crunch, the cream, the sweet egg—it’s perfect. I think you’ll love making these springtime sweets for someone you love.
Instructions
Step 1: Make your crumb base first. Stir graham crumbs, sugar, salt, and melted butter. It should look like wet sand. I love the smell of this. Doesn’t that smell amazing? Spoon it into your jars.
Step 2: Press the crumbs down firmly with a spoon. This makes a strong floor for your cheesecake. (A hard-learned tip: press really well so your layers don’t mix!) Set these little jars aside for now. They look so cute already, don’t they?
Step 3: Now, whip your cold heavy cream. Use a cold bowl for best results. Whip it until it forms soft peaks. Then, pop it in the fridge. This chilling step is a secret for fluffy no-bake mini cheesecakes.
Step 4: Beat the softened cream cheese with powdered sugar, vanilla, and lemon juice. Make it super smooth and fluffy. This is the heart of your springtime mini cheesecakes. Gently fold in your whipped cream. Do you know what “fold” means? Share below!
Step 5: You can divide the filling and tint it with pastel colors. Keep the colors light for spring. Pipe or spoon it over your crust. Chill everything for at least two hours. Top with coconut “grass” and mini eggs right before you serve.
Creative Twists
Lemon Zest Sunshine: Add fresh lemon zest to the filling. It tastes like a sunny spring day.
Cookie Swap: Use crushed Biscoff cookies instead of graham crackers. It’s a delicious change.
Berry Surprise: Add a layer of blueberry jam at the bottom. I still laugh at how happy this makes people.
Which one would you try first? Comment below!
Serving & Pairing Ideas
Serve these jars straight from the fridge. Hand out small spoons with them. I like to add a few fresh berries on the side for color. A glass of cold milk or a cup of tea pairs perfectly. These easy Easter mini cheesecakes are a joy to share. You could also line them up on a tray for a sweet centerpiece. Which would you choose tonight?
Keeping Your Cheesecake Jars Fresh
These little jars are perfect for making ahead. Just cover them tightly and pop them in the fridge. They will stay happy for up to three days. I love to make a batch on a quiet afternoon. This way, I am ready for any surprise guests.
You can also freeze them for a later treat. Place the jars in the freezer without toppings for one hour. Then, seal them with a lid. They will keep for a month. Thaw them in the fridge overnight when you are ready. I remember my first batch of no-bake Easter treats. I was so proud to have dessert ready in my freezer.
Batch cooking like this saves time and stress. It means more moments for fun, not fussing in the kitchen. Have you ever tried storing it this way? Share below!
Simple Fixes for Common Hiccups
Is your filling too soft? Your cream or bowl might have been warm. Always start with cold cream and a chilled bowl. I once tried to whip cream on a hot day. It turned into soup! Chilling everything first makes a big difference.
Is your crust too crumbly? You may not have used enough butter. The mixture should look like wet sand. Press it down very firmly with a spoon. A solid crust gives you that perfect creamy and crunchy bite in every Easter delight.
Are your colors not mixing in? Use gel food coloring, not liquid. Liquid coloring can make your filling runny. Gel color blends smoothly and gives lovely pastel shades. Getting these small things right builds your confidence. It also makes the flavor and texture just perfect. Which of these problems have you run into before?
Your Quick Questions, Answered
How do I prevent cracks in my mini cheesecakes?
Good news! These are no-bake, so cracks are not a worry. The key is to mix your filling until it is smooth, but do not over-mix. Gently fold the whipped cream into the cream cheese. This keeps the filling light and airy. Over-mixing can make it dense. A smooth mix sets perfectly in the fridge with no cracks.
Can I use a different type of cookie for the crust?
Absolutely! Digestive biscuits or vanilla wafers work wonderfully. You can even use crushed Oreos for a chocolate crust. Just make sure you have about one and a half cups of fine crumbs. Mix them with the melted butter and sugar. The butter binds the crumbs so your crust holds together in the jar.
How far in advance can I make cheesecake jars?
You can make them up to three days ahead. Keep them covered in the refrigerator. Add any crunchy toppings, like your springtime sweets or mini eggs, right before serving. This keeps the toppings from getting soft. The filling actually gets more flavorful as it chills. It is a great make-ahead dessert.
Can I make these mini cheesecakes without a water bath?
Yes, you certainly can. A water bath is for baked cheesecakes. This recipe is a no-bake version. It sets firmly in the refrigerator. The secret is chilling it for at least two hours. This gives the filling time to become perfectly creamy and sliceable without any oven fuss at all.
What are some easy topping ideas for mini cheesecakes?
Keep it simple and colorful. Fresh berries are always lovely. A dollop of fruit jam or lemon curd is delicious. For Easter, green coconut “grass” and mini eggs are so fun. A drizzle of melted chocolate or a sprinkle of crushed cookies adds nice texture. Let your creativity guide your toppings.
How do I store leftover cheesecake in jars?
Just screw the lids on tightly. Store them in the refrigerator. They will be good for up to three days. You can also freeze them for a month. *Fun fact: Cheesecake is one of the few desserts that freezes beautifully!* Thaw frozen jars in the fridge overnight before you enjoy them again. Which tip will you try first?
From My Kitchen to Yours
I hope you have fun making these cheerful jars. Cooking is about sharing joy and making memories. These little desserts are perfect for both. I would love to hear about your kitchen adventures.
Tell me all about it in the comments below. Did you try a different crust? What toppings did your family love? Have you tried this recipe? Your stories are my favorite thing to read. Happy cooking!
—Elowen Thorn

My Easy Mini Cheesecakes in Jars Recipe
Description
These adorable and easy mini cheesecakes are layered in jars for a perfect individual dessert. A buttery graham cracker crust is topped with a light, creamy no-bake cheesecake filling and festive spring toppings.
Ingredients
Crust:
Cheesecake filling:
Color and flavor (optional):
Toppings:
Instructions
- Make the crumb base: Stir graham crumbs, sugar, salt, and melted butter until the mixture looks like wet sand.
- Pack the crust: Spoon 2–3 tablespoons into each jar and press down firmly with the back of a spoon. Set aside.
- Whip the cream: In a cold bowl, whip heavy cream to medium-stiff peaks. Chill while you make the base.
- Beat the cream cheese: Mix softened cream cheese, powdered sugar, vanilla, and lemon juice until smooth and fluffy, 1–2 minutes.
- Fold it together: Gently fold the whipped cream into the cream cheese mixture in two additions until no streaks remain.
- Add color (optional): Divide the filling and tint with pastel gel colors. Keep it light for a spring look.
- Fill the jars: Pipe or spoon the cheesecake filling over the crust, leaving a little room for toppings.
- Chill: Cover and refrigerate for at least 2 hours, or up to 24 hours, to set.
- Decorate: Add coconut “grass,” sprinkles, and nestle in mini eggs right before serving so they stay crisp.
- Serve cold: Hand out with small spoons and enjoy the creamy, crunchy layers.
Notes
- For a firmer crust, you can bake the crust layer in the jars at 350°F (175°C) for 5 minutes and let cool completely before filling. Ensure cream cheese is fully softened to avoid lumps. Gel food coloring gives vibrant color without thinning the filling.