

My Sunshine Bars
These lemon bars are my happy place. They remind me of spring picnics. The lemon is like a little burst of sunshine. Doesn’t that sound nice?
I first made them for my grandson’s birthday. He said they tasted like a cloud that fell in a lemon tree. I still laugh at that. It just stuck. Now we always call them my Sunshine Bars.
The Secret is in the Layers
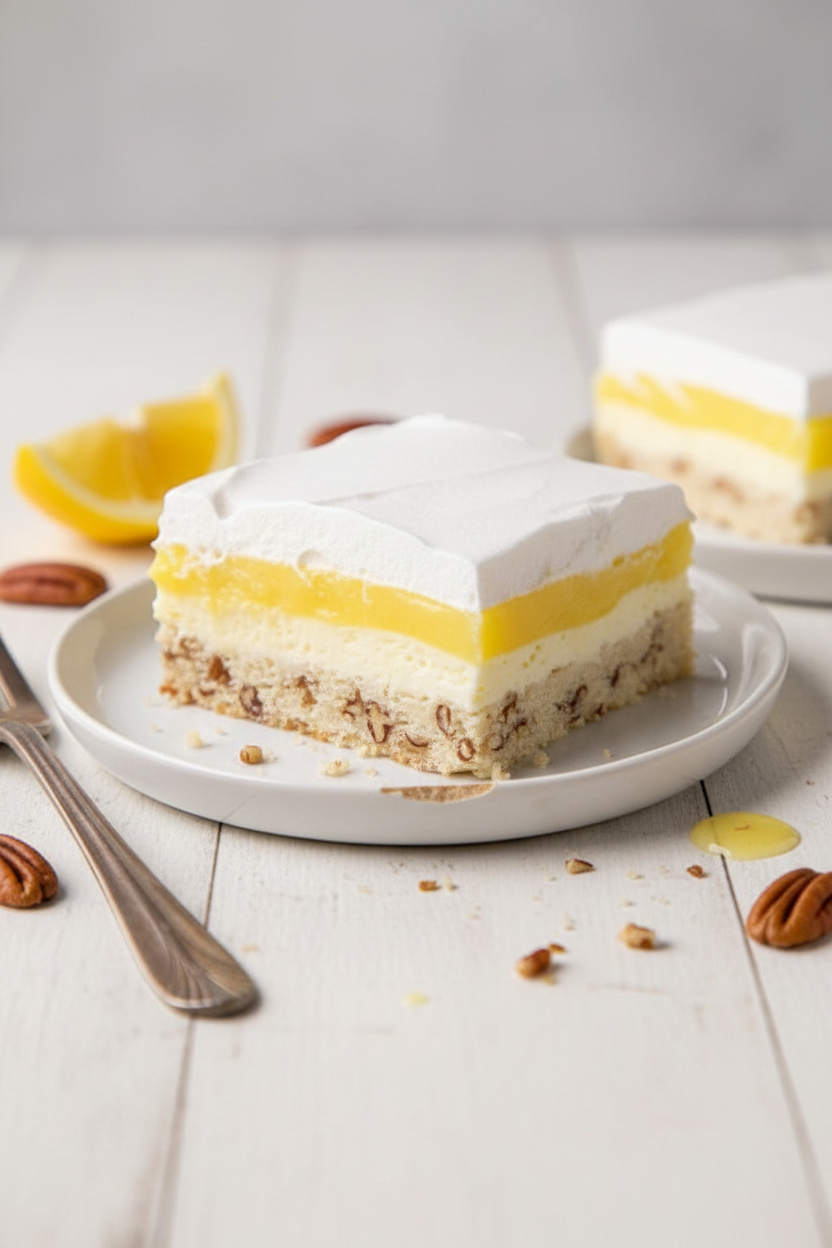
This dessert is like building a little house. A crunchy floor, a creamy wall, a sunny room, and a fluffy roof. Each layer has a job. Together, they make magic.
Why does this matter? Well, it teaches patience. You must let each layer set before adding the next. Good things take a little time. The wait is always worth it.
A Little Kitchen Helper
My favorite part is pressing the crust. I use my fingers. It feels like making sandcastles, but tastier! The smell of toasting pecans is so warm and cozy.
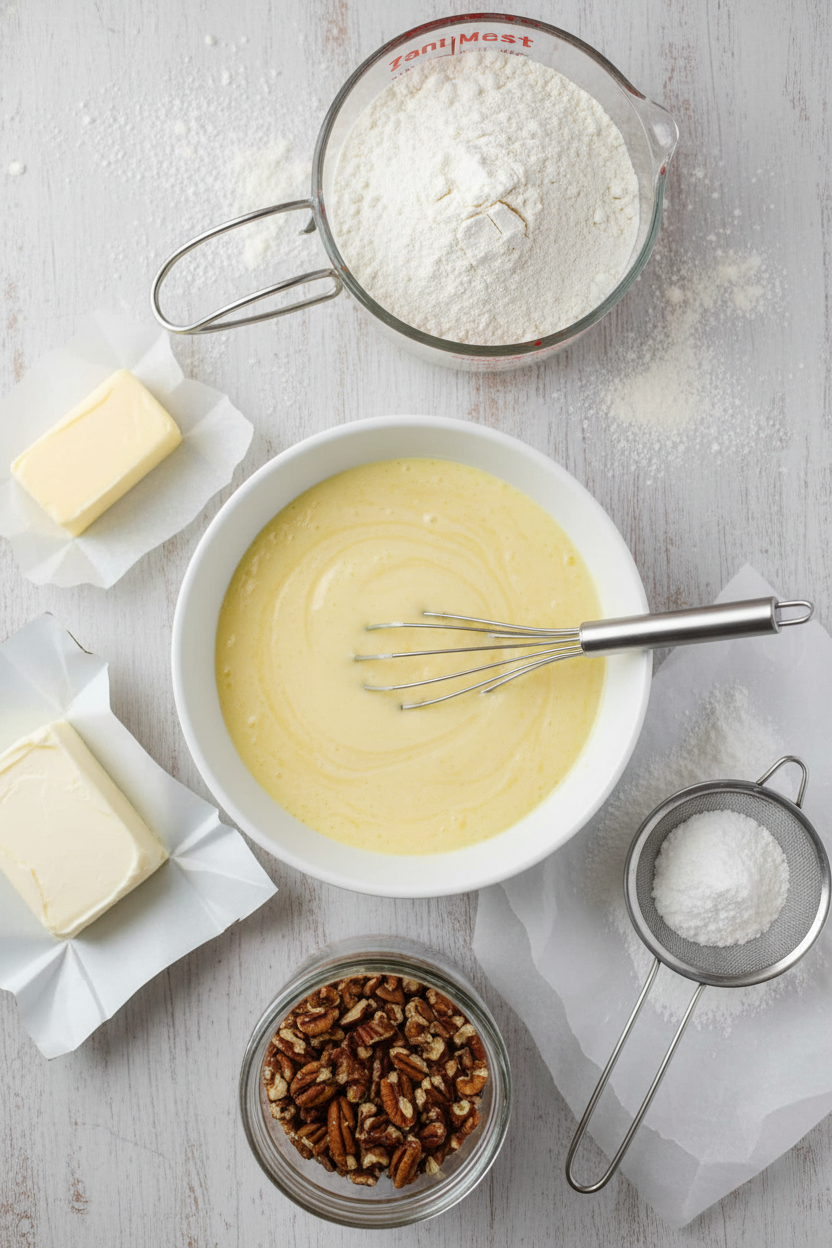
*Fun fact*: That “cutting in” butter with forks? You’re making tiny pockets of fat. This keeps the crust tender and flaky. Science in the kitchen!
Make It Your Own
This recipe loves to play dress-up. Use lemon Oreos for the crust if you want. Try vanilla or cheesecake pudding instead. It’s your kitchen, your rules.
I sometimes use real whipped cream. It feels special. The key is to whip it until it forms stiff peaks. This means it stands up tall on your whisk. Have you ever made whipped cream from scratch?
The Final Touch
Here’s my big tip. Pop the whole pan in the freezer before you cut it. Just for 45 minutes. This gives you the cleanest, prettiest squares. It makes all the difference.
Why does this matter? Taking that extra step shows care. It turns simple dessert bars into a gift you made with your hands. Food made with love just tastes better.
What’s your favorite flavor to bake with? Is it lemon like me, or something else? Tell me about your kitchen adventures. I’d love to hear.
Ingredients:
| Ingredient | Amount | Notes |
|---|---|---|
| All-purpose flour | 1½ cups | For the crust (first layer) |
| Butter, cubed | ¾ cup (1½ sticks) | For the crust; use salted or unsalted |
| Finely chopped pecans | ½ cup | For the crust; walnuts can be substituted |
| Salt | ½ teaspoon | Omit if using salted butter |
| Cream cheese, softened | 1 package (8 oz) | For the second layer |
| Powdered sugar | 1 cup | For the second layer |
| Whipped topping | 1 cup | From an 8 oz container; for the second layer |
| Instant lemon pudding | 2 small boxes (3.4 oz each) | For the third layer; any flavor can be substituted |
| Milk | 3 cups | For the third layer |
| Whipped topping | Remainder of 8 oz container | For the fourth/final layer |
Instructions
Step 1: First, make your crust. Mix the flour and salt in a big bowl. Cut in the cold butter until it looks like little peas. Stir in those yummy pecans. Press it all firmly into your pan. Bake it until the edges look golden. (Keep your butter cold for a flaky crust!)
Step 2: Let the crust cool completely. Now, make the creamy layer. Beat the soft cream cheese and powdered sugar together. It will get fluffy and sweet. Gently fold in one cup of whipped topping. Spread this dreamy cloud over your cool crust.
Step 3: Time for the sunny lemon layer! Whisk the pudding mixes and milk for two minutes. Watch it thicken right before your eyes. Doesn’t that smell amazing? Pour it carefully over the cream cheese. Spread it gently to cover every bit.
Step 4: Top it all with the rest of the whipped topping. I use a butter knife to spread it. Now, the hard part—waiting! Cover it and let it chill for hours. What’s the hardest part of making dessert? Share below!
Step 5: To serve, pop the pan in the freezer for 45 minutes. This makes slicing so easy. Use a sharp knife for perfect squares. I still laugh at the time I tried to cut it warm. What a sweet, lemony mess that was!
Creative Twists
Sunshine Crust: Use crushed lemon Oreos instead of the flour crust. No baking needed!
Berry Happy: Add a layer of fresh blueberries or raspberries on top of the cream cheese.
Tropical Dream: Use coconut cream pudding and toast some coconut for the top. Which one would you try first? Comment below!
Serving & Pairing Ideas
I love serving these bars on a pretty plate. A few fresh raspberries on the side look so cheerful. For a fancy touch, add a tiny mint leaf on top. A glass of cold iced tea is the perfect partner for this sweet, tangy treat. Which would you choose tonight?
Keeping Your Lemon Bars Fresh
These lemon bars are best kept in the fridge. Cover the pan tightly with plastic wrap. They will stay perfect for about four days. You can also freeze them for a month. Slice them first and place parchment between layers.
I remember my first batch. I left it out too long. The topping got soft and weepy. Now I always chill it right away. This matters because a cool dessert is a refreshing one. It makes every bite firm and creamy.
Batch cooking is a wonderful trick. Make two pans at once. Freeze one for a happy surprise later. This saves so much time on busy days. Have you ever tried storing it this way? Share below!
Simple Fixes for Common Hiccups
Is your crust too crumbly? You did not press it firmly enough. Pack it into the pan like wet sand. I once had a crust fall apart. A good press fixes everything.
Is the cream cheese layer lumpy? Your cream cheese was too cold. Let it sit on the counter first. Soft cheese mixes smoothly with sugar. This matters for a silky, dreamy layer you will love.
Is the pudding too runny? You must mix it for the full two minutes. The mixer makes it thick and lovely. This matters for clean slices that hold their shape. Which of these problems have you run into before?
Your Quick Questions, Answered
What is the best lemon bar recipe?
My favorite is the one right here. It has a nutty crust and creamy layers. The lemon pudding is bright and tangy. It is a no-bake filling on a baked crust. This makes it simple but very special. Everyone always asks for this recipe after they try it.
How do you make lemon bars not soggy?
The key is to cool the crust completely. A warm crust will melt the cream cheese. It also makes the pudding layer weep. Let it cool on the counter for an hour. This ensures every layer stays distinct and perfect.
What are lemon cream dessert bars?
They are a layered, no-bake style dessert. A shortbread crust holds a sweet cream cheese layer. On top is a smooth lemon pudding. The final layer is fluffy whipped topping. They are creamy, light, and very lemony. They are different from traditional baked lemon bars.
Can I use bottled lemon juice for lemon bars?
This recipe uses instant pudding, so no juice is needed. But for the curd in baked bars, fresh is best. Bottled juice can taste metallic or flat. Fresh lemon juice gives a bright, sunny flavor. Your taste buds will notice the happy difference.
How do you thicken lemon curd for bars?
You cook it gently on the stove with eggs and sugar. Constant stirring is the secret. The mixture will coat the back of a spoon. Then it is thick enough. For this recipe, the pudding mix thickens with milk and mixing.
What is the difference between lemon bars and lemon squares?
Often, the names are used for the same thing. Usually, they mean a baked dessert with a curd topping. My recipe here is called a cream dessert bar. It is layered and chilled, not baked after the crust. *Fun fact: The first printed lemon bar recipe appeared in a 1960s cookbook!*
Which tip will you try first?
From My Kitchen to Yours
I hope you love making these bars. They bring sunshine to any day. Sharing them with family is my favorite part. I would love to hear about your baking adventure.
Tell me all about it in the comments. Have you tried this recipe? Let me know how it turned out for you. Your stories make my day brighter.
Happy cooking!
—Grace Ellington.

My Favorite Lemon Cream Dessert Bars
Description
These no-bake Lemon Cream Dessert Bars feature a buttery pecan crust, a creamy cheesecake layer, tangy lemon pudding, and a fluffy whipped topping.
Ingredients
1½ cups all-purpose flour
½ cup finely chopped pecans
¾ cup butter (cubed, 1½ sticks)
½ teaspoon salt (omit if using salted butter)
1 package (8 oz) cream cheese, softened
1 cup powdered sugar
1 cup whipped topping (from an 8 oz container)
2 small boxes (3.4 oz each) instant lemon pudding
3 cups milk
Remaining whipped topping from an 8 oz container
Instructions
- Preheat oven to 350°F (175°C).
- For the crust: In a large bowl, combine flour and salt. Cut in butter until pea-size lumps form. Stir in pecans. Press into a 13×9 inch pan. Bake for 16–20 minutes until edges are golden. Cool completely.
- For the second layer: Beat softened cream cheese and powdered sugar until light and fluffy. Fold in 1 cup of whipped topping. Spread over the cooled crust.
- For the third layer: Beat pudding mix and milk together for 2 minutes until thickened. Pour over the cream cheese layer and spread evenly.
- For the fourth layer: Dollop the remaining whipped topping over the pudding. Spread gently with an offset spatula. Cover and refrigerate for at least 4 hours or overnight.
- To serve: Place dessert in the freezer for 45 minutes to firm up. Slice into squares with a sharp knife.
Notes
- To use real whipped cream instead of whipped topping, substitute 3 cups of fresh whipped cream (made from 1.5 cups heavy cream + 1 tablespoon powdered sugar, whipped to stiff peaks). Use 1 cup in the cream cheese layer and the remaining 2 cups for the final layer. You can substitute any flavor of instant pudding. You can substitute walnuts for pecans or leave nuts out. For an extra lemony crust, swap for a lemon Oreo crust: crush one package (14.3 oz) of lemon Oreos into fine crumbs, mix with 6 tablespoons melted butter, and pat into the pan (no need to bake).