

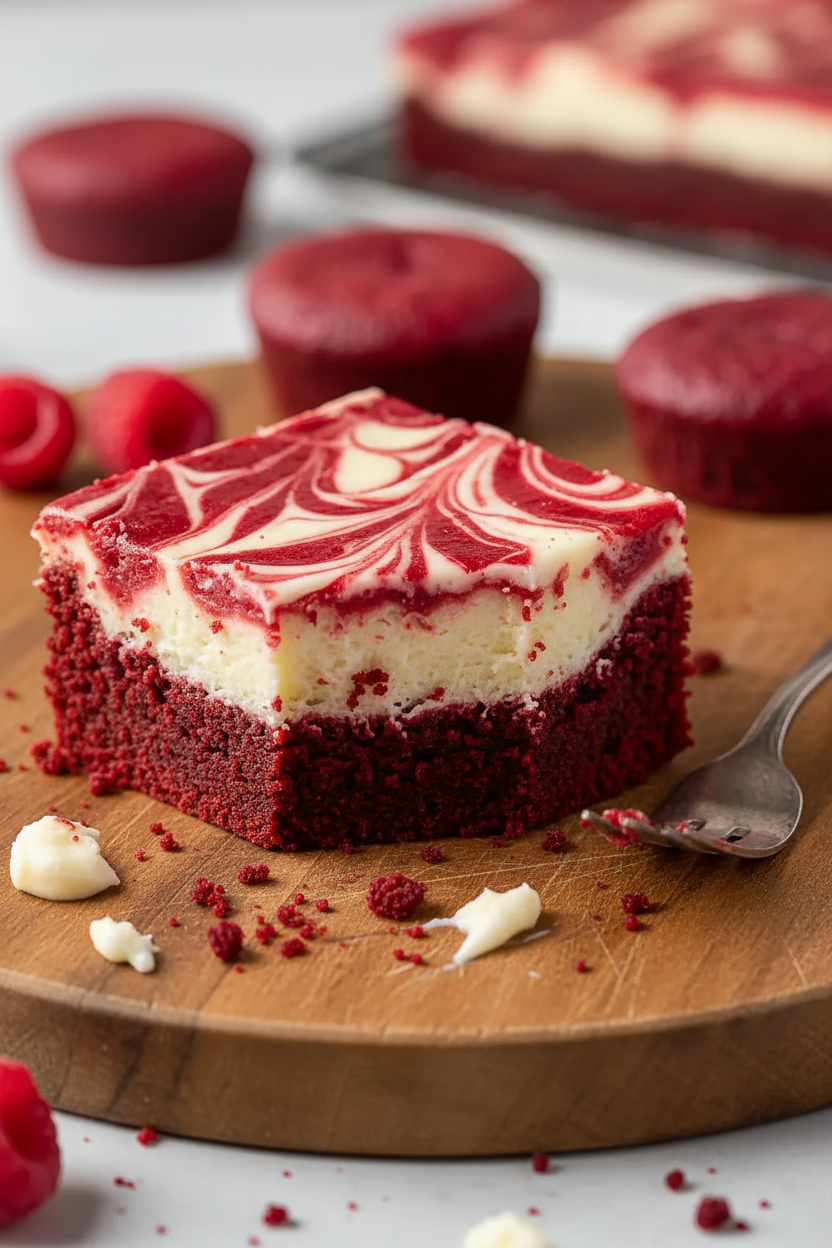
The Story Behind the Swirl
I first made these for my grandson’s birthday. He wanted something red. I thought, why not make brownies fancy? So I swirled in some cheesecake. His eyes got so wide when he saw them. I still laugh at that.
Mixing two treats into one feels like a little magic trick. It turns a normal day into a party. That’s why this matters. Food can make simple moments feel special. Do you have a favorite treat that makes you smile?
Why Room Temperature Eggs Matter
Let’s talk about those eggs. The recipe says “room temperature.” I know it’s easy to skip. But warm eggs mix into batter much smoother. Cold eggs can make the batter clumpy.
Here’s my trick. I put the eggs in a bowl of warm water for 10 minutes. It works every time. *Fun fact: Room temperature eggs help your baked goods rise better!* This small step makes a big difference. It gives you that perfect, fudgy texture.
The Joy of Swirling
My favorite part is the swirl. You drop little spoonfuls of red batter on top. Then you drag a knife through. Doesn’t that smell amazing? Each pattern is unique, like a snowflake.
Don’t be afraid to make a mess. There’s no wrong way to swirl. This is where you can be an artist. What’s your favorite kitchen activity? Is it mixing, swirling, or maybe licking the spoon?
Patience is a Secret Ingredient
The hardest part is waiting. You must let the pan cool completely. Then, pop it in the fridge. I know it’s tempting to cut right away.
But waiting lets the cheesecake layer firm up. This is why this matters. It gives you those beautiful, clean slices. You see every lovely red and white layer. It’s worth the wait, I promise. Do you find it hard to wait for treats to cool, too?
A Treat for Sharing
These brownies are rich and sweet. One small square is often enough. That makes them perfect for sharing. I love bringing a plate to a neighbor.
Food tastes better when we share it. It connects us. Making something with your own hands is a gift of love. Who would you share a batch of these with first?
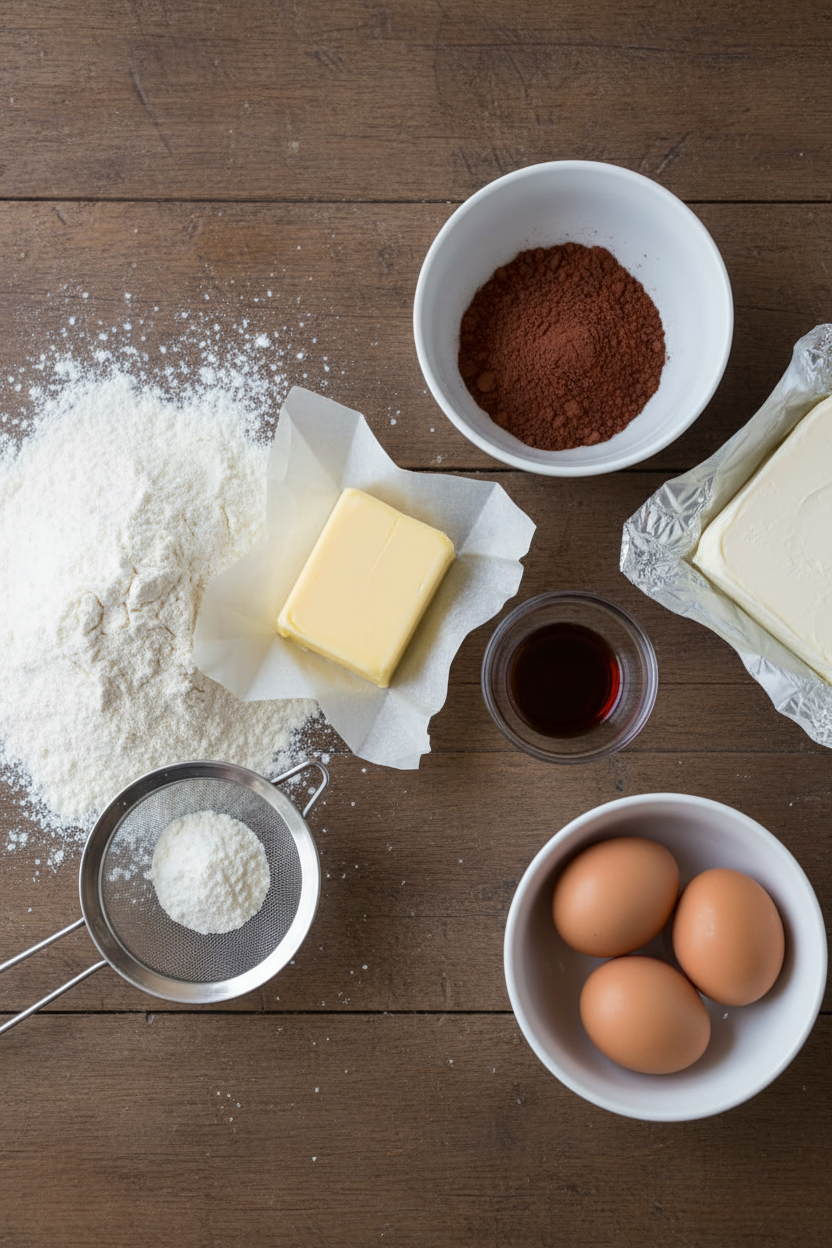
Ingredients:
| Ingredient | Amount | Notes |
|---|---|---|
| For the brownie layer: | ||
| Butter | 5 oz | I prefer Kerrygold unsalted for a richer flavor |
| Sugar | 3/4 cup | |
| Vanilla extract | 1 1/2 tsp | |
| Cocoa powder | 1/3 cup | I use Hershey’s Special Dark for a deep color |
| Salt | 1/8 tsp | |
| Red food coloring | 1 1/2 tbsp | |
| Vinegar | 1 tsp | |
| Large eggs | 2 | room temperature, about 70°F |
| Flour | 3/4 cup | |
| For the cheesecake layer: | ||
| Cream cheese | 8 oz | I always use Philadelphia original blocks, softened |
| Sugar | 1/4 cup | |
| Large egg | 1 | |
| Vanilla extract | 1/2 tsp |
Instructions
Step 1: First, turn your oven to 375°F. Grease your baking pan well. I use my fingers and a bit of soft butter. This makes sure nothing sticks later. It’s a simple but important start.
Step 2: Melt the butter in a pan. Stir in the sugar until it looks sandy. Now, add the vanilla, cocoa, and that bright red food coloring. Doesn’t that color just make you smile? Mix in the eggs, then gently fold in the flour. (Room-temperature eggs mix in much smoother!)
Step 3: Pour most of that red batter into your pan. Save about a quarter cup in a little bowl. Spread the batter in the pan evenly. I still laugh at how my first try was so lopsided. This layer is your fudgy foundation.
Step 4: Time for the cheesecake! Beat the soft cream cheese and sugar together. It should look fluffy and happy. Add the egg and vanilla, and beat until it’s smooth. Now, spread this carefully over your red layer. Do you think the cream cheese swirls will look like hearts or clouds? Share below!
Step 5: Take your saved red batter. Drop little spoonfuls on top of the white cheesecake. Use a knife to gently swirl them together. Don’t mix too much! You want pretty ribbons. Bake for about 30 minutes until the top is set. Let them cool completely before you cut.
Creative Twists
Add a handful of white chocolate chips to the red batter.
Swap the food coloring for beet juice for a natural red.
Top with a simple powdered sugar glaze after baking.
Which one would you try first? Comment below!
Serving & Pairing Ideas
These brownies are wonderful all on their own. For a special treat, add a dollop of whipped cream. A glass of cold milk is the perfect partner. You could also sprinkle a few fresh raspberries on the side. The tart fruit is lovely with the sweet cream cheese. Which would you choose tonight?
Keeping Your Brownies Fresh and Ready
Let’s talk about storing these beautiful brownies. They keep well in the fridge for five days. Just cover the pan tightly with foil. You can also freeze them for a month. Wrap each piece in plastic wrap first. Then place them all in a freezer bag.
I remember my first batch. I left them on the counter. They dried out so fast. Now I always refrigerate them. It keeps the cheesecake layer safe and firm. Batch cooking is a wonderful trick. Make a double batch and freeze half. You’ll always have a sweet treat ready for surprise guests.
This matters because good food is a gift. Having a dessert ready to share is a warm feeling. It turns a busy day into a special moment. Have you ever tried storing it this way? Share below!
Simple Fixes for Common Brownie Troubles
Even grandmas run into little kitchen problems. First, a cracked top. This happens if the oven is too hot. I once baked a batch that looked like a dry desert. Just lower your oven temperature by 25 degrees next time.
Second, a gooey middle. The brownies need more time. The center should be just set. Use the jiggle test from the recipe. Third, a tough swirl. If you mix too much, the layers blend. Use a light hand for pretty ribbons.
Fixing these small issues builds your confidence. You learn how ingredients behave. It also makes your food taste and look its best. Good flavor comes from good technique. Which of these problems have you run into before?
Your Quick Questions, Answered
What is the best way to swirl cheesecake into brownie batter?
Drop small spoonfuls of brownie batter on top of the cheesecake layer. Use a knife or skewer. Gently draw it through the batters in a loose figure-eight pattern. Do not over-swirl. You want pretty ribbons, not a muddy mix. This creates that beautiful marbled look everyone loves.
Can I use a box mix for red velvet brownies?
Yes, you can use a red velvet box mix. Prepare it according to the package directions. Then use it as your brownie base layer. Follow the rest of the recipe for the cheesecake layer and swirling. It is a great shortcut for a busy day. The results will still be delicious.
How do you keep red velvet brownies moist?
The key is not overbaking them. Take them out when the center just barely jiggles. Let them cool completely in the pan. Then store them in the fridge covered tightly. The cold keeps the moisture in. A fun fact: the vinegar in the recipe also helps keep them tender.
What cream cheese is best for cheesecake swirl?
Use the brick-style cream cheese, not the spreadable kind in a tub. I always use Philadelphia original. Let it sit out until soft. This helps it mix smoothly with no lumps. A smooth cheesecake layer makes swirling much easier and gives you a creamy texture.
Can you make red velvet cheesecake brownies ahead of time?
Absolutely. They are even better the next day. Bake and cool them completely. Then refrigerate them overnight. This lets the flavors blend and the layers set firmly. It makes them easier to cut into neat squares. They are perfect for making a day before a party.
How do you get a distinct red velvet flavor in brownies?
You need both cocoa powder and vinegar. The cocoa gives the chocolate taste. The vinegar reacts with the other ingredients. This creates that special, slightly tangy red velvet flavor. Do not skip the vinegar. It is the secret behind the classic taste. Which tip will you try first?
From My Kitchen to Yours
I hope you love making these brownies. Baking should be fun, not stressful. Share them with someone you care about. The best recipes are the ones we make together.
I would love to hear about your baking adventure. Tell me how it went in your kitchen. Have you tried this recipe? Let me know in the comments below.
Happy cooking!
—Danielle Monroe.

My Favorite Swirled Red Velvet Cheesecake Brownies
Description
Red Velvet Brownies with Cheesecake Layer
Ingredients
For the brownie layer:
For the cheesecake layer:
Instructions
- Step 1: Prepare Pan and Preheat Oven
Preheat your oven to 375°F. While it heats, grease an 8×8 inch baking dish or 9-inch square pan with butter or cooking spray, making sure to coat the bottom and sides evenly. This prevents sticking and helps the brownies release cleanly once cooled. - Step 2: Make the Red Velvet Brownie Base
Melt the butter in a medium saucepan over low heat, then remove from heat and stir in the 3/4 cup sugar until combined. Add the 1 1/2 tsp vanilla, cocoa powder, salt, red food coloring, and vinegar, mixing until the cocoa is fully incorporated and the mixture is a deep burgundy color. Crack your room-temperature eggs into a small bowl, beat them lightly, then add them to the chocolate mixture and stir until smooth. Finally, fold in the flour gently with a spatula until just combined—don’t overmix. Reserve 1/4 cup of this batter in a small bowl and set aside for the top layer. - Step 3: Layer the Brownie and Cheesecake Batter
Pour the larger portion of the red velvet brownie batter (about 3/4 of the mixture) into your prepared baking dish, spreading it evenly into the corners. This will be your base layer that provides structure and fudgy texture for the finished brownies. - Step 4: Make and Spread the Cheesecake Layer
In a separate bowl, beat the softened cream cheese with the 1/4 cup sugar until smooth and fluffy, about 1-2 minutes. Add the large egg and 1/2 tsp vanilla, beating until fully incorporated and the mixture is creamy with no lumps. Spread this cheesecake mixture evenly over the brownie base layer, working carefully so you don’t disturb the layer beneath. - Step 5: Add the Top Layer and Create the Swirl
Spoon the reserved 1/4 cup red velvet brownie batter (from Step 2) in small dollops across the top of the cheesecake layer. Using a thin knife or skewer, gently swirl through the batter in a figure-8 or back-and-forth pattern to create decorative streaks—don’t overmix or you’ll lose the distinct layers. The contrast between the red velvet and cream cheese creates a beautiful marbled effect. - Step 6: Bake and Cool
Bake the brownies for 30-35 minutes, until the top is set but still has a slight jiggle in the center when you gently shake the pan. The cheesecake layer should be mostly set, and the brownie edges should pull away slightly from the sides of the pan. Remove from the oven and let cool to room temperature on a wire rack, about 1-2 hours, before cutting into squares. I like to refrigerate these for at least 1 hour after cooling so the layers set completely and the cheesecake firms up, which makes for cleaner cuts.
Notes
- Estimated nutrition for the whole recipe (without optional ingredients): Calories: 2400-2600, Protein: 34-38 g, Fat: 140-155 g, Carbohydrates: 275-295 g. Per serving (1/9 of recipe): ~280 kcal.