

The Joy of a Simple Crust
Let’s start with the crust. It is just crumbs and butter. You press it into the pan. It smells so good when it bakes. It reminds me of my grandson’s first baking project. He got crumbs everywhere. I still laugh at that.
This crust matters because it holds everything together. A good base makes a happy dessert. Do you like a crunchy or a soft crust? I’d love to know. For another fun crumb idea, try this lemon meringue pie cannoli.
The Magic of the Filling
Now for the magic. The filling is so easy. You just whisk a few things. Sweet milk, lemon juice, and egg yolks. It turns thick and sunny yellow right away. Doesn’t that smell amazing?
This mix matters. The lemon makes it bright. The sweet milk makes it creamy. *Fun fact:* The acid in the lemon juice thickens the milk. It’s like a little kitchen science trick. If you love this creamy lemon magic, you might enjoy this baby lemon impossible pie too.
A Little Patience Makes Perfect
Here is the hard part. You must let it cool. I know, it is tempting to cut right in. But wait. Let it sit on the counter. Then pop it in the fridge. This makes the squares neat and firm.
Why does this matter? Good things take a little time. The flavors settle and become friends. It is worth the wait. What is the hardest dessert for you to wait for? Tell me your story. For a treat that’s a bit faster, this lemon cream cheese braid is wonderful.
Sharing the Sunshine
These squares are for sharing. I always make a double batch. One for my family, one for a neighbor. A little lemon sunshine can make anyone’s day better. It is a small act of kindness.
Food connects us. That is the real secret ingredient. Who will you share these with? I think they would love them. For another shareable lemon delight, these lemon custard muffins are perfect.
Instructions
Step 1: First, let’s make our sunny crust. Mix graham crumbs with melted butter. Press it firmly into your lined pan. I still laugh at that time I forgot the parchment. (A little tip: warm hands melt the butter, so press fast!). Bake it for 10 minutes until it smells toasty. What’s your favorite crust to make? Share below!
Step 2: Now for the magic filling. Whisk the milk, lemon juice, and yolks together. Doesn’t that smell amazing? Pour it over your warm crust. For a perfect set, try my tart little miracle trick: add a spoon of flour. It makes them just right.
Step 3: Bake until the filling doesn’t jiggle. Let it cool completely on the counter. Patience is hard, I know! Then pop it in the fridge. Chilling firms them up for clean slices. It’s like the magic in a lemon custard cake.
Creative Twists
Lemon Meringue Topping: Top your squares with fluffy meringue and toast it lightly.
Berry Swirl: Swirl a little raspberry jam into the filling before baking.
Gingery Crust: Add some crushed ginger snaps to your graham cracker crumbs.
Which one would you try first? Comment below!
Serving & Pairing Ideas
Dust your squares with powdered sugar for a snowy look. They’re lovely with fresh berries on the side. For a real treat, serve with a dollop of whipped cream. It’s as delightful as a lemon cream cheese braid. Which would you choose tonight?
Keeping Your Sunshine Squares Fresh
Let’s talk about storing these lemon bars. They last three days in the fridge. Cover the pan tightly. You can also freeze them for a sweet treat later. I freeze the whole uncut square. It works perfectly.
I learned this the hard way. My first batch went straight into a tin. They got soggy by day two. Now I always use the fridge. It keeps the texture just right. For more make-ahead magic, check out this lemon custard cake.
Batch cooking saves so much time. Make a double batch this weekend. Freeze one for a busy day. Having dessert ready feels like a gift. It makes weeknights a little sweeter. Have you ever tried storing it this way? Share below!
Simple Fixes for Common Hiccups
Sometimes our bakes need a little help. First, a soggy crust. Press your crumbs very firmly into the pan. I use a measuring cup to press. This creates a solid base.
The second issue is a runny filling. Make sure your bars are fully set before cutting. Let them cool completely. Chilling them makes clean cuts easy. For another zesty project, this lemon meringue cannoli is fun.
Third, bars that stick to the pan. Always use parchment paper with overhang. It creates a handy sling to lift them out. I remember forgetting paper once. What a mess! Getting these details right builds your confidence. It also makes the flavor shine in every bite. Which of these problems have you run into before?
Your Quick Questions, Answered
What is the secret to a perfect graham cracker crust?
Press, press, press! Use your fingers first. Then use a flat cup to press it down hard. This packs the crumbs together. A firm crust won’t crumble when you cut it. It also holds up under the creamy filling. Mix the crumbs well with melted butter first. Every crumb should be coated. This is the simple secret to a perfect base.
Can I use regular lemons instead of Meyer lemons for lemon bars?
Yes, you absolutely can. Regular lemons are easier to find. They will give you a brighter, tangier flavor. Meyer lemons are a bit sweeter. Your bars will still be delicious with regular lemon juice. Just taste your filling before baking. You might like the extra zip. It’s a great way to make a classic dessert.
How do you prevent lemon bars from being too runny?
Bake them until the center is set. It should not jiggle much. Let them cool completely in the pan. Then chill them in the fridge. The cold air firms everything up. You can also add one tablespoon of flour to your filling. This little trick helps thicken it. No more runny lemon squares on your plate.
Can lemon bars be made ahead of time?
They are a perfect make-ahead dessert. Bake them a day before you need them. Let them cool and then chill overnight. This actually improves the flavor. The lemon taste gets a chance to settle in. Just keep them covered in the refrigerator. They will be ready for your party. It makes hosting so much easier.
What is the best way to cut lemon bars cleanly?
Chill the bars first. A cold bar cuts neatly. Use a very sharp knife. Wipe the blade clean between each cut. This stops the creamy filling from smearing. For pretty squares, you can trim the edges first. *Fun fact: dipping your knife in hot water helps too!* Try this method with a lemon cream cheese braid.
Can I freeze lemon bars for later?
Freezing works wonderfully. Let the whole pan cool completely first. Lift out the uncut square with the parchment paper. Wrap it tightly in foil. Pop it in the freezer for up to three months. Thaw in the fridge overnight when you’re ready. You’ll have a sweet treat waiting. It’s like a gift from your past self. Which tip will you try first?
From My Kitchen to Yours
I hope you love making these sunny squares. Baking should be fun, not fussy. Don’t worry if your first try isn’t perfect. Mine never were! The joy is in the sharing. I’d love to hear about your baking adventures. For another tangy treat, these lemon custard muffins are wonderful.
Tell me all about it in the comments. Have you tried this recipe? Let me know how it turned out for you. Happy cooking!
—Elowen Thorn.

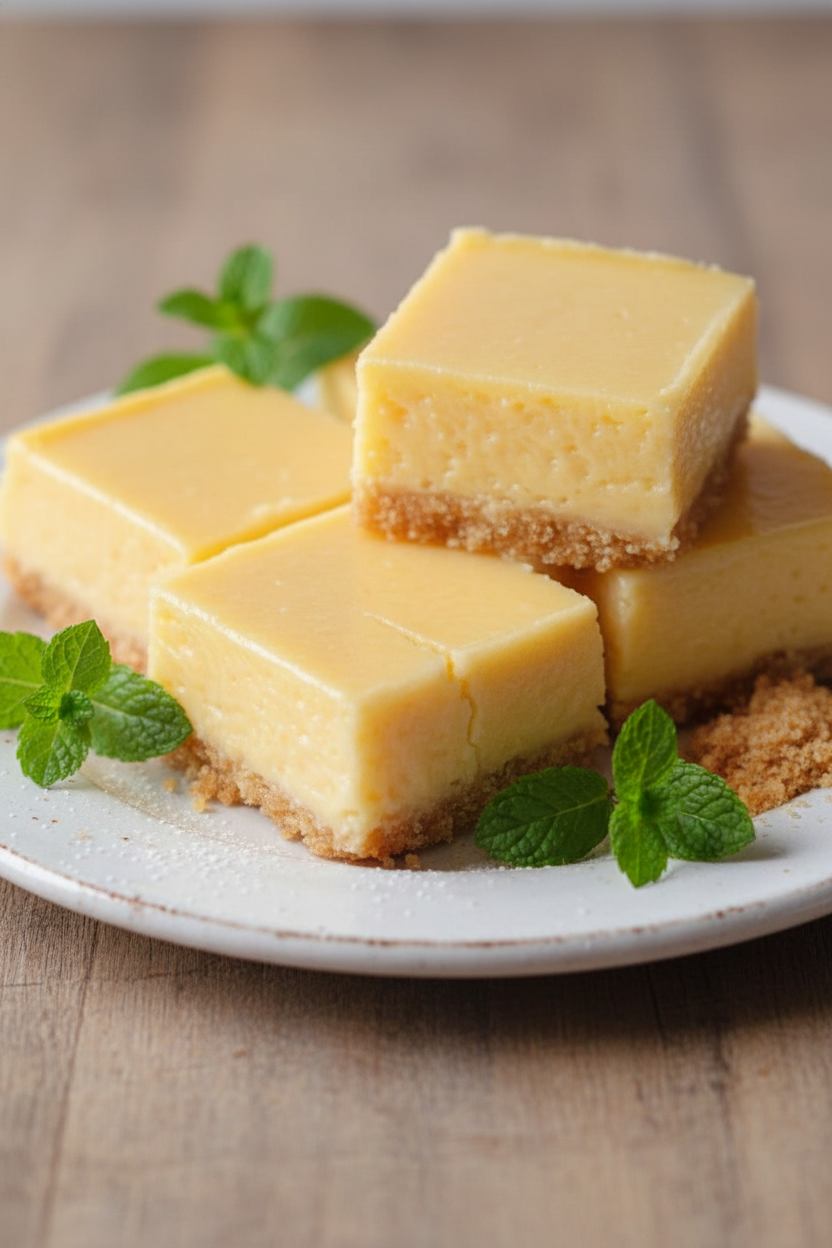
My Go-To Lemon Bars with a Perfect Graham Cracker Crust
Description
A classic dessert featuring a sweet, buttery graham cracker crust topped with a tangy, creamy lemon filling. Simple, delicious, and always a crowd-pleaser.
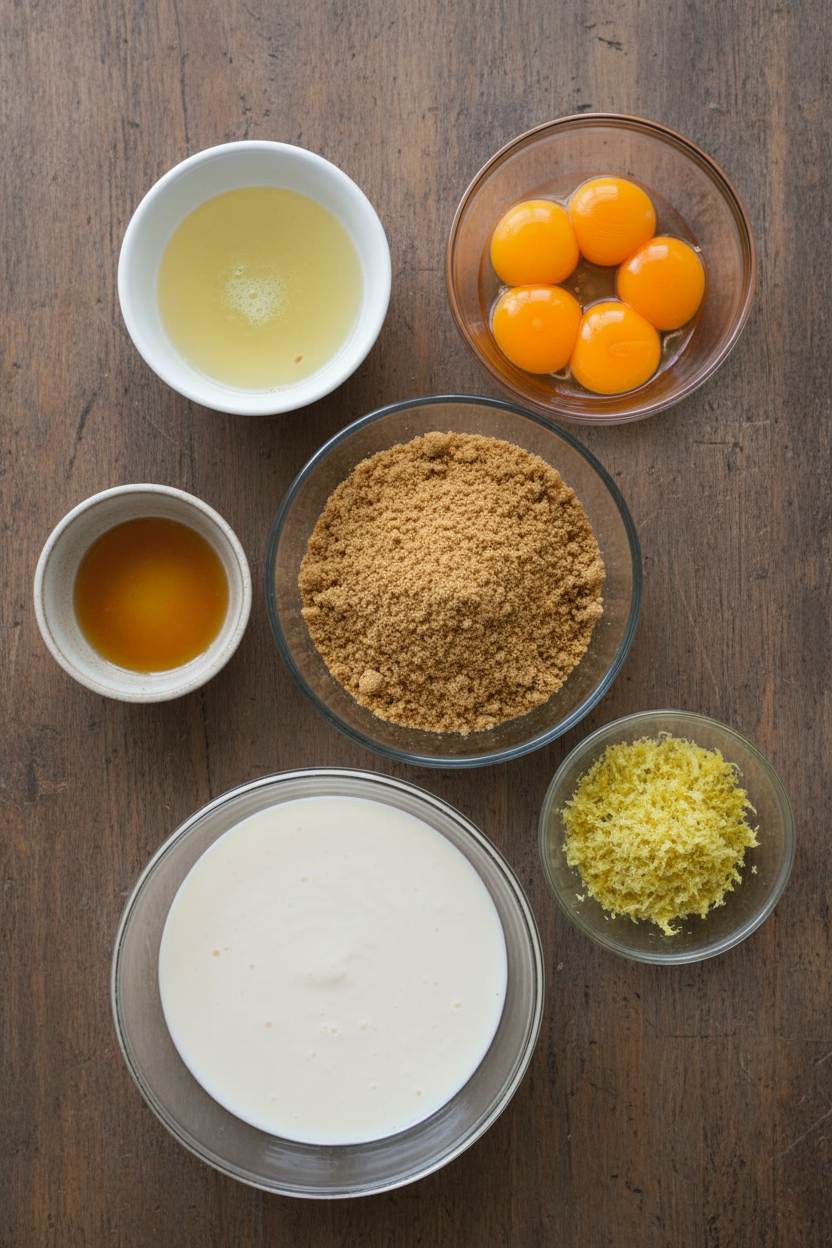
Ingredients
Instructions
- For the crust: Preheat oven to 350°F (175°C). Line an 8×8 inch baking pan with parchment paper, leaving an overhang on the sides.
- In a medium bowl, combine graham cracker crumbs, melted butter, and sugar (if using). Press the mixture firmly and evenly into the bottom of the prepared pan. Bake for 10 minutes. Remove from oven and let cool slightly.
- For the filling: In a medium bowl, whisk together sweetened condensed milk, lemon juice, and egg yolks until completely smooth and well combined. (Optional: add lemon zest and/or 1 tbsp flour or cornstarch for extra flavor and to prevent runniness).
- Pour the filling over the warm crust. Bake for 15-20 minutes, or until the filling is set. Do not under-bake. Let cool completely in the pan on a wire rack.
- For firmer squares, refrigerate for at least 30 minutes after cooling to room temperature. Use the parchment paper overhang to lift the square from the pan. Cut into squares.
Notes
- Store in the refrigerator for up to 3 days. To freeze, cool completely in the pan, lift out the whole square without cutting, wrap in aluminum foil or plastic wrap, and freeze for up to three months. Thaw at room temperature or in the refrigerator.