

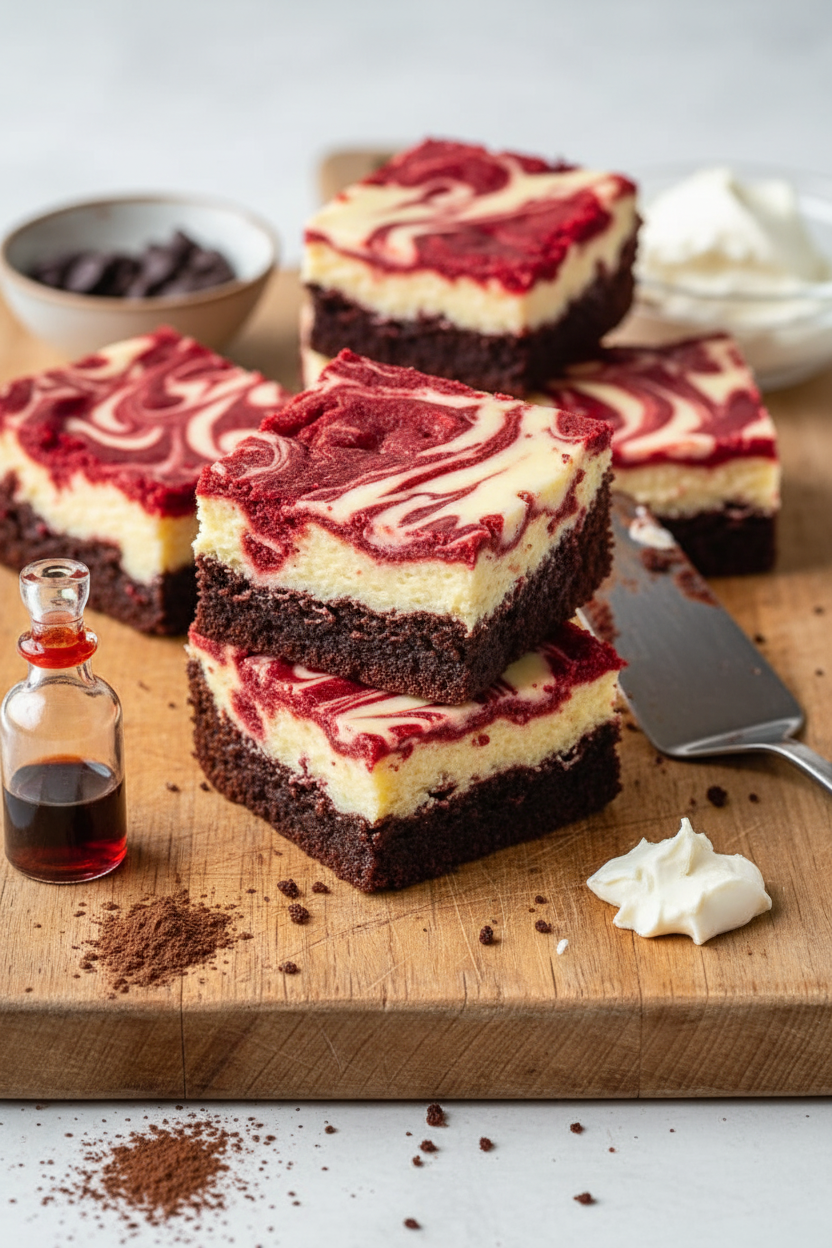
My Red Velvet Surprise
I first made these for my grandson’s birthday. He wanted something red and fun. I thought, why not mix his two favorites? So I swirled red velvet brownies with cheesecake. His eyes got so wide when he saw them. I still laugh at that.
That’s the magic of a simple layered dessert. It feels like a party. You get the rich chocolate and the creamy cheese all at once. It matters because food made with a little love makes the best memories. What’s a dessert that always makes you smile?
The Secret is in the Swirl
Making the swirl is my favorite part. You drop little spoonfuls of red batter on the white cheesecake. Then you drag a knife through it. It makes such pretty patterns. It feels like you are painting with food.
Don’t worry about making it perfect. Messy swirls taste just as good. This step matters because it makes the treat your own. It’s a fun trick for many easy layered desserts. Do you like making pretty swirls, or do you just dive right in?
A Little Kitchen Science
You might wonder about the vinegar in the brownies. It sounds odd. But it’s a quiet helper. It reacts with the cocoa and baking soda. This makes the brownies very tender and soft.
*Fun fact*: That vinegar is also what helps give red velvet its classic bright red color. It wakes up the color. So each piece is a beautiful ruby red. It’s a neat bit of dessert recipe magic. Isn’t it fun how ingredients work together?
Patience is a Sweet Virtue
Now, the hardest part. You must let them cool. Then you must chill them in the fridge. I know, it’s tough to wait. The smell is amazing. But trust this old grandma.
If you cut them warm, they will be a gooey mess. Chilling them lets everything set. You will get those perfect, clean slices. This waiting matters. It turns a pan of batter into a real, special dessert. It’s the same trick for a perfect homemade brownie bar.
Make It Your Own
This recipe is a wonderful start. But you can play with it. Maybe add some toasted coconut on top for crunch. Or a drizzle of caramel. My friend adds a pinch of cinnamon to her batter. It’s lovely.
That’s the joy of baking. You start with a great base, like this decadent treat. Then you add your own story. What would you add to make these brownies tell your story?
Instructions
Step 1: First, get your oven warm and ready. Line your pan with parchment paper. This makes cleanup so easy later. I always keep a roll in my drawer. Doesn’t that smell amazing? It’s the start of something good.
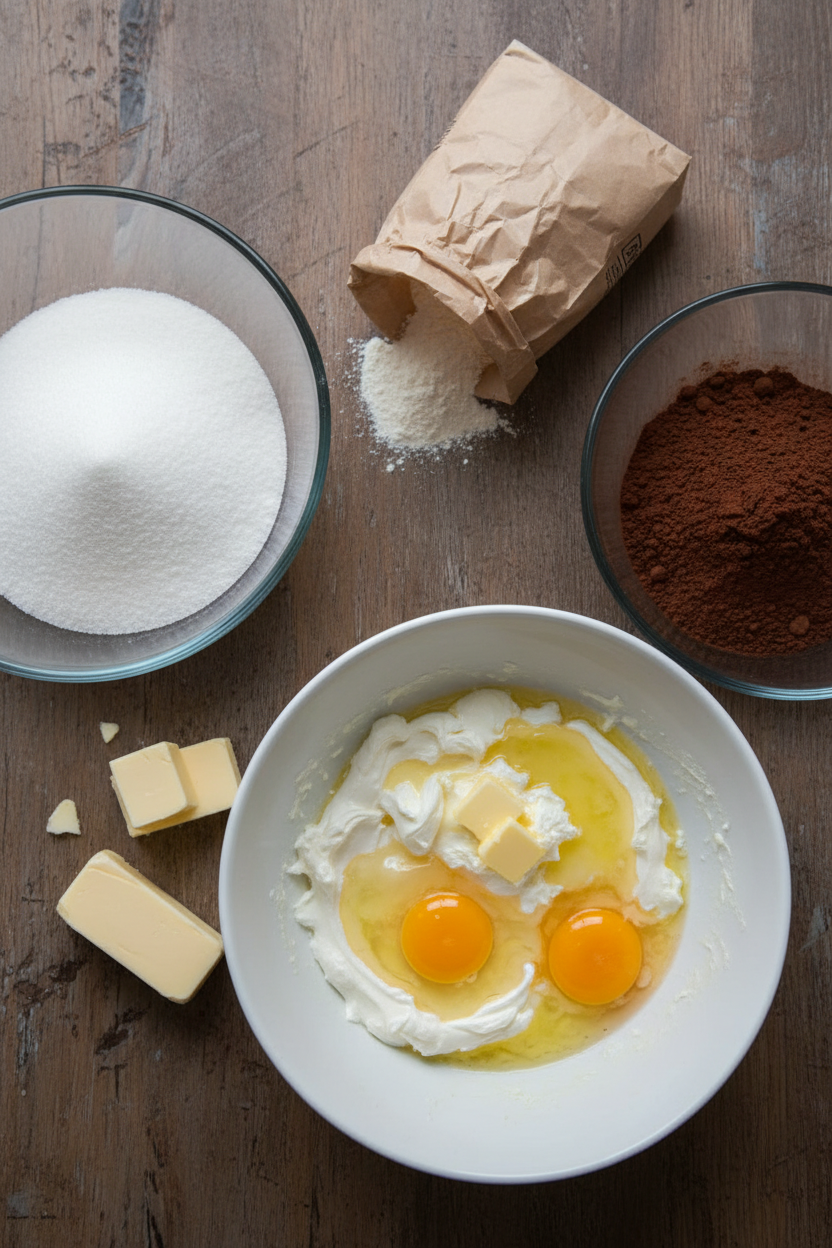
Step 2: Mix your melted butter and sugar in a big bowl. Whisk in the eggs one by one. Then add the vanilla, red color, vinegar, and cocoa. Stir in the flour and salt just until it’s combined. (A gentle hand keeps them fudgy, not tough.) Do you know what the vinegar does? Share below!
Step 3: Save a little brownie batter for the top. Pour the rest into your pan. Smooth it out with a spoon. Now, beat the cream cheese until it’s dreamy smooth. Add the powdered sugar, egg, and vanilla. I still laugh at how my grandson licks this spoon.
Step 4: Spread the creamy cheesecake layer over the brownie base. Drop little spoonfuls of your saved batter on top. Swirl it all with a toothpick. Bake until the center is just set. Let it cool completely on the counter. This patience is the hardest part!
Step 5: Finally, chill your creation in the fridge. Wait at least two hours before you slice. This makes for the cleanest, prettiest squares. Serve them cold and watch faces light up. It’s a triple-layer of joy in every bite. Which would you choose tonight?
Creative Twists
Add a handful of white chocolate chips to the brownie batter.
Swap the red food coloring for beet juice for a natural hue.
Top with a drizzle of caramel and sea salt after baking. Which one would you try first? Comment below!
Serving & Pairing Ideas
Serve a square with a cold glass of milk. It’s a classic for a reason. For a fancy touch, add a dollop of whipped cream. A few fresh berries on the side look lovely. You could even crumble one over vanilla ice cream. It’s like a dessert cup but in a bowl. Which would you choose tonight?
Keeping Your Brownies Beautiful
Let’s talk about keeping your brownies fresh. Cool them completely first. Then, store them in a tight container in the fridge. They will stay perfect for four days. You can also freeze them for a sweet treat later. Wrap each square tightly in plastic wrap. Then, pop them all in a freezer bag.
I remember my first batch of red velvet cheesecake brownies. I left them on the counter. They dried out so fast! Now I always chill them. This keeps the cheesecake layer safe and the brownie fudgy. Batch cooking matters because life gets busy. Having a ready-made dessert brings a little joy to any day.
Have you ever tried storing it this way? Share below! To reheat, let a frozen square thaw in the fridge. Or, warm it for ten seconds in the microwave. This makes it taste fresh-baked all over again. It is a wonderful trick for a quick dessert.
Simple Fixes for Common Hiccups
Even grandmas have kitchen troubles sometimes. Here are three common issues. First, a cracked cheesecake top. This happens if you over-mix the cream cheese. Just mix until it is smooth and creamy. Your creamy dessert will look much prettier.
Second, brownies that are too cakey. This often means you mixed the flour too much. Stir it in gently, just until you see no white streaks. I once made brownies that were like chocolate bread! Gentle mixing keeps them dense and fudgy. This matters because texture is a big part of the joy.
Third, a weak red color. Natural cocoa powder can make the batter look muddy. Using a bright red gel food coloring helps a lot. A vibrant color makes the treat feel special and fun. Which of these problems have you run into before? Solving small issues builds your cooking confidence. You learn that mistakes are just stepping stones.
Your Quick Questions, Answered
What makes red velvet brownies different from regular brownies?
Red velvet has cocoa, buttermilk or vinegar, and red color. The vinegar reacts with the cocoa. This gives a unique, slight tang and tender texture. It is not just a chocolate brownie with color. It is its own special flavor. Regular brownies focus on deep chocolate taste. Red velvet is more about a mild cocoa and a pretty, bright look.
Can I use cake mix for red velvet cheesecake brownies?
You can, but the texture will be different. A cake mix will make a lighter, more cake-like base. Our from-scratch recipe makes a denser, fudgier brownie. It holds up better under the creamy cheesecake layer. If you use a mix, follow the box directions for “brownies.” Then, add your cheesecake swirl on top. Both ways are delicious!
How do you get the cream cheese swirl pattern?
First, save a little brownie batter. After spreading the cheesecake layer, drop small spoonfuls of that saved batter on top. Then, take a toothpick or knife. Gently drag it through the dollops in loose figure-eight shapes. Do not over-swirl, or the pattern will disappear. This creates a beautiful, marbled look that is sure to impress your friends and family.
What’s the best cocoa powder for red velvet desserts?
Use natural, unsweetened cocoa powder. Dutch-process cocoa is treated with alkali. This changes its acidity. *Fun fact: The acid in natural cocoa reacts with the baking soda or vinegar.* This reaction helps the red color pop and gives the classic taste. For the truest red velvet flavor and color, natural cocoa is your best friend in the kitchen.
Can these brownies be made ahead and frozen?
Yes, they freeze wonderfully! Let them cool and chill completely first. Cut them into squares. Wrap each one tightly in plastic wrap. Then, place all the wrapped squares in a heavy freezer bag. They will keep for up to two months. Thaw in the refrigerator overnight for the best texture. It is a great way to plan for parties or cravings.
How do I know when the cheesecake brownies are done baking?
The edges will look set, and the center should have a slight, gentle jiggle. It should not look liquidy. A toothpick inserted near the edge should come out with moist crumbs, not wet batter. The top will be puffed and may have small cracks. Remember, they continue to set as they cool. This patience gives you the perfect layered dessert.
Which tip will you try first?
From My Kitchen to Yours
I hope you love making these as much as I do. Baking is about sharing sweetness. It is about creating memories around the table. These brownies are perfect for a special afternoon or a holiday treat. I would love to hear about your baking adventure in my kitchen.
Have you tried this recipe? Tell me all about it in the comments below. Did you make them for a friend? Maybe you tried a fun twist like adding toasted coconut? I read every note you leave. Thank you for baking with me today.
Happy cooking!
—Elowen Thorn

My Gooey Red Velvet Cheesecake Brownie Recipe
Description
Indulge in the ultimate dessert fusion: rich red velvet brownies swirled with a creamy, tangy cheesecake layer.
Ingredients
For the brownie layer:
For the cheesecake layer:
Instructions
- Preheat oven to 350°F (175°C). Line an 8×8-inch baking pan with parchment paper.
- In a mixing bowl, combine melted butter and sugar. Whisk in eggs one at a time, then add vanilla, red food coloring, vinegar, and cocoa powder. Stir in flour and salt until just combined.
- Reserve 1/4 cup of the brownie batter for swirling. Pour the remaining batter into the prepared pan and smooth the top.
- In a separate bowl, beat cream cheese until smooth. Add powdered sugar, egg, and vanilla extract. Mix until creamy.
- Spread the cheesecake mixture over the brownie layer in the pan.
- Drop spoonfuls of the reserved brownie batter over the top and swirl with a toothpick or knife.
- Bake for 35–40 minutes, until the center is set. Cool completely at room temperature.
- Chill in the fridge for at least 2 hours before slicing and serving.
Notes
- For clean slices, use a hot, wet knife. Store leftovers covered in the refrigerator for up to 5 days.